

Session submission forms
The session submission form is the first interaction a submitter or speaker has with Sessionboard. It captures information about the session and speaker(s), and once submitted, creates records accessible to admins.
Video transcript
Now the form. For most of your speakers the submission form is the first time they meet your event on a screen, so it’s worth building carefully. Two halves today. The program vocabulary the form draws from, tracks, formats, roles, statuses. Then the form builder itself.
Program, then Settings. This page is the vocabulary. Anything you define here shows up as a dropdown on the form, a filter on the sessions list, and a color on the agenda. So a track you add here is a question your submitters answer and a column your reviewers sort by, all at once.
Tracks are the broad themes attendees filter by. Formats are the shape of the session, keynote, workshop, panel, poster. Levels and languages work the same way, and tags are the loose keywords for things like sponsored or live-streamed. Fill these in before the form goes live. Adding a format after fifty submissions means fifty sessions with a blank.
Roles, and this one answers a question we get on nearly every call. The submitter is the person who fills in the form, and they may never set foot on stage. Speakers present. A chairperson oversees the session, a moderator runs it, introductions, timing, questions. Submitters can add people only in the roles a form ticks under Participant roles. A new form ticks Speaker alone, so chairs and moderators stay with your team unless you offer them. Manage means the role has its own view under CRM. Rename these, or add your own.
Statuses. Five categories are built in, accepted, the accept queue, pending, the decline queue and declined, and every status you add sits inside one of them. If your committee thinks in stages like shortlisted or needs revision, add a custom status here, pick its category and a colour. Any status, standard or custom, can be the one a form drops new submissions into, and we’ll see that setting in a minute.
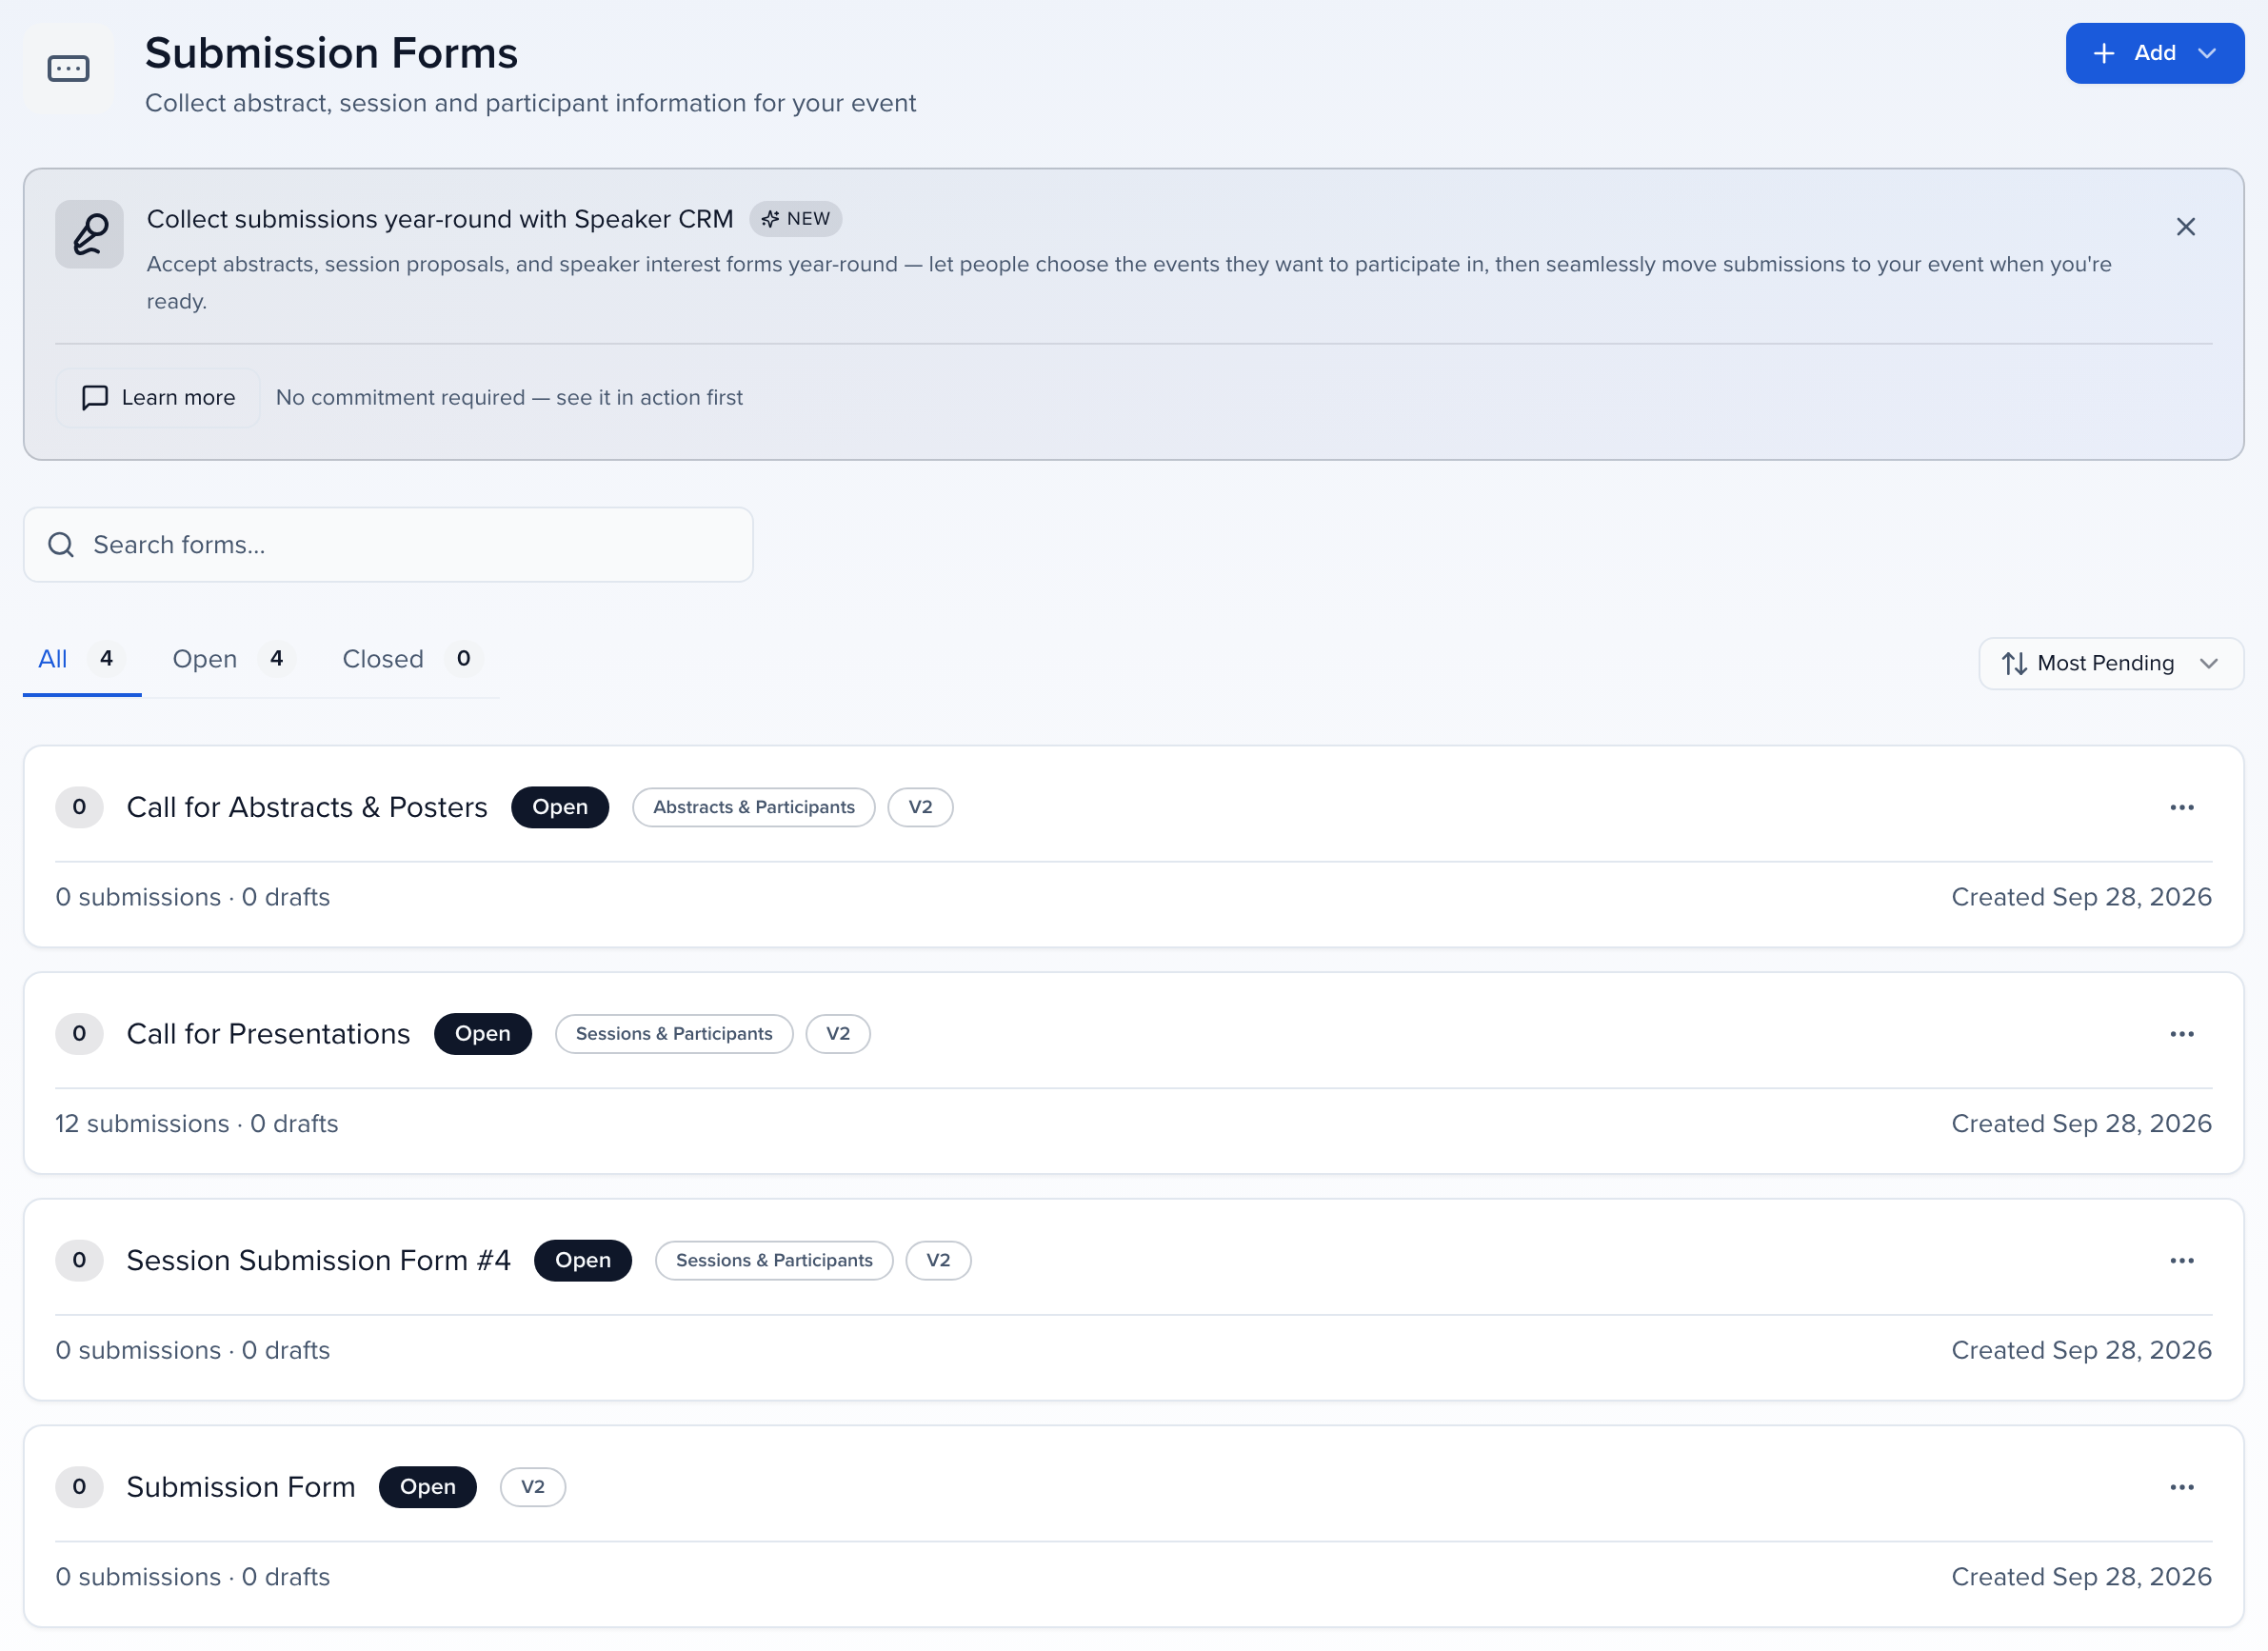
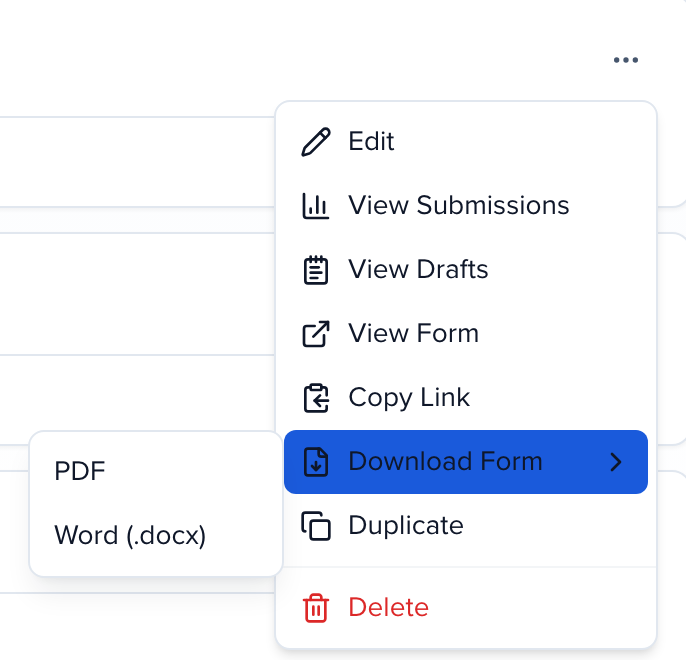
Program, Forms. Every event starts with one form, and you can have several, an abstract call and a session call, say. Add, Create Form starts a new one. The three dots on a form give you Edit, the submissions and drafts that came through it, the public link, and duplicate, which is how most people build next year’s form. Let’s open this one.
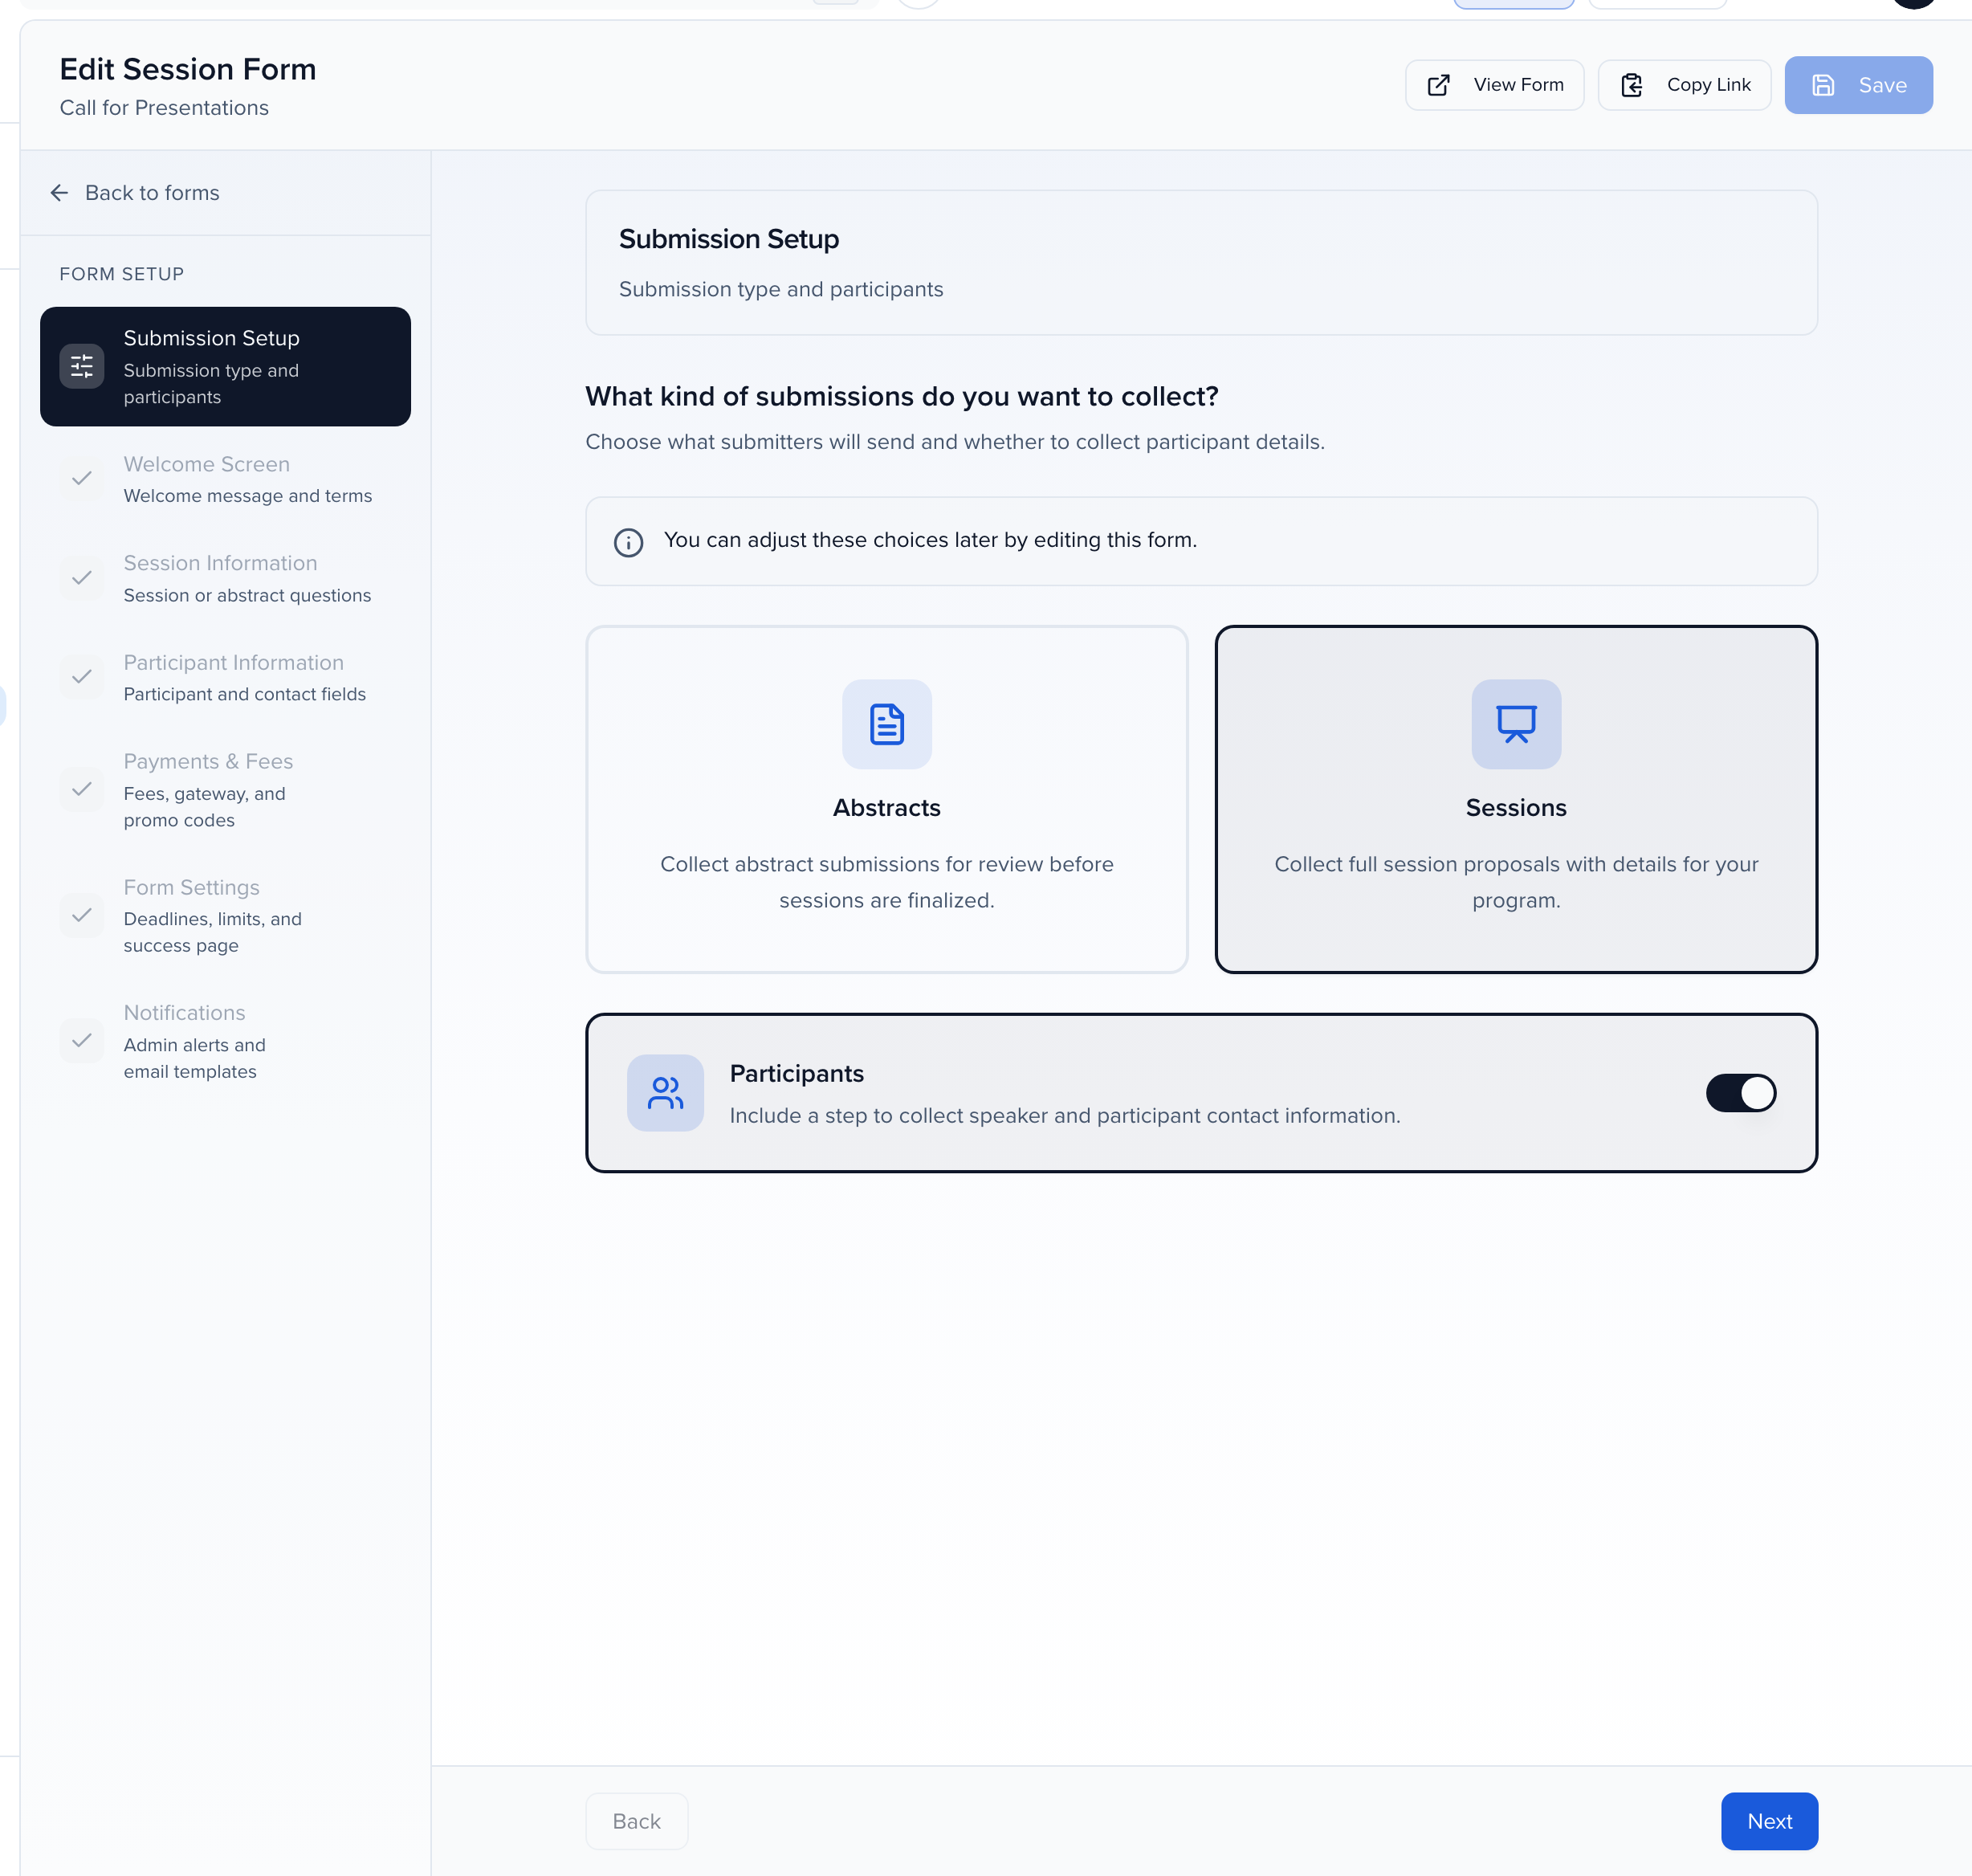
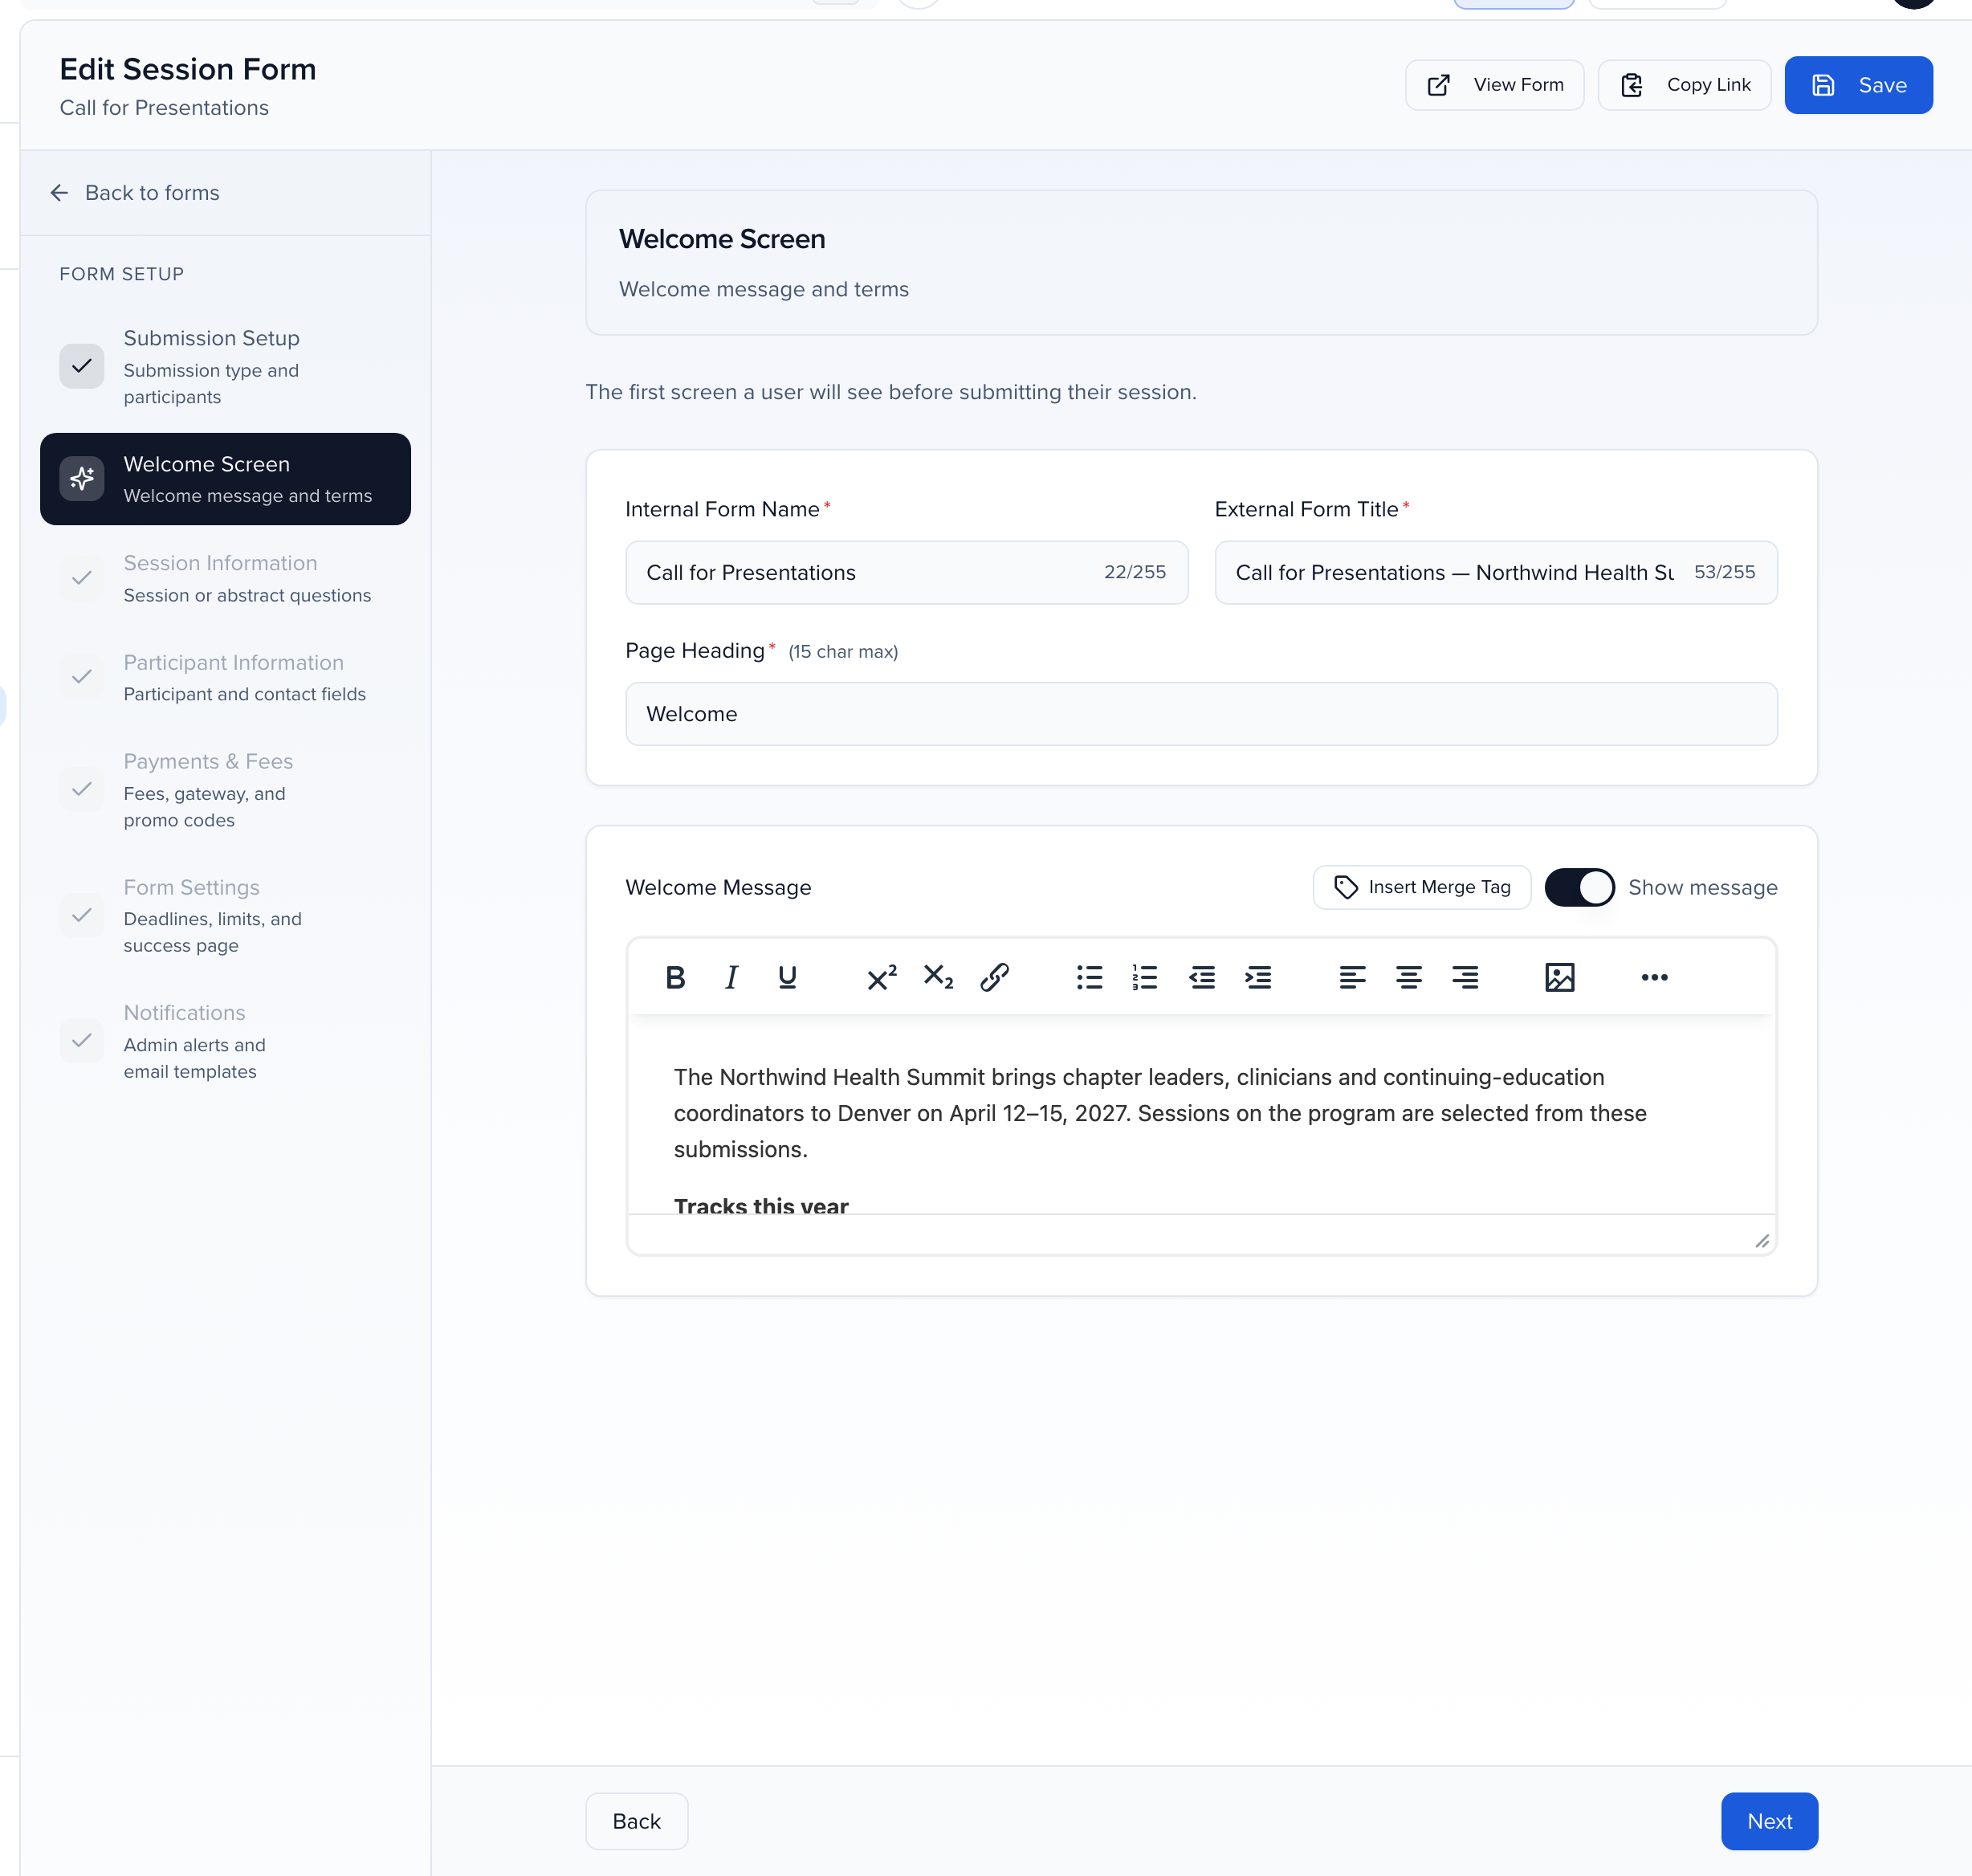
The builder walks down the left. Submission Setup first. Abstracts or Sessions decides what the form collects, and the Participants switch decides whether there’s a step for speaker details at all. Then the Welcome Screen, the message and terms people see before they start. Say what you’re looking for and when it closes, that’s the whole job of this screen.
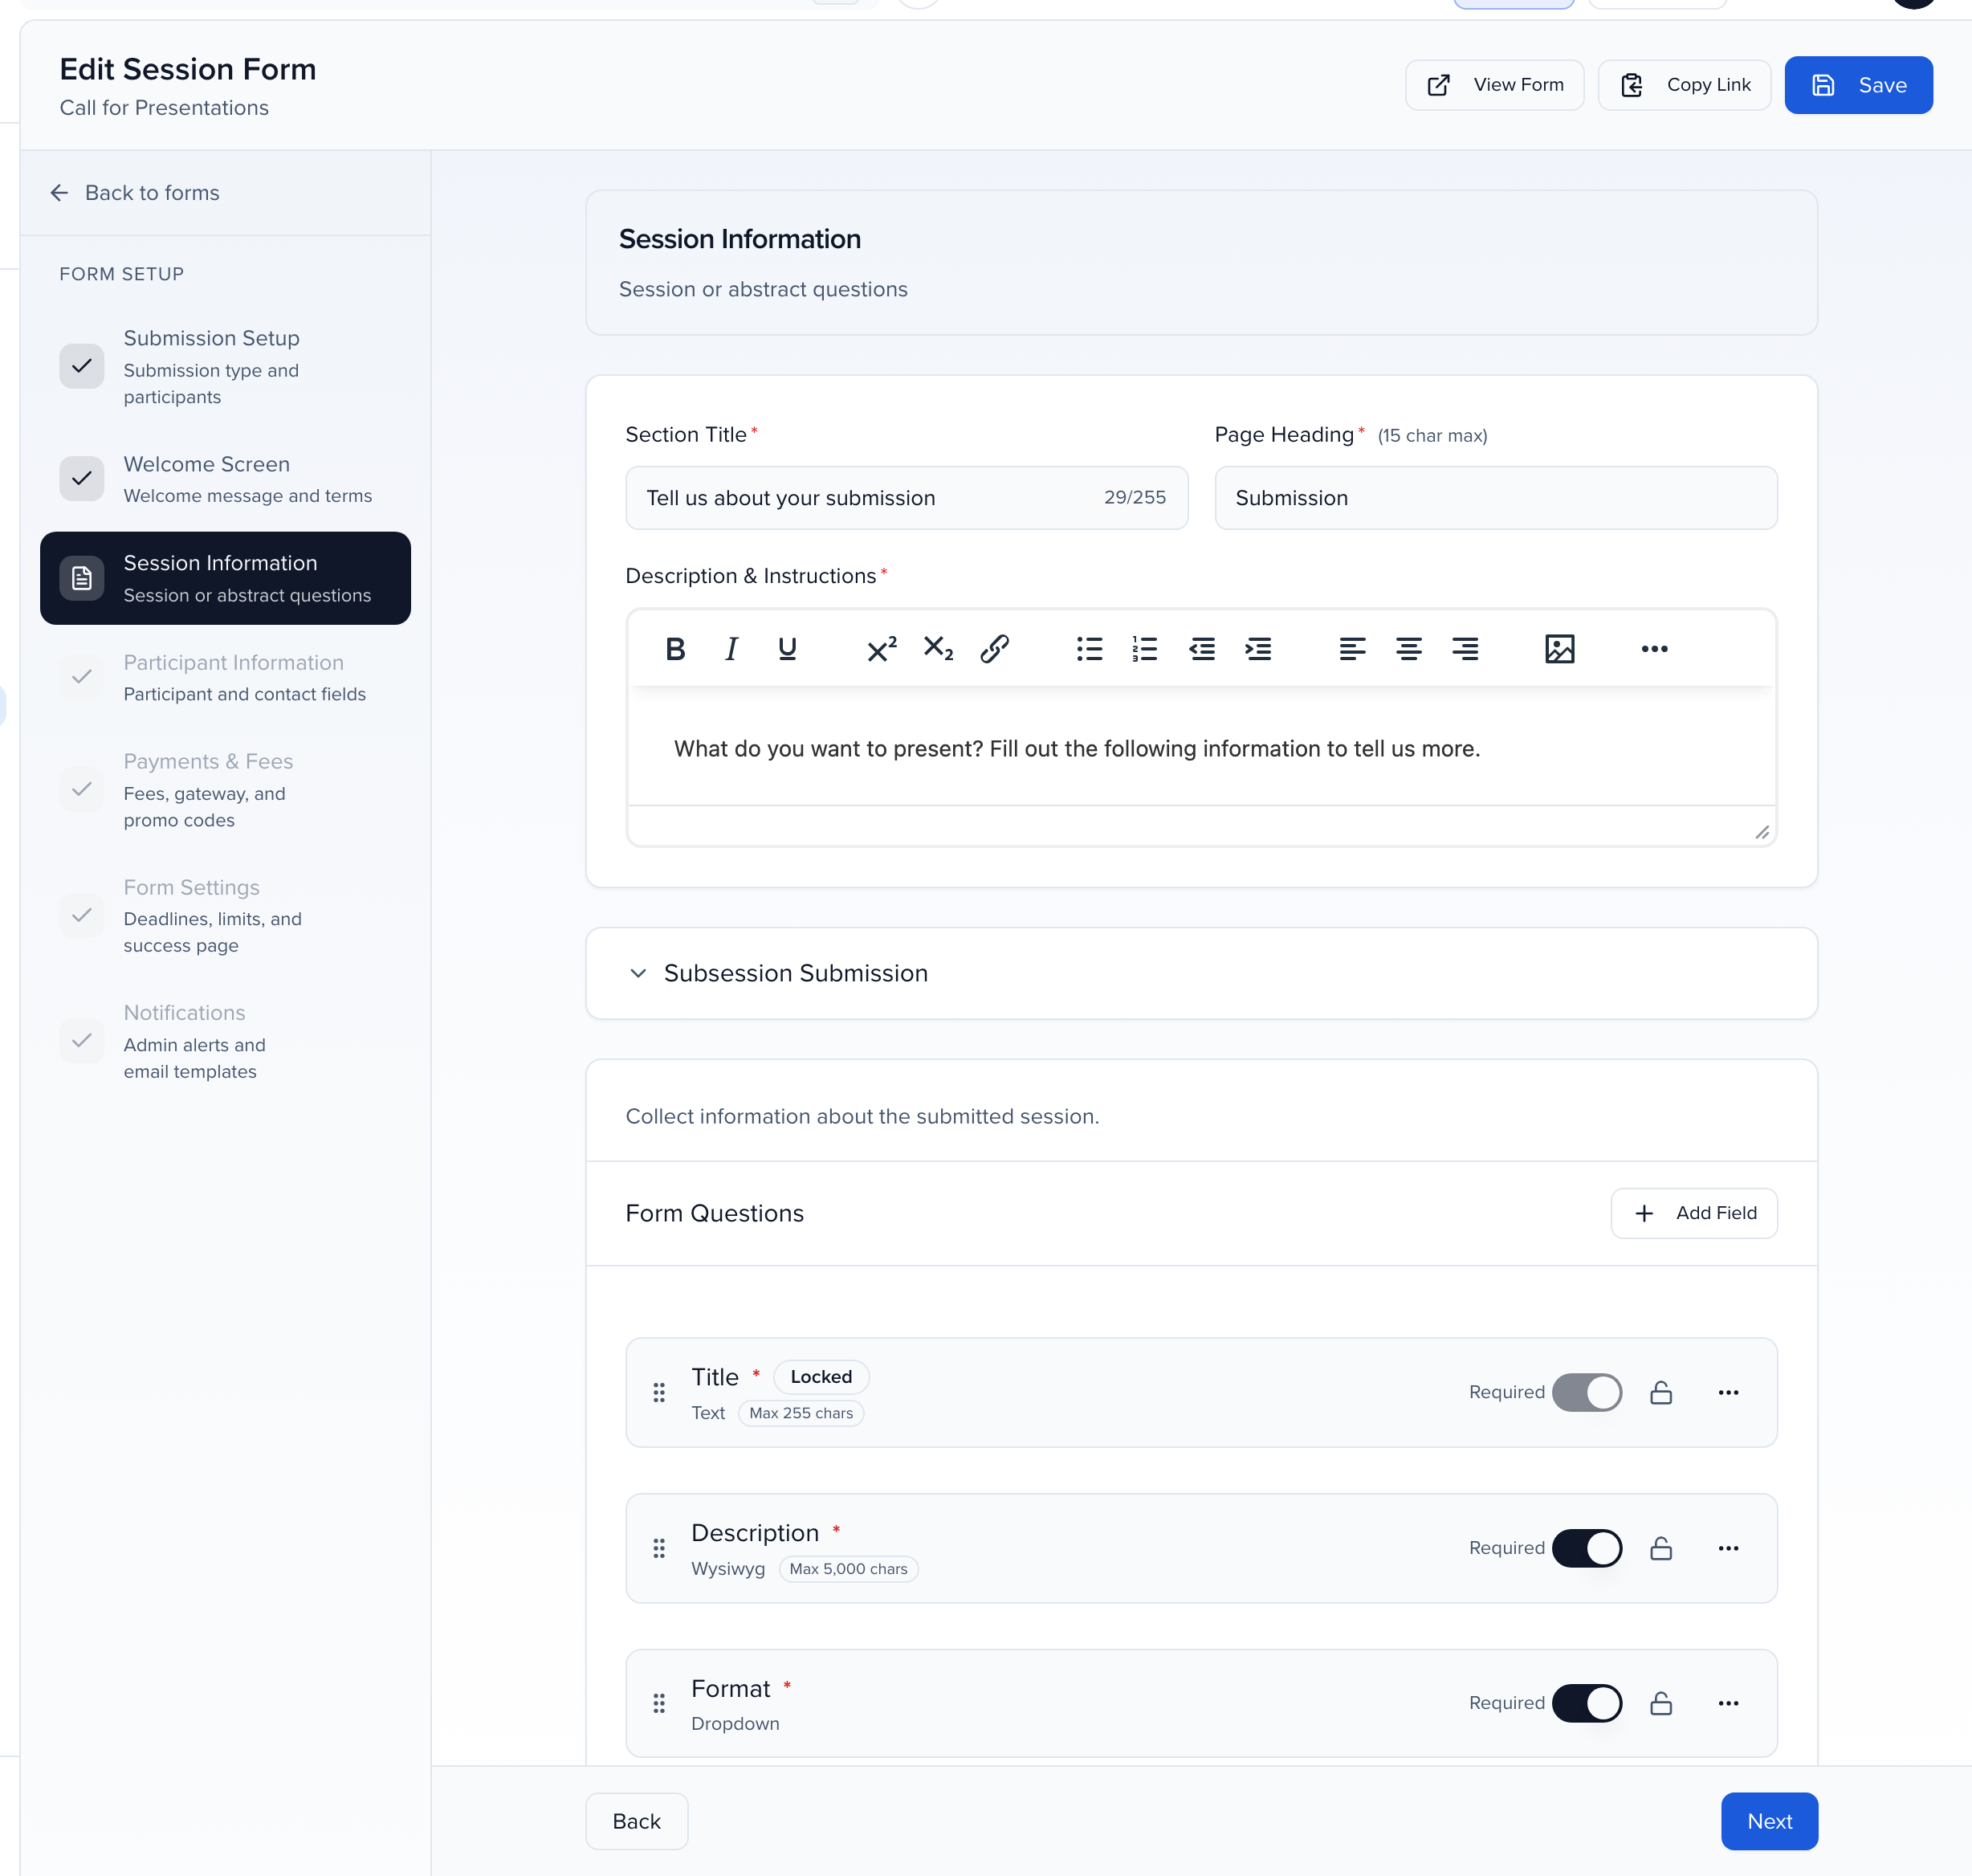
Session Information is the heart of it. A section title and a short page heading, that’s the tab name submitters see. Then the questions. Title is locked, every session needs one. Everything else you control. Required is a switch on each row, and the padlock makes a field view-only, useful when you’re pre-filling something and don’t want it edited.
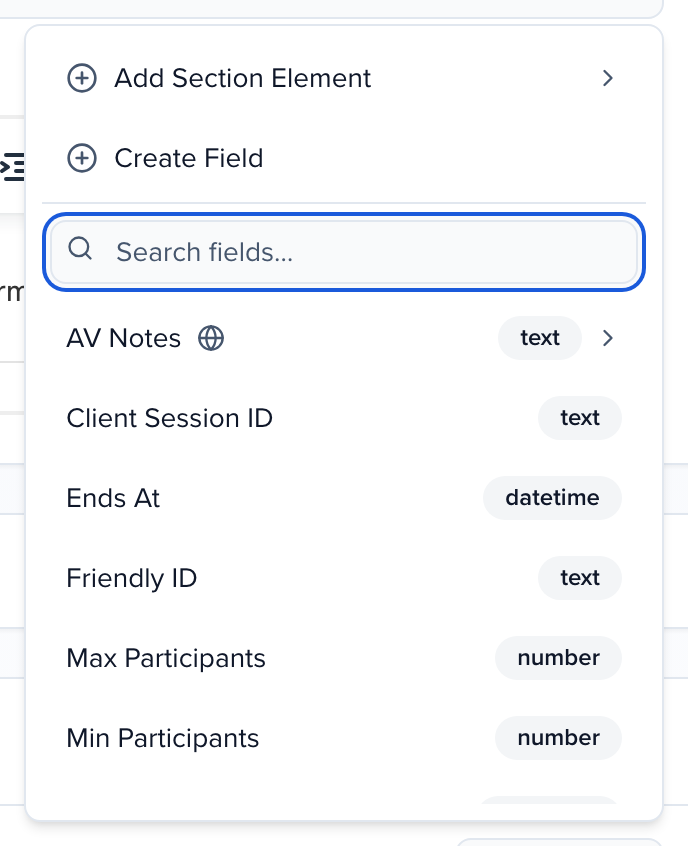
Add Field. Search the fields that already exist, this is why the Event setup chapter builds fields first, they’re waiting here. Create Field makes a new one without leaving the form, event or global, same choice as before. And Add Section Element is for a header, a divider or a block of text between questions. One thing to know, evaluators will see these field names when they review, so name them the way you’d want a reviewer to read them.
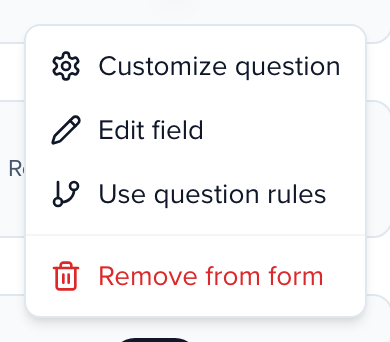
The three dots on a question. Customize question changes the label and help text your submitters see, and sets a word or character limit with a live counter. Edit field changes the field itself, everywhere it’s used. And Use question rules is how one form handles several session types. Format is Workshop shows duration and room setup, Format is Poster hides them. Build every field first, save, then add the rules.
Participant Information. Up top, the roles this form lets a submitter add, and a minimum and maximum for each, with a total across all roles for the whole session. Those limits are only enforced once Check participant limits is on, otherwise they’re advice. Below, the questions per person. First name, last name and email are locked, that’s how a speaker becomes a contact. Biography and mobile are optional until you switch Required on. Ten speakers is the most the public form will take, whatever you set here.
Form Settings. Open and close dates, and once there’s a close date, draft reminders go out five days and one day before. Advanced gives certain answers a different deadline, posters get an extra month. Set Submission Limit caps how many one person can submit through this form, and it counts drafts. Default status for new submissions is the setting I mentioned, lightning talks can land straight in the accept queue. Auto-redirect sends them to their portal after the confirmation page. And Notifications is who on your team hears about each new submission.
View Form, top right, opens what your submitters get. Welcome, account, submission, participant, review. Same headings you just wrote. Walk through it once as a submitter before you send the link, and read every help text out loud. If a question needs explaining on a call, it needs better help text.
That’s the form. Vocabulary first, then one form with rules instead of five forms. The Integrations chapter is getting registrations in, and sessions and speakers out to your website and your app. The Help Center article is Session submission forms, and Copy Link on the form is what goes in your call for papers email.
Why use it
Section titled “Why use it”The submission form is the first thing a prospective speaker touches, and every question on it is asked exactly as you designed it — dates, money, files and all. Question rules keep the form short for each person, participant roles collect co-authors and moderators properly, built-in fees remove a separate checkout, and each answer lands on a session and a contact your team can evaluate, schedule and email without re-keying anything.
The form builder walks down the left side of the screen, one step at a time. This article follows the same order, then covers the question-level tools (customize, question rules, layout elements), multi-language forms, and the actions on the forms list.
Forms still on the older builder
Section titled “Forms still on the older builder”Every form on Program → Forms carries a v1 or v2 badge, and the Version filter next to the tabs shows only one or the other; a v1 forms count appears while any remain.
A v1 badge marks a form built on the older builder, which had four steps — Welcome Screen, Session Information, Speaker Information, Form Settings — and capped events at 20 forms. The settings are the same; only where they sit differs. Three things changed in the newer builder: you choose whether the form collects Abstracts or Sessions, Speaker Information became Participant Information with custom roles and per-role limits, and Payments & Fees is a step on the form itself.
A v1 form still collects submissions, but if your event starts more than 60 days from now it can only be viewed: a banner says so on the list and in the editor, and editing, duplicating and sending wait until you choose Convert to V2… from the form’s menu. Converting changes the form in place — it is not a copy — and open submission links keep working. If you need to keep editing a v1 form without converting it, ask your Customer Success Manager; they can unlock v1 editing for the event, and the list then shows v1 editing is unlocked for this event.
Where forms live
Section titled “Where forms live”Open Program → Forms. Every event starts with one form, and you can have several — an abstract call and a session call, for example. Each card shows whether the form is Open or Closed, what it collects, and how many submissions and drafts came through it. Add creates a new form.
The ellipsis (⋯) on a form holds everything else:
| Action | What it does |
|---|---|
| Edit | Open the form builder. |
| View Submissions | The sessions that came through this form. On a form with Allow submitters to select a parent session, each submission is a sub-session of the parent it picked, so the list shows that parent, expanded, with only the sub-sessions this form created under it. |
| View Drafts | Submissions started but not completed — see draft submissions. |
| View Form | Open the public form in a new tab. |
| Copy Link | Copy the form’s public URL for your call for papers email. |
| Download Form | Download a blank copy as a PDF or Word document, with every question laid out in order — see Download a blank copy of a form. |
| Duplicate | Copy the form — how most teams build next year’s form. See Copy a form. |
| Delete | Remove the form from your event. |
Copy a form
Section titled “Copy a form”Choose Duplicate from a form’s ellipsis menu and confirm. Sessionboard creates a new form named Copy: <original name> and opens it in the editor.
The copy carries the original’s fields and sections, question rules, pricing, VAT and promo-code rules, notifications, submitter rules and participant validation rules. It starts with no submissions or drafts, and the record of who was emailed about drafts is cleared, so Email draft holders starts fresh on the copy.
If Duplicate is greyed out, hover over it. Two things cause that:
- You don’t have permission to create submission forms. Ask an event admin to change your role. See Permissions by module.
- The form is on the older v1 builder and the event starts more than 60 days from now. Choose Convert to V2… from the menu instead. See Forms still on the older builder.
Build the form, step by step
Section titled “Build the form, step by step”Choose Edit to open the builder. The steps run down the left; View Form and Copy Link stay in the header so you can check the public form at any point. Save writes the step you’re on.
Submission Setup
Section titled “Submission Setup”Two decisions that shape the rest of the form:
- Abstracts or Sessions — what kind of submissions the form collects. Abstracts are short proposals reviewed before they become sessions; Sessions are full proposals with program details.
- Participants — whether the form has a step for speaker details at all. Turn it off for a form that only collects the proposal.
You can change both later by editing the form.
Welcome Screen
Section titled “Welcome Screen”The first screen a submitter sees. Internal Form Name is what your team sees on the forms list; External Form Title is what submitters see. The Welcome Message is a rich-text block for what you’re looking for, when the call closes, and any terms — Show message hides it without deleting it.
Session Information
Section titled “Session Information”The heart of the form. Section Title and Page Heading name the step — the page heading is the tab submitters see — and Description & Instructions sits above the questions.
Under Form Questions, Title is locked because every session needs one; everything else is yours. Each row has a Required switch, and the padlock makes a question view-only, which is useful when you pre-fill something and don’t want it edited. Drag rows to reorder them, or use Move up and Move down in the row’s menu. With the keyboard, focus a row’s handle, press Space to pick it up, the arrow keys to move it, and Space again to drop it.
Add Field opens the field picker. Search the fields that already exist on the event or organization, use Create Field to make a new one without leaving the form, or Add Section Element for a header, divider, or block of text between questions.
When you create a field, two options decide how far it reaches. Field Description is internal context for your team and is never shown to submitters. Field Level decides whether the field belongs to one event (Event Field) or to every event in the organization (Global Field). Field level can’t be changed after the field is created.
Once fields are on the form, the ellipsis (⋯) on a question opens Customize question, Edit field, Use question rules, and Remove from form — each covered under Question tools below.
At the bottom of the step, two switches let a submission sit inside a larger one — a talk within a symposium, or a workshop with its own breakouts:
- Allow submitters to select a parent session — the submitter can attach their submission to an existing parent session.
- Allow submitters to submit sub-sessions — the submitter can add sub-sessions beneath the session they are proposing.
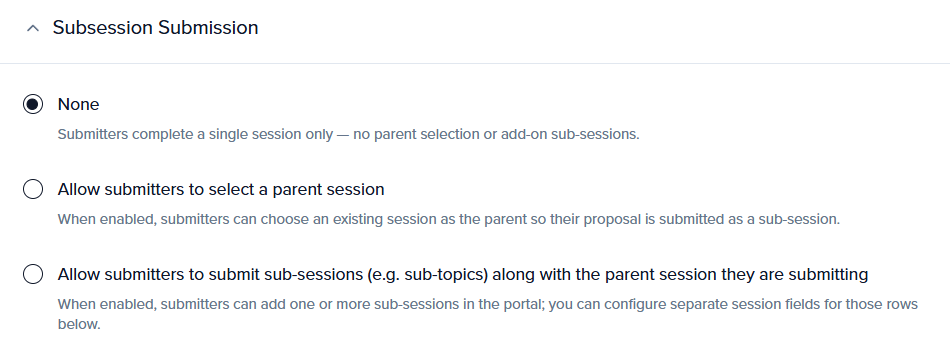
Limits on sub-sessions. Turning on Allow submitters to submit sub-sessions reveals a Sub-session settings card with Minimum sub-sessions and Maximum sub-sessions (leave blank for No minimum / No maximum). The minimum can’t exceed the maximum. A submitter who goes over or under sees “This form allows at most N” or “requires at least N” and can’t submit until the count fits.
There is a second, event-wide cap: Limit subsessions per session under Record Settings (up to 500), with Filtered overrides for sessions that match a filter, such as one format. See Submission and subsession limits. When a form maximum and an event limit both apply, the submitter can add sub-sessions only up to the lower of the two.
Session choice
Section titled “Session choice”A Session choice question lets submitters apply to sessions you have already created — a call for speakers built around a set program — by browsing them and ranking their favorites. It sits at the top of the session questions on forms built with the newer builder, and is off until you click Add question. Then set:
- Question title and Description / instructions — what submitters read above the list.
- Ranked choices — 1st choice only, 1st and 2nd choice, or 1st, 2nd and 3rd choice. The 1st choice is always required; the others are optional.
- Sessions submitters can choose — the live, published, top-level sessions of this event that match every filter you set: Status, Tracks, Formats, Levels and Tags. With no status selected, sessions that came in through a submission form are left out, so nobody sees other people’s proposals.
- Details panel — submitters always see each session’s description, track, format, level and tags; add custom session fields to show them as well.
On the form, submitters search or browse the offered sessions, select one to read its details beside the list, and use Set as 1st choice (2nd, 3rd) to rank it. A session can hold only one rank, and the form won’t move on without a 1st choice. Picks are saved with a draft and filled back in when the submitter edits the submission. See Choose and rank sessions on a submission form for their side.
The submission still creates its own session record, so Title stays required. Each choice links the submitter to the chosen session as a potential speaker:
- On the chosen session, admins see a Potential speakers card with each applicant’s rank, email and a link to their submission. They are not participants: they get no acceptance emails or tasks, aren’t synced to integrations, and never appear in the portal’s participant lists. To book one, add them as a participant on the session.
- On the submission itself, Session choices lists the sessions the submitter ranked.
Removing the question later keeps the choices already made.
Participant Information
Section titled “Participant Information”This step appears when Participants is on in Submission Setup. It has its own section title, page heading, and instructions, then two parts:
Participant roles — the roles a submitter can add (speaker, chairperson, moderator, and any custom roles from program settings), each with a Min and Max. Total across all roles caps the whole session with Total min and Total max. When primary speakers are enabled, Max primary per role and Total max primary cap how many participants can be marked primary; a limit of 0 hides the primary toggle. Send submission confirmation email per role decides whether people added in that role receive the confirmation too.
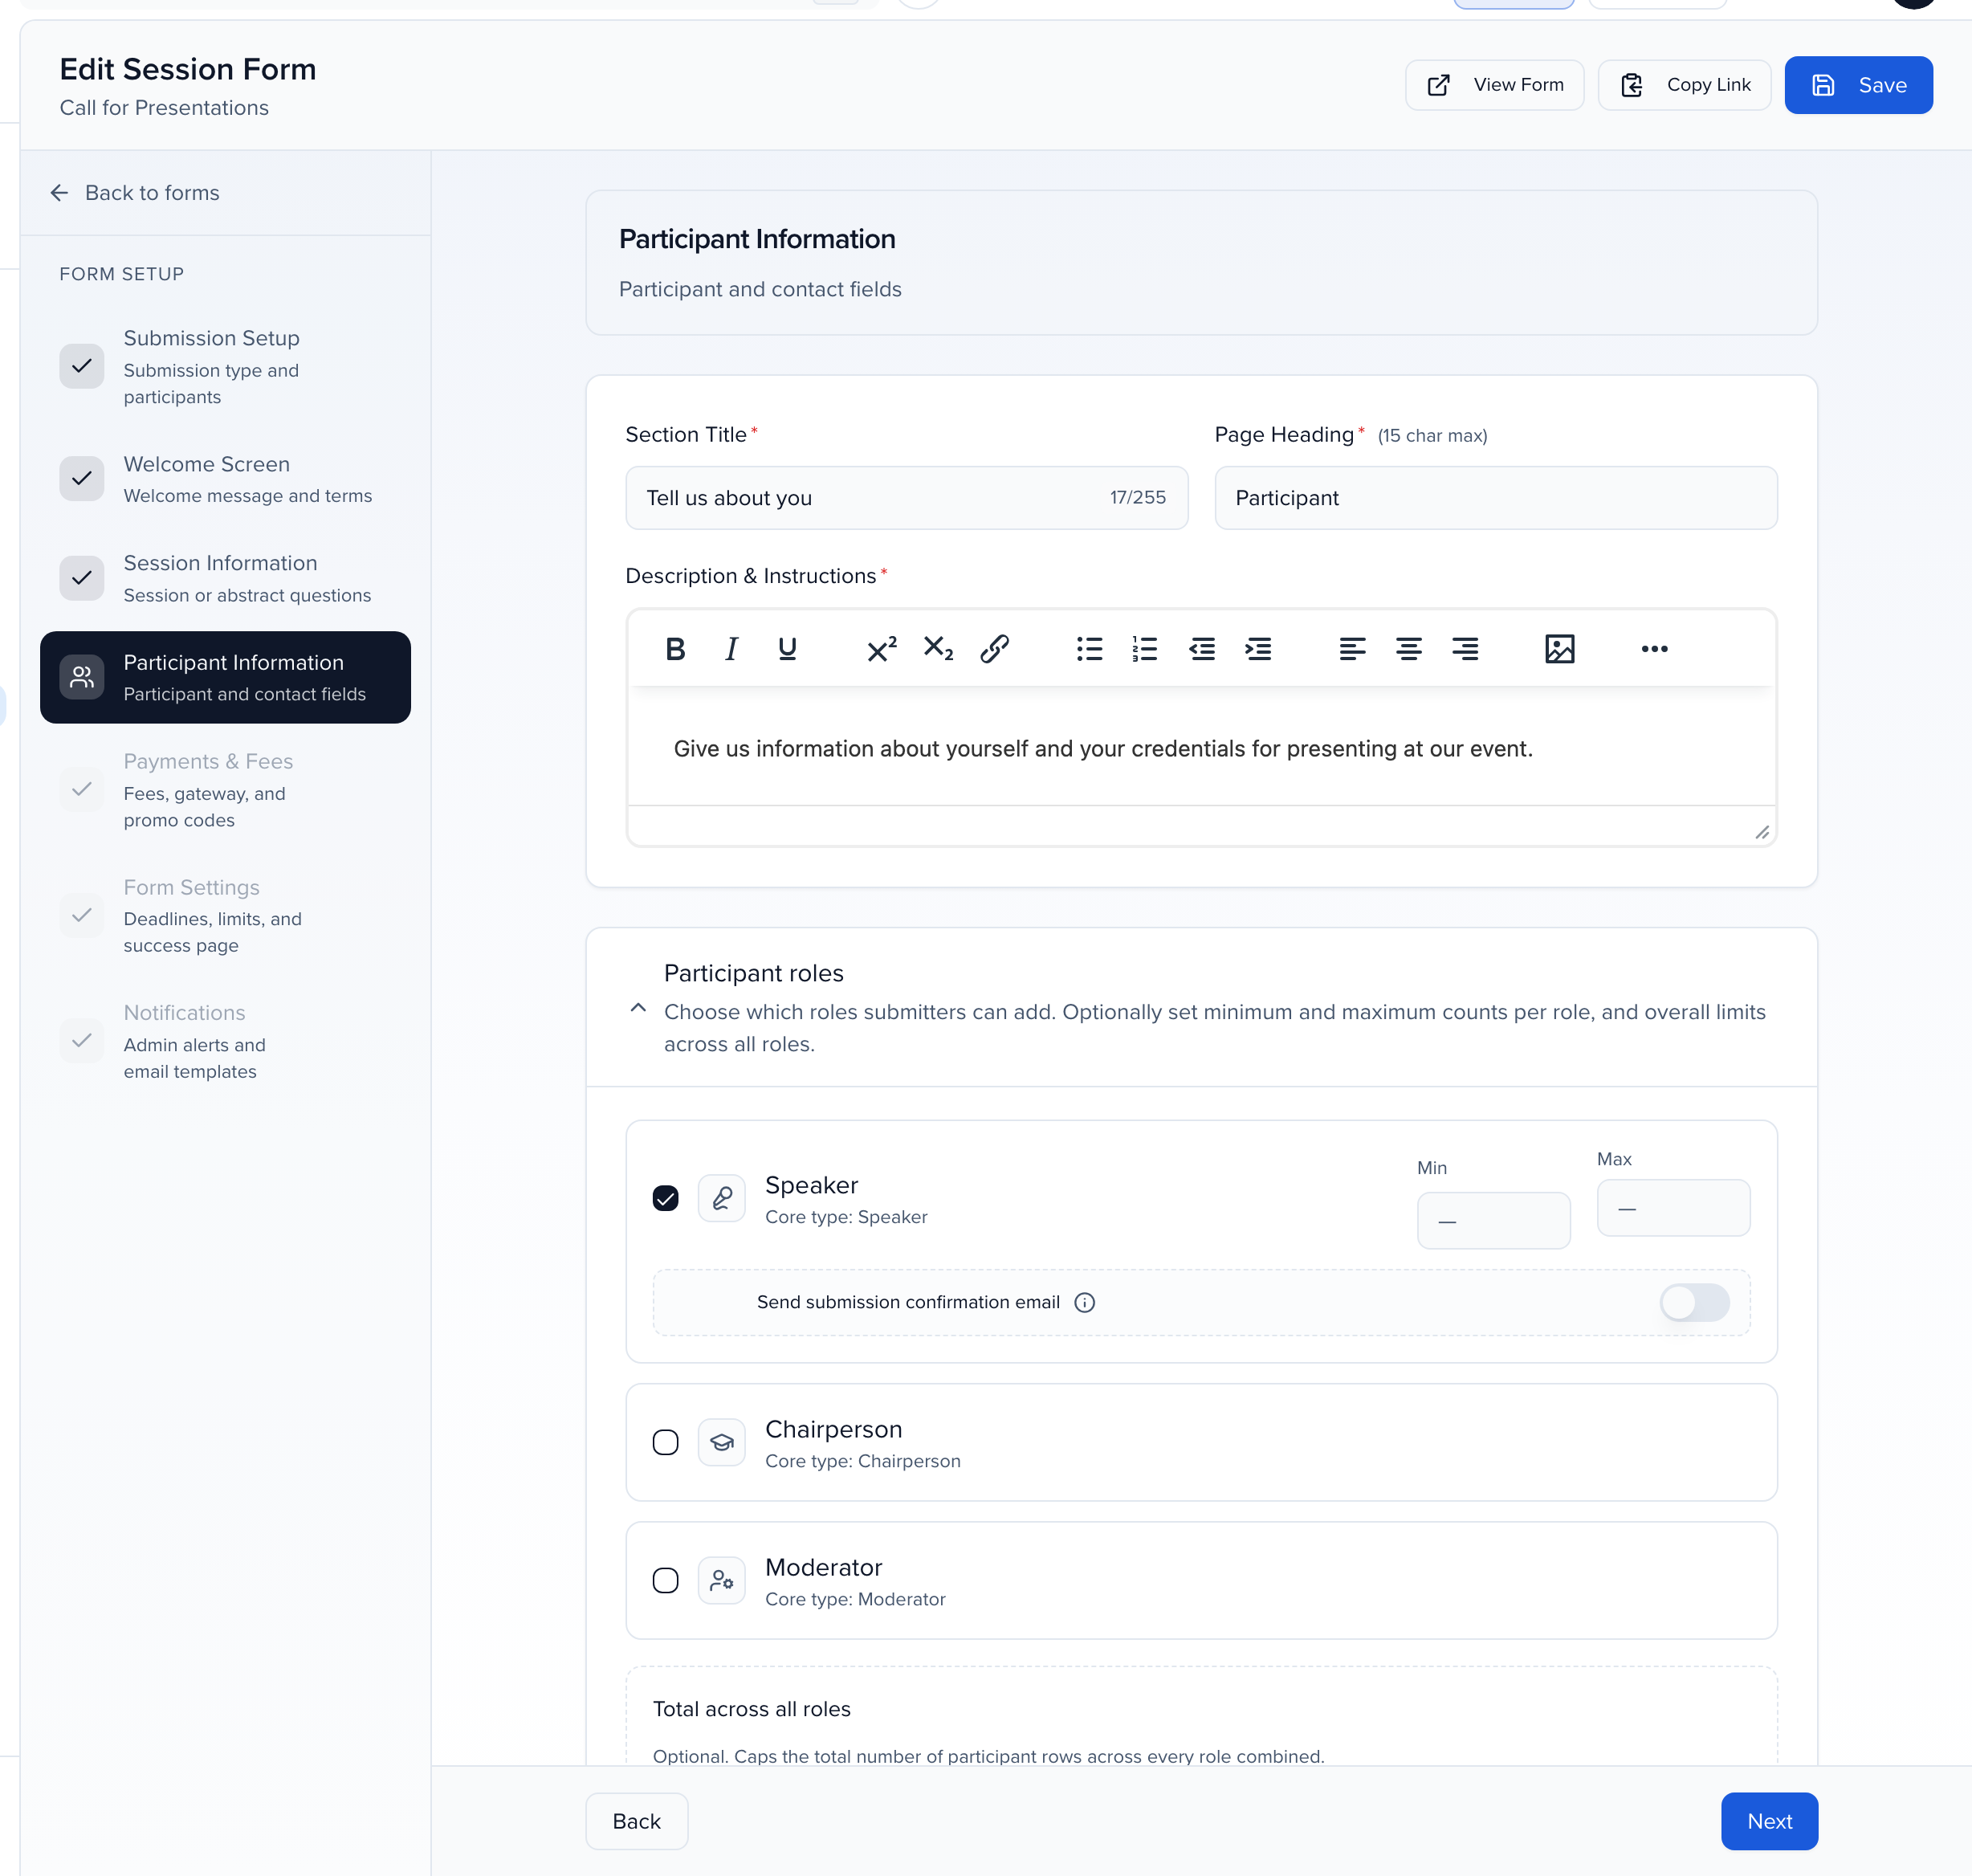
Check participant limits, above the roles table, is what makes the Min and Max counts enforced; leave it off and the limits are advisory.
On the form, each participant row has a This is me option. A submitter who is also presenting marks their own row: it fills in their email, which they can change to another address they use. The participant is then linked to the submitter’s own account rather than becoming a second contact. Only one row can be marked. If the email belongs to someone else’s account, the row shows an error. The email on that row is stored on the contact only; the submitter still signs in with their account’s email.
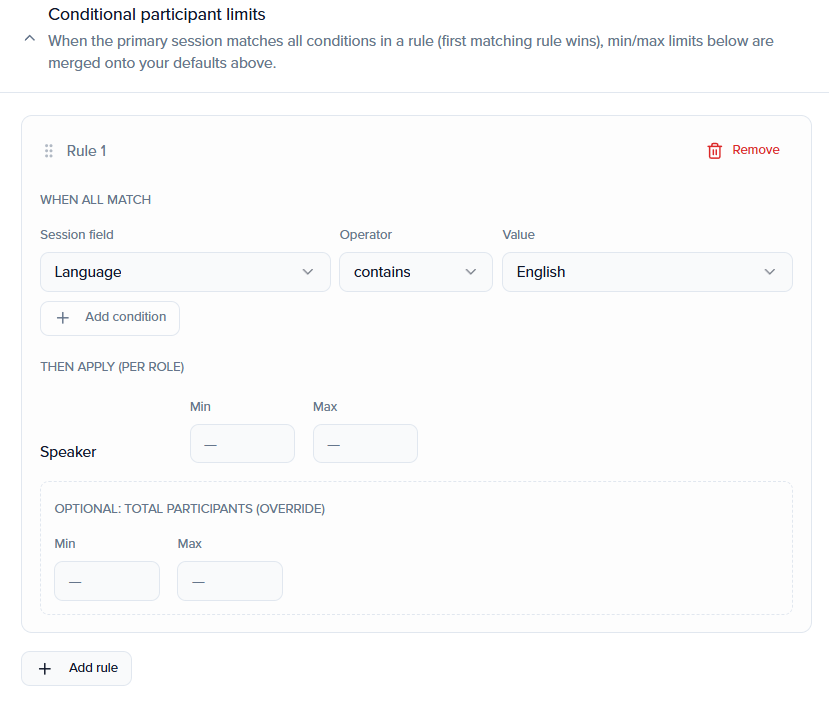
Conditional participant limits override the defaults for certain submissions — a workshop that allows more presenters than a poster. Add rule gives each rule a When all match block (one or more session-field conditions, such as Format is Workshop), a Then apply (per role) block with Min/Max overrides for each role, and Optional: total participants (override). The first matching rule wins; its overrides are merged onto the defaults, and a submission that matches no rule uses the defaults from the roles table.
Form Questions — the questions asked about each person. First Name, Last Name, and Email are locked; that’s how a participant becomes a contact. Everything else — biography, mobile, headshot — is optional until you switch Required on.
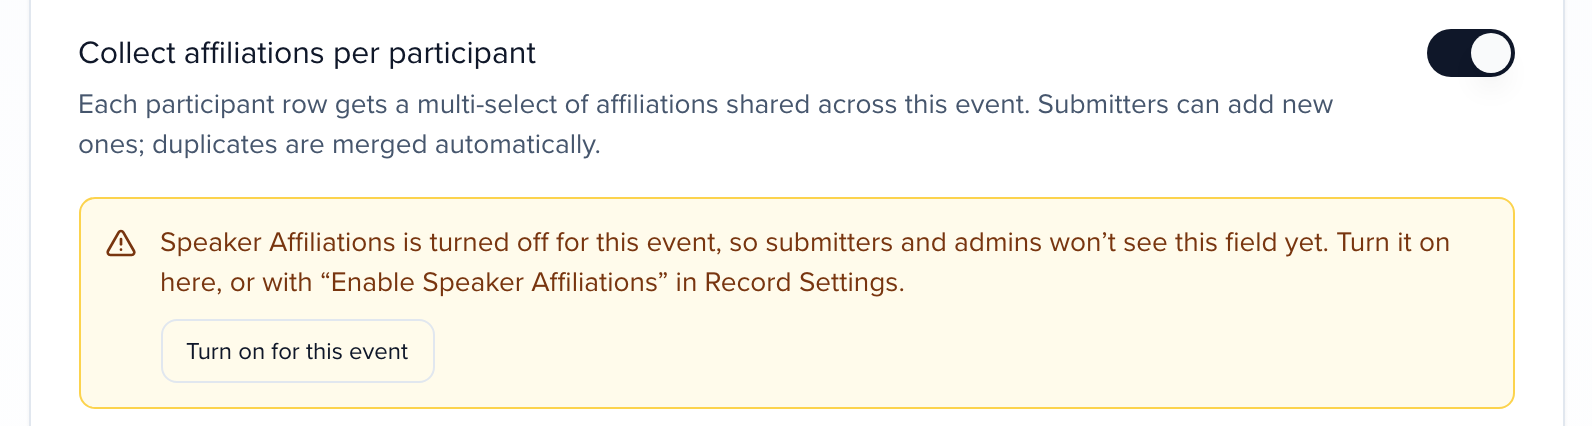
Collect affiliations per participant — gives each participant row a multi-select of affiliations shared across the event. Submitters can add new ones, and duplicates are merged automatically. Affiliations also need Enable Speaker Affiliations in the event’s Record settings; while that is off, the field is hidden on the form and in the session’s Participants tab, and the form editor shows a notice with Turn on for this event, which switches the event setting on without changing any other record setting.
Collect role attributes — on by default for new forms. When on, the role attributes marked Collect on CFP forms are asked for each participant the submitter adds, beneath the affiliation field, filtered to that participant’s role; required attributes block submission until answered. Turn it off on a form that shouldn’t ask — an internal intake, say — without touching the attribute definitions.
The order participants are entered in is kept. Submitters can change it at any time before the form closes for edits: Review author order on the participants step opens a list they can drag, or move with the arrow buttons, then Confirm order. Nobody has to be removed and re-added, and the new order is saved with the next save or submit — including a resubmission. (On forms where subsessions are added as linked records, the button isn’t offered.) If your event shows participants As submitted (see role order and participant display order), the session lists them in exactly that sequence, which is how author order on an abstract survives from the form to the session and into reports.
Unique Contact Settings decide what happens when a submitter adds someone who already exists as a contact:
| Setting | What it does |
|---|---|
| Allow users to submit new information for existing contacts | On: the submitter can enter new details for an existing contact. Off: the existing contact must log in to the portal to update their own information. |
| Notify existing contacts that they have been added to a submission | Emails the existing contact so they can log in and check their details. Reword the email in Email Templates → System → Existing contact added to a submission. |
| Display existing values for unique contacts (read-only) | Shows the contact’s current values on the form instead of blank fields. |
| Lock empty participant fields | Keeps empty fields on an existing contact from being filled in by the submitter. |
Whatever these settings say, when a signed-in submitter adds themselves as a participant, a field they leave blank never clears a value already saved on their own contact — their phone number or biography stays as it was. | Allow submitters to edit their existing values | Off by default. When a signed-in submitter adds themselves as a participant, their own row (the one with their account email) is filled in with what is already saved on their contact, and they can edit it. Changes update their contact; a field they leave blank or clear keeps its saved value. Other people’s rows follow the settings above. |
Payments & Fees
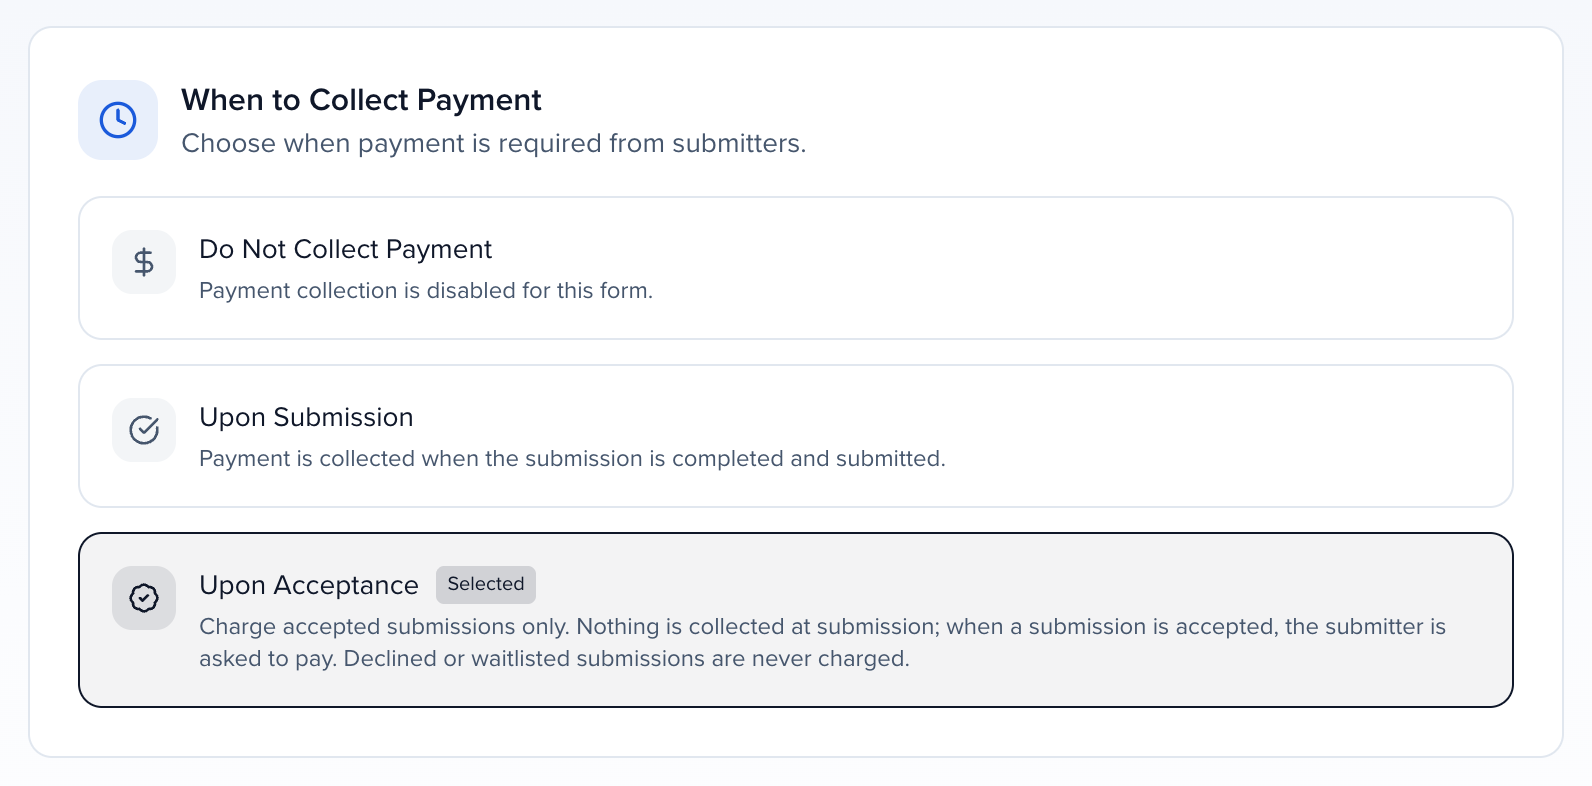
Section titled “Payments & Fees”Appears on every newer form (the sidebar calls it Fees, gateway, and promo codes). Leave When to Collect Payment on Do Not Collect Payment for a free call. To charge every submitter, choose Upon Submission; to charge only the submissions you accept, choose Upon Acceptance (details below). Then set:
| Setting | What it does |
|---|---|
| Payment Gateway | A gateway already saved under your organization’s Payment Settings. The dropdown shows None until one exists; Manage Payment Settings underneath opens Org Settings → Payment Settings. Payment Settings does not need Awards. |
| Base Fee | The amount every submitter is charged before rules, promo codes and VAT. |
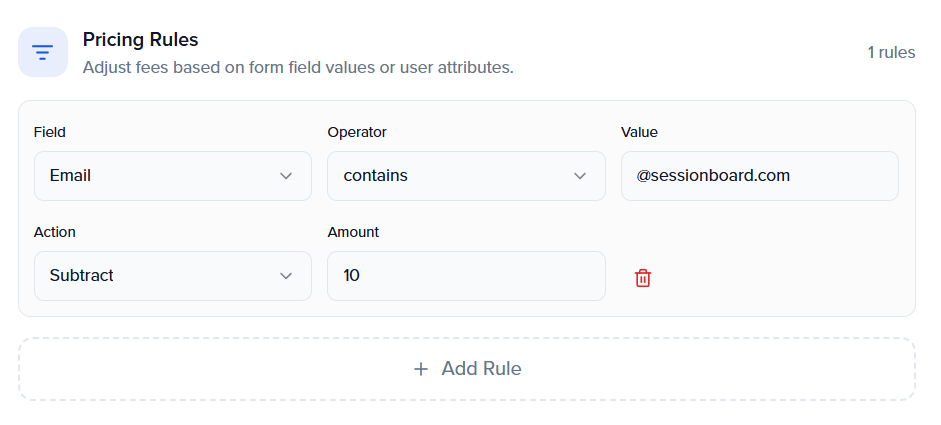
| Pricing Rules | Add Rule adjusts the fee when a field answer or user attribute matches — a Field, an Operator (is, is not, contains), a Value, and the Amount to add or subtract. |
| VAT Rules | Add VAT Rule applies tax to the checkout total: a Type (percentage or fixed), an Amount, and the Label the submitter sees. |
| Promo Codes | Add Promo Code creates a discount the submitter enters at checkout: the Code, a Type (percentage or fixed), and an Amount. |
Early-bird pricing works the same way as on awards forms — see date & time tiers. Sessionboard adds no platform fee; the gateway’s own processing fees apply.
Collect payment on acceptance
Section titled “Collect payment on acceptance”With Upon Acceptance, nobody pays to submit. When a submission’s status is set to Accepted — one at a time, by bulk edit, or by any other path — Sessionboard prices it with the form’s base fee, date tier, pricing rules and VAT as of that moment, and the person who submitted it owes that fee once. Co-speakers are never asked to pay, and sub-sessions entered as part of one submission share its single fee. The amount is fixed at acceptance: later changes to the fee or rules do not change what an accepted submission owes, and a submission that came to $0 when accepted stays free. Submissions that are declined, waitlisted, withdrawn or still pending are never charged.
| Setting | What it does |
|---|---|
| Payment due (days after acceptance) | Optional. The due date shown in the acceptance email and on the payment page. Submitters can still pay after it, and after the form’s deadline. |
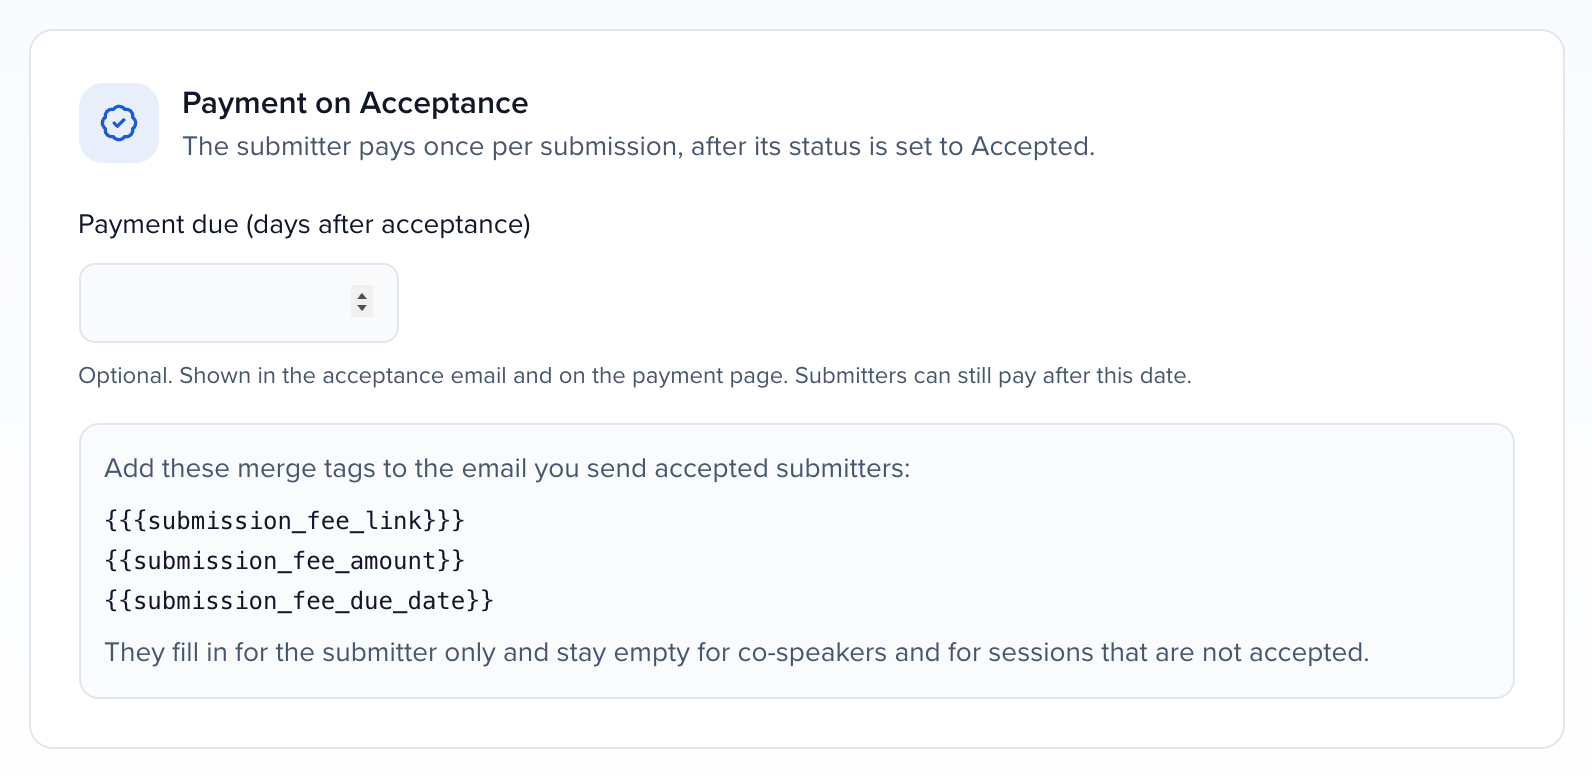
Tell accepted submitters how to pay by adding these merge tags (in the Sessions group of the merge-tag picker) to the email you send them:
| Merge tag | Shows |
|---|---|
{{{submission_fee_link}}} | A link to the payment page for that submission. |
{{submission_fee_link_url}} | The same link as plain text, for a button. |
{{submission_fee_amount}} | The fee, for example $150.00. |
{{submission_fee_due_date}} | The due date, in the event’s time zone. Empty when the form sets no due date. |
The tags fill in only for the person who submitted (the account that pays) and stay empty for co-speakers and for sessions that are not accepted, so the same email can go to every participant. Send it as one email per recipient: with combine recipients on, one copy goes to everyone on the session, so the tags stay empty in it. To drop the whole paragraph for everyone else, wrap it: {{#submission_fee_link_url}}<p>Please pay {{submission_fee_amount}} by {{submission_fee_due_date}}: {{{submission_fee_link}}}</p>{{/submission_fee_link_url}}.
The payment page asks the submitter to sign in with the account they submitted with, then takes the card payment and shows the receipt; the invoice appears under Invoices like any other submission fee. On the session, the Connections tab shows Submission fee (on acceptance) as Payment due, Paid, or Not due (the session is no longer accepted). Moving an accepted session to another status does not refund a payment that was already made — refund it from Invoices if you need to. Accepting it again makes an unpaid fee due again; it is never charged twice.
Form Settings
Section titled “Form Settings”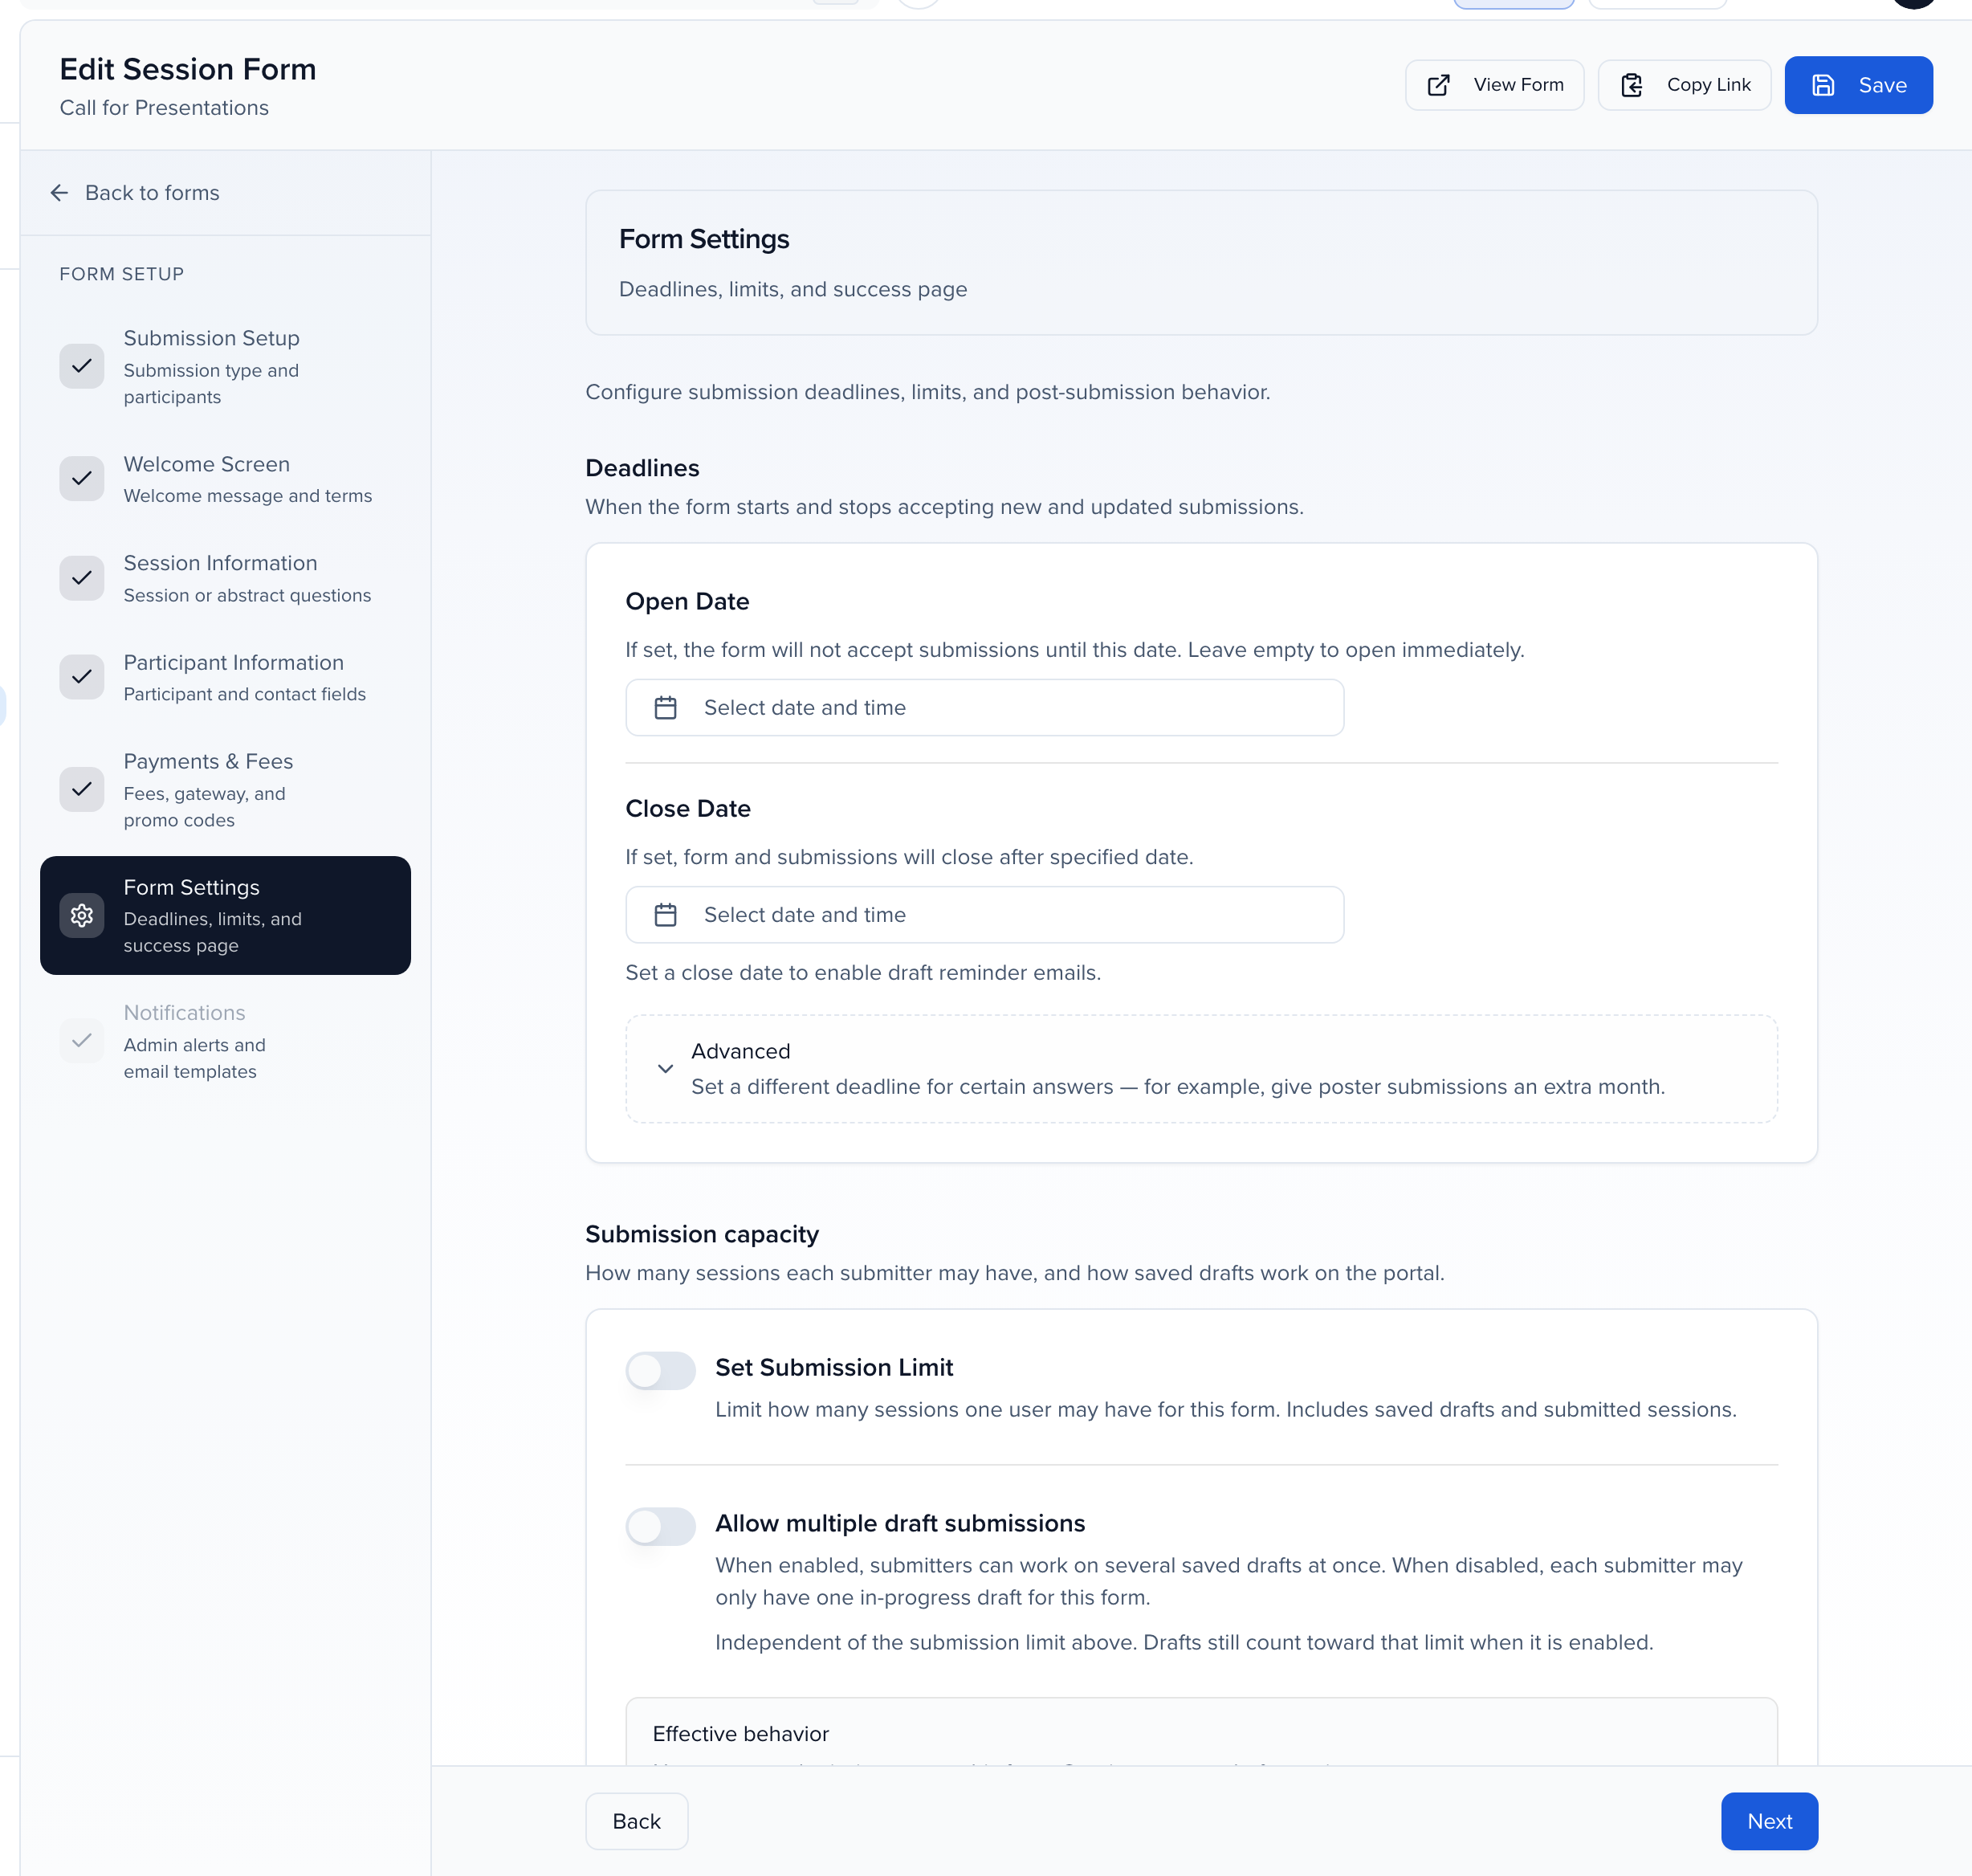
Deadlines
Section titled “Deadlines”| Setting | What it does |
|---|---|
| Open Date | The form won’t accept submissions until this date. Leave it empty to open immediately. |
| Close Date | Closes the form after this date. New submissions stop, and edits to existing ones are refused. |
| Send Reminder Email | Appears once a close date is set. Emails submitters who saved a draft but never completed it, five days and one day before the form closes. |
| Advanced | Conditional deadlines — a different close date for certain answers, such as an extra month for posters. |
A form can also be closed without a date, by setting Open for submissions to No (for example by asking in the Ask panel to close the form for submissions). A closed form works like one past its close date: the public link shows that submissions are closed, nobody can start or save a draft, saves to drafts already in progress are refused, and Edit submission disappears from the portal. Set Open for submissions back to Yes to reopen it; nothing already saved is lost.
After the deadline
Section titled “After the deadline”The Close Date locks submitters, not your team.
- Submitters: the form turns read-only — they can’t start a draft, finish a saved draft, or edit a submitted session. That includes the participant list, files and answers. Edit submission disappears from the portal.
- Event team: you can still open any submission or draft from Program → Submissions or the form’s View Drafts and edit it, including participants and files. Use this for deadline-day requests such as a late author change, then tell the submitter.
- Letting one more person in: move the Close Date later, use an Advanced conditional deadline for a group, or edit the record yourself. Changing the date reopens the form for everyone.
Submission capacity
Section titled “Submission capacity”| Setting | What it does |
|---|---|
| Set Submission Limit | Limits how many sessions one user may have on this form. This counts saved drafts as well as submitted sessions — at the limit, submitters can resume a draft but can’t start a new one. An event-wide limit from session settings applies when no form-level limit is set. |
| Allow multiple draft submissions | Lets one submitter keep more than one draft in progress at a time. Off, the portal’s Account step shows Resume draft only. |
The Effective behavior summary underneath restates what the two settings add up to, so you can read the result before you save.
New submissions
Section titled “New submissions”| Setting | What it does |
|---|---|
| Default status for new submissions | The status every submission created from this form starts in. Choose one of the standard statuses — Pending (the default), Accept Queue, Accepted, Decline Queue, or Declined — or any custom status from Program Settings → Statuses. Each form has its own default, so a lightning-talk form can land submissions straight in Accept Queue while your main call for papers keeps them Pending. |
If you pick a custom status, whether submitters see its custom name or its standard category label follows that status’s Show custom status name to external users setting. If the custom status is later archived, new submissions from the form fall back to Pending.
After submission
Section titled “After submission”| Setting | What it does |
|---|---|
| Auto-redirect to speaker portal | Sends the submitter to their portal 10 seconds after the confirmation page. With it off, they click Continue to portal themselves. |
| Customize the success page message | The message shown on the confirmation page after submitting, and after payment where fees apply. |
Submission PDF
Section titled “Submission PDF”Generate a submission PDF gives submitters a printable copy of their answers. The PDF is created on submit and attached to the confirmation email, with a download link. It is not saved as a file on the submission, so it does not appear on the submission’s Files tab, in the Files library, to reviewers or in integrations.
After submitting, the confirmation screen shows Print submission; it prepares the PDF for a few seconds and gives a Download PDF link if the browser blocks the new tab. The PDF is only for completed submissions — a draft has no PDF. To see a draft’s contents, open it from View Drafts, or export the Drafts tab to CSV or XLSX (see draft submissions). A blank copy of the whole form is Download Form in the form’s menu.
Withdrawal
Section titled “Withdrawal”Allow submitters to withdraw their submission is off by default. When it is on, the person who submitted (not their co-participants) sees Withdraw submission on each of their submissions from this form in the portal, at any status, whether or not Participant Acceptance is on. They confirm and can give a reason. The submission moves to Withdrawn and event admins get the withdrawn notification; the session’s Withdrawn banner shows when, who and the reason, and the submission is listed under the Withdrawn tab of the Submissions page. Submitters cannot undo a withdrawal themselves; an admin can, from the session.
Character limits
Section titled “Character limits”Flag over-limit text instead of cutting it off is off by default. Off, typing stops at a question’s Maximum Length and pasted text is cut off at the limit. On, Text and Text Area questions on this form keep everything the submitter types or pastes, the counter turns red, and a message under the question asks them to shorten it, for example Your response is 1,240 characters. The limit is 1,000. Please shorten it before continuing. Next and Submit stay blocked until the answer fits. Turn it on when submitters draft long answers in Word and paste them in, so nobody loses the end of an abstract without noticing. See Add a character limit to a field.
Languages
Section titled “Languages”Enable multi-language submissions shows a language selector on the public form. See Multi-language submissions below for what is translated and how.
Cross-field character limits
Section titled “Cross-field character limits”Per-field character limits cap one answer. A cross-field rule caps several answers together — useful when a programme allows, say, 2,000 characters across the abstract, the summary and the learning objectives combined, and lets submitters spend it where they like.
Under Cross-field character limits, click Add rule and set:
| Field | Notes |
|---|---|
| Rule name | Named in the error message, so make it recognizable |
| Combined character limit | A positive whole number |
| Fields in this rule | Any text, long text, or rich text fields on the form |
| Custom error message | Optional. Replaces the default message when the limit is exceeded |
Every field in one rule must come from the same step — all session fields, or all participant fields. A participant-scope rule is counted per participant; a session-scope rule is counted once for the submission. Mixing the two would make “combined” ambiguous, so the form editor does not allow it.
Counting matches per-field limits: formatting is stripped from rich text before counting, and whitespace counts. Submitters see a live counter for each rule as they type, and per-field limits still apply alongside it.
The rule keeps applying after the submission is in. Every later edit of those answers is checked against the combined total of everything already saved: a submitter editing the session from their portal, your team editing it in the Sessions grid or drawer, a follow-up form, and the public API. An edit that would take the total over the limit is refused with the rule’s message, and nothing is saved. An edit that shortens an answer is always accepted, even if the total is still over, so an over-limit abstract can be trimmed one field at a time. In the portal’s session panel, Edit shows a counter for each rule under Save; it turns red over the limit and Save stays disabled until the text is short enough. The counter adds up every field in the rule, including fields the portal’s Show/Hide fields leave out of the panel, which count with what is saved.
Membership & Access
Section titled “Membership & Access”The second tab on Form Settings controls who may submit at all.
| Setting | What it does |
|---|---|
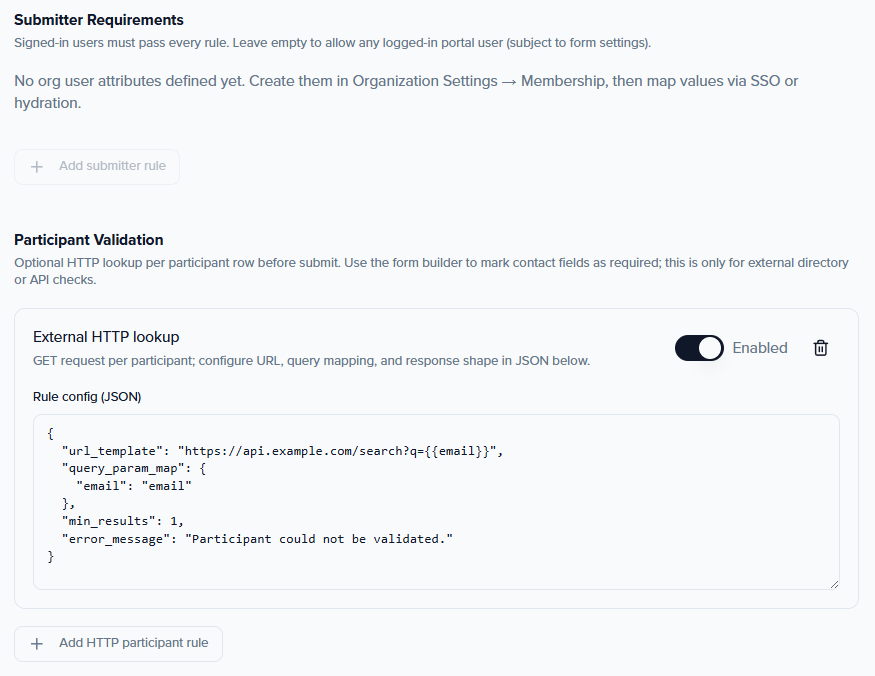
| Submitter Requirements | Restricts the form to users matching membership criteria defined under Organization Settings → Membership. Everyone else is turned away before the Welcome Screen. |
| Participant Validation | Checks each participant against an external system over HTTP before the submission is accepted — an External HTTP search rule whose Rule config (JSON) holds the lookup URL and the request/response mapping. Used by organizations that must verify people against a membership database; contact support to set it up against your system. |
Notifications
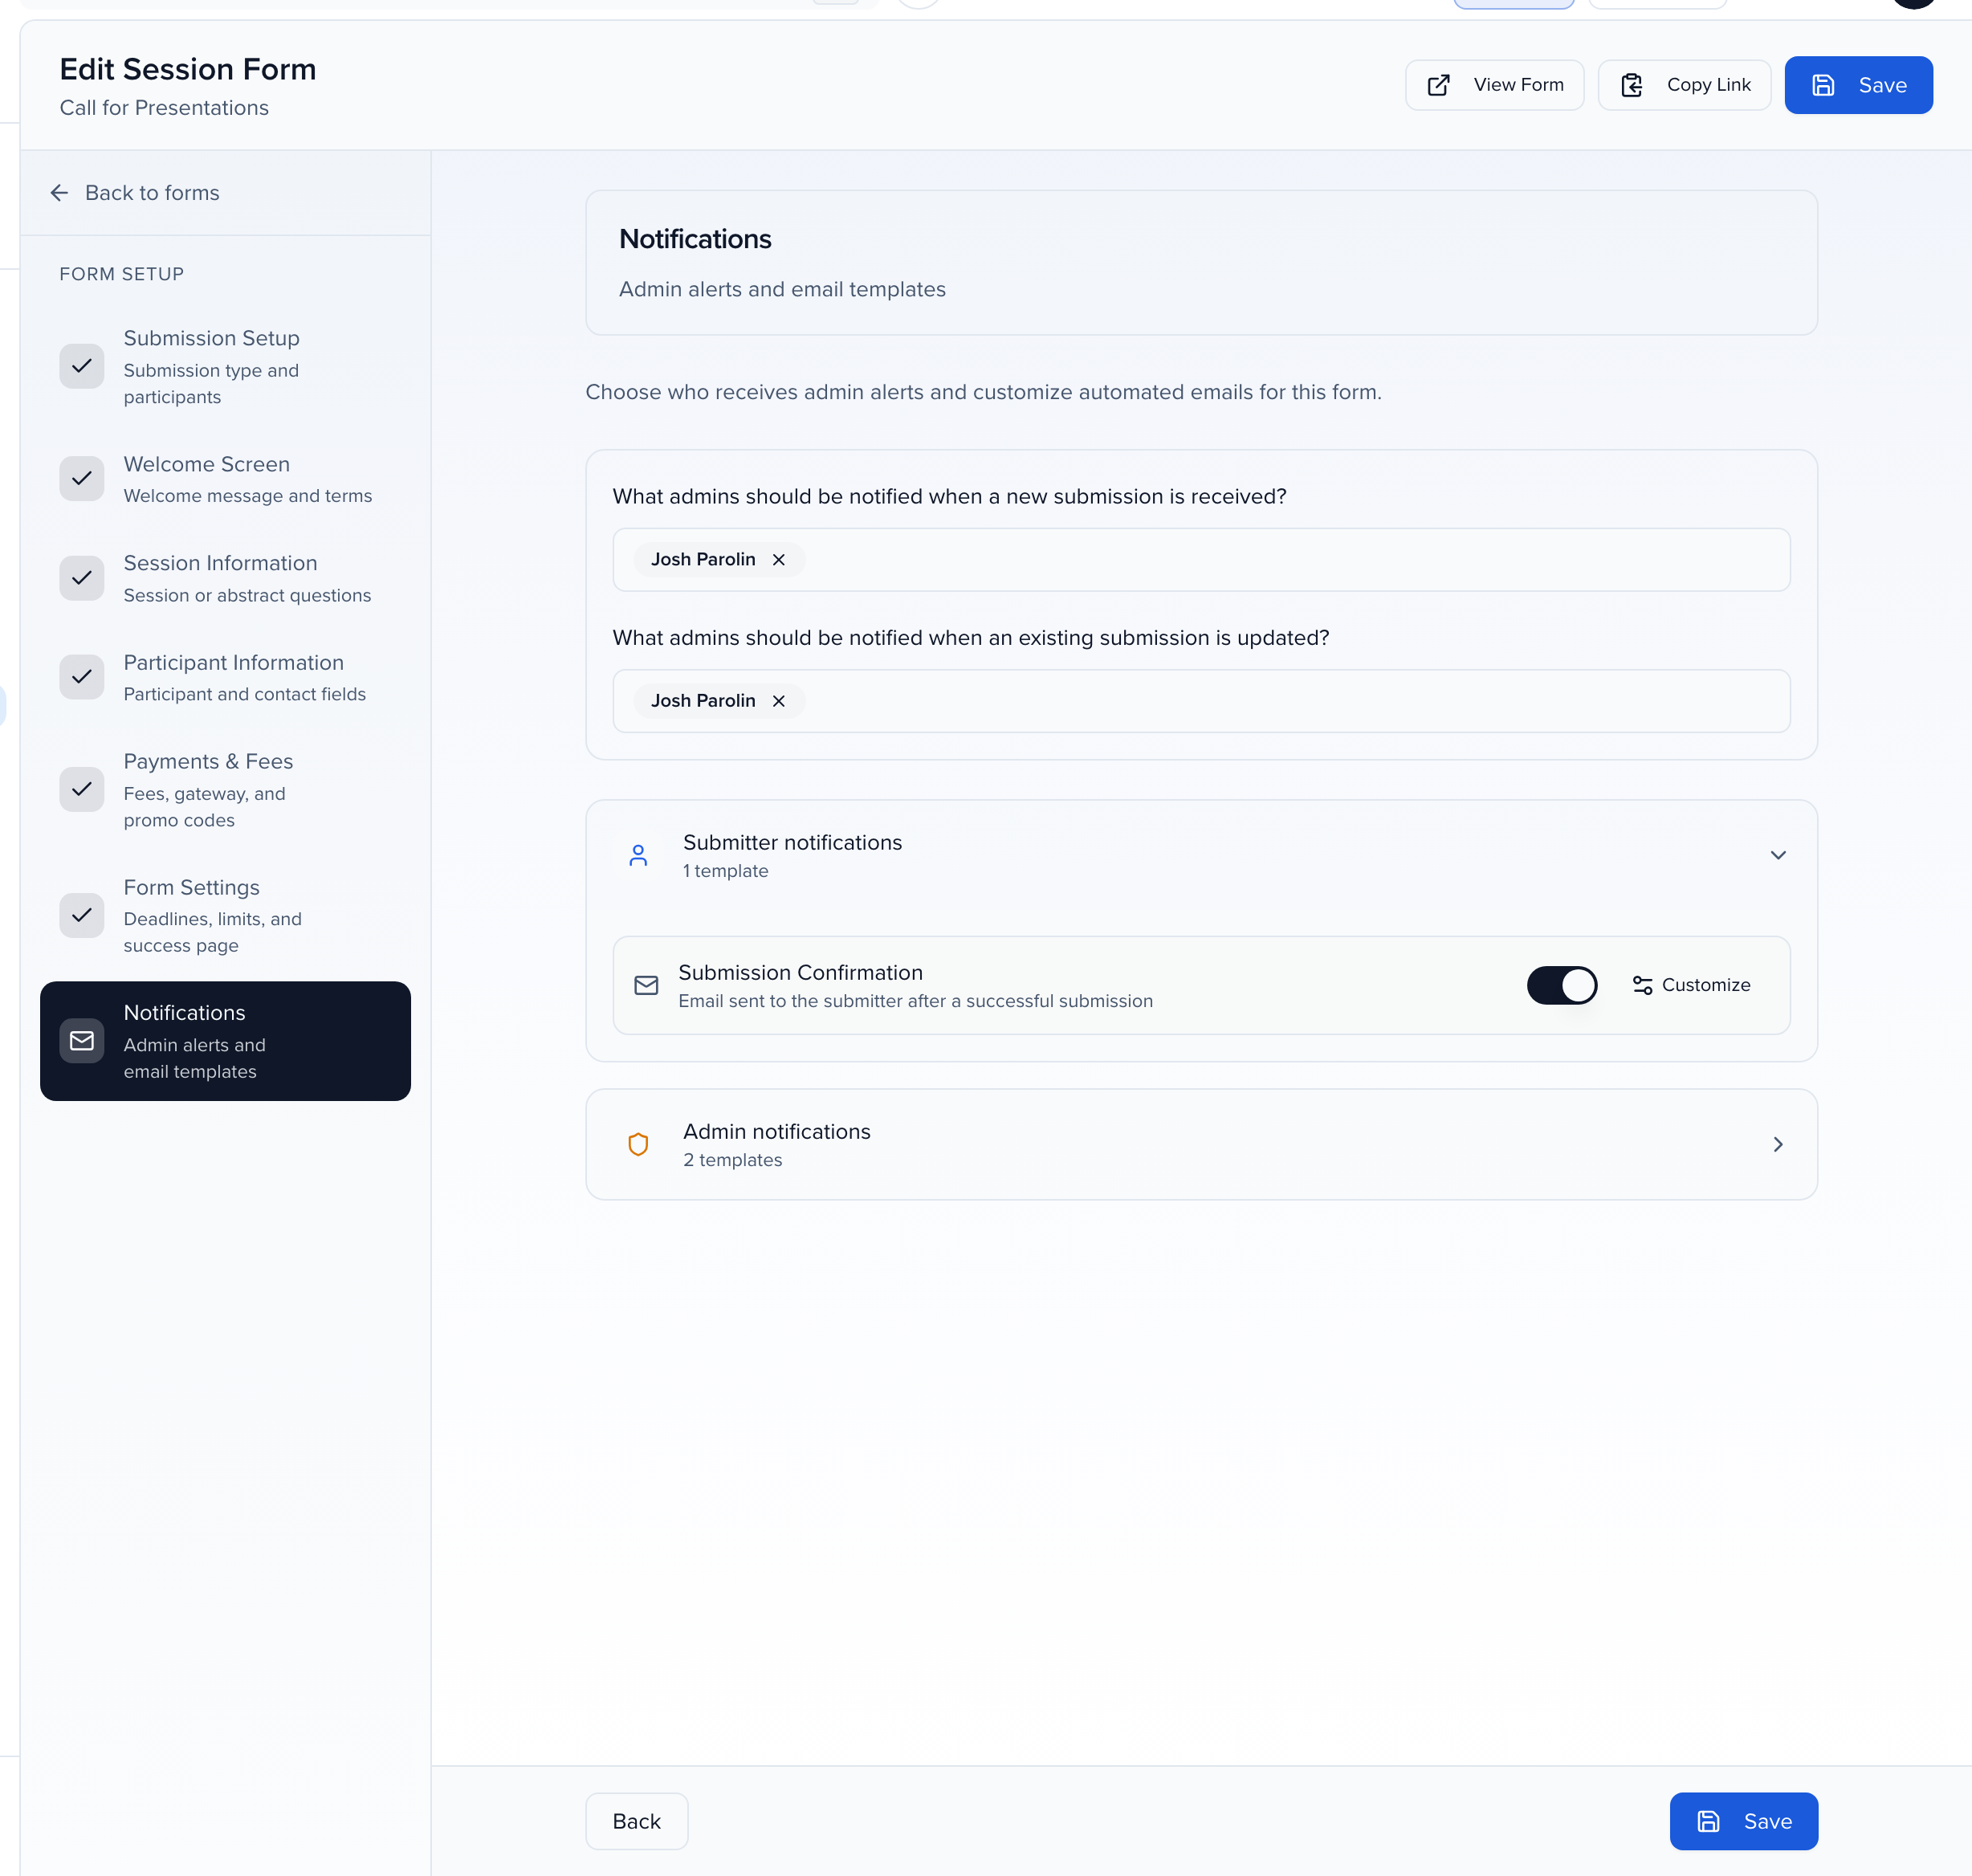
Section titled “Notifications”The last step is who hears about submissions. Pick the event team members to notify — any role except Portal User — when a new submission is received and when an existing submission is updated. Under Submitter notifications, the Submission Confirmation email can be switched on or off and customized — from name, subject, and body with merge tags — and Admin notifications does the same for the emails your team receives.
The Submission Confirmation also goes to participants on any role where Send submission confirmation email is on. In every copy, the Submitter name merge tag is the person who submitted the session, so a moderator’s copy still says who submitted it. To greet each reader by their own name, use Recipient name instead — for example Dear Recipient name rather than Dear Submitter name.
The two admin emails — new submission and revision — offer a Session ID merge tag ({{session_id}}): the ID your team sees in the sessions grid, such as SESS-123, or SESS-12-3 for a subsession. It is in the default wording, so your team can find the submission even after a submitter retitles it.
Share the form
Section titled “Share the form”Once the form is ready there are two ways to put it in front of submitters: Copy Link on the forms list gives the public URL for your call-for-papers email, and the Program site lists every open form on a branded page where submitters can also track what they have sent in. With the form live, the next step is usually an evaluation plan to review what comes in.
Have Ask build it
Section titled “Have Ask build it”You can describe the form instead of clicking it together. Open Ask from the top bar — on Program → Forms or inside a form — and say what you need in your own words: “Create a call for papers form for session proposals with a Track dropdown (AI, Operations, Leadership), an abstract capped at 1,000 characters, a speaker dietary-requirements question, and close it on 15 January.”
Ask reads what the event already has before it changes anything. It reuses fields that already exist in Settings → Library rather than creating near-duplicates, creates the ones that are missing, places them on the right page of the form (session or participant), adds headers, dividers and text blocks, and sets show-when rules the same way the question rules do. It can also set the form’s settings: open and close dates, who is notified, submission limits, per-role participant limits, terms, confirmation messages, and the submitter and affiliations sections.
Every change shows up as a card in the conversation with Approve and Reject before it is made. Opening or closing the form for submissions is confirmed every single time, since that is the moment the public link starts or stops accepting submissions. Fees, translations, sub-sessions and Who can submit rules stay in the form builder.
The result is an ordinary form: open it in the builder to check the questions, and use View Form to walk through it as a submitter.
Question tools
Section titled “Question tools”Customize question
Section titled “Customize question”Use Customize question to change how a field appears to submitters without changing the field itself.
- Custom Label — the name they see.
- Help Text — extra guidance under the field.
- Length Limit (text fields) — set a Minimum and/or Maximum length and choose whether to Count in Characters or Words. Submitters see a live counter under the field (for example “45 / 100 words”). An answer outside the limits blocks the step it sits on, so a submitter has to fix it before moving forward rather than discovering it at the end on Submit. The message names the field and the limit — “Answer is too long”, with “Abstract must be 100 words or fewer (currently 150)” beneath it — and matches what the server says if the answer reaches it. Leave both blank for no limit.
- Show character count (short and long text fields) — on by default, it shows submitters how many characters they have used, such as 3/255. Turn it off to hide the counter: the field’s maximum still applies, typing stops at the limit, and the submitter sees Limit of 255 characters reached when they get there.
- Maximum file size (file fields) — the size advertised on the form, up to 5 GB. Leave blank to inherit the field default (up to 5 GB). Session Files settings do not apply to this form. A video uploaded to a file question gets a copy for streaming (up to 720p) automatically, a minute or two after upload. Reviewers on your Site and your team in the admin file viewer watch that copy, so a large original doesn’t pause to load; Download always gives the original. Replacing or removing the video removes its copy.
- Show only some options on this form (dropdowns and multi-selects on the session step, including Track, Format, Level, Language and Tags) — tick the options this form offers. Another form can offer a different set from the same field, and the admin session page still shows every option. A submission that already holds an option you later hide keeps it, and the submitter can resubmit with it. Leave it off to offer every option. While it is on, Save stays unavailable until the options have loaded (Loading options…) and at least one current option is ticked; with none ticked the dialog says Pick at least one option, or turn this off. If the options can’t be loaded, it says The options could not be loaded. Close and reopen this question to try again, or turn this off. A saved selection whose options have all since been deleted counts as none ticked, so the form never falls back to offering every option without you choosing it.
- Accepted file types (optional) (file fields) — tick the formats this question takes, such as PDF only. Leave every box unticked to accept anything. Submitters see the list in the hint under the field, and a file that isn’t one of those types is rejected — Sessionboard reads the file’s contents, so renaming it doesn’t get it through. See Restrict a file question to certain file types.
On Headshot and Logo, Help Text you write is the only line under the field. Sessionboard does not add a second “Images only (up to 5 GB)” hint beneath it. If Help Text is empty, submitters see a type-and-size hint from the field’s accepted types and this Maximum file size — for example “Images only (up to 2 MB)”, or “Images only (up to 5 GB)” when size is blank.
Other file fields still show the type-and-size hint even when they also have Help Text.
The photo editor still enforces participant headshot limitations (formats, dimensions, and the event file-size cap). Those limits do not change the hint.
Edit field
Section titled “Edit field”Edit field changes the field itself — its type, options, description — everywhere it is used, on every form and every record. Use Customize question when the change should apply to this form only.
Use question rules
Section titled “Use question rules”Question rules (conditional logic) show or hide questions based on earlier answers, so one form can take in several session types: Format is Workshop shows duration and room setup, Format is Poster hides them.
Rules can hang off these field types:
- Checkbox
- Dropdown
- Number
- Country
On a dropdown, a second tab, Answer option rules, hides or shows individual answers instead of the whole question — including on Tags, Track, Format, Level and Language, whose answers come from Program settings. See Show or hide individual answer options.
Question rules only hide or show questions. To write other field values when the submission is saved, use an Assignment Field Rule.
Layout elements
Section titled “Layout elements”Add Field → Add Section Element inserts structure between questions:
- Section Header — a heading that groups related questions (255 characters).
- Divider — a line between groups.
- Rich Text — a block of formatted text, links, or images.
Event merge tags in form content
Section titled “Event merge tags in form content”Form content can reference the event by name instead of hard-coding it — useful when you duplicate a form for next year’s event or copy it between events.
Use Insert Merge Tag in the rich-text toolbar (or type the tag directly) anywhere in the form’s written content: the welcome screen, page titles and descriptions, section headers, rich text blocks, and the confirmation message.
| Merge tag | Renders as |
|---|---|
| {{event_name}} | The event’s name |
| {{event_slug}} | The event’s URL slug |
Submitters see the resolved value on the public form. Anything that isn’t a recognized tag is left exactly as you typed it.
Multi-language submissions
Section titled “Multi-language submissions”Form Settings → Languages lets submitters switch the form into another language.
How well each language is translated
Section titled “How well each language is translated”Sessionboard ships maintained translations of the form’s own wording — buttons, navigation, validation messages — for English, French, Spanish, and German. Any other language you enable is machine-translated when the form loads. It is not professionally localized and nobody reviews it, so treat that wording as a best effort. Anything with no translation available falls back to English.
The Auto-translate the following options decide which of your own content is machine-translated: page headers, titles, descriptions and terms; field labels without a saved translation; placeholders and dropdown values; and the confirmation message.
Right-to-left languages
Section titled “Right-to-left languages”Enable a right-to-left language — Arabic, Hebrew, Persian, Urdu, Pashto, Kurdish, Divehi, Yiddish — and a submitter who picks it gets the form laid out right to left, not just translated. Text aligns from the right, and the reading order follows the language. Switch back to a left-to-right language and the form returns to normal.
Regional codes resolve to the same direction, so ar and ar-SA both read right to left. This applies anywhere portal translations are on: the submission form, the portal itself, and follow-up forms.
Add a translated field to the form
Section titled “Add a translated field to the form”Language variants you have enabled can go on the form itself, next to the default-language field.
In Add Field, a field that has variants appears as one collapsed row with a globe icon and a chevron. Click the row to expand it, and the translated versions of that field are listed underneath — click the one you want to add it. A variant you cannot find in the list is usually sitting inside a collapsed parent rather than missing.
Search finds variants as well as parents. Type the translated name and the field surfaces even though its row shows the default-language name, or type a locale code such as ar to narrow the list to fields that have an Arabic variant. When your search matches exactly one field through its variant, that row opens expanded, so the entry you searched for is the one you see.
Replace or unrequire a locked standard field
Section titled “Replace or unrequire a locked standard field”Some standard fields carry a Locked badge, so they cannot be made optional or removed. Title is the one organizers hit most often.
The lock lifts as soon as a translated variant of that same field is on the form. Add the Arabic Title beside the English one, and the English Title’s Required switch becomes editable and Remove from form appears. That is the supported way to make Title optional, or to replace the English Title with the translated one. Take the variant back off the form and the field locks again.
Hover the Locked badge and it says so, which saves guessing — the explanation appears only when that field actually has a translated variant available to add.
What a multi-language submission stores
Section titled “What a multi-language submission stores”When a submitter fills in only the translated Title or Description — German only, say — Sessionboard also copies that text into the default-language Title and Description. The session never shows up untitled in lists, the agenda or exports. The translated value is stored as that language’s variant as well.
Sessionboard also records the language the form was filled in. The session sidebar shows it next to the form name, for example Submitted via Call for Papers 2027 · German, and the Public API returns it too — see which language a submission came in. To fill in the other language across your submissions, use the Update language value automation action.
Common questions
Section titled “Common questions”What event teams ask while building their first call for sessions, with the section or article that answers each.
Should we use a submission form, an application form, or a portal form?
A submission form is for content decisions: it collects the speaker and the session, abstract, or poster they propose, and feeds Submissions, Evaluation, and the agenda. An application form is a yes/no about a person or company (scholarships, volunteers, invited-speaker confirmations). A portal form collects details from people already in the event. Interest forms source speakers year-round at the organization level. Which form should I use? compares all of them.
One form or several?
Start with one. Question rules (conditional logic) show different questions by session type or any dropdown answer, so one form can carry general sessions, workshops, and posters. Create a second form when the audiences need different open and close dates, different welcome copy, or a different confirmation flow. Each form has its own dates, submission limit, default status, and notifications, and you can Duplicate one from its ellipsis menu.
Which fields should be required, and which can we leave optional?
Title is always required on the session step, and First Name, Last Name, and Email on the participant step; everything else is your choice per field. Make required only what you need to evaluate the proposal (title, abstract, format, track) and collect the rest, such as headshots, full bios, AV needs, and disclosures, as portal tasks after acceptance, when the speaker has a reason to finish them. Use Customize question to set length limits and help text, and question rules to show a question only when it applies.
Can we change the wording, order, logo, and branding submitters see?
Yes. The Welcome Screen carries your introduction; each step has its own title and instructions; Customize question sets a custom label and help text per field; and questions are reordered by dragging them in the builder. The event logo from Event Details appears on the form, portal, and emails (see event images and dimensions). Event merge tags let the form text reference the event name without retyping it (event merge tags in form content).
Can submitters save a draft and come back, or edit after they submit?
Drafts are built in: a submitter can leave and return to the form, and draft submissions are listed under View Drafts. Turn on Send Reminder Email with a close date and drafts are chased five days and one day before it closes. After submitting, speakers edit their session from their portal for as long as the form is open and the portal allows it; the Close Date refuses edits as well as new submissions. See can end users submit more than one submission? for limits.
Why does the form ask new submitters for a password?
The submission form signs people in with email and password, or SSO, and it only decides which one after it sees the email. The account step opens on Get started with Your Email Address: and Next. Someone new to Sessionboard then sees Create account: Create a password:, First Name, Last Name and the terms checkbox. Someone who already has a Sessionboard account, from any event, sees Log in with your existing account and Enter your existing password:, with Forgot your password? if they don’t remember it.
That is why a test with your own address always asks for a password you already have. To see what a first-time submitter sees, use an email address that has never had a Sessionboard account, in a private browser window. If the event signs people in by magic link only (Username & password off in Settings > Portal Login), the form asks for the email and offers Email me a sign-in link instead of a password; the link brings the person back to the form signed in. See portal login methods.
Once someone is signed in, the account step ends with You are logged in as and the name and email the submission will be saved under, with Log out beside it. If the same browser is signed in to a speaker portal as someone else — common when your team tests the form while logged in to admin — the form saves under that portal account and names it there. Log out, or use a private window, to submit as a different person.
What happens to speaker and co-author records — will we get duplicates?
Every person on a submission becomes a contact, matched on email address. The Unique Contact Settings on the Participant Information step decide whether a submitter may enter new information for an existing contact or whether that contact must log in to update it themselves, and whether existing contacts are notified that they were added. If duplicates still appear, merge duplicate contacts. Custom participant roles (co-author, moderator) are defined in program settings and offered on the form.
How does the form connect to sessions, the portal, and speakers?
A completed submission creates the session record (in the form’s Default status for new submissions) and the participant contacts, links them, and sends the confirmation email with a link to the speaker portal. From there the session moves through evaluation and accept or decline; accepted sessions appear on the agenda and in the portal. Turning View Session Submission Form from Portal on in the portal settings lets speakers reopen their submission.
How do we share and test the form?
Copy Link from the form’s ellipsis menu gives the public URL; View Form opens it in a new tab. Submit a test proposal with a personal address before you announce it, then delete the test session and contact. See how do I share my submission form?.
Who is emailed when a submission arrives?
The submitter receives the Submission Confirmation email from the Notifications step. Admins you list there are emailed when a new submission arrives and when one is edited. Status changes later (accept, decline) are sent through automated emails and email templates.
Who can be picked to receive submission notifications?
Anyone on the event team with a role other than Portal User — custom roles included, not only admins. A track chair or committee member who should hear about new submissions needs to be invited to the event team first; then they appear in the What admins should be notified when a new submission is received? list. Give them a custom role if they should see only some sessions.
We turned on participant emails after submissions came in. How do we reach the people already added?
Send them an email yourself. Send submission confirmation email on a role, and Notify existing contacts that they have been added to a submission, only email people when a submission is made after you turn them on; nobody already on a submission is emailed retroactively.
- Open Program → Sessions and filter to the sessions submitted so far.
- Select them (Select all takes the whole list) and click Send Emails in the bar above the table.
- Under Who should receive this email?, choose All Participants or a single role.
- Insert the Portal Login Link (Hyperlink) merge tag so each person signs in to their own portal, then review and send.
See Email moderators and chairpersons for the same flow in more detail.
Why can't I add Location to my submission form?
Location is assigned by your team, so it is not offered in Add Field on a session submission form. The same goes for Status, Notes, Capacity and CEU Credits; speakers and other participants are added on the Participant Information step instead. Starts At and Ends At can go on the form.
To ask submitters for a room or venue preference, create a custom dropdown field — name it something like Preferred room so it isn’t mistaken for Location — and add it to the form. Your team then sets the real Location on each session, or by dragging it into a room on the agenda.
How do I reopen a form after it closed, including a v1 form?
A form closes on its Close Date. To take submissions again, open the form, go to Form Settings → Deadlines, set a later Close Date and save. If you use conditional deadlines under Advanced, move those dates too, since a matching rule’s date replaces the main one.
A form with a v1 badge works the same way once you can edit it. If your event starts more than 60 days from now, a v1 form is view-only: choose Convert to V2… from the form’s menu first — the form is converted in place and its links keep working — then change the close date. To keep it on v1, ask your Customer Success Manager to unlock v1 editing for the event. See Forms still on the older builder.
Can I get a deleted form back?
Yes, through support. Deleting a session form — or a portal form — hides it but does not erase it, and the sessions that came in through it stay in your event. Restoring isn’t available inside your event, so email support@sessionboard.com with the event name and the form’s name. Support restores the form as it was: same name (no “Copy:” prefix), same fields and settings, and a portal form keeps the portals it was assigned to. A form can’t be restored while its event is deleted.
What does the submission count on a form card include?
The submissions number on a card on Program → Forms counts every session that came in through that form and is still in the event, whatever its status — accepted, declined and waitlisted ones included. Sub-sessions submitted on the form and sessions brought in with a form-submission import count too.
It leaves out:
- Drafts, which have their own drafts number on the card.
- Deleted sessions.
- Sessions your team added directly on the Submissions page, since they didn’t come through the form.
So the card is usually higher than a report filtered to one status, and lower than the event’s total sessions. View Submissions in the card’s ⋯ menu opens the submissions list filtered to that form, so you can see which sessions make up the number.