

Awards pricing, payments & invoices
Why use it
Section titled “Why use it”Submission fees help an awards program cover its costs, and the pricing step lets you charge different amounts by date, category or promo code without anyone editing the program on cutoff day. Every payment becomes an invoice you can search and export. When your finance team asks about a charge, the Reconciliation tab shows whether your invoices and your gateway agree on it.
When to charge for submissions
Section titled “When to charge for submissions”Not every awards program requires a submission fee — but for those that do, Sessionboard lets you configure pricing directly within the program setup wizard (Step 4: Pricing) or later by clicking Edit on your Program Dashboard and choosing Pricing in the sidebar.
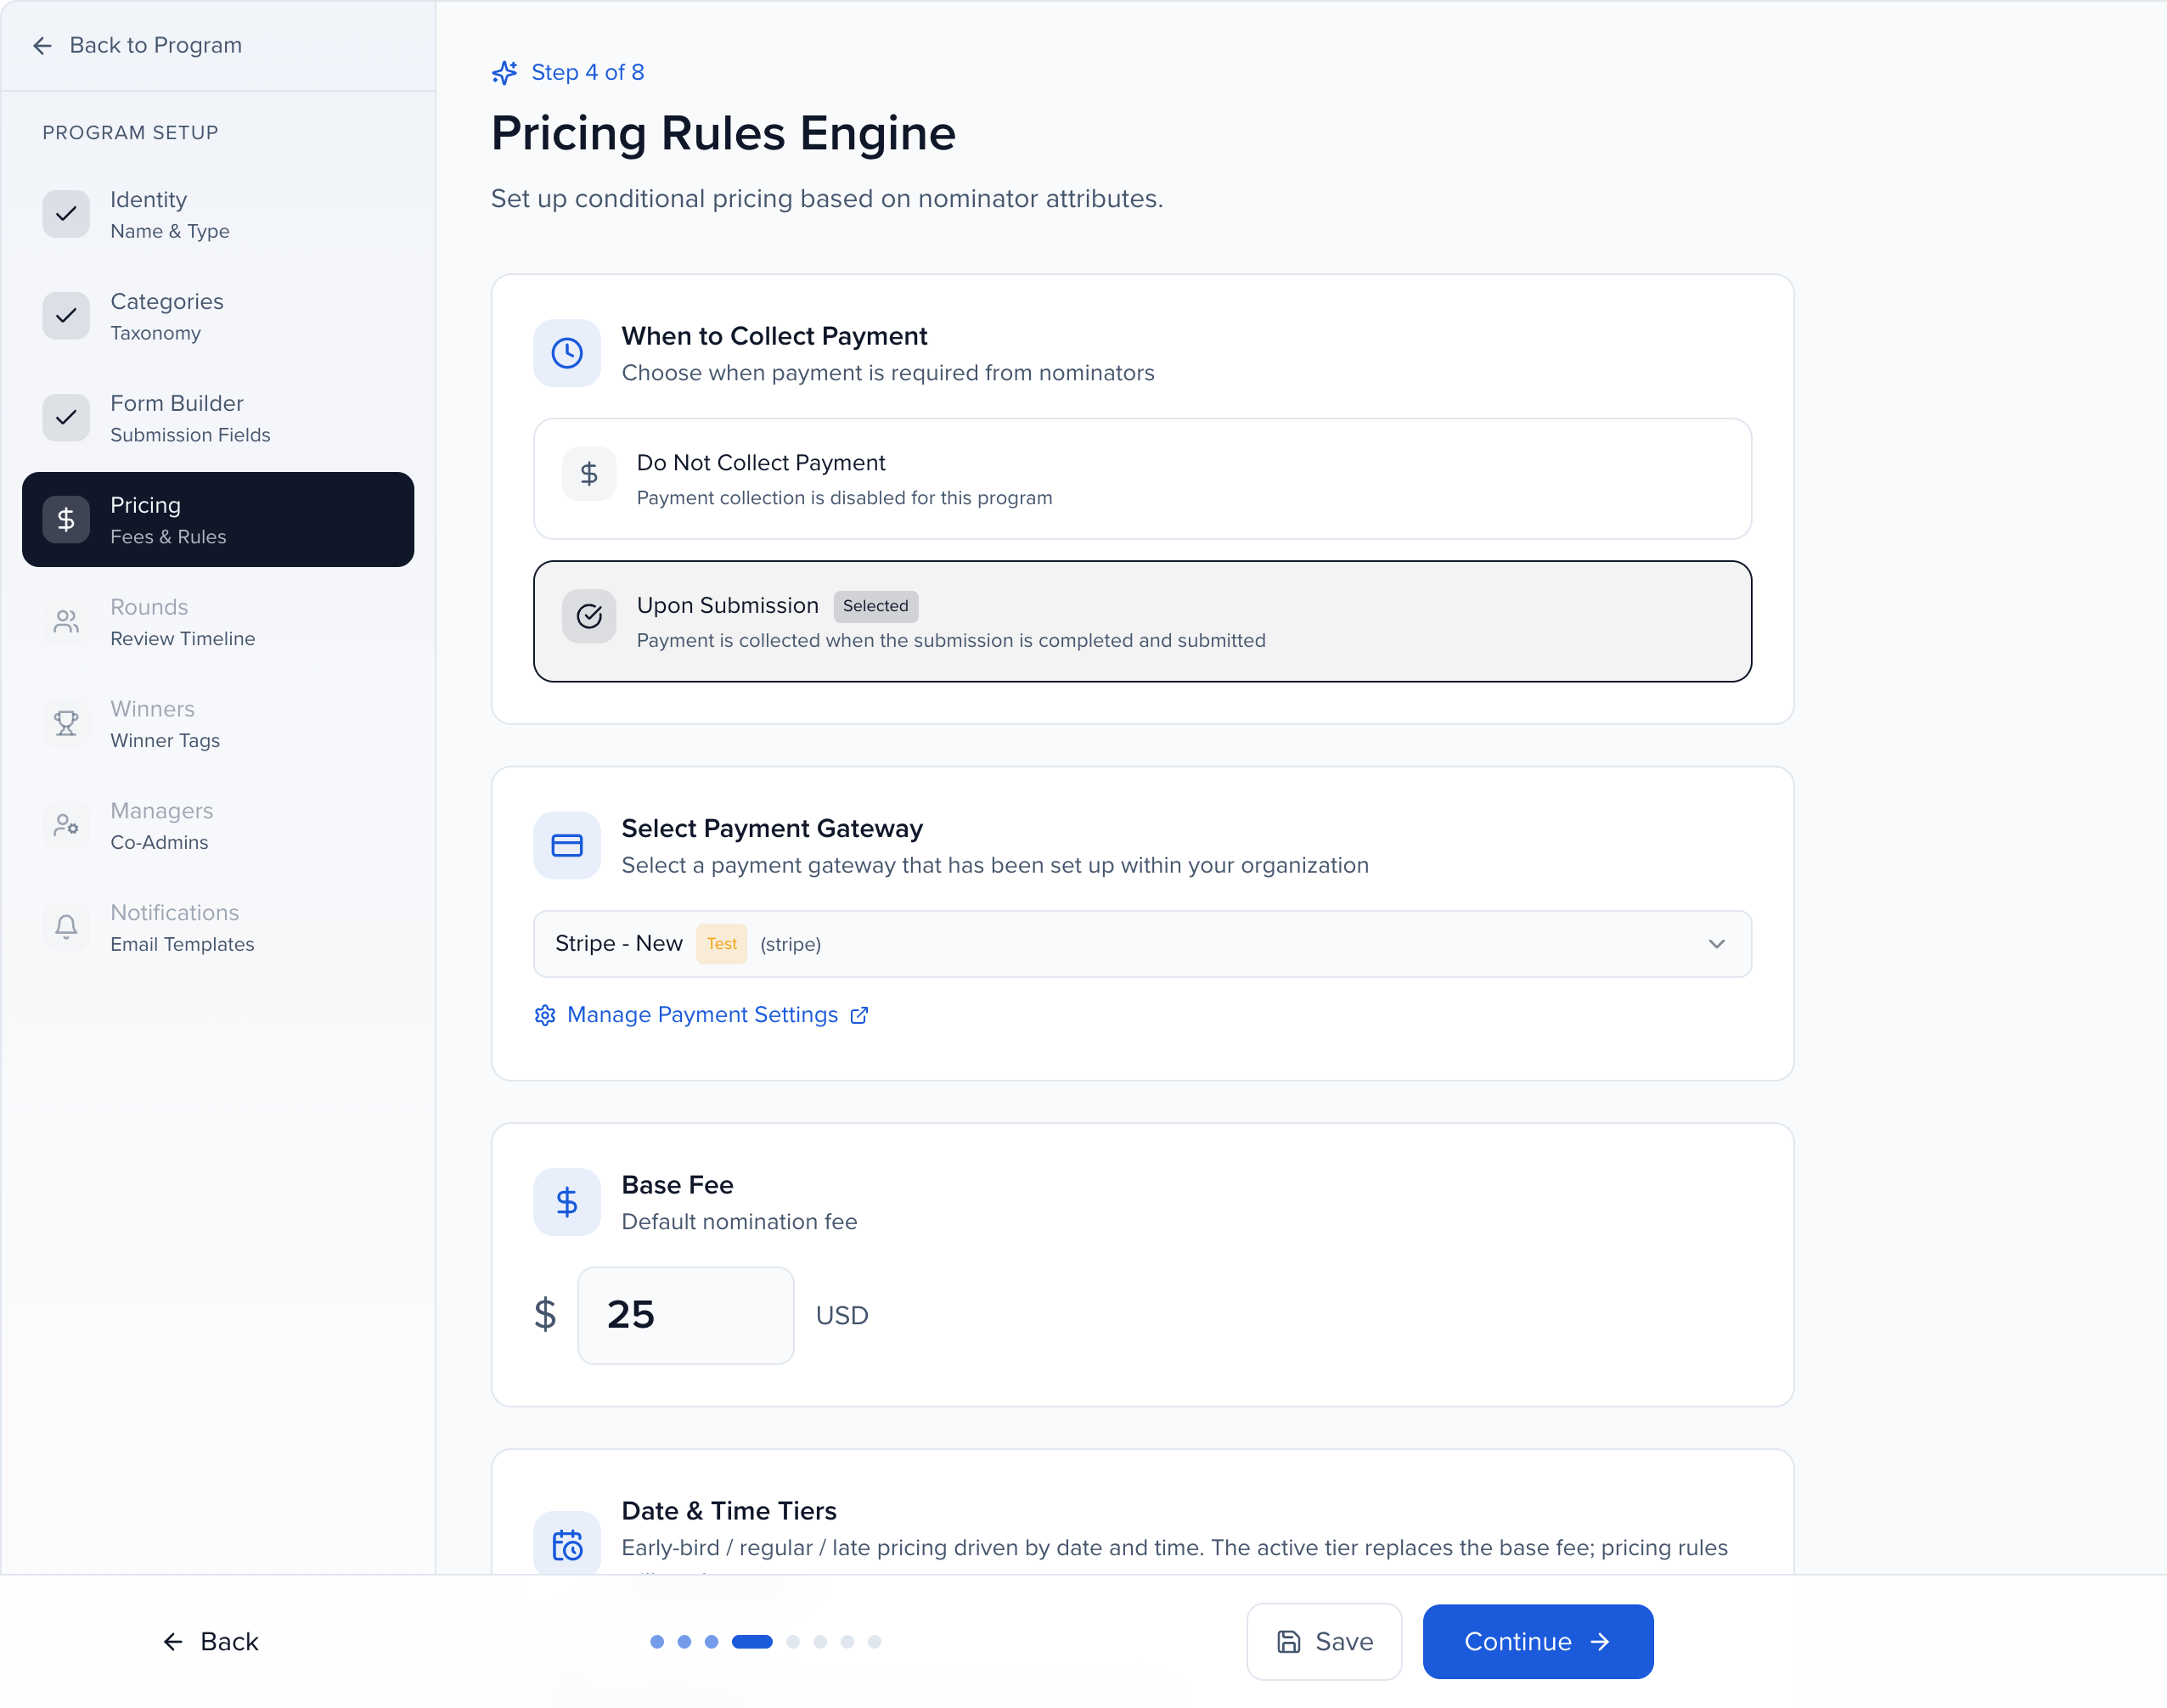
The first choice you will make is When to Collect Payment. There are two options:
- Do Not Collect Payment — Submissions are free. The rest of the pricing configuration is skipped entirely. You can always enable payment collection later by editing your program settings.
- Upon Submission — Payment is collected at the time the submitter completes and submits their entry. The submitter must complete payment before the submission is finalized.
Setting up a payment gateway
Section titled “Setting up a payment gateway”Before you can collect payments, you need a payment gateway connected to your organization. This is configured at the organization level, not per program — so once set up, any awards program in your organization can use it, and so can submission forms that charge a fee.
If no payment gateway is configured yet, the Pricing step will display a prompt with a Manage Payment Settings button. Clicking this takes you to your organization’s payment settings, where you can connect a gateway.
Once a gateway is available, select it from the Select Payment Gateway dropdown in the Pricing step. The selected gateway will process all transactions for this program.
Supported payment gateways
Section titled “Supported payment gateways”Sessionboard supports over 100 payment gateways. When adding a new gateway, you can choose from the following featured providers:
- Stripe — Cards, wallets, and bank transfers.
- Braintree — PayPal, Venmo, and cards.
- Authorize.net — Cards and eChecks.
- PayPal Commerce — PayPal, Pay Later, and Venmo.
- BluePay — Cards and ACH (Fiserv).
- BlueSnap — Cards.
For the full list, see Supported payment gateways.
If your preferred gateway is not listed, reach out to the Sessionboard team for assistance connecting it.
Adding a payment gateway
Section titled “Adding a payment gateway”Open your organization’s Settings → Payment Settings and click Add Gateway. The page lists your gateways with their provider, status, currencies, and last use, and shows how many are active, in test mode, and which currencies they cover.
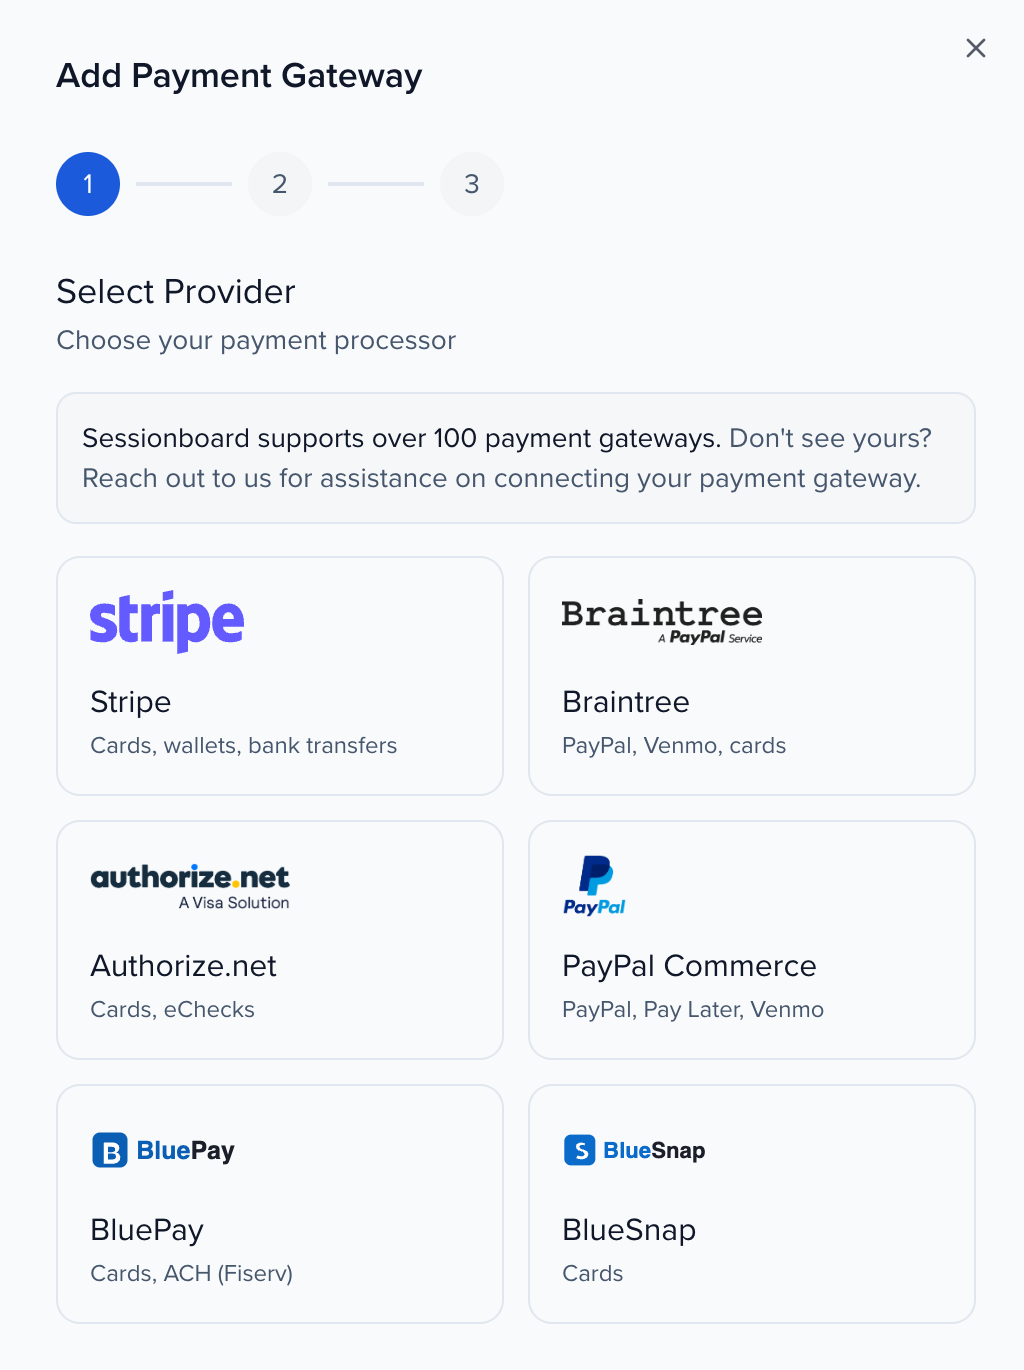
Adding a gateway takes three steps:
- Select Provider — Choose your payment processor from the provider cards.
- Configure Gateway — Enter a Gateway Nickname (a friendly name such as “Stripe - Awards”), paste the credentials your provider asks for (for Stripe, a Restricted API Key), and turn on Test Mode to use sandbox credentials while you test. Expandable Setup Instructions explain where to find the key.
- Currency Support — Pick the currencies this gateway accepts, click Test Connection to confirm the credentials work, then Add Gateway.
Configuring the base fee
Section titled “Configuring the base fee”The Base Fee is the default fee charged for every submission in this program. It appears at the top of the pricing configuration and is set as a fixed dollar amount (e.g., $50 USD).
To set or change the base fee, enter the amount in the Base Fee field. This fee applies to all submissions regardless of category or other conditions — think of it as the starting price before any pricing rules adjust it.
If your program is free, leave the base fee at $0 (or select “Do Not Collect Payment” in the step above).
Date & time tiers (early-bird pricing)
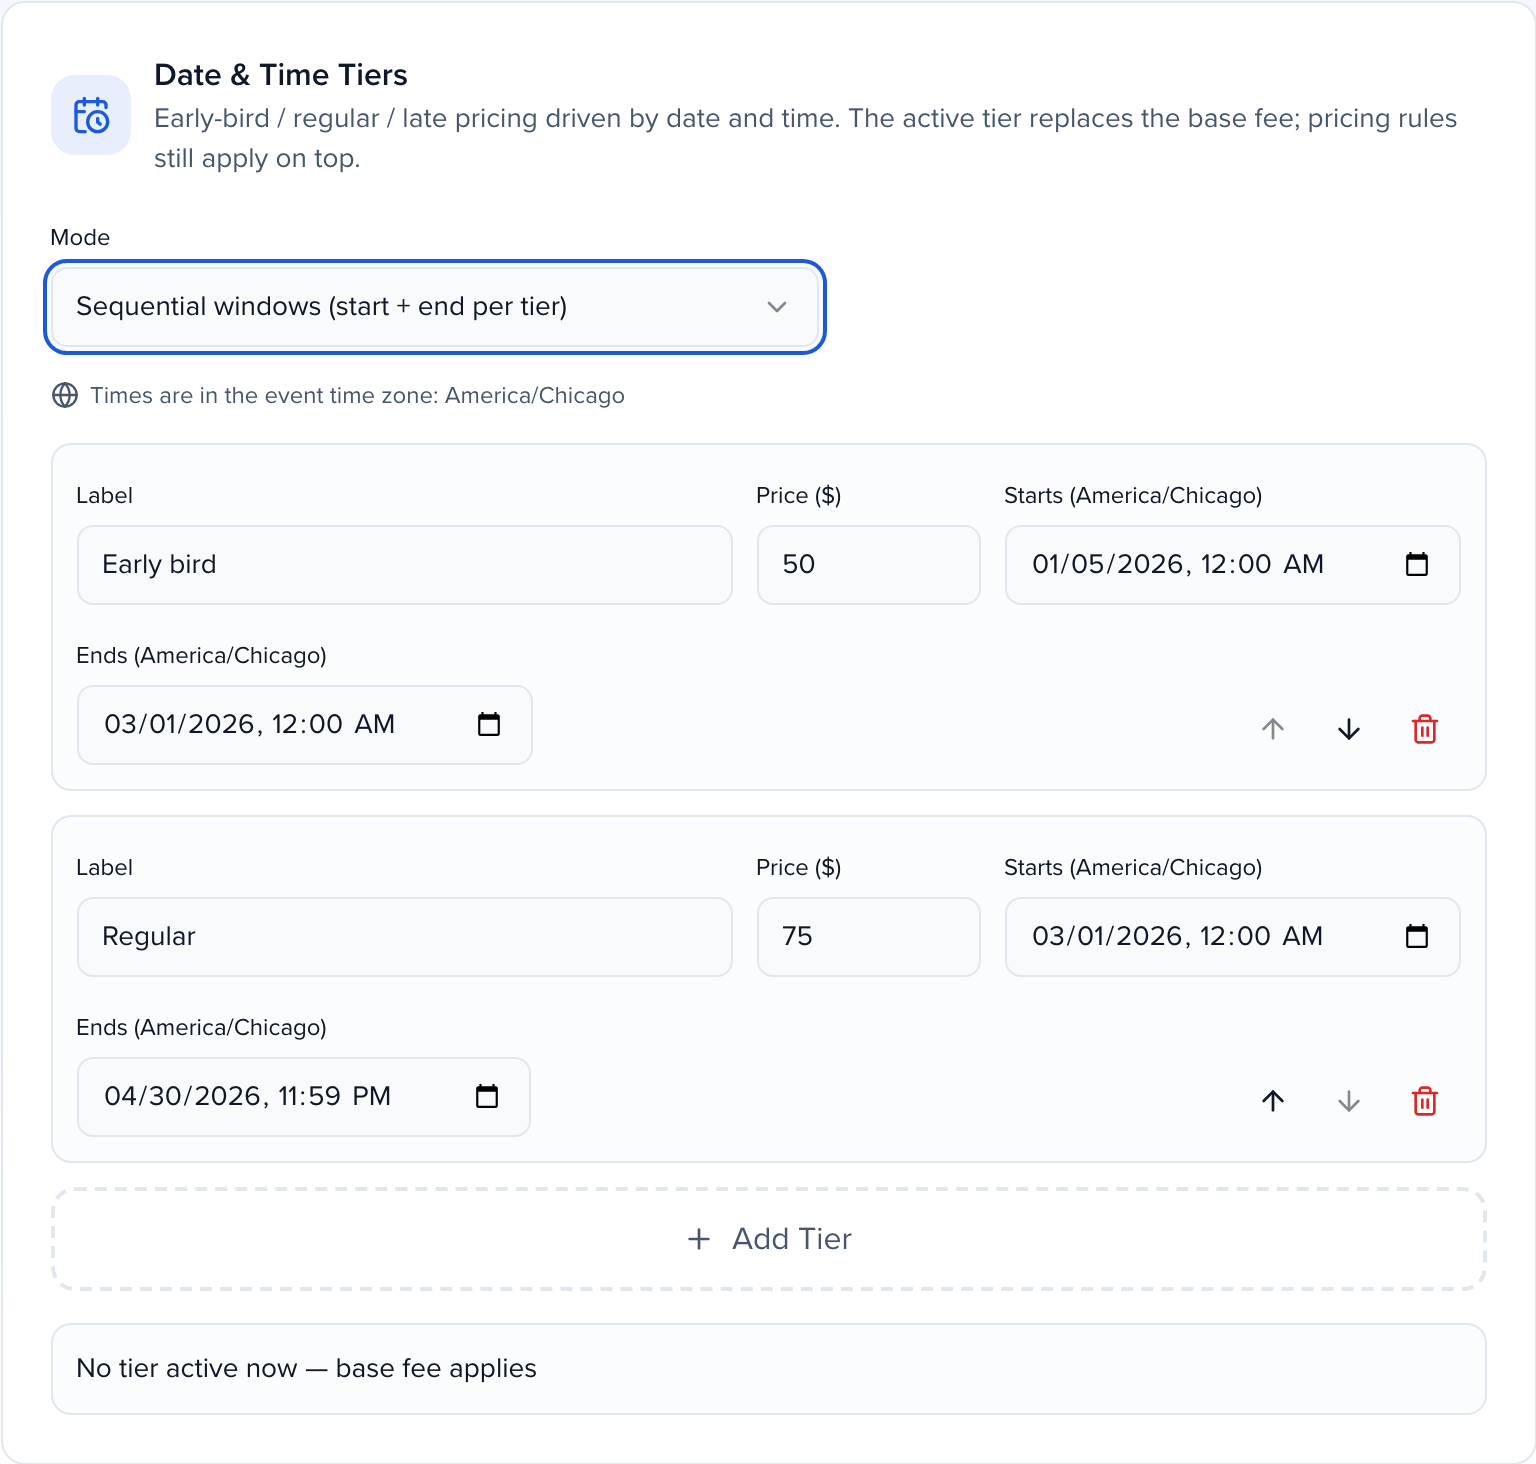
Section titled “Date & time tiers (early-bird pricing)”Date & Time Tiers let the submission fee change automatically on a schedule — early-bird, regular, and late pricing without anyone editing the program on cutoff day. While a tier is active, its price replaces the base fee; pricing rules, VAT rules, and promo codes still apply on top of the tier price, unless the tier is a flat fee (below).
Pick a mode from the Mode dropdown in the Date & Time Tiers section:
- Off — base fee only — No date-based pricing. This is the default.
- Sequential windows — Each tier has its own start and end date/time. The active tier is the one whose window contains the current moment. Windows cannot overlap; gaps are allowed, and the editor warns you about them (during a gap, the base fee applies).
- Cutoff dates — Each tier has a single cutoff. The price steps up after each cutoff passes — classic “prices go up March 1” behavior. Cutoffs must be in increasing order.
For each tier, set a Label (submitters see it at checkout, e.g. “Early bird”), a Price, and the date/time bounds for your mode. All times are interpreted in your event’s time zone, which the editor shows explicitly, and a status line tells you which tier is active right now.
Flat fee tiers
Section titled “Flat fee tiers”Each tier has a Flat fee switch, off by default. Turn it on when everyone should pay the same price during that tier, whatever their category: while a flat-fee tier is active, its price is the fee for every entrant and pricing rules do not apply. Promo codes and VAT rules still apply. When the tier ends, pricing goes back to the base fee or the next tier, with pricing rules on top.
For example, an Early bird tier of $50 with Flat fee on, and pricing rules that set Category A to $70, B to $80 and C to $100: every entrant pays $50 during the early-bird window, and $70, $80 or $100 by category after it ends. The switch is the same on submission form tiers.
When a tier is active at checkout, submitters see the tier price along with a note about when the current pricing ends (e.g. “Early bird pricing ends Mar 1, 2026”). If no tier matches — before the first window opens or after the last cutoff passes — the base fee is charged.
Pricing rules (conditional fees)
Section titled “Pricing rules (conditional fees)”Pricing Rules let you adjust the submission fee based on specific conditions. This is useful for scenarios like category-based pricing, early-bird discounts, or tiered fees based on submission attributes.
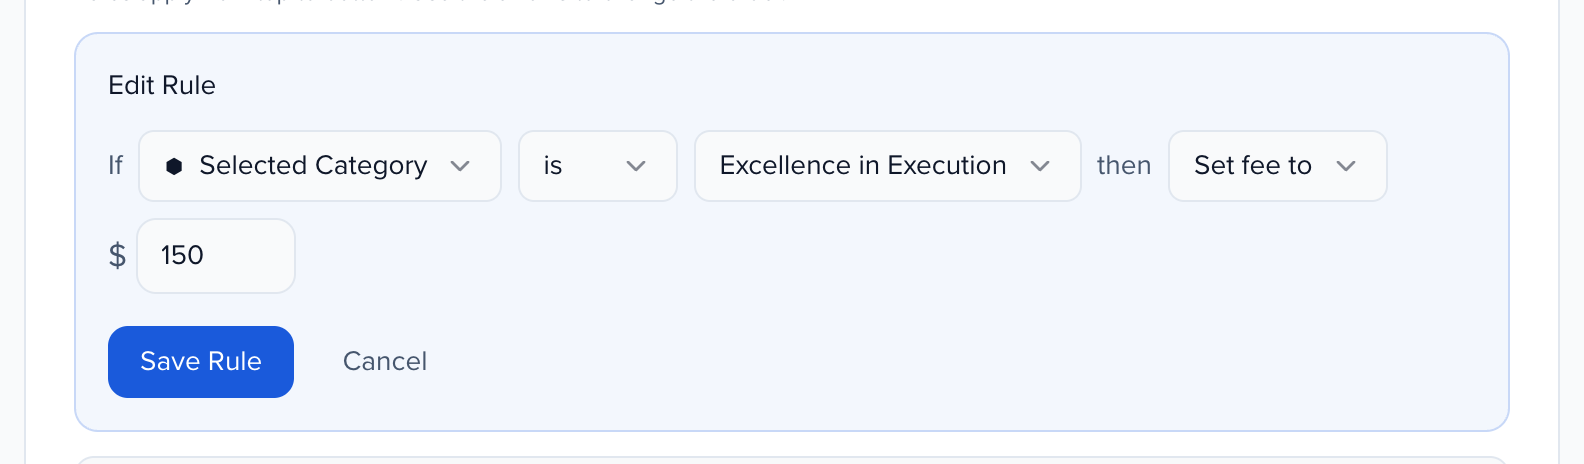
To add a pricing rule, click Add Rule in the Pricing Rules section. Each rule follows an If / then structure: pick a form field, a condition (is, is not, or contains) and a value — for example “Selected Category is Lifetime Achievement” — then define how the fee changes. The action can be one of three types:
- Set fee to — Overrides the base fee entirely with a specific dollar amount for matching submissions.
- Add — Adds a fixed amount on top of the base fee.
- Subtract — Reduces the base fee by a fixed amount (useful for discounts tied to specific conditions).
Pricing rules apply from top to bottom, on top of (or in place of) the base fee, so order matters: a Set fee to rule replaces whatever the rules above it produced, and an Add or Subtract rule below it adjusts the new amount. Use the up and down arrows on a rule to move it; the order is saved with the step and is the order the fee is calculated in.
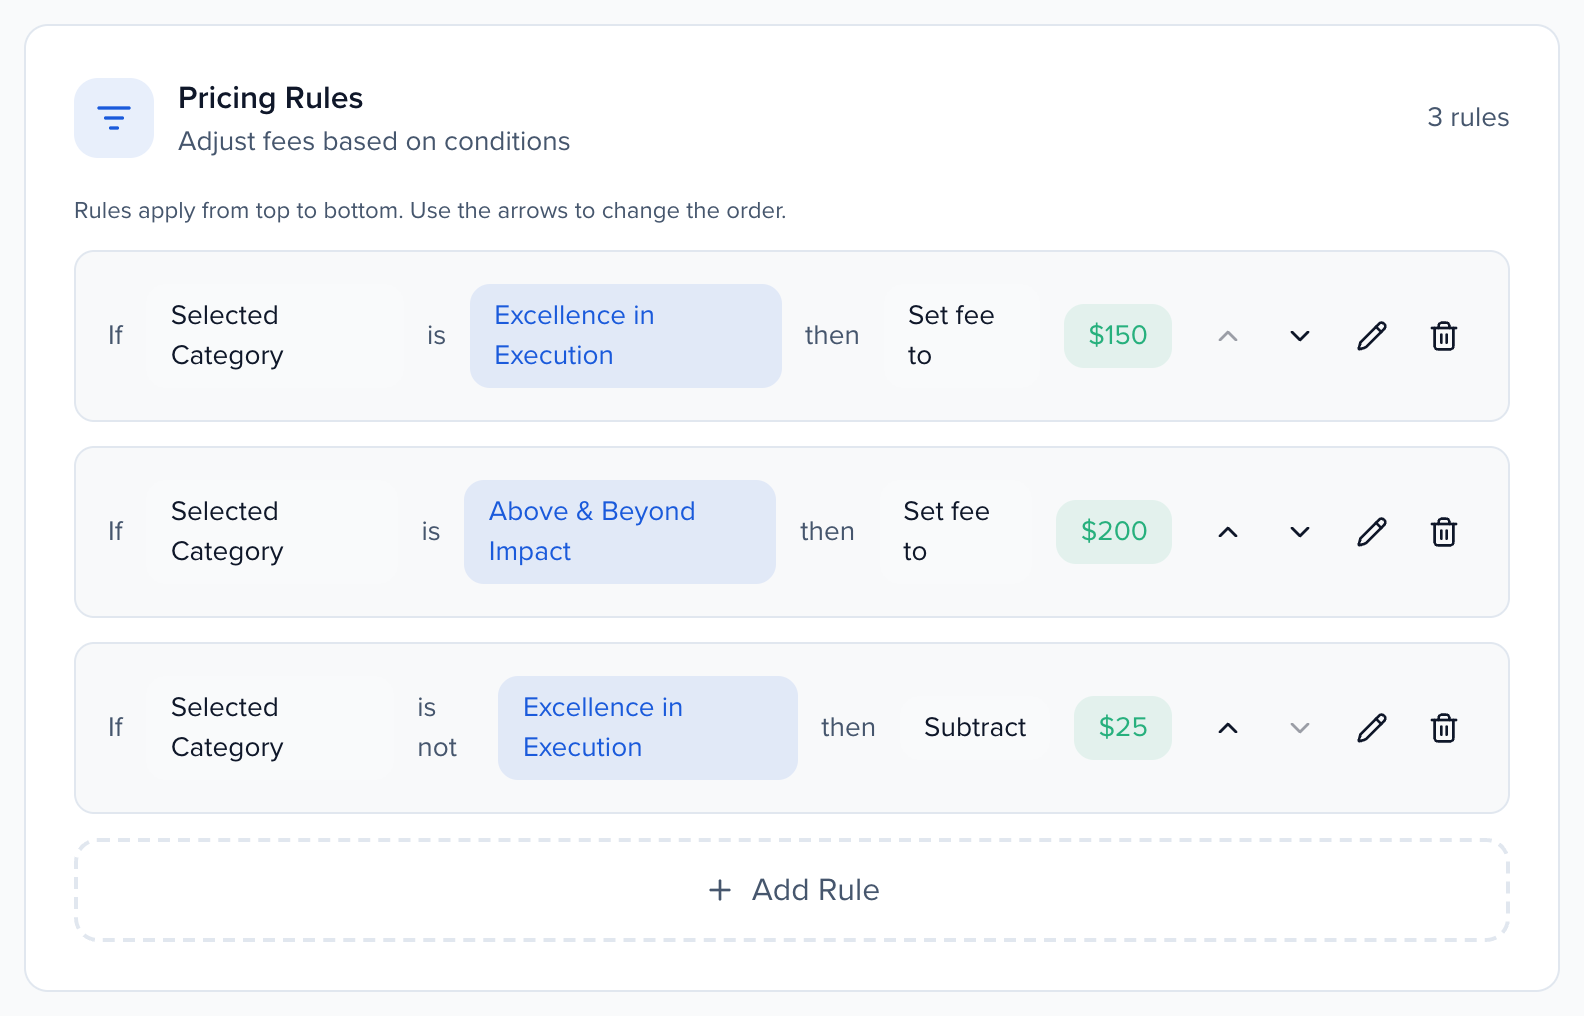
To change a rule, click its pencil icon. The rule opens in the builder with its current field, condition, value, action, and amount; change what you need and click Save Rule. The rule keeps its place in the list. Cancel leaves it as it was.
VAT rules
Section titled “VAT rules”If your organization needs to collect tax on submission fees, use the VAT Rules section to configure tax rates. VAT rules are applied to the overall total in a user’s cart after the base fee and any pricing rules have been calculated.
Click Add VAT Rule to create a new rule. Each rule requires a Label (e.g., VAT, GST, Sales Tax), a Type, and an Amount. The type can be either:
- Add additional % — Applies a percentage-based tax on top of the total (e.g., +20%).
- Add flat fee — Adds a fixed amount to the total regardless of the submission fee.
Promo codes
Section titled “Promo codes”Promo codes give you the ability to offer discounts to specific submitters. When a promo code is active, applicants can enter it at checkout to receive a reduced fee. If the program has no active promo code (none created, or all of them expired, not yet started or deleted), checkout doesn’t show the promo code box, so applicants aren’t left looking for a discount that doesn’t exist. It appears again as soon as a code is active.
To create a promo code, click Add Promo Code in the Promo Codes section at the bottom of the Pricing step. Enter a Code (the text string applicants will type at checkout, e.g., EARLYBIRD), select a Type, and set an Amount. The discount type can be:
- Percentage off — Reduces the submission fee by a percentage (e.g., 20% off).
- Flat amount off — Deducts a fixed dollar amount from the submission fee.
Managing invoices
Section titled “Managing invoices”Once your program collects payments, every transaction is tracked as an invoice. You can see them in two places:
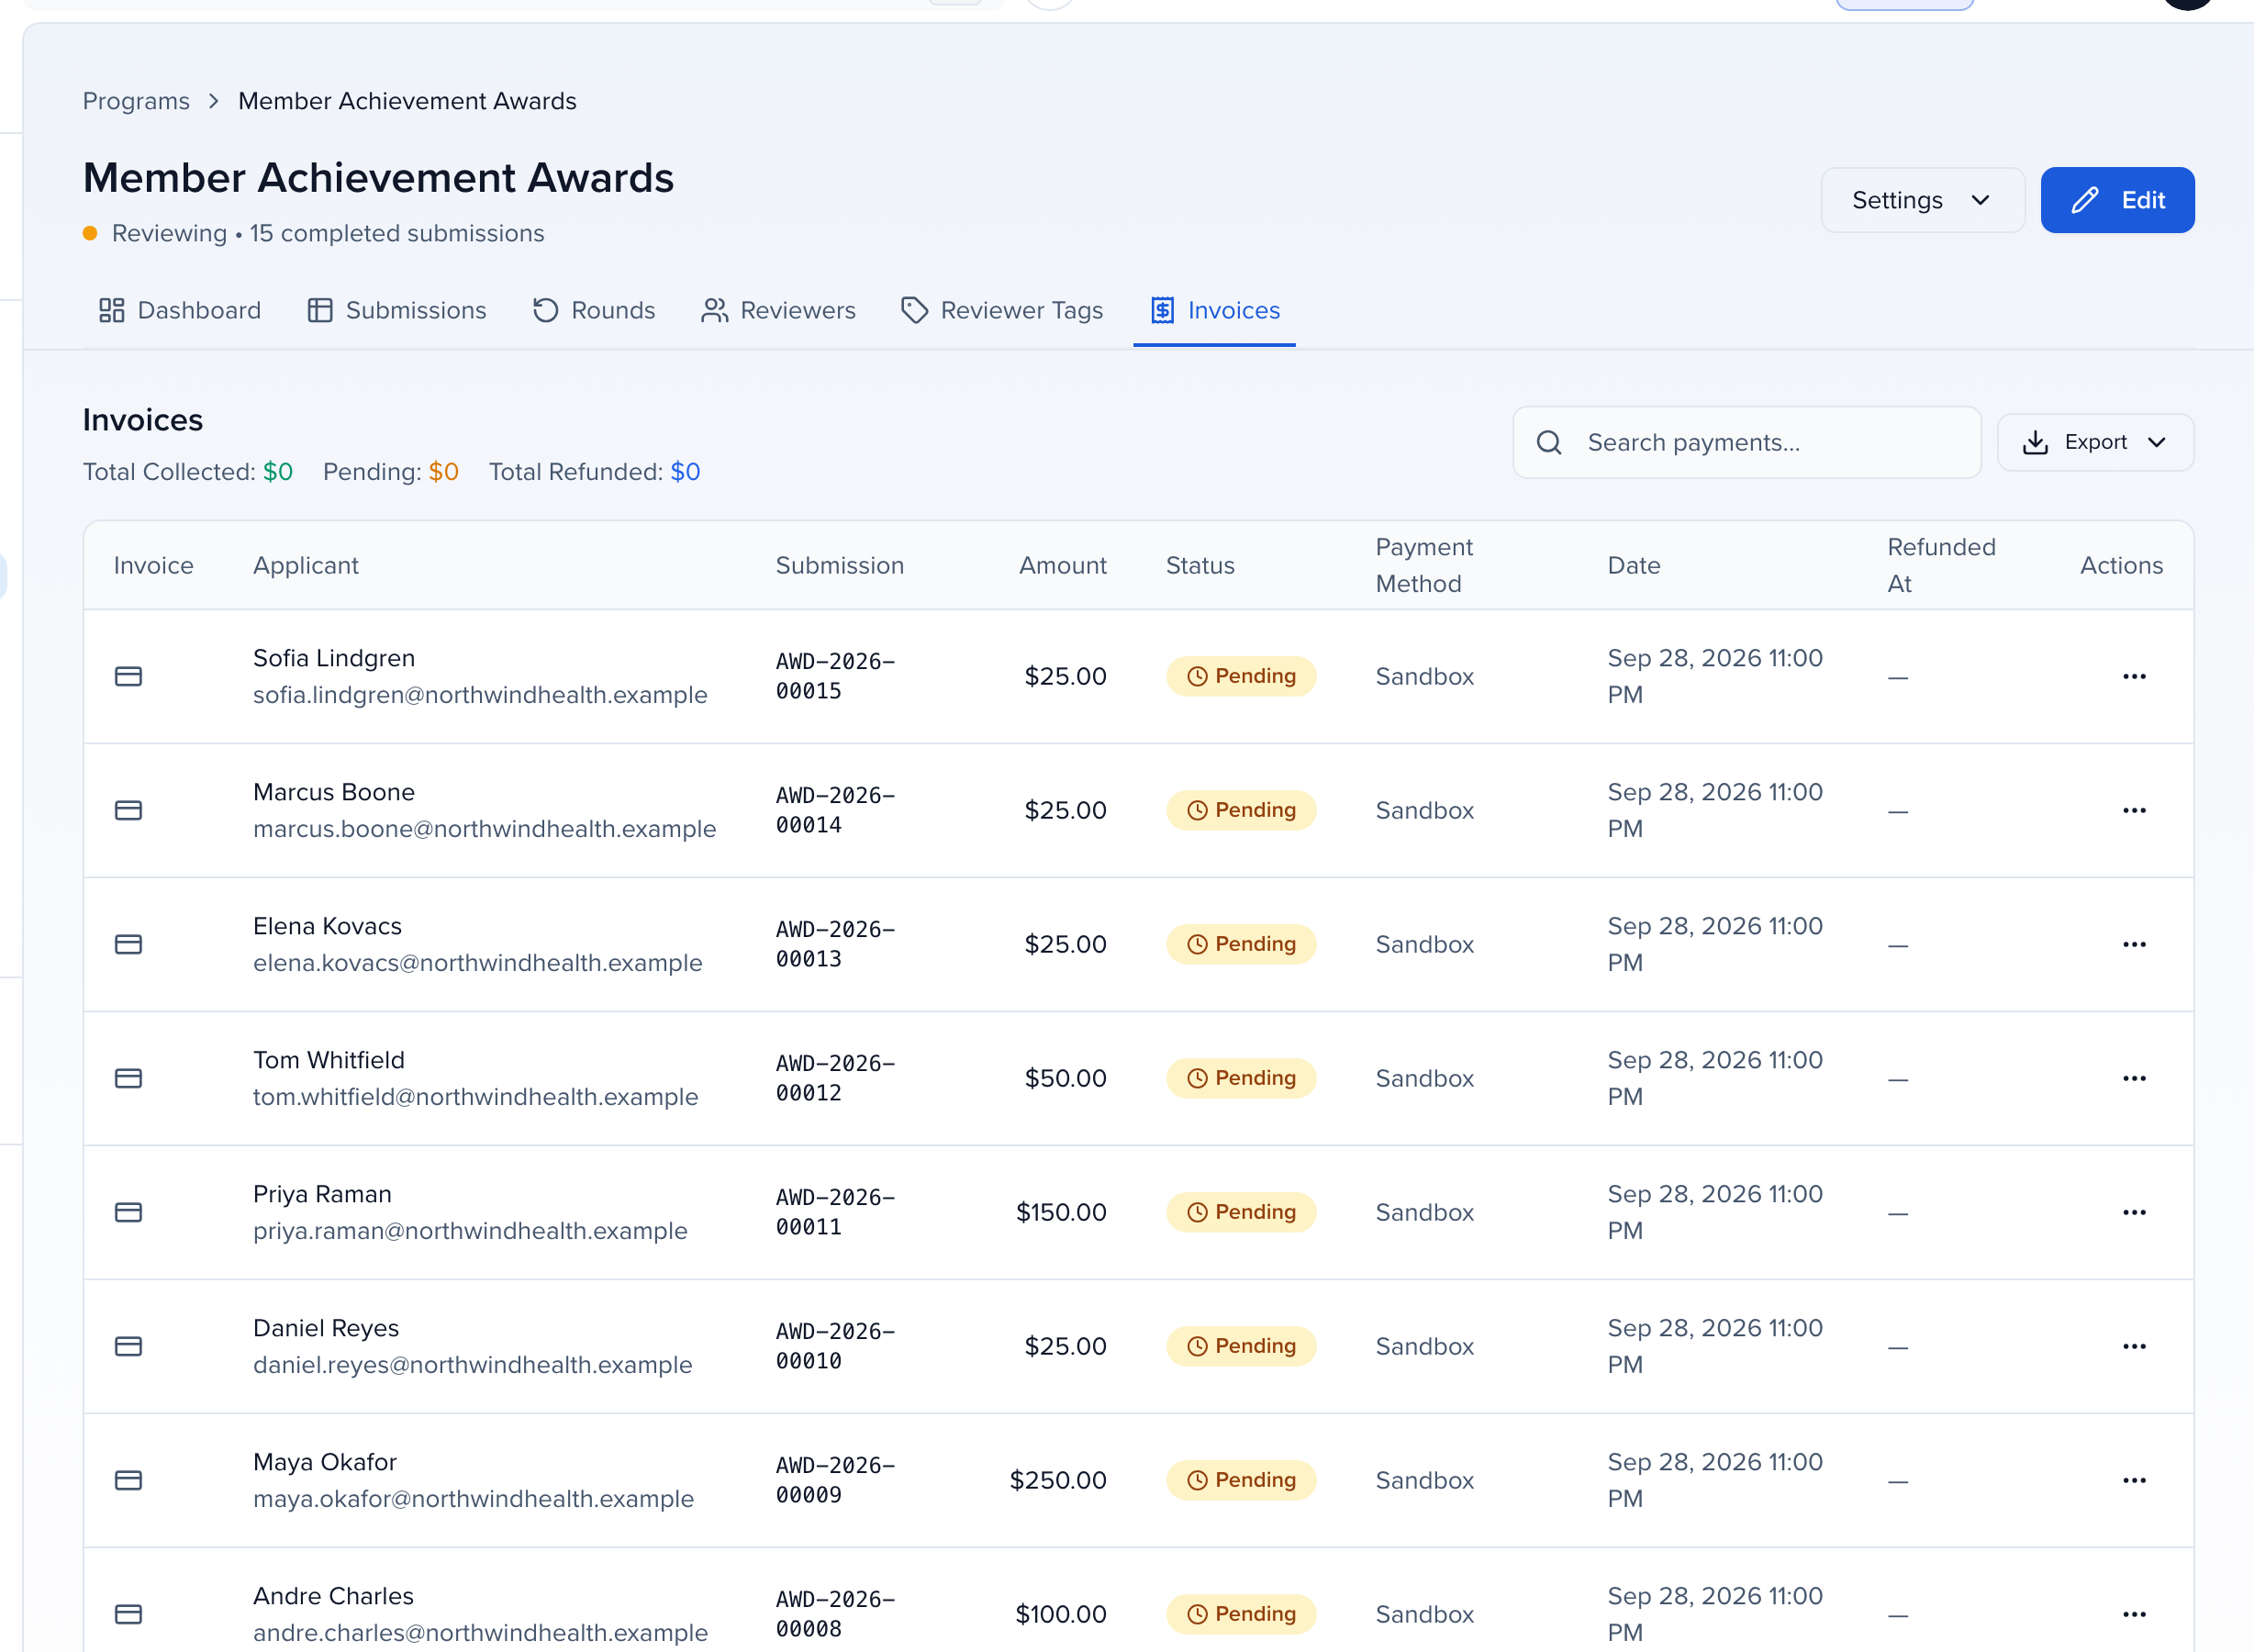
- Program-level: The Invoices tab on the Program Dashboard lists this program’s payments, with Total Collected, Pending, and Total Refunded above the table.
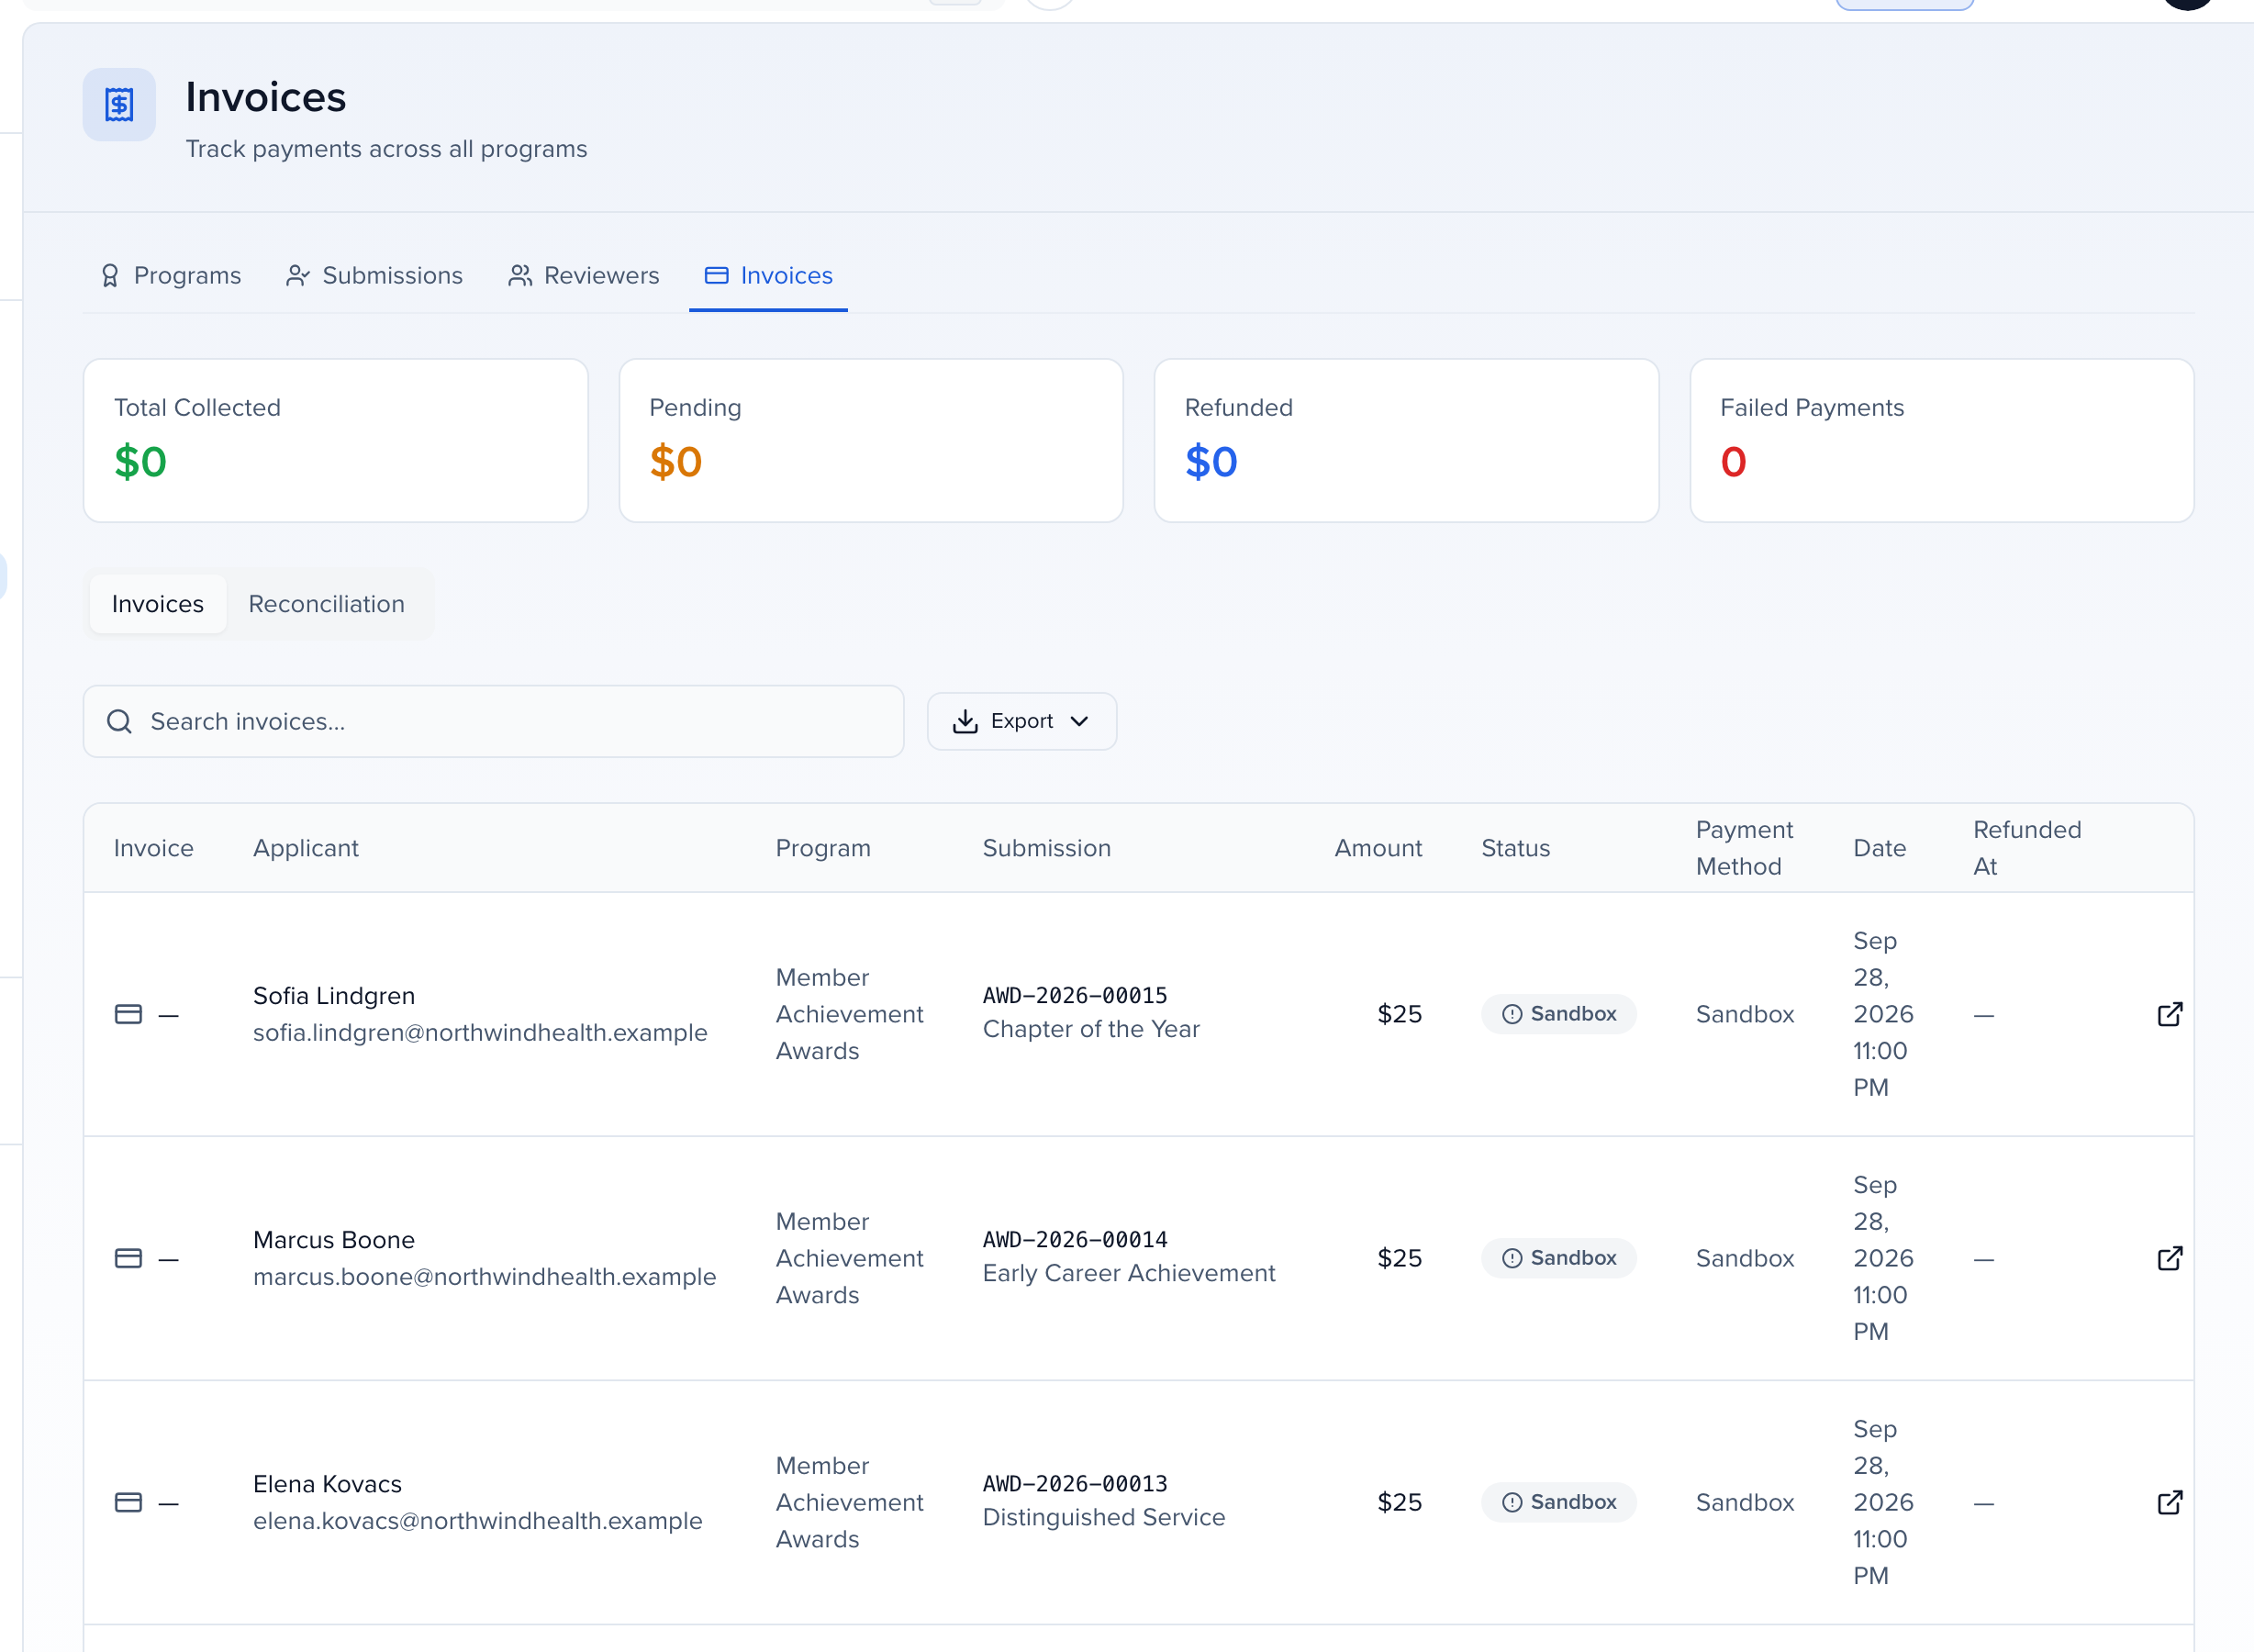
- Organization-level: From Program → Awards, click Invoices to see payments across all programs, with four summary cards: Total Collected, Pending, Refunded, and Failed Payments.
Each row shows the invoice number, applicant, submission ID, amount, status, payment method, date, and refund date. Use the search box to find an invoice, Export to download the list, and the row’s Actions menu to View Receipt. A submission’s own Invoices tab, in its detail sheet, shows the same payments for that one entry.
Refunds
Section titled “Refunds”If a submitter needs a refund — a duplicate entry or a withdrawn nomination, for example — contact support@sessionboard.com with the invoice number. Refunds go back through the gateway that took the original payment, and the invoice then shows a Refunded status and a Refunded At date, which also feeds the Refunded total.
Reconciling payments with your gateway
Section titled “Reconciling payments with your gateway”Your invoices are Sessionboard’s record of what was charged. Your payment gateway holds the money and keeps its own record of every transaction. The Reconciliation tab puts the two side by side, one row per payment, so you can see where they disagree — a card the gateway charged that your invoice records as failed, or an invoice marked paid that the gateway never settled.
Open it from Program → Awards → Invoices and select the Reconciliation tab. Events that collect fees on a submission form have the same tab on the event’s Invoices.
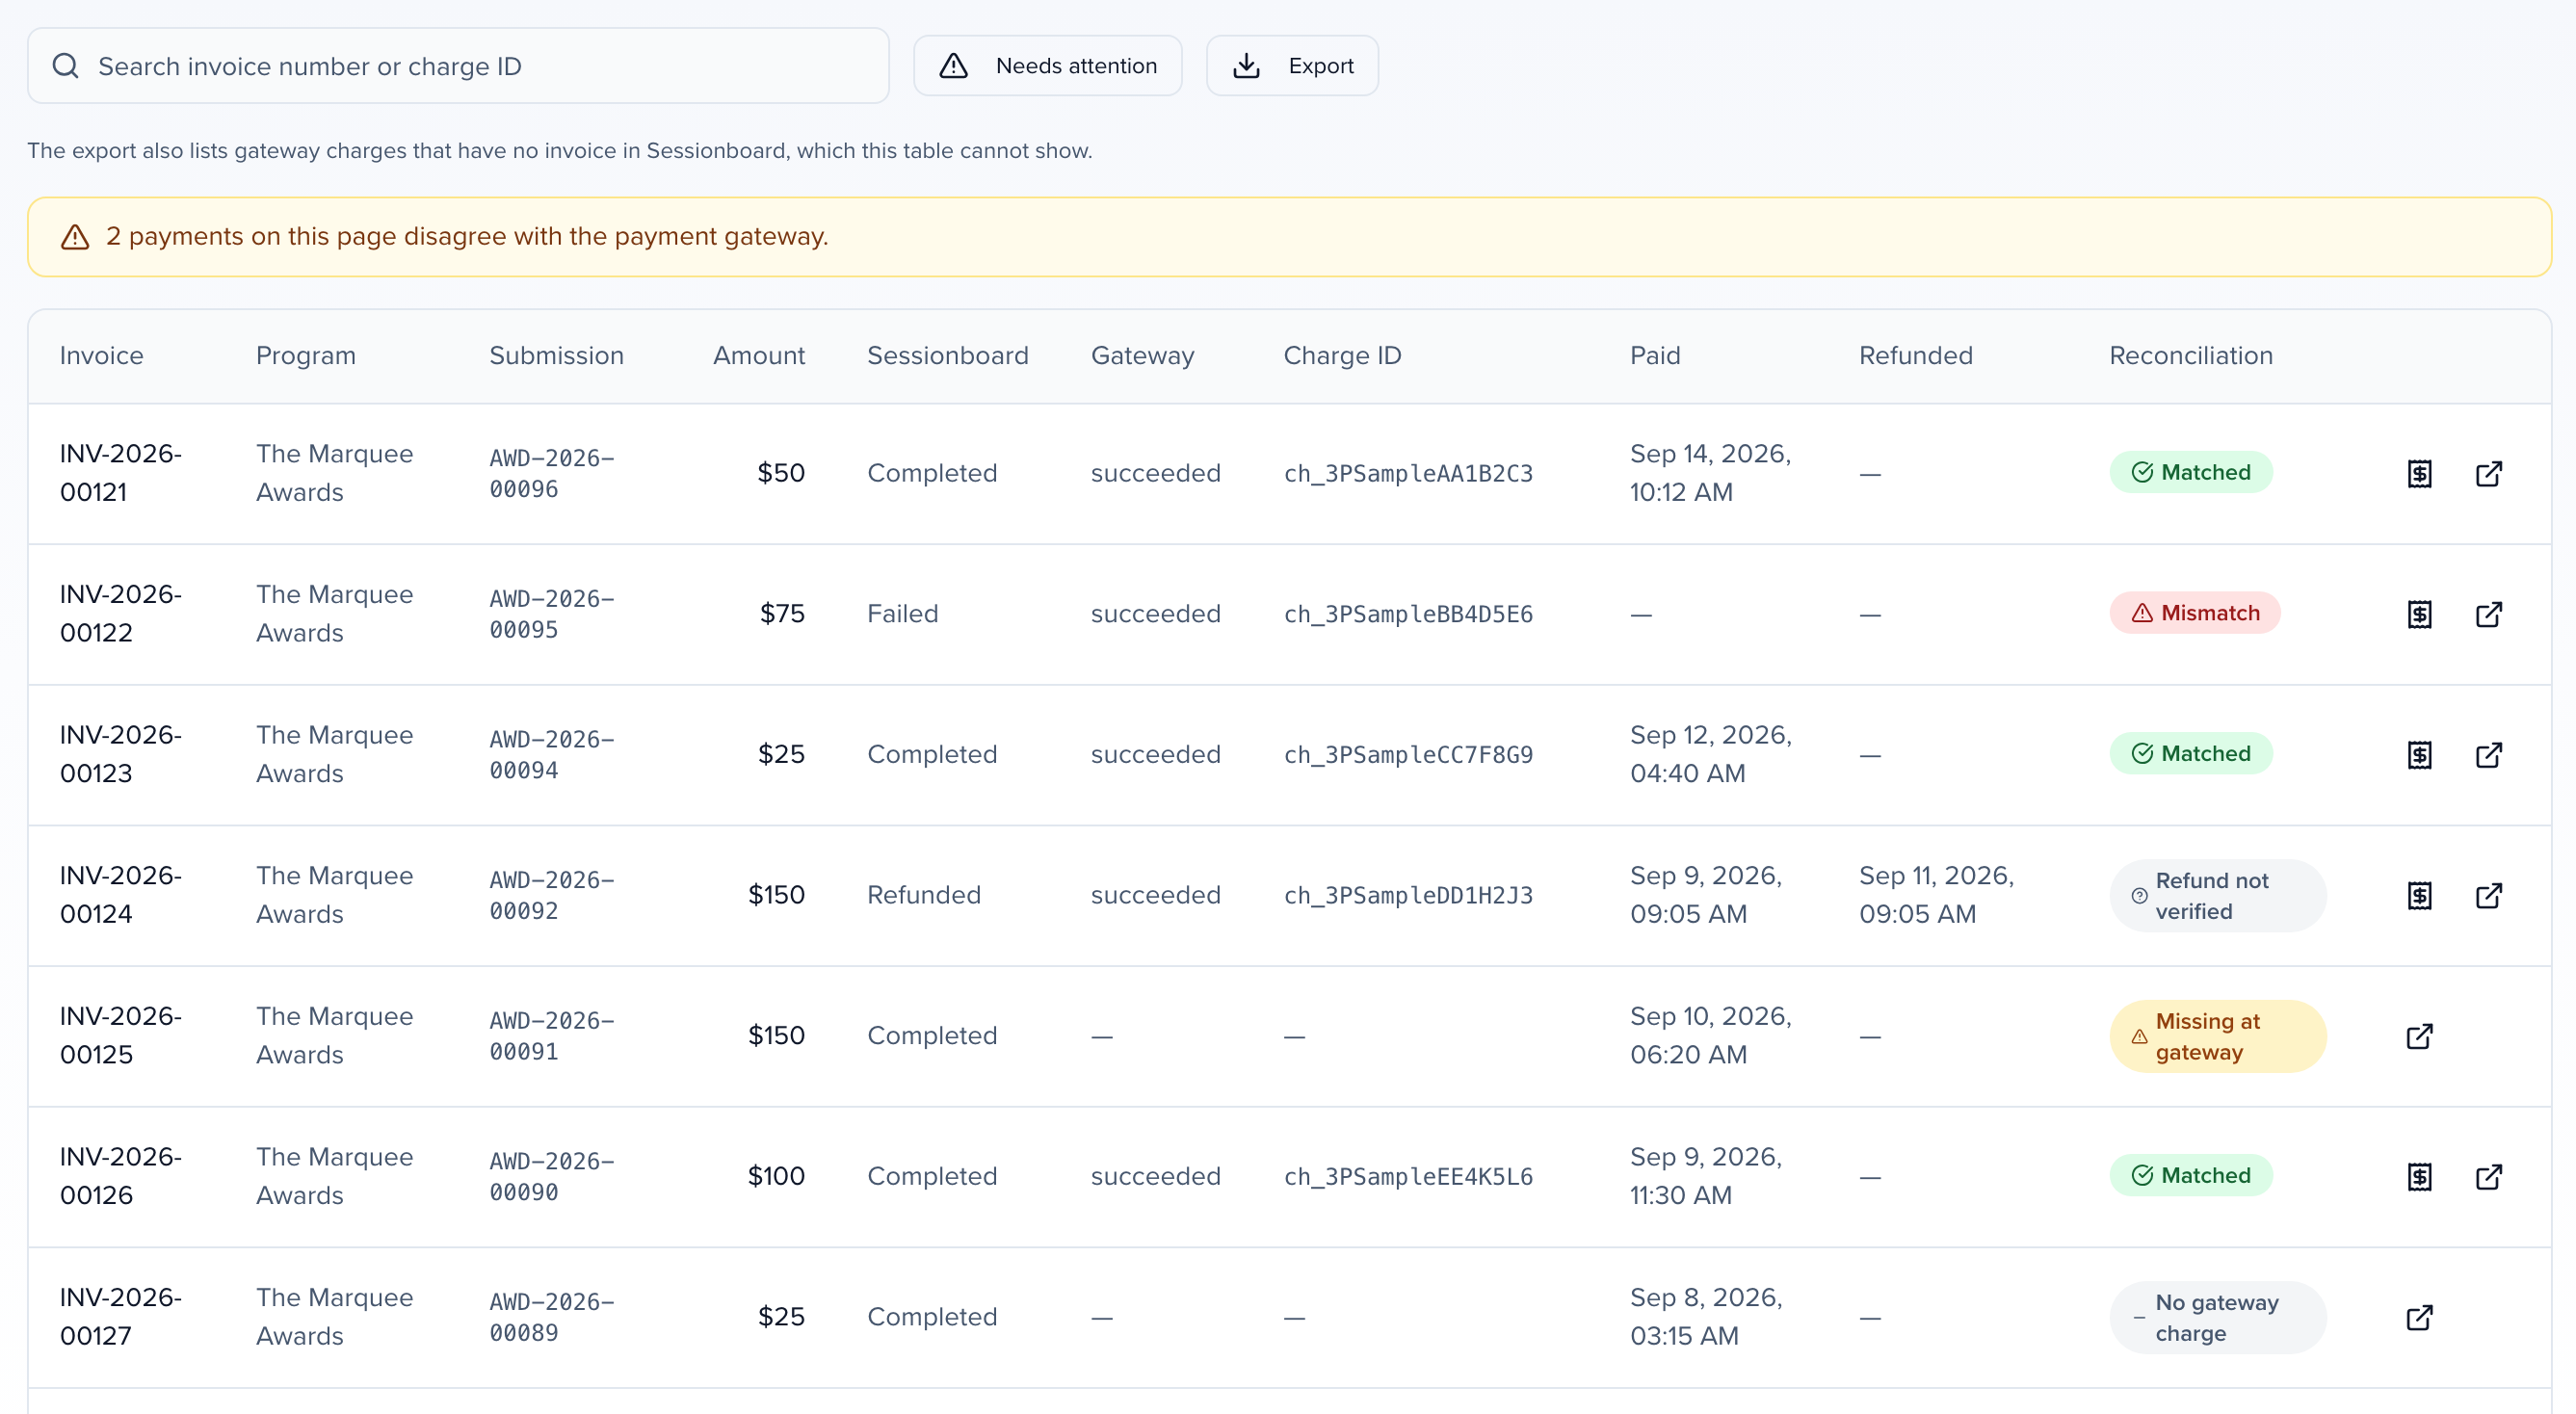
Alongside the invoice number, program, and amount, each row shows both sides of the comparison:
- Sessionboard — the status on your invoice, such as
completed,refunded, orfailed. - Gateway — the gateway’s own verdict for that transaction, such as
succeeded. - Charge ID — the transaction identifier from your processor, for example a Stripe
ch_ID. Click it to copy it, then search for it in your gateway account. - Paid and Refunded — the times recorded on the invoice.
- Reconciliation — the result of comparing the two. Hover a label to see what it means.
Where your processor provides one, a receipt icon at the end of the row opens the gateway’s own hosted receipt for that charge. A Test badge next to an invoice number means the payment ran through a gateway configured in Test Mode.
What each reconciliation result means
Section titled “What each reconciliation result means”| Result | What it means |
|---|---|
| Matched | Sessionboard and the gateway agree on this charge. |
| No gateway charge | Paid by promo code, $0, or collected outside the gateway, so there is no transaction to compare. |
| Not verified | This charge has not been checked against the gateway yet. |
| Refund not verified | Recorded as refunded here. A refund cannot be confirmed from the original charge, so check it in the export or in your gateway. |
| Mismatch | The two sides disagree about whether the charge settled. Money may have moved without being recorded as revenue. |
| Missing at gateway | Recorded as a card payment, but there is no gateway transaction to verify it. |
| Amount differs | The gateway charged a different amount than the invoice records. |
| Unresolved attempt | The payment attempt never finished. The card may still have been charged — look for a gateway charge matching the amount and time. |
| Not in Sessionboard | The gateway processed this charge, but no invoice here corresponds to it. This result appears in the export. |
The last five results mean someone needs to look. Click Needs attention to narrow the table to just those rows; when any appear on the page you are viewing, a banner counts them. Click it again to return to every payment.
Exporting the comparison
Section titled “Exporting the comparison”Export produces the same comparison as a CSV or Excel file, which downloads when it is ready. Each row carries the invoice details, both statuses, the charge ID, and the reconciliation result, so you can send a finance team the whole picture in one file.
The organization-wide Awards export answers one question the table cannot: it also lists charges your gateway processed that have no invoice in Sessionboard. Because a gateway is connected to your organization rather than to one program or event, those charges belong to the organization as a whole, which is why they appear in the Awards export.
Next steps
Section titled “Next steps”With pricing and payments configured, continue setting up your program:
- Awards notifications & email templates — Customize the Invoice / Receipt email and other automated notifications that reference pricing and payment details.
- Managing submissions, reviewers & rounds — Set up review rounds, add reviewers, and manage the review pipeline.
- Setting up your Sessionboard site — Publish a branded portal where submitters can log in, pay, and track their submissions.