

Participant acceptance
Participant acceptance lets people confirm or decline their part in a session from their portal, rather than by email. Each participant answers for every role they hold on a submission, so someone who is both a speaker and a moderator confirms each one separately.
In pictures 3
Why use it
Section titled “Why use it”A session is not settled when you accept it — it is settled when the people on it say they will be there. Participant acceptance gives you that answer per person and per role, in one place, instead of chasing replies by email. Send each participant a formal invitation, give them a date to answer by, and let Sessionboard remind them and flag anyone who misses it, so your team spends its time on the few who need a call rather than on everyone. Conditions keep invitations from going out before a session is ready, and presenting authors of placed abstracts join the list without anyone adding them by hand.
Settings
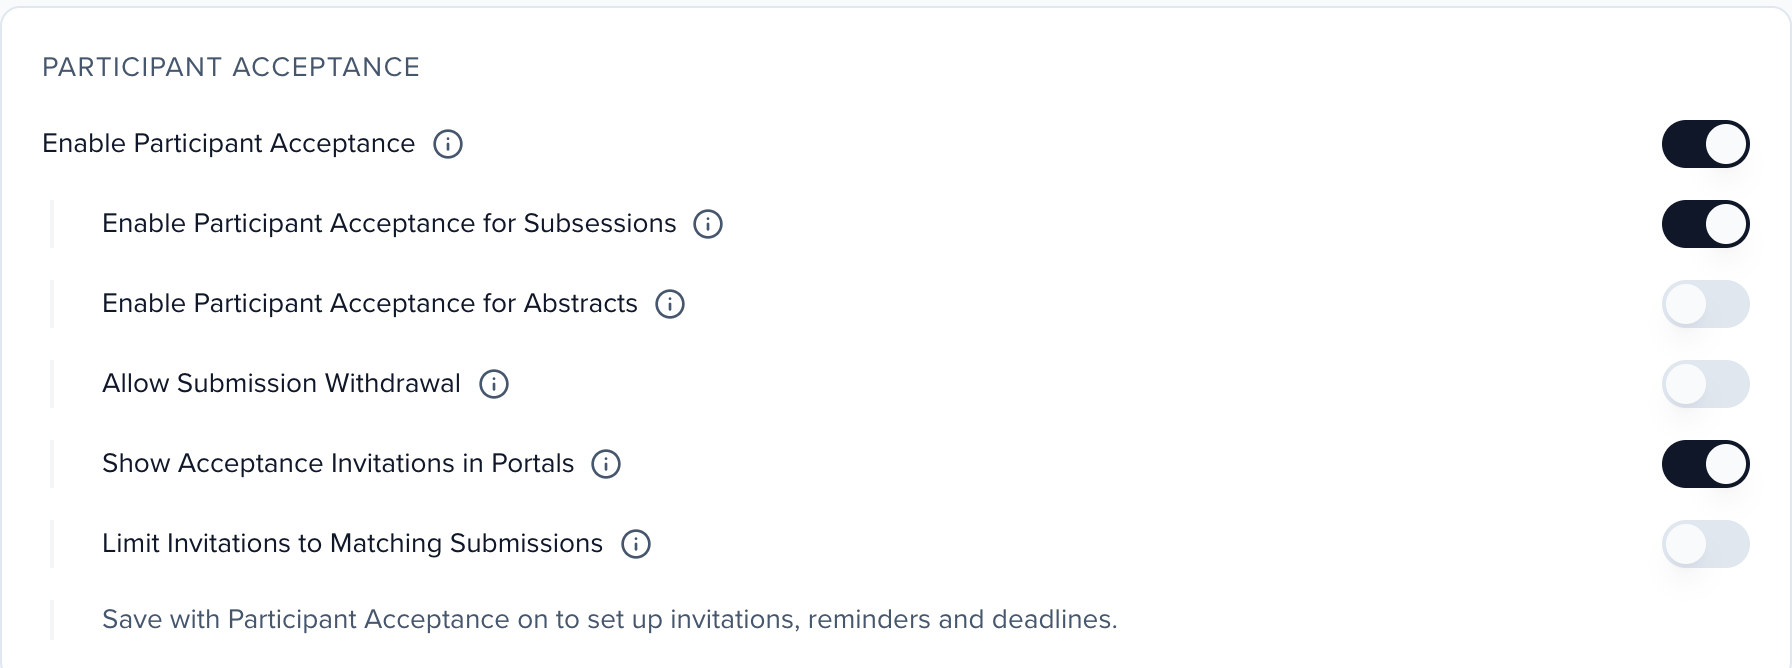
Section titled “Settings”In Settings → Record Settings, under Participant Acceptance:
| Setting | What it does |
|---|---|
| Enable Participant Acceptance | Lets participants accept or decline each of their roles on a submission. Everything below appears only once this is on. |
| Enable Participant Acceptance for Subsessions | Shows acceptance on subsessions and stand-alone submissions only, not on parent submissions that have children. |
| Enable Participant Acceptance for Abstracts | Off by default. When on, participants on an accepted abstract — including its submitting author — are asked to confirm or decline in the portal, with the same invitations, deadlines and reminders sessions use. When off, abstracts never ask for a confirmation. Turning Enable Participant Acceptance off clears it. |
| Allow Submission Withdrawal | Lets participants withdraw a submission from the portal acceptance task. Turn it off to hide the Withdraw button. |
The portal shows each submission’s real status — the status name your team set, custom statuses included — so there is no separate wording to configure.
Abstracts and placed sessions
Section titled “Abstracts and placed sessions”Enable Participant Acceptance for Abstracts asks for a confirmation on the abstract itself. It is separate from the confirmation a presenting author gives once their abstract is placed into a session, which is asked on the program session and works whether or not this switch is on. Turn it on when you need authors to commit to presenting before you build the program.
Invitations and deadlines
Section titled “Invitations and deadlines”Once Enable Participant Acceptance is saved on, an Invitations and deadlines panel appears under Participant Acceptance in Settings → Record Settings. It controls when participants are asked, by when they must answer, and who gets reminded. The panel saves on its own with Save invitation settings, separately from the page’s main Save. If you have just switched acceptance on, save the page first; the panel says so until you do.
Nothing changes for an event until you use it: invitations go out only when you send them, reminders are off, and with no accept-by rules there is no deadline.
| Setting | What it does |
|---|---|
| Ask participants to accept | Where a participant on a sub-session is asked. On each session they are on (the default) asks on the sub-session and mirrors the answer to the parent. On sub-sessions only (not the parent session) asks only on the sub-session; the parent shows them as context, with nothing to answer. On the parent and each sub-session asks at both levels, and each answer stands on its own. Someone assigned directly to the parent, such as a moderator, is always asked on the parent. |
| Send reminders | Emails participants who have not answered before their Accept by date. Days before Accept by takes whole numbers from 1 to 365, separated by commas. The default is 7, 2: one reminder a week out and another two days out. Each reminder goes once, and never on the day the invitation was sent (in the event timezone) — a reminder due that day goes at the first hourly check the next day. Overdue handling also runs only while Send reminders is on. |
| When overdue, set participant status to | Moves an overdue participant to one of your custom participant statuses. Leave it on Leave status unchanged to keep their status as it is. |
| View invitations | Opens the list of every participant who needs to accept, across the event. |
Accept-by rules
Section titled “Accept-by rules”Accept-by rules set the deadline. Click Add rule and choose:
- Session format and Participant role — leave either on Any format / Any role. A rule with both on “any” is the Event default.
- Accept by — A fixed date (in the event timezone), or Days after the invitation is sent for a rolling deadline.
- Grace days — 0 to 90. Participants can still respond this many days after Accept by; they show as Overdue meanwhile.
- Send only when — conditions that must all be true before an invitation can be sent (see Hold invitations until a session is ready).
The most specific rule wins: format and role, then format, then role, then the event default. You can have only one rule per format and role. A session that matches no rule has no deadline. A rolling rule has no date until the invitation is sent.
Hold invitations until a session is ready
Section titled “Hold invitations until a session is ready”Conditions under Send only when stop an invitation from going out before the session is ready for it — for example, only once the session is Accepted. You can check Session status, Session custom status, Session format, Session date (is set or is empty), Parent session status, and Another participant in role (has or has not accepted — useful for inviting a co-presenter only after the lead speaker has confirmed).
A participant whose conditions are not met shows as Blocked, with the reason. Sending to a mix sends the eligible rows and lists the blocked ones; send again once the session is ready.
Send invitations
Section titled “Send invitations”Invitations are sent from two places, both with a table of participants and their Invitation state and Accept by date:
- One session — open the session from Program → Sessions and expand Acceptance invitations in its side panel or on its profile page.
- Several sessions — select them in Program → Sessions and click Send invitations in the bulk action bar (up to 150 sessions at a time). The dialog lists only the participants on those sessions.
Filter the table with All, Awaiting response, Not sent, Sent, Overdue and Blocked. Each row has a Send invitation or Resend invitation button; tick rows and use Send / resend for a batch, or, with nothing ticked, Send invitations for everyone on the listed sessions. After a send, a summary counts what was sent, resent, already sent, blocked and already responded, and lists each skipped row with its reason. A participant whose Accept by date has passed is blocked from sending until you extend their deadline. Someone already invited is not emailed again unless you choose Resend invitation.
A participant gets one email per session, even if they hold several roles on it. Sending needs permission to send emails.
Extend a deadline
Section titled “Extend a deadline”Click the calendar icon (Extend deadline) on a row — or tick several rows and use the one beside Send / resend — pick a date and click Apply. The date becomes the end of that day in the event timezone, and the row shows Extended. Remove extension goes back to the rule’s date. You can only extend an invitation that has been sent, and you need permission to edit sessions.
Reminders and overdue invitations
Section titled “Reminders and overdue invitations”With Send reminders on, Sessionboard checks every hour. Reminders go at your Days before Accept by offsets. When Accept by passes without an answer, the participant gets one overdue email, your event admins get one notification listing overdue participants by session format (it opens the Overdue list), and the participant moves to your overdue status if you set one. Reminders stop as soon as the participant answers.
Overdue rows show in red under Overdue. Once a participant is past their Accept by date plus grace days, the portal no longer lets them change their answer; extend their deadline if they still need to respond.
Invitation emails
Section titled “Invitation emails”Four emails are sent for invitations. Reword them under the System tab of your event emails — see automated emails:
| When it’s sent | |
|---|---|
| Participant invitation | You choose Send invitation or Resend invitation. |
| Participant invitation reminder | At each reminder offset before Accept by. |
| Participant invitation overdue | Once, after Accept by passes without an answer. |
| Abstract placed into a session | The first invitation to the presenting author of an abstract placed into a session. |
They share merge tags for the session title and date, parent session title, the participant’s roles, the accept-by date, days left to respond, and the portal link. To show the deadline in your own emails and campaigns, use the Accept by session merge tag ({{accept_by_date}}) — it shows the recipient’s earliest open deadline for that session in the event timezone, and is empty once they have answered or when there is no deadline.
Presenting authors of placed abstracts
Section titled “Presenting authors of placed abstracts”When you place an abstract into a session — for example with Create a subsession on the Abstracts list — its presenting author is added as a participant waiting to accept, at the level you chose. Co-authors are not invited. Their first invitation uses the Abstract placed into a session email, and the row reads Placed from abstract. The abstract keeps its own review status.
Set a participant’s status as an admin
Section titled “Set a participant’s status as an admin”Open the session
In Program → Sessions, click Edit on the session.Go to Participants
Open the Participants tab. Each person’s row shows their current status as a chip.Set the status
Click the chip and choose Pending, Accepted or Declined.Save
Click Save Changes at the bottom of the panel.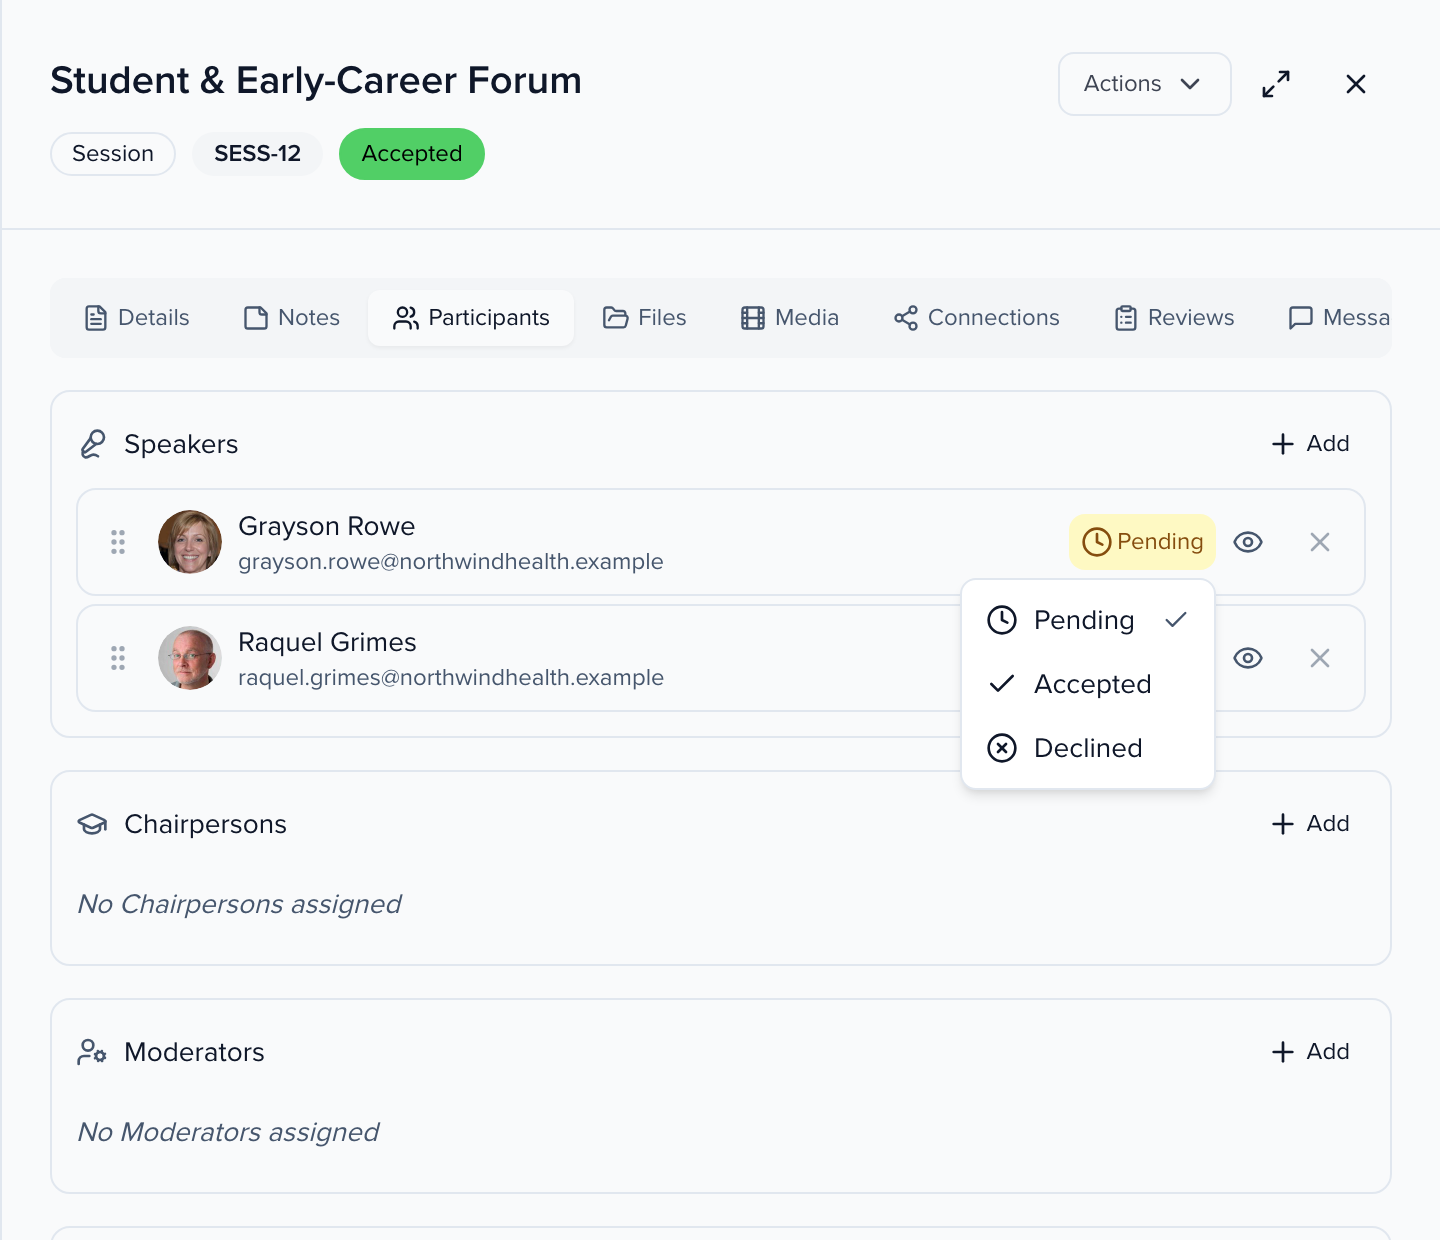
A participant with no answer yet reads as Pending. You can also set statuses for many people at once from the sessions grid and its bulk actions.
Confirm participation as a participant
Section titled “Confirm participation as a participant”In the portal’s My Participation card, anything waiting on the participant sits at the top under Pending Participant Confirmation — split into Sessions and Abstracts when both are present — with a Confirm button. Each row shows the status your team set, such as Accepted.
Confirm opens the Confirm Acceptance dialog, which lists every participant on the submission and their role. The participant sets their own row to Confirm or Decline and clicks Save; if the portal lets them manage related participants, they can answer for the others too. If withdrawal is enabled, Withdraw Submission pulls the whole submission and asks for a reason.
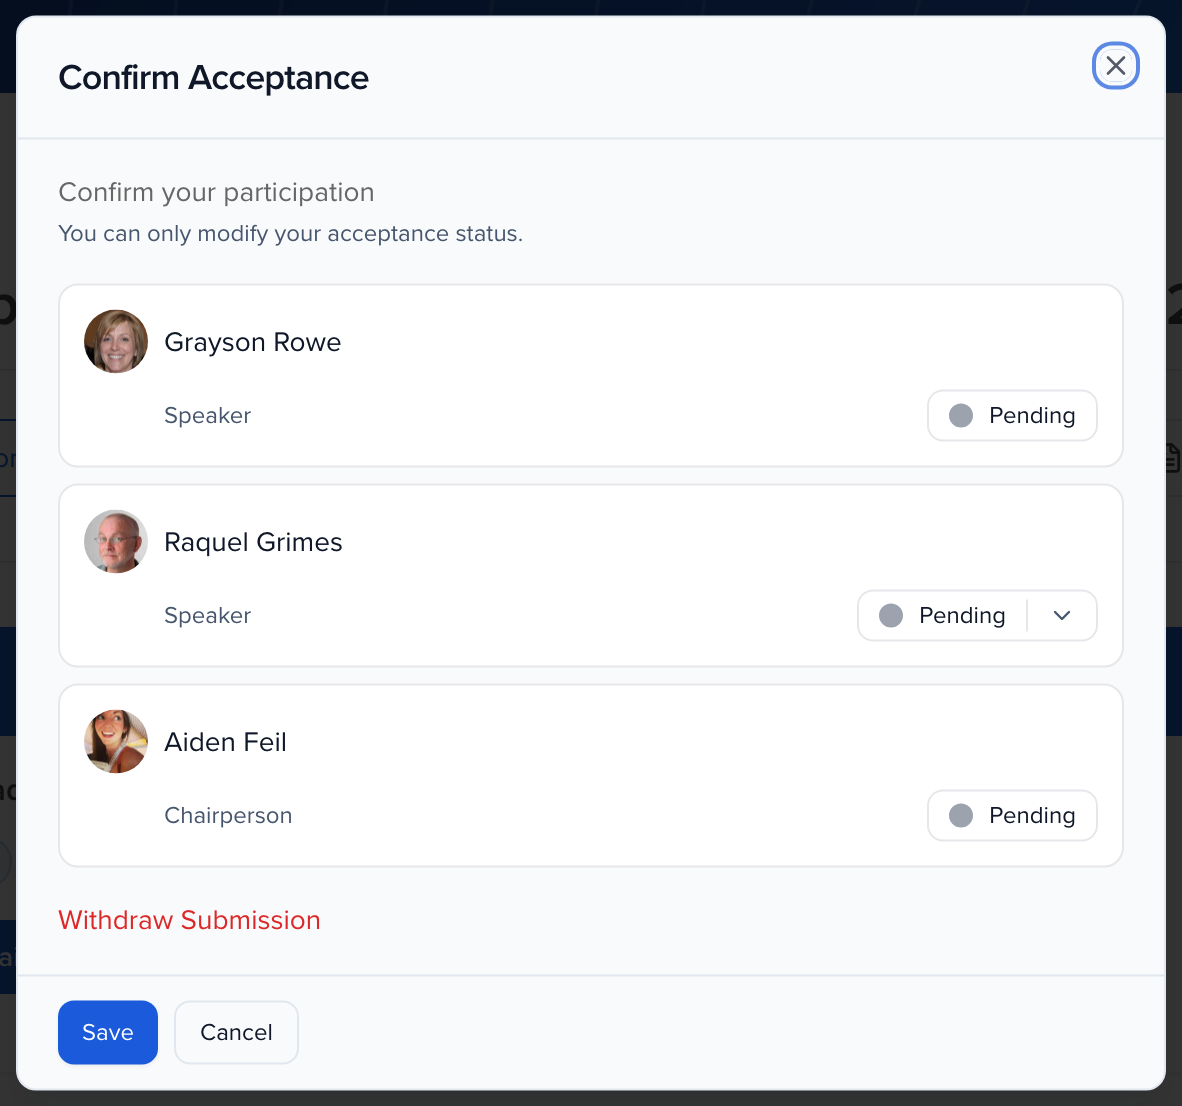
Once answered, the row leaves Pending Participant Confirmation and appears under its status group, such as Accepted Sessions, with the button Participant Confirmation Completed. Clicking it opens Your Participant Confirmation, which shows every role with the saved answer and reason, read-only; to change an answer, the participant contacts your team. A submission whose speakers have all declined is withdrawn automatically.
Deadlines in the portal
Section titled “Deadlines in the portal”When an accept-by rule applies, the participant sees Respond by and the date under the Confirm button, and the dialog opens with Please respond by and their earliest open deadline, in the event timezone. A role with a different deadline shows its own date.
After the deadline plus any grace days, the dialog reads “The deadline to respond has passed. Please contact the event team to change your response.” and that role can no longer be changed. Extend the participant’s deadline to let them answer. With On sub-sessions only (not the parent session), roles that belong to a sub-session are locked on the parent with “Respond to this role on the sub-session”.
On events that use accept-by rules or ask at a level other than On each session they are on, a submitter who also presents on an accepted session stays under Pending Participant Confirmation until they confirm, rather than being confirmed automatically.
When a submission is withdrawn, it appears under the Withdrawn view in Program → Sessions. Opening it shows who withdrew it and why, and you can delete the session, set it to Declined, or undo the withdrawal.
Control who sees invitations
Section titled “Control who sees invitations”With acceptance on, two more switches appear under Participant Acceptance in Settings → Record Settings:
| Setting | What it does |
|---|---|
| Show Acceptance Invitations in Portals | When off, no portal user sees a Confirm / invitation. Your team still sets Accepted, Pending, or Declined from the session Participants page, grids, and bulk actions. Turning it off also clears any invitation filters. |
| Limit Invitations to Matching Submissions | When on, only submissions that match the filters you add (for example Track = AI) show an invitation in the portal. Non-matching submissions never show one; your team can still manage their statuses from the admin app. Subsessions inherit their parent submission’s match. A live count tells you how many submissions currently match. |
Events that have never touched these switches keep the original behavior: invitations visible, unfiltered.
How the portal groups sessions
Section titled “How the portal groups sessions”Every portal shows a participant’s submissions in one My Participation card (and the My Participation tab), whether or not acceptance is on. See My Participation for the groups and filters.
View participant status
Section titled “View participant status”- Dashboard — the Speakers section counts Accepted, Pending response, Declined and Withdrawn; each count links to the matching list.
- CRM → All Contacts — filter on [Session] Session Status to list everyone who is accepted, pending or declined on a session. See Filter contacts by session status.
- Program → Sessions — the Speakers column lists each session’s participants; open a session’s Participants tab for the status chip on each row.
- Communications — the campaign recipients step has a Participant acceptance quick filter, so you can remind only the people who have not answered.
Can you create custom participant statuses?
Can participants on abstracts confirm?
Can you assign a status to a moderator or chairperson?
Can the Withdraw button be removed from the portal?
Can I withdraw a submission on a speaker's behalf?
How do I find everyone who declined?
Look in two places, because a decline is recorded per person, not per session. A session whose speakers have all declined is withdrawn automatically and is listed on the Withdrawn tab of Program → Sessions, with All speakers declined as the reason. Someone who declined while others on the session accepted shows a Declined chip on that session’s Participants tab. To email them, start a campaign from Communications and use the recipients step’s Participant acceptance quick filter set to Declined — the step shows how many people match and a sample of the first 25.
Authors are asked to accept both their abstract and the session it was placed in. How do I ask only once?
Open Settings → Record Settings, and under Participant Acceptance find Invitations and deadlines. Set Ask participants to accept to On sub-sessions only (not the parent session) and click Save invitation settings. Authors then answer only on the sub-session their abstract became. The parent session still lists them, with nothing to answer, and in the portal their role on the parent reads “Respond to this role on the sub-session”. People assigned directly to the parent session, such as a moderator, are still asked there. See invitations and deadlines.