

Portals 101
A portal is where a speaker, sponsor or exhibitor signs in to see their sessions, complete what you ask of them, and read what you share. Every contact and group on the event lands in exactly one portal, chosen by filters; you decide per portal what they see, what they can edit, and what they are asked to do.
Video transcript
Let’s talk about the portal. This is where your speakers land once they’re in, so everything we set up here is what they’ll see. Think of it as their to-do list for your event, and your view of who has done what.
Portals live here in the left navigation, inside Program, in the Portals section. Every event starts with a Default People Portal, and every contact in your event lands there unless a custom portal’s filters pick them up first. This event has a Speaker Portal for accepted speakers, and that’s the one we’ll build on.
Under Portals you’ll see the things you can put in one. A task is a plain action item, register for the event, book your hotel, that kind of thing. A file request is a task that needs an upload, like a signed agreement. And a form collects structured answers, so a headshot and a bio in one go. Today we’ll build a task.
On the Tasks page I’ll open Add and choose Add Task. First a name. Keep it in the speaker’s words, so “Confirm your travel dates” rather than “Travel confirmation”. Then the type. Contacts means people, your speakers, moderators, chairs.
Groups is for sponsor and exhibitor companies, so one task lands on the company and anyone on their team can complete it.
And Submissions attaches the task to each session instead of each person, which is what you want for something like uploading slides. Ours is about the person, so Contacts it is.
The description is where you tell them what good looks like. You can type one description for everyone, or choose Use Field to pull it from a contact field, so each speaker sees their own. Same idea for the task link. If every speaker has a personal registration link stored on their record, Use Field opens theirs. Links need the https prefix or they won’t resolve. Create Task, and it’s saved.
A task on its own doesn’t show up anywhere yet. It has to be assigned to a portal. Back on the portal list, the three dots next to the Speaker Portal, then Edit Tasks. That opens the portal’s Assign Items step. In the Tasks section I’ll click Add, tick our task, and Add Selected. A task can sit in more than one portal, so you build it once.
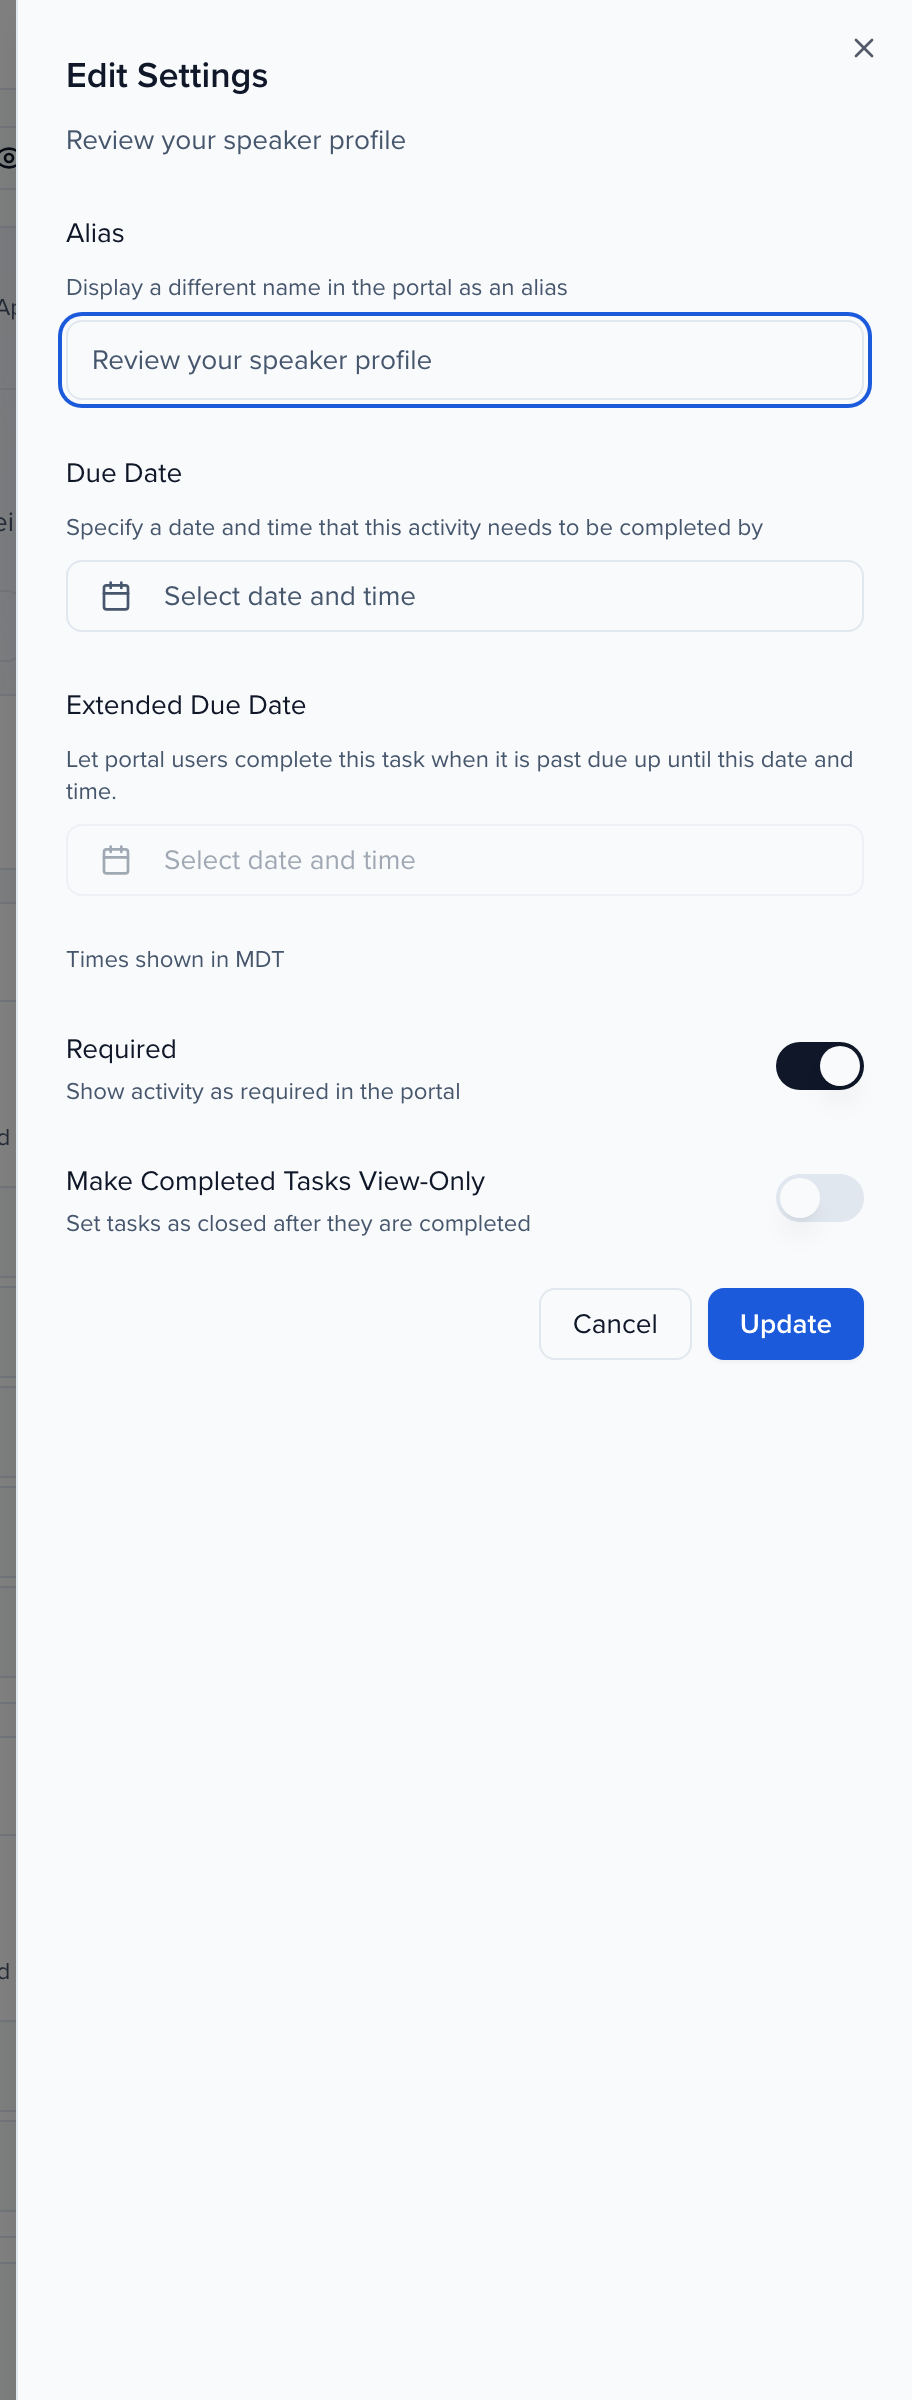
Now the pencil under Actions, because this is where the settings that matter live. Alias lets the portal show a different name. Due Date is a real deadline, once it passes they can’t mark it complete, they see a message with the date instead. If you know people will be late, set the Extended Due Date now, before the deadline, and they get a grace window. Required puts it at the top of their list. And Make Completed Tasks View-Only stops someone unticking a task by accident.
For a Submissions task there’s one more control in here, Assign By Filter. Say the task is “Upload your slides” and only breakout sessions need it. Add a filter, format is Breakout, and speakers on a keynote never see it. Up to three filters per task. Ours is a contact task, so we don’t see it today. Update, and we’re set.
One setting trips people up, so let’s look at it. Under Configuration, Always Show Tasks. When it’s off, tasks only appear for speakers whose session is accepted. That’s usually what you want during review, nobody gets homework before they’re in. When it’s on, everyone in the portal sees every task, including moderators and anyone still pending.
Before you send anything, look at it as a speaker would. View Portal, top right, then View portal as, and pick one of your real contacts. This is the same screen they’ll get, same task order, same due dates. I do this every time I change a portal, it catches a lot.
Back in Contacts, tracking is a column, not a report. Open Columns, find the task, and it joins the table. Each row tells you where that person is. Green check, done. Blue circle, assigned through the portal and still open. Orange checklist means someone on your team assigned it by hand. Save the view and it’s there every morning.
If a handful of people need something extra, you don’t need another portal. Select them here, Assign, then Tasks, pick it, set the due date, and it lands only on those records. Anything assigned this way can be unassigned from the same column. Tasks that came through the portal can’t, which is a good reason to keep portal tasks to the ones everyone needs.
That’s the portal. Speakers get a clear list, you get a clear column. The Communications chapter sets up the emails that point them to it, the templates, the merge tag for the portal link, and the reminders the portal sends on its own. The full write-up is in the Help Center under Portals 101, and your CSM is happy to walk your team through your own setup.
Why use it
Section titled “Why use it”A portal gives every speaker, sponsor or reviewer one place to see what you need from them and do it — upload the deck, confirm the bio, sign the form — without an email thread per person. You decide which fields they see and which are locked, so the data your team set stays as you set it, and the status column tells you at a glance who is done.
Where portals live
Section titled “Where portals live”Open Program → Portals. The page lists Contact Portals (people — speakers, moderators, submitters) and Group Portals (sponsors and exhibitors), each as a card with its filters, who it is assigned to, and an ellipsis (⋯) menu.
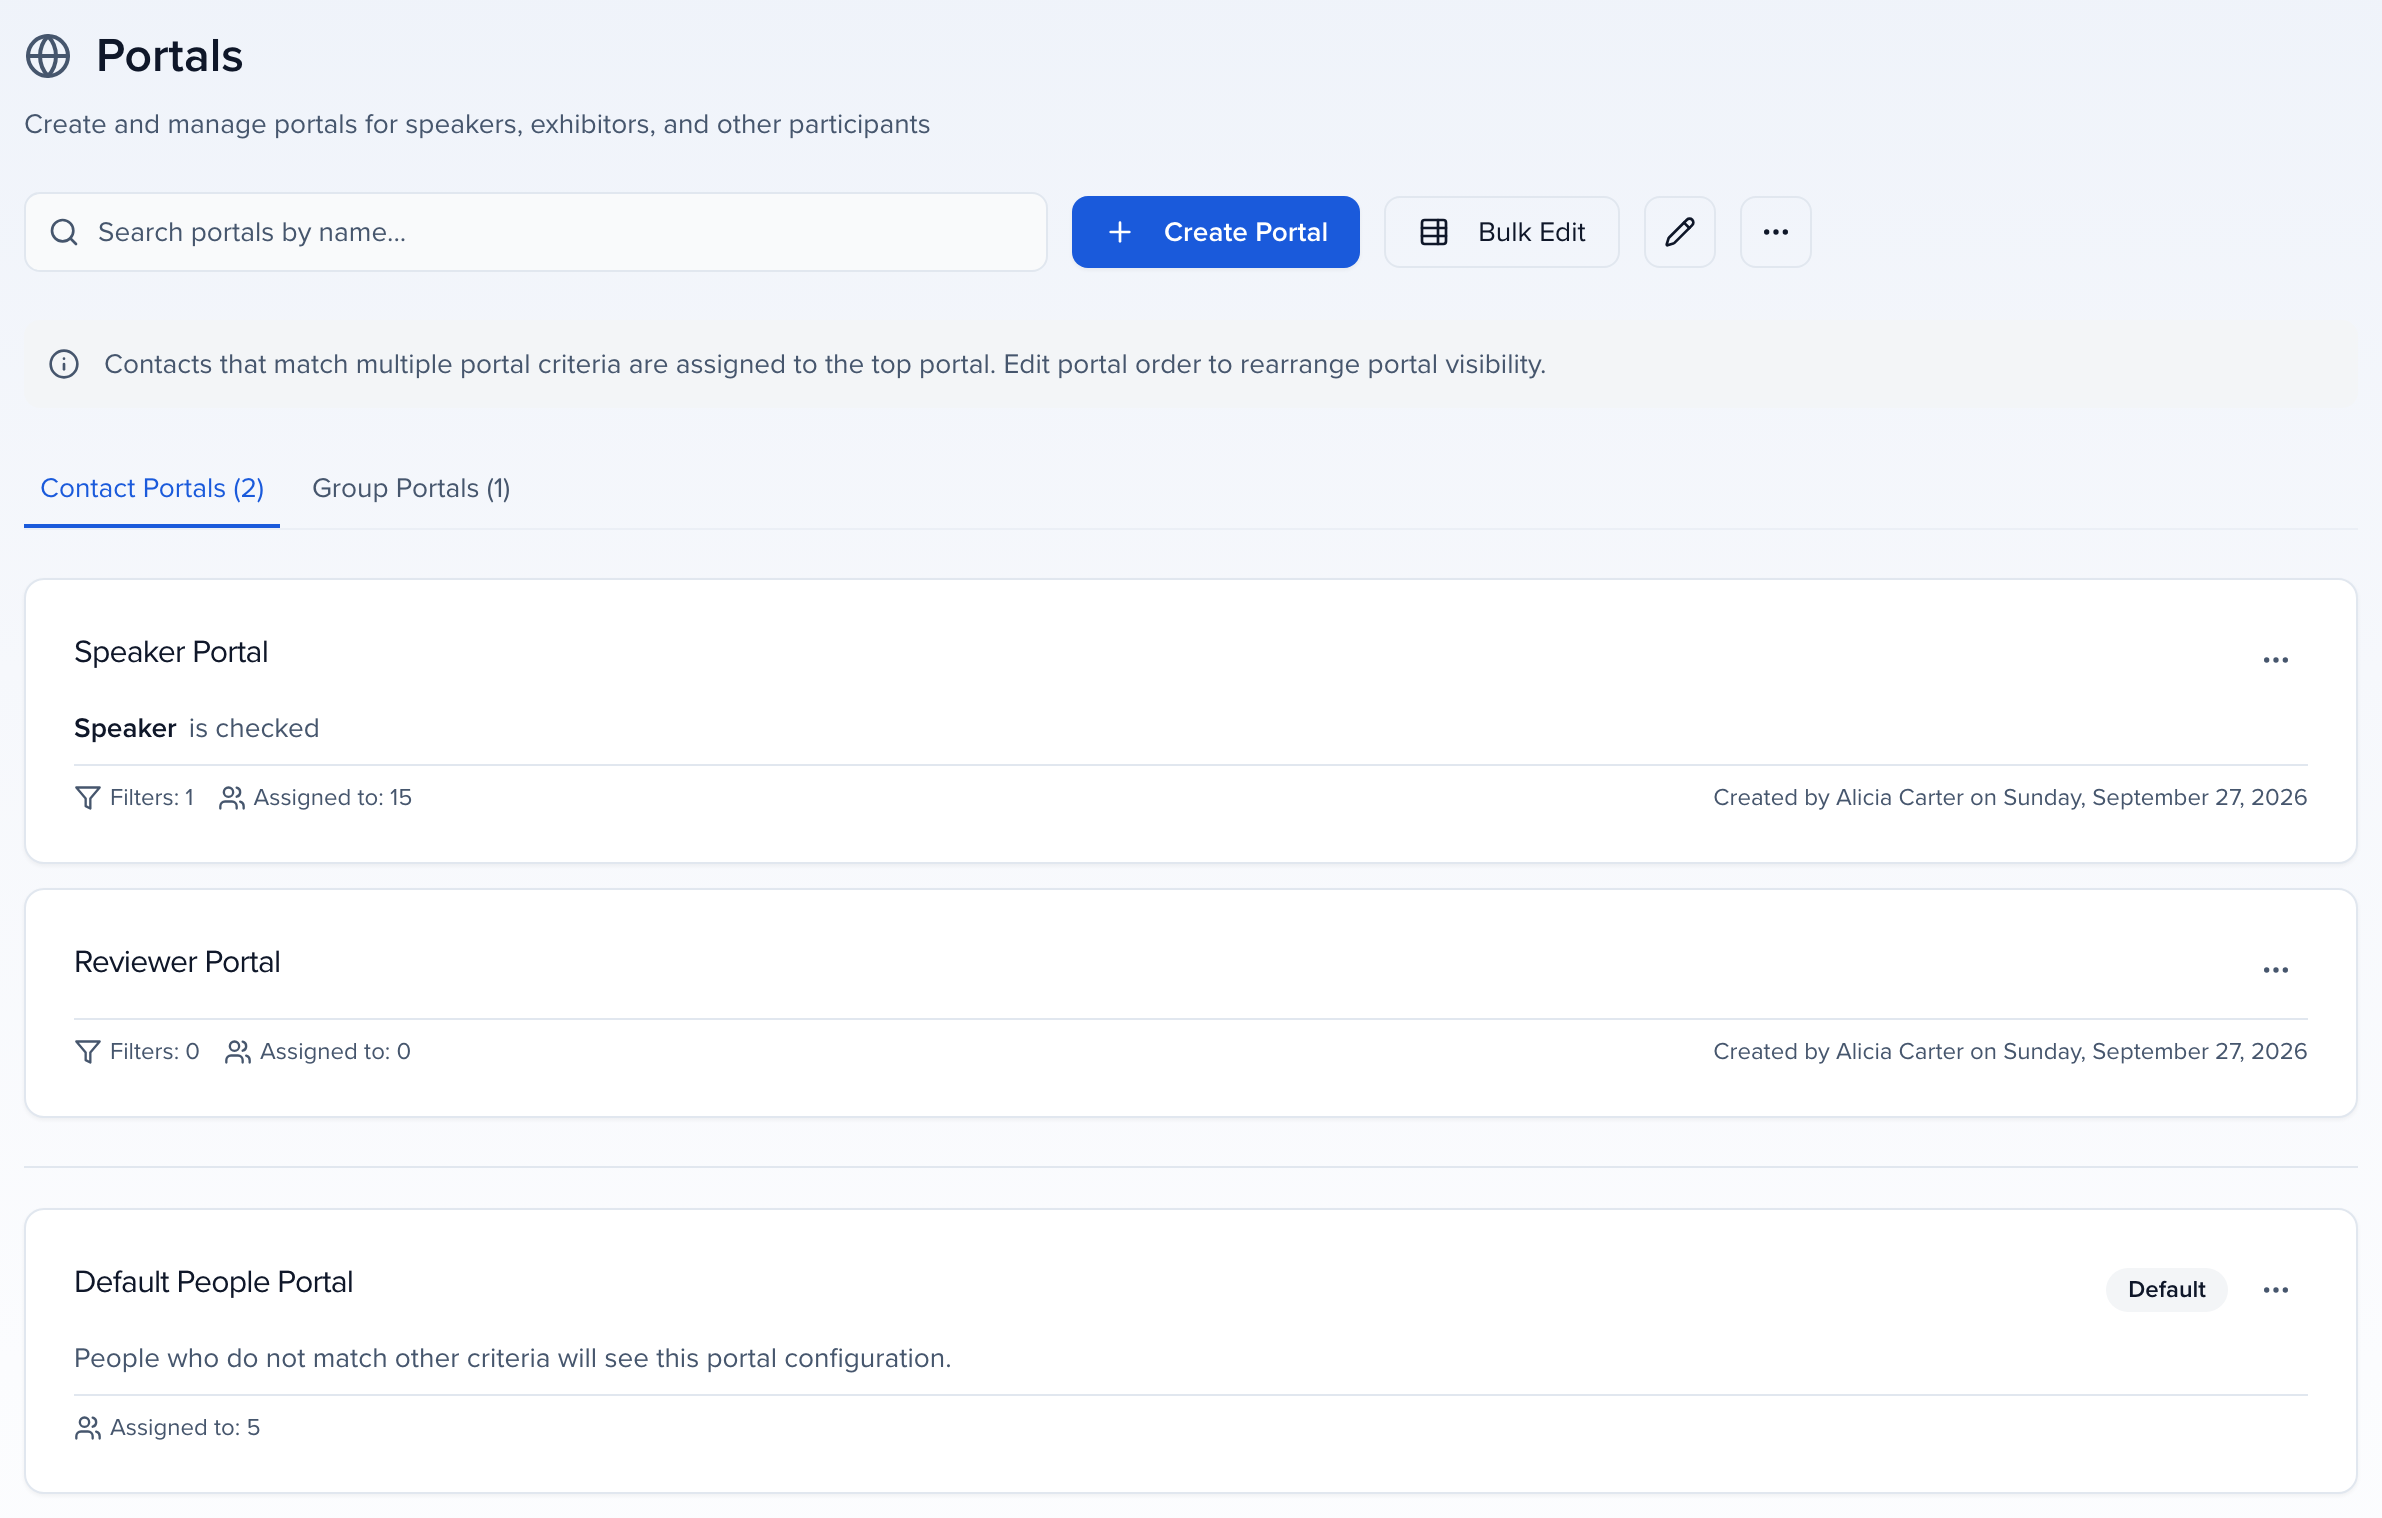
Every event starts with a default portal per module — Default People Portal, Default Exhibitor Portal, Default Sponsor Portal. A default portal is the catch-all: it takes everyone who matches no custom portal, and it cannot carry filters of its own.
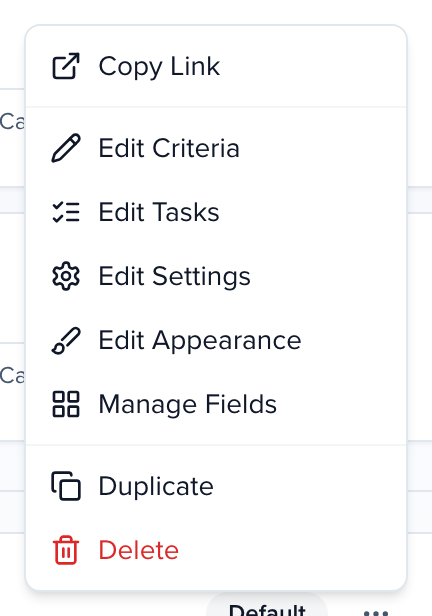
The card menu jumps straight into one step of the editor — Edit Criteria, Edit Tasks, Edit Settings, Edit Appearance, Manage Fields — and holds Copy Link, Duplicate, and Delete.
Build the content once
Section titled “Build the content once”Tasks, forms, file requests, pages and files are built in their own libraries under Portals, then assigned to as many portals as need them. Build first, assign second.
| Library | What it is for |
|---|---|
| Tasks | An action item with a due date — register, book travel, confirm your session. Three types: Contacts, Groups, Submissions. |
| File Requests | An upload you review — a signed agreement, a headshot, the slides — with Pending, In Review, Approved and Denied states. |
| Portal forms | Structured answers through fields — biography, dietary needs, disclosures — that can write straight onto the contact, group or submission. |
| Resources | Pages you write in the portal — a Know Before You Go guide — updated live, with merge tags for personalized pages. |
| Portal files | A document or link people download — a slide template, the venue map. |
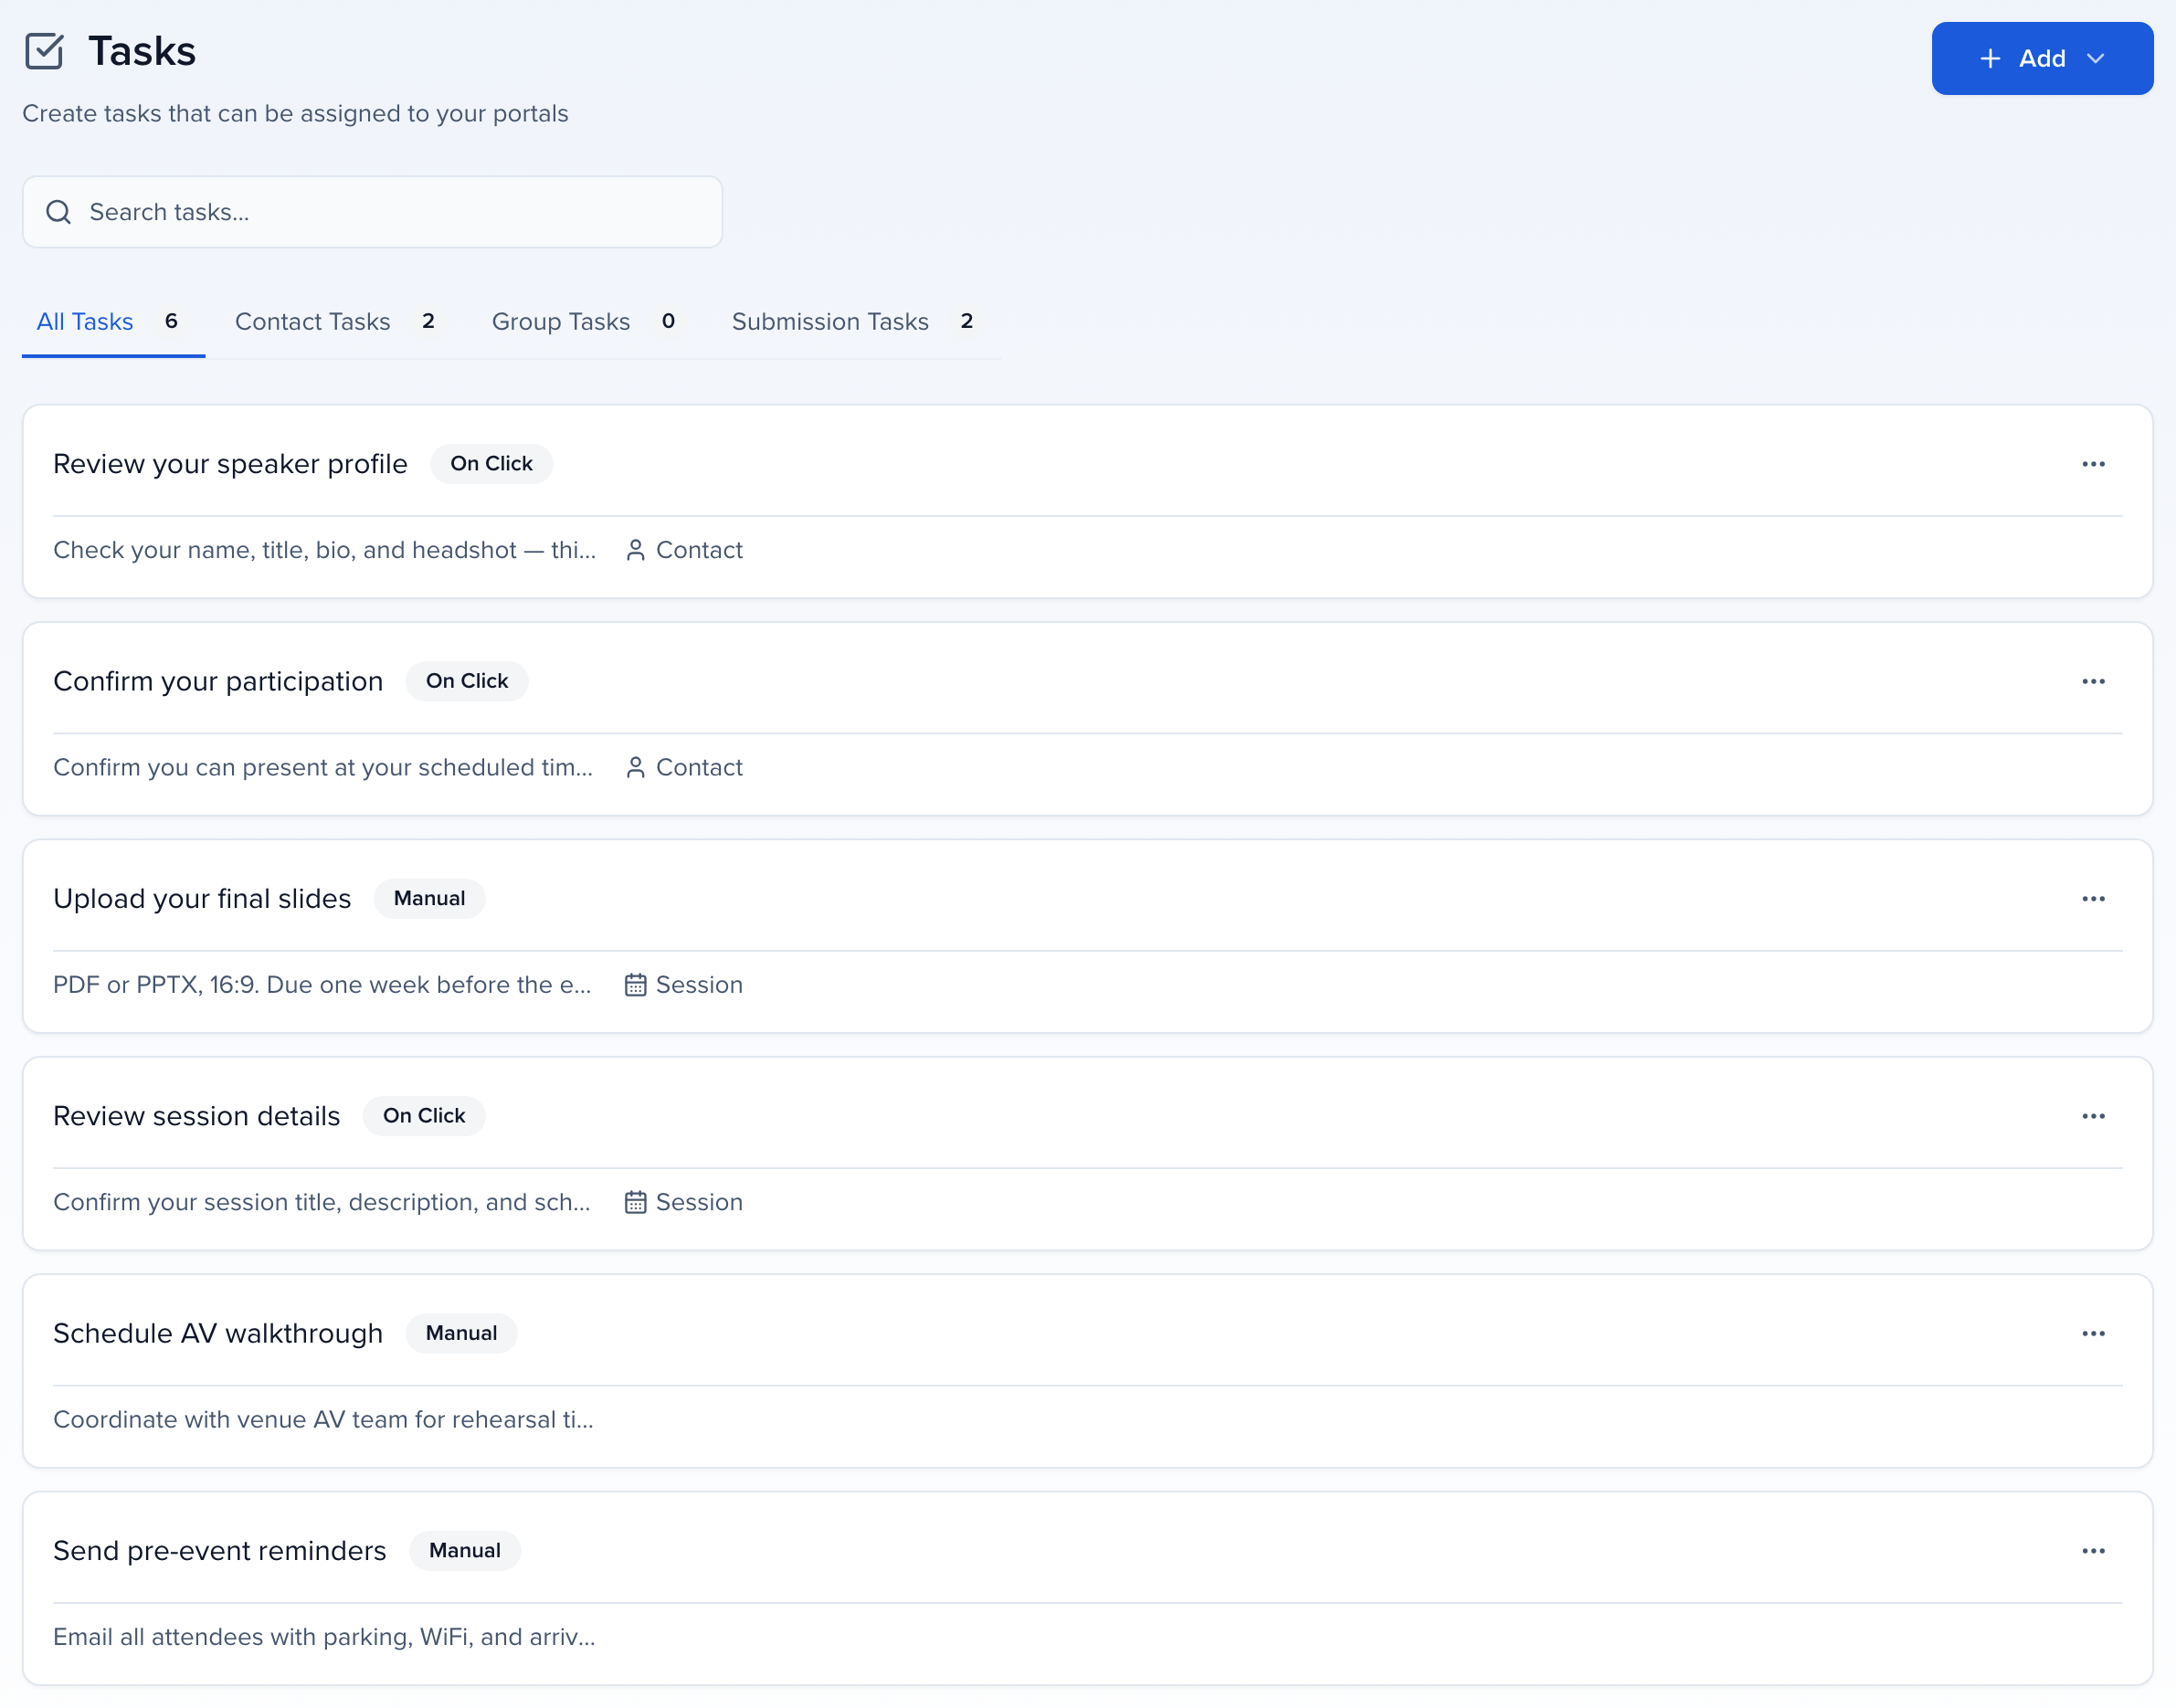
Every library’s Add button has two entries: Add … creates a new item, and Copy from… brings items over from another event in your organization, so a recurring event reuses last year’s tasks, forms and pages instead of rebuilding them.
Create a portal
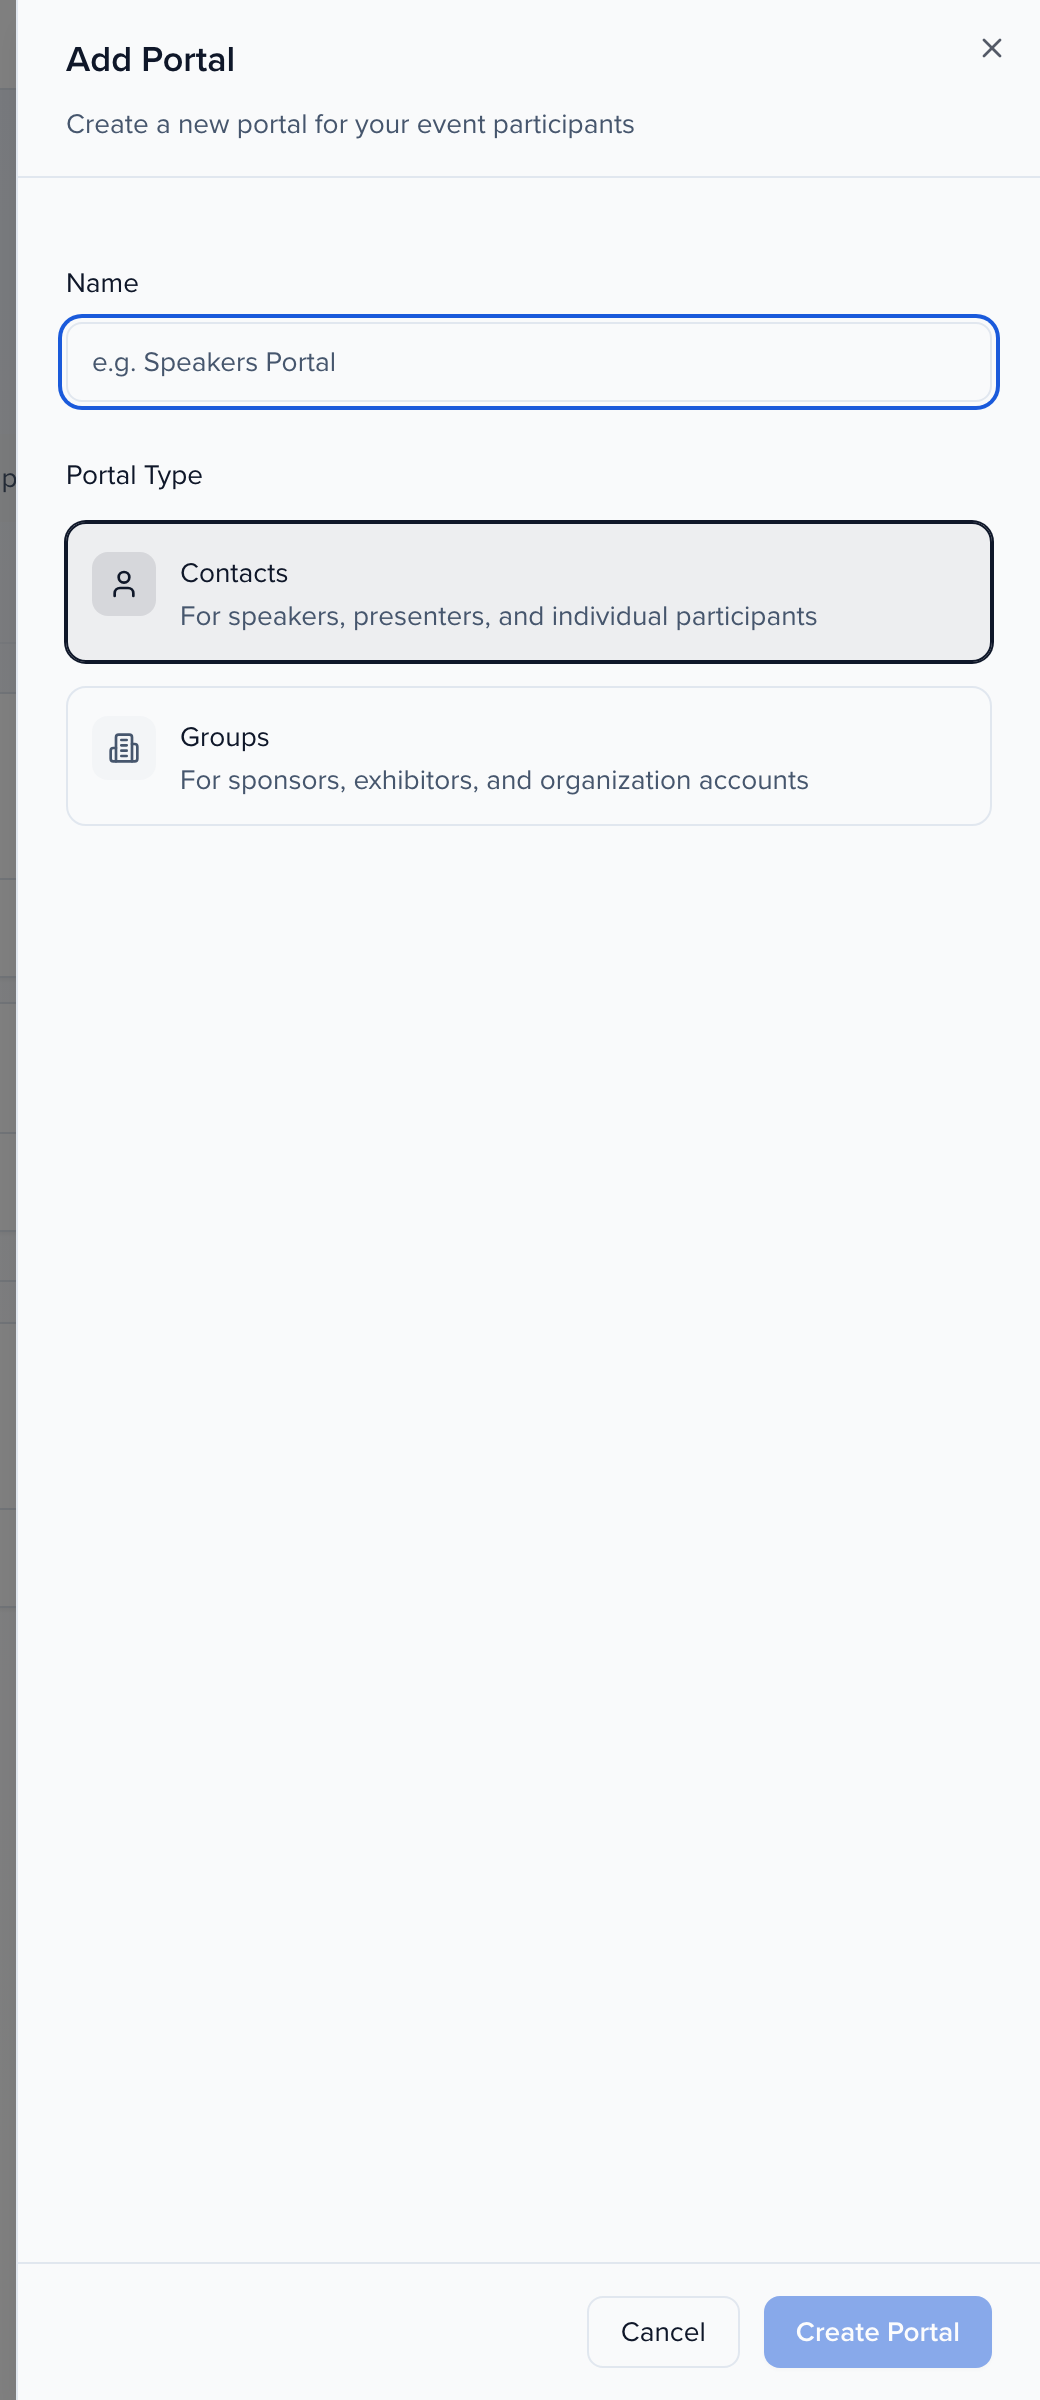
Section titled “Create a portal”Click Create Portal, give it a Name, and choose the Portal Type: Contacts for speakers, presenters and individual participants, or Groups for sponsors, exhibitors and organization accounts. Groups needs Sponsor Pro or Exhibitor Pro; on an event without either, it is locked and the panel says why. Sponsors who present can still reach a Contacts portal through their submission. The editor then walks left to right through five steps.
Select Participants
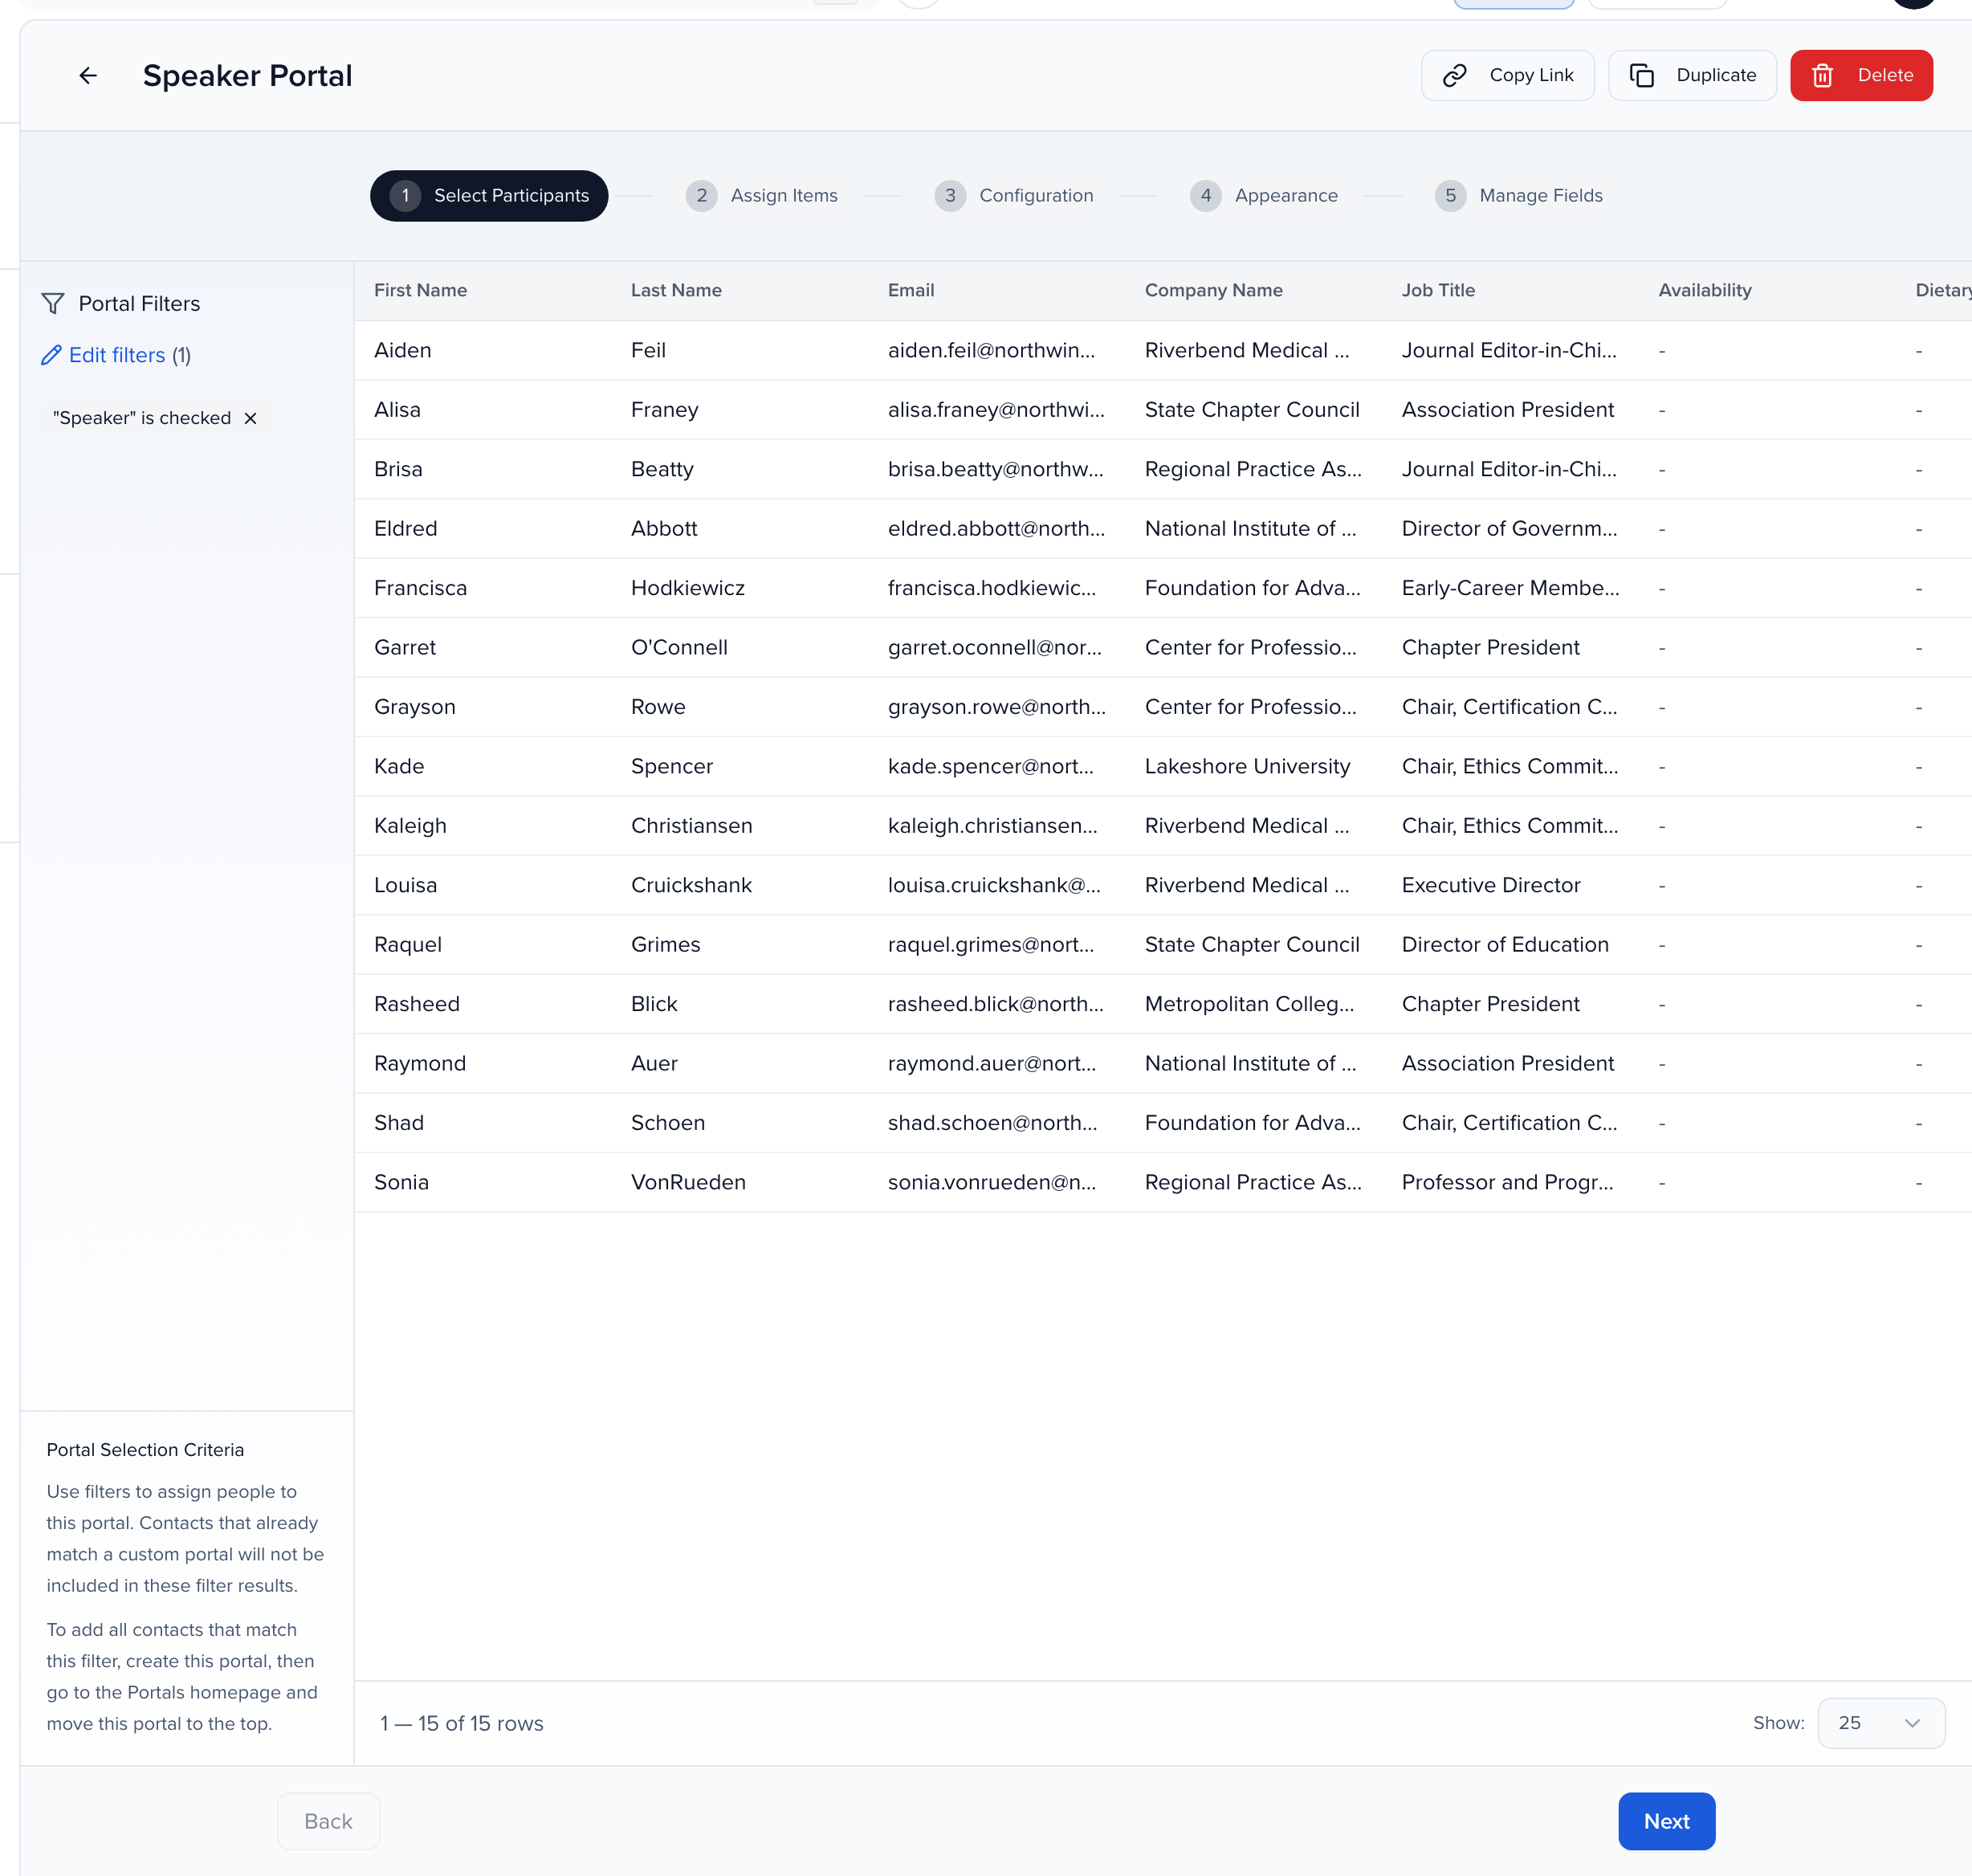
Section titled “Select Participants”Portal Filters decide who is assigned. Click Add filter and build the criteria — contact role, session status, sponsor tier, any contact or submission field — then Save Filters. The table below previews who matches. Contacts who already match a custom portal higher in the list are not included; to take them, create the portal, then move it to the top of the Portals page (see reorder portals).
Assign Items
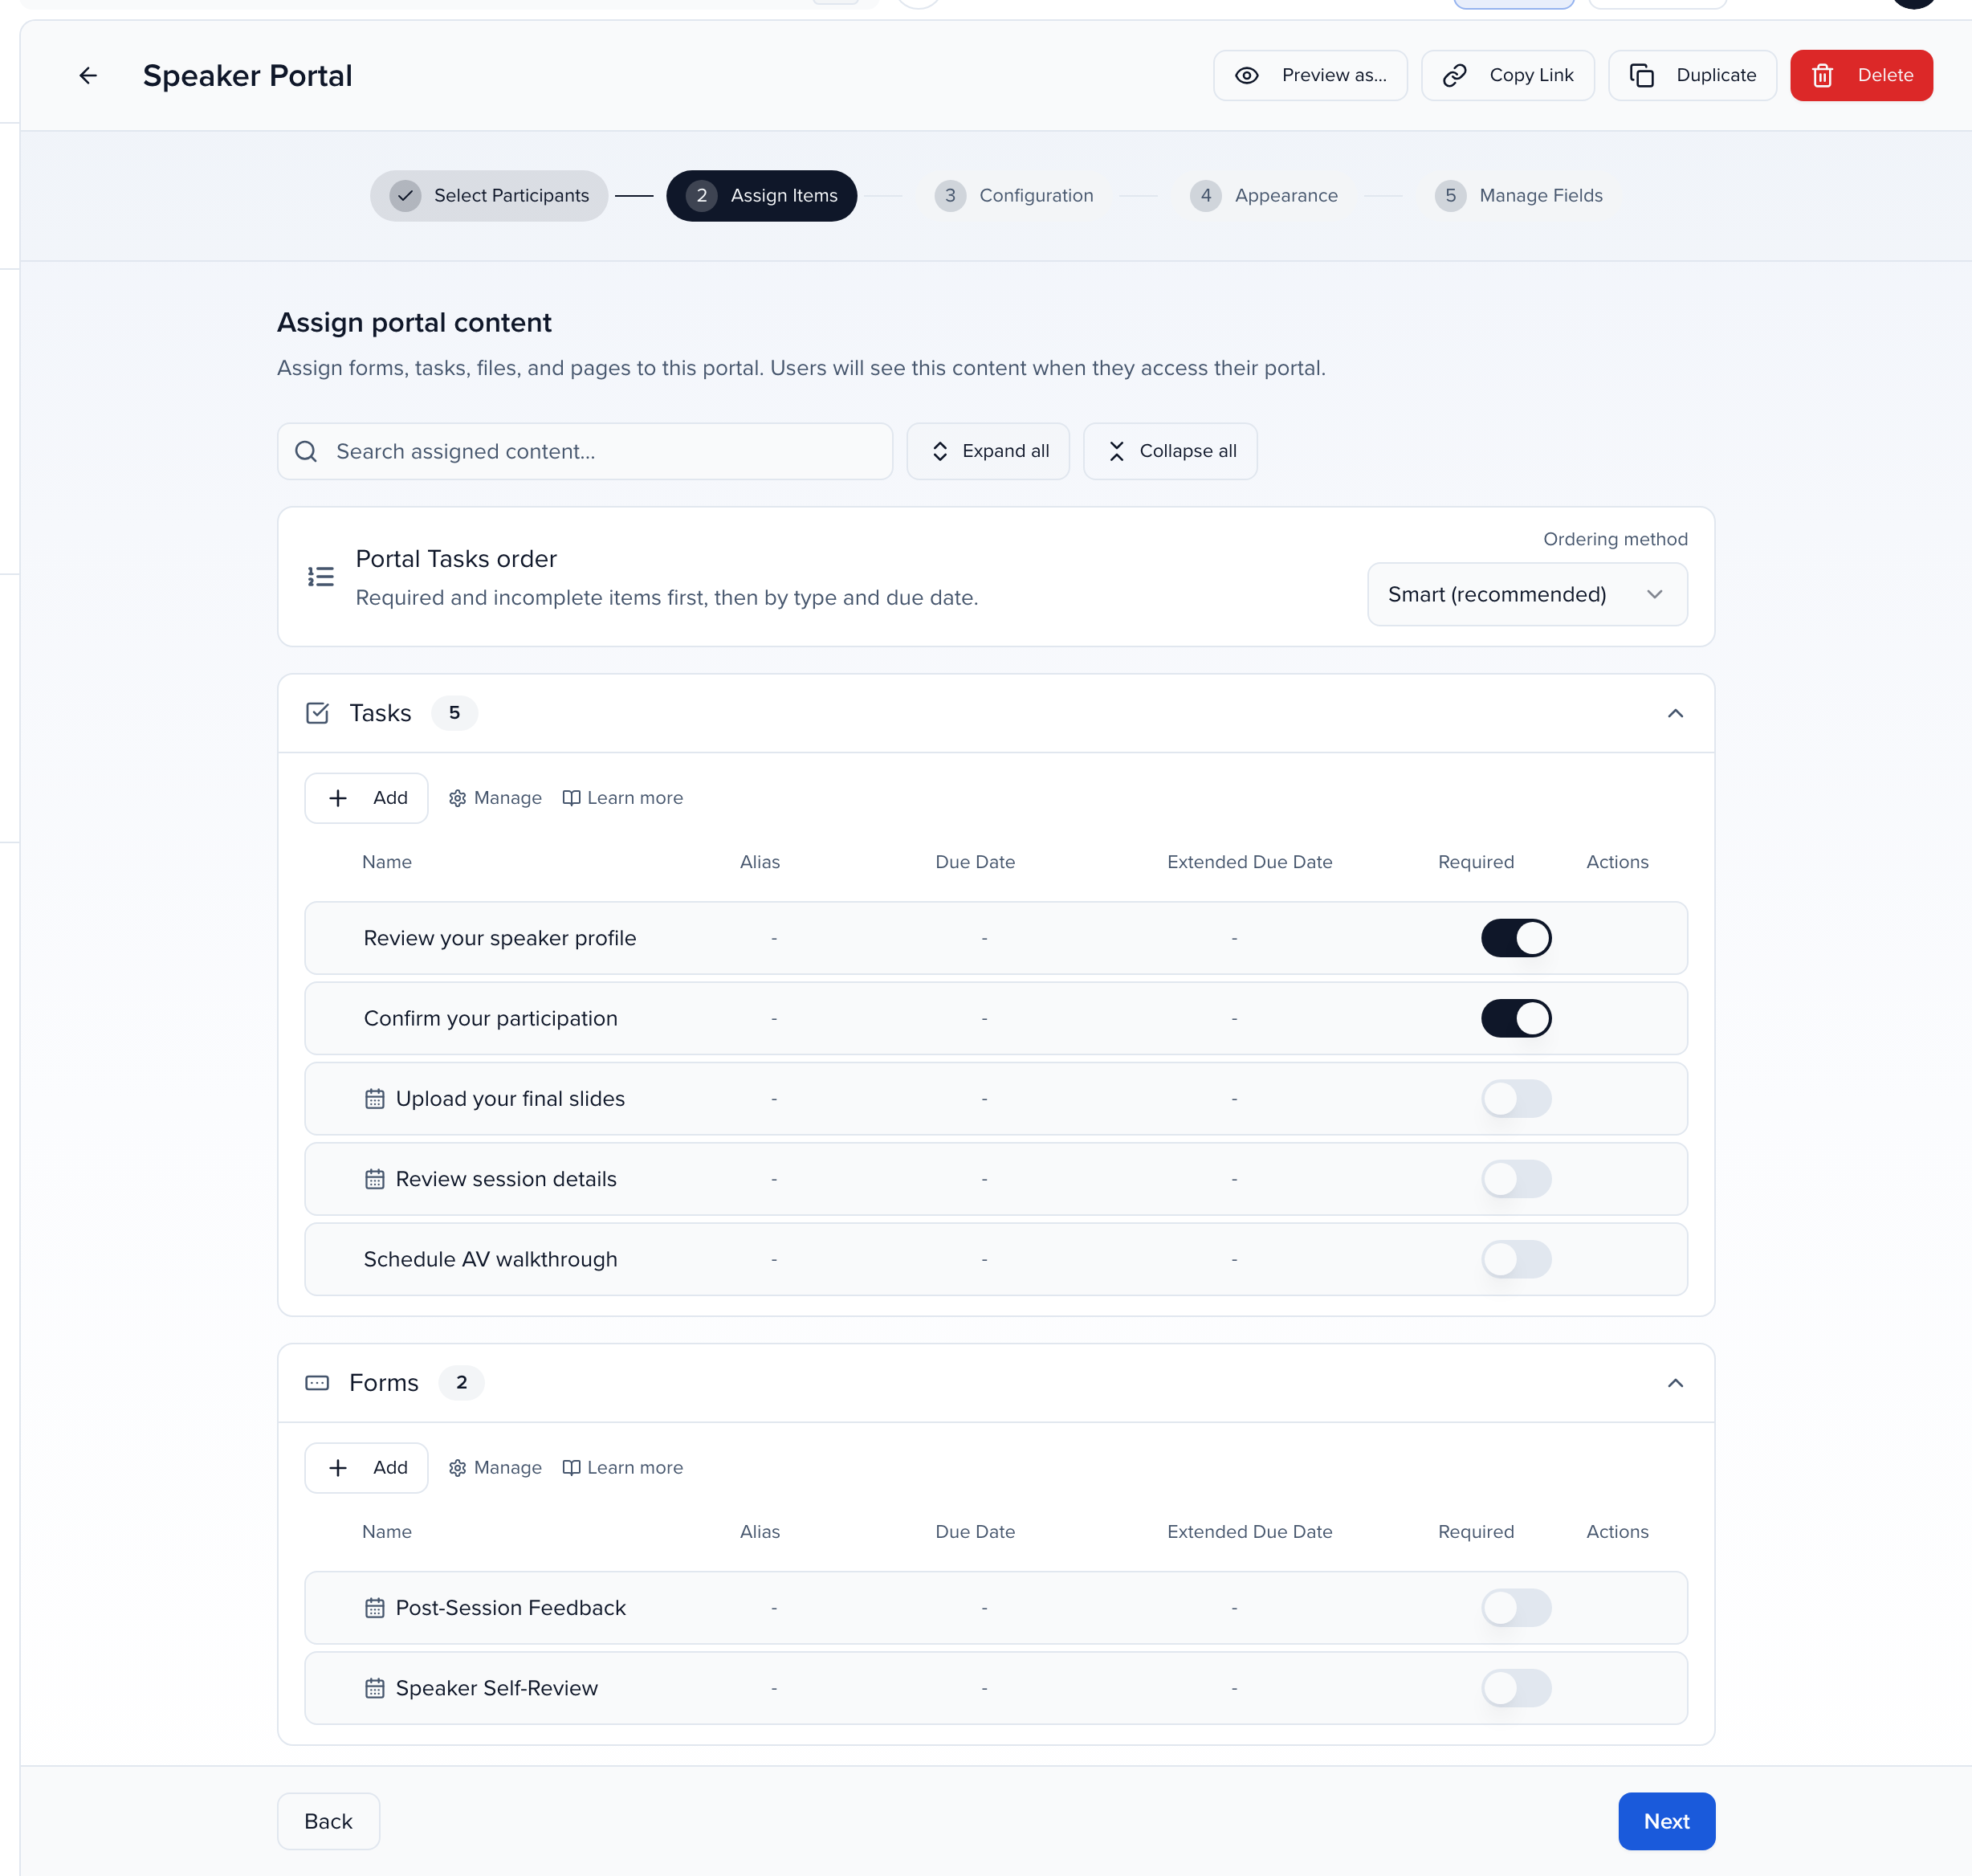
Section titled “Assign Items”Assign portal content lists the portal’s Tasks, Forms, File Requests, Resources, Files, and Advocacy campaigns. Click Add in a section to pick from the library, or Manage to open it. Each row shows Name, Alias, Due Date, Extended Due Date and Required; drag rows to set the Portal Tasks order, or leave the Smart (recommended) ordering — required and incomplete items first.
The pencil on a row opens Edit Settings for that item on this portal only: an Alias to display a different title, the Due Date and Extended Due Date, Due date relative to assignment on tasks, forms and file requests (N days after the person is assigned or after the assignment email is sent), Required, Allow edits once a form is submitted, Make Completed Tasks View-Only, and for submission tasks Assign By Filter — show the task only for submissions that match Submission Filters or carry certain Participant Roles.
Configuration step
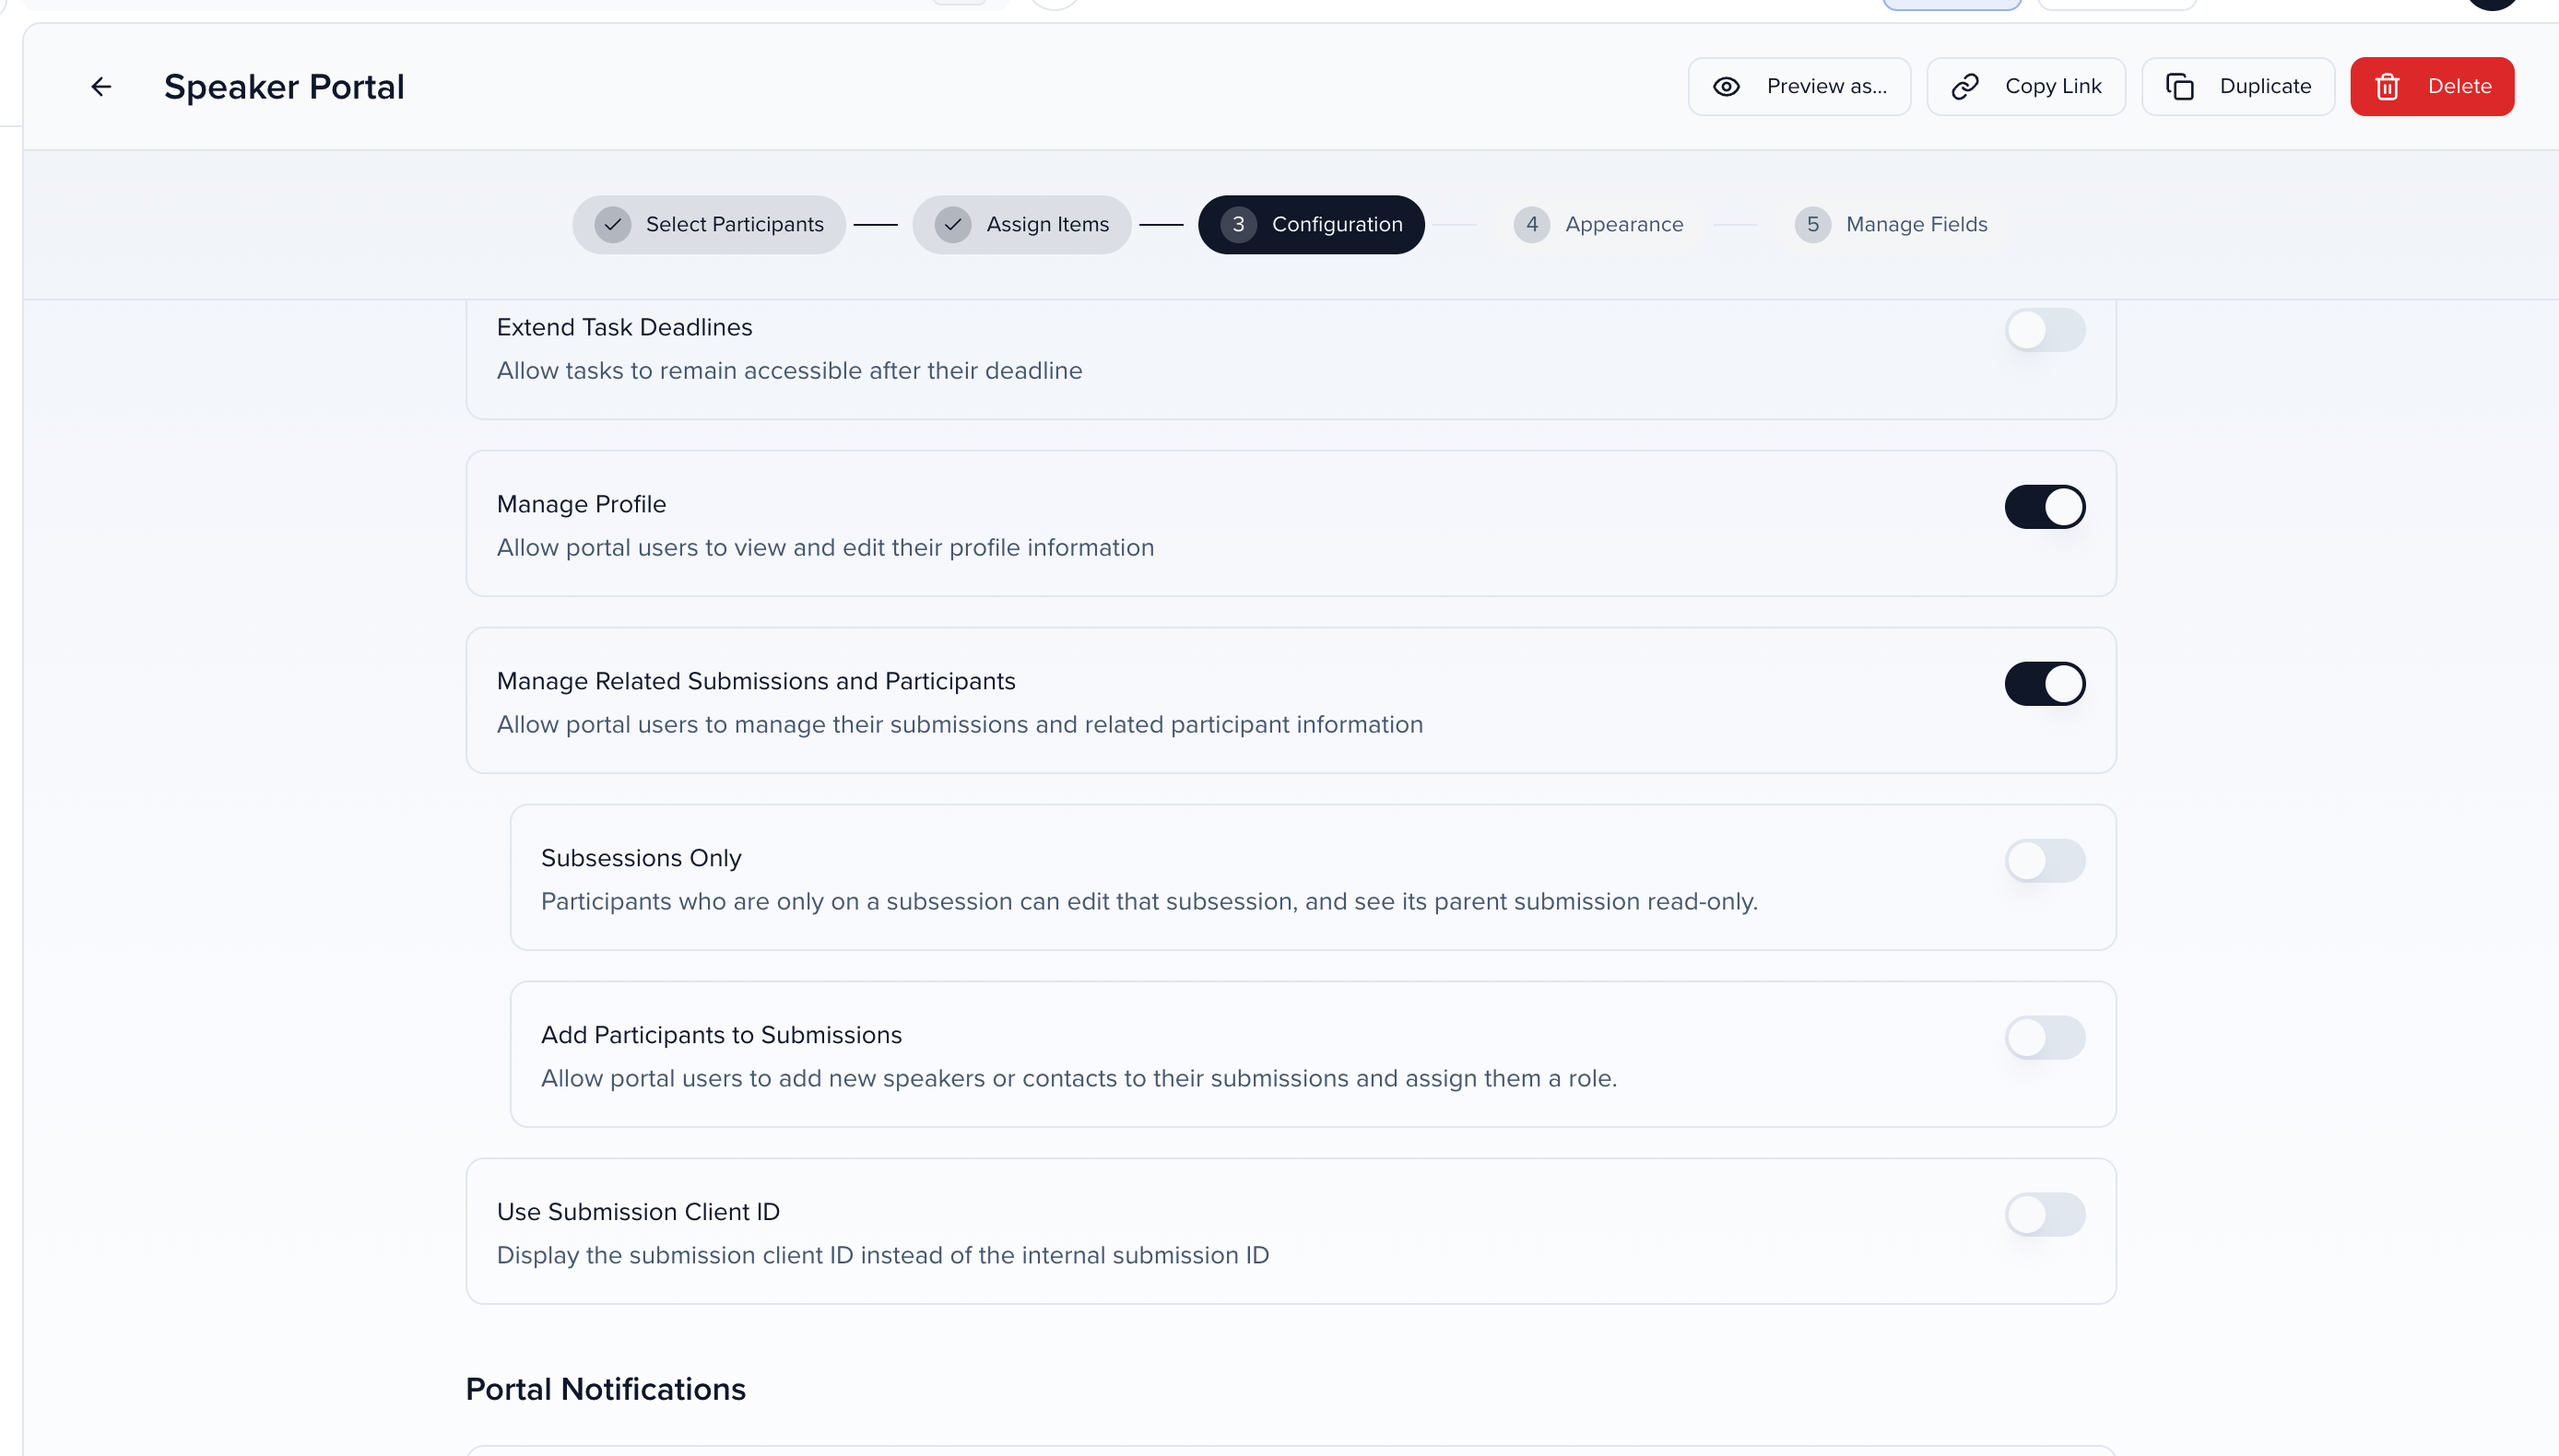
Section titled “Configuration step”What portal users can see and do. The full list is below.
Appearance
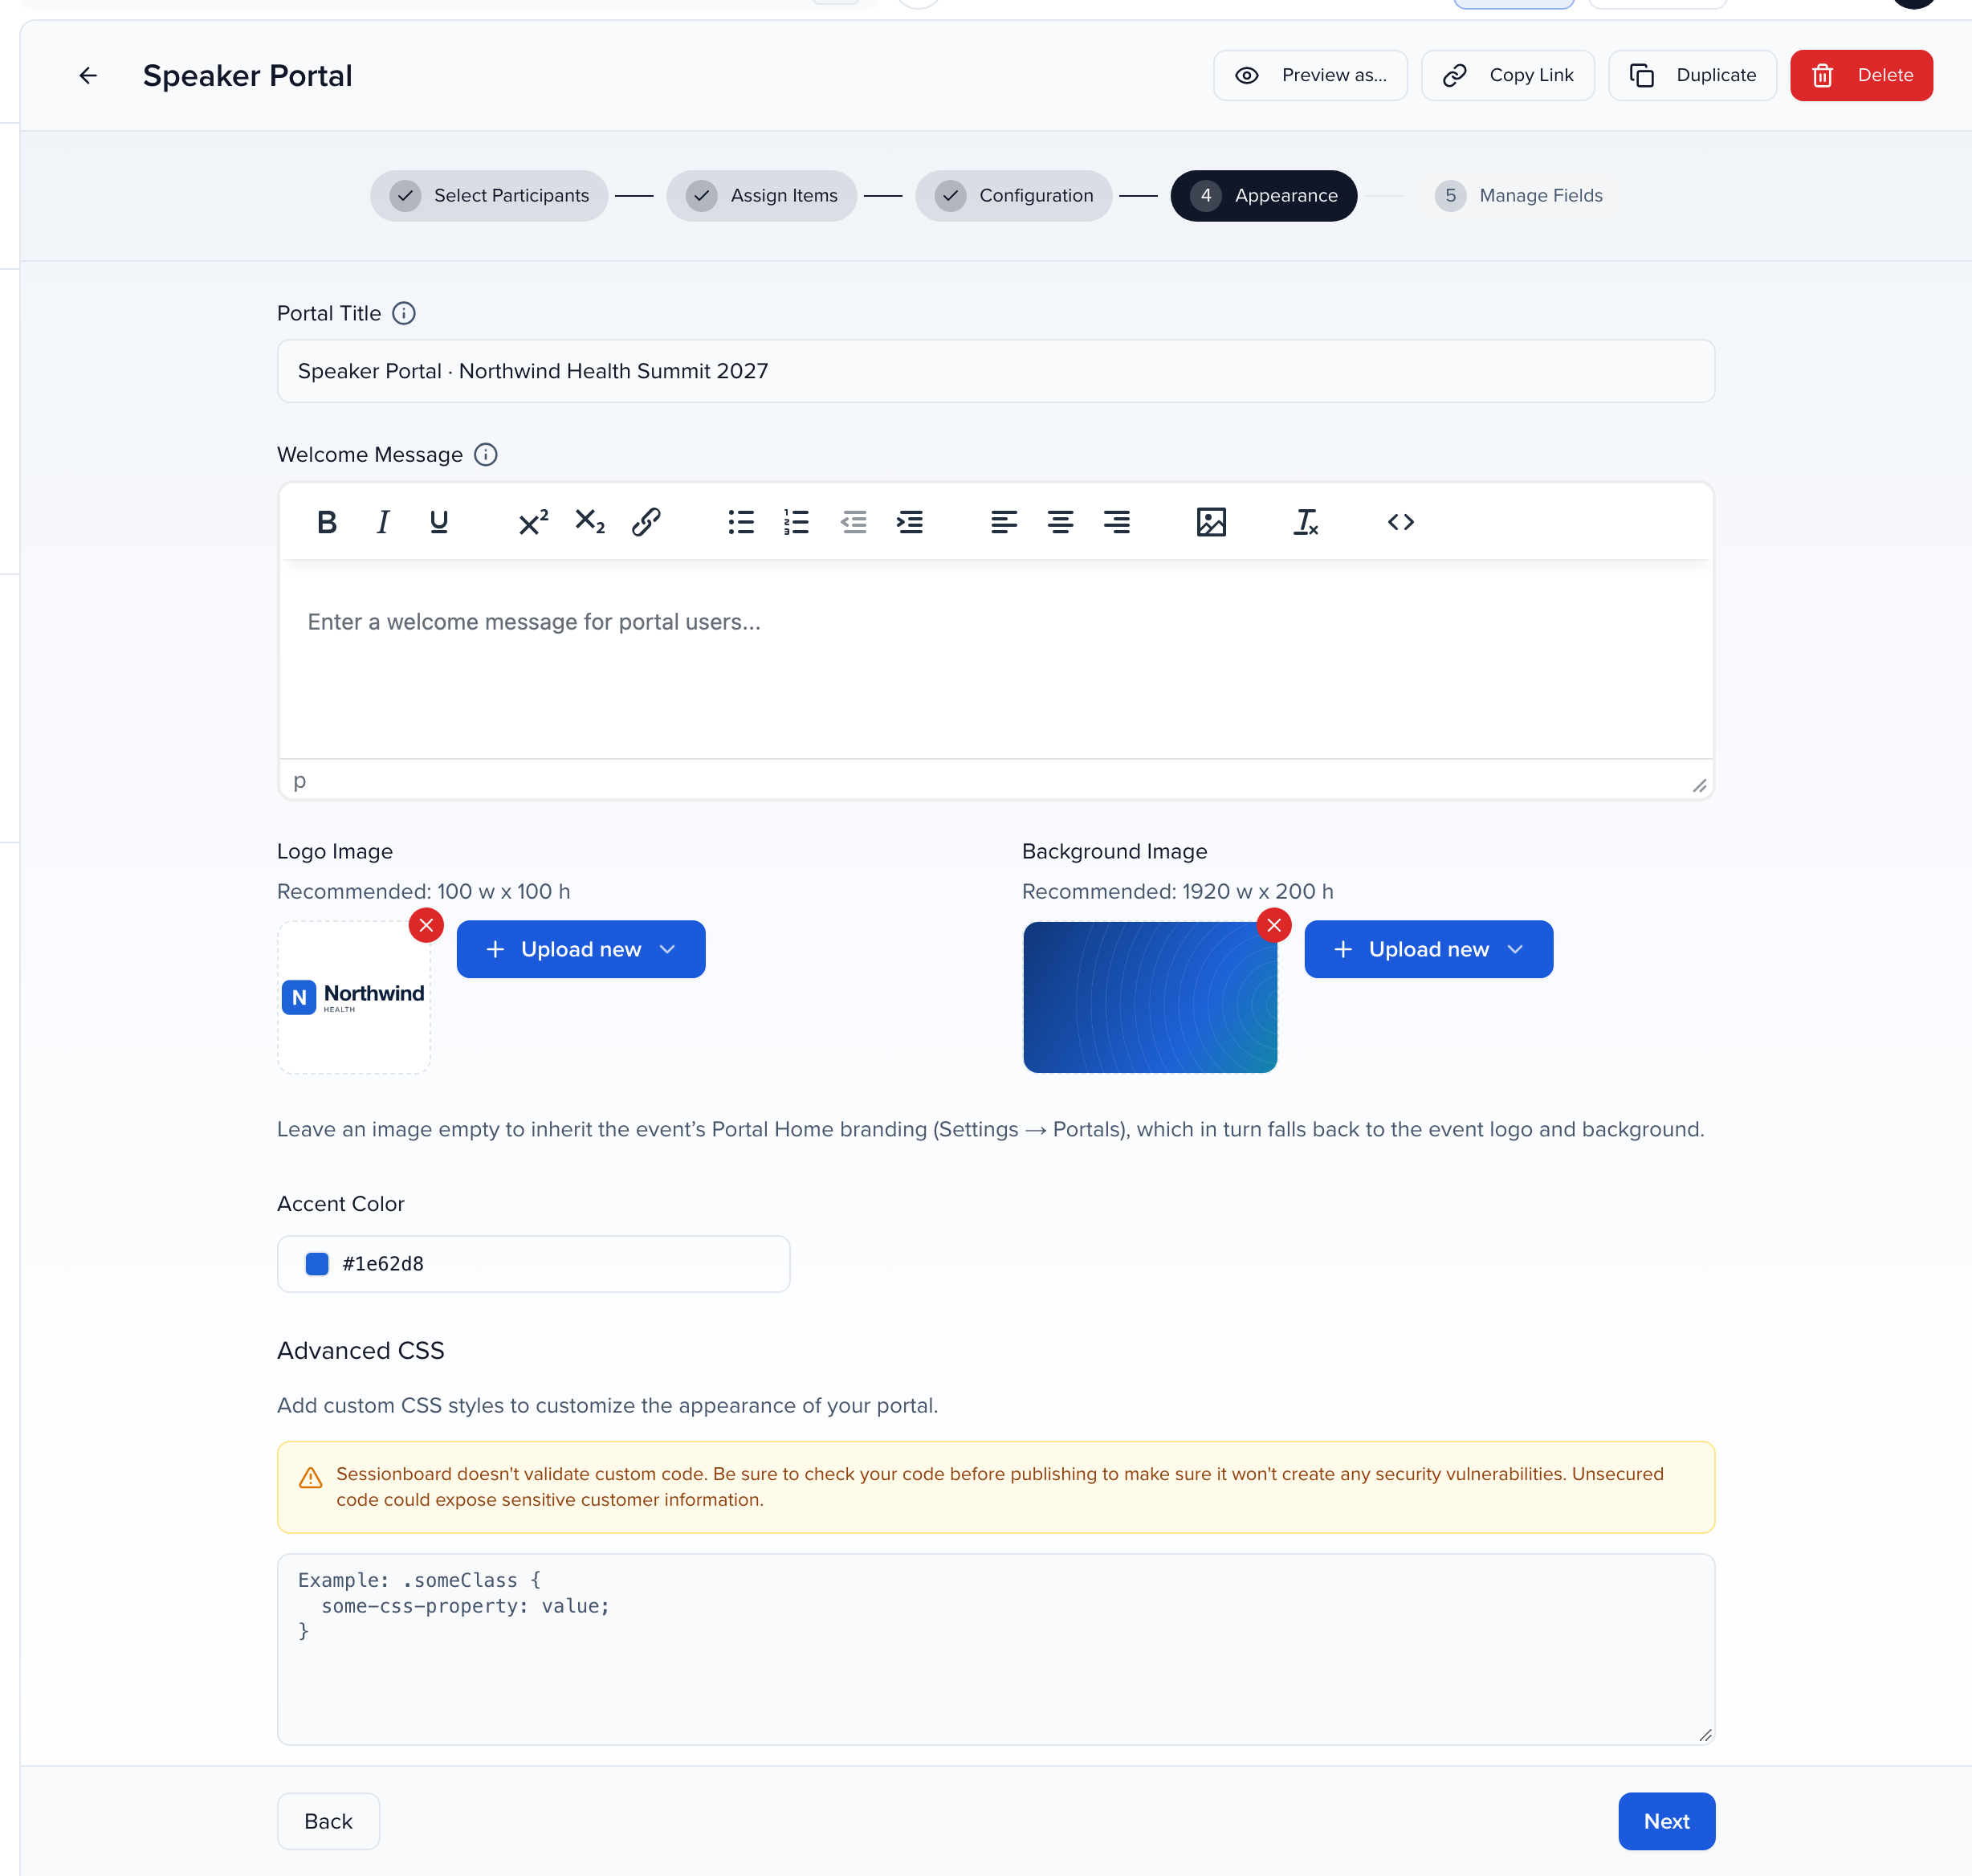
Section titled “Appearance”A Portal Title (the default is “Home”), a Welcome Message, a Logo Image (100 × 100), a Background Image (1920 × 200), an Accent Color, and Advanced CSS for anything the controls do not cover. To make the background full-width, use portal settings.
Manage Fields
Section titled “Manage Fields”Which fields portal users see and edit, in tabs for Submission Fields, Contact Fields (or Group Fields), Profile Fields, and the Contact Participants / Group Participants shown on co-presenter records. Each row has a Locked switch — locked fields are view-only. Show/Hide Fields opens the picker where you choose the visible fields, drag them into order, and add Help Text under any of them. Hide Empty Submission and Participant Fields tidies records that have blanks.
The session’s room follows the Location field. Leave Location out of the visible Submission Fields and the room is hidden everywhere in the portal: the home page’s session list, the calendar, task headers and the session panel. If you have never chosen visible fields, every field shows, including the room.
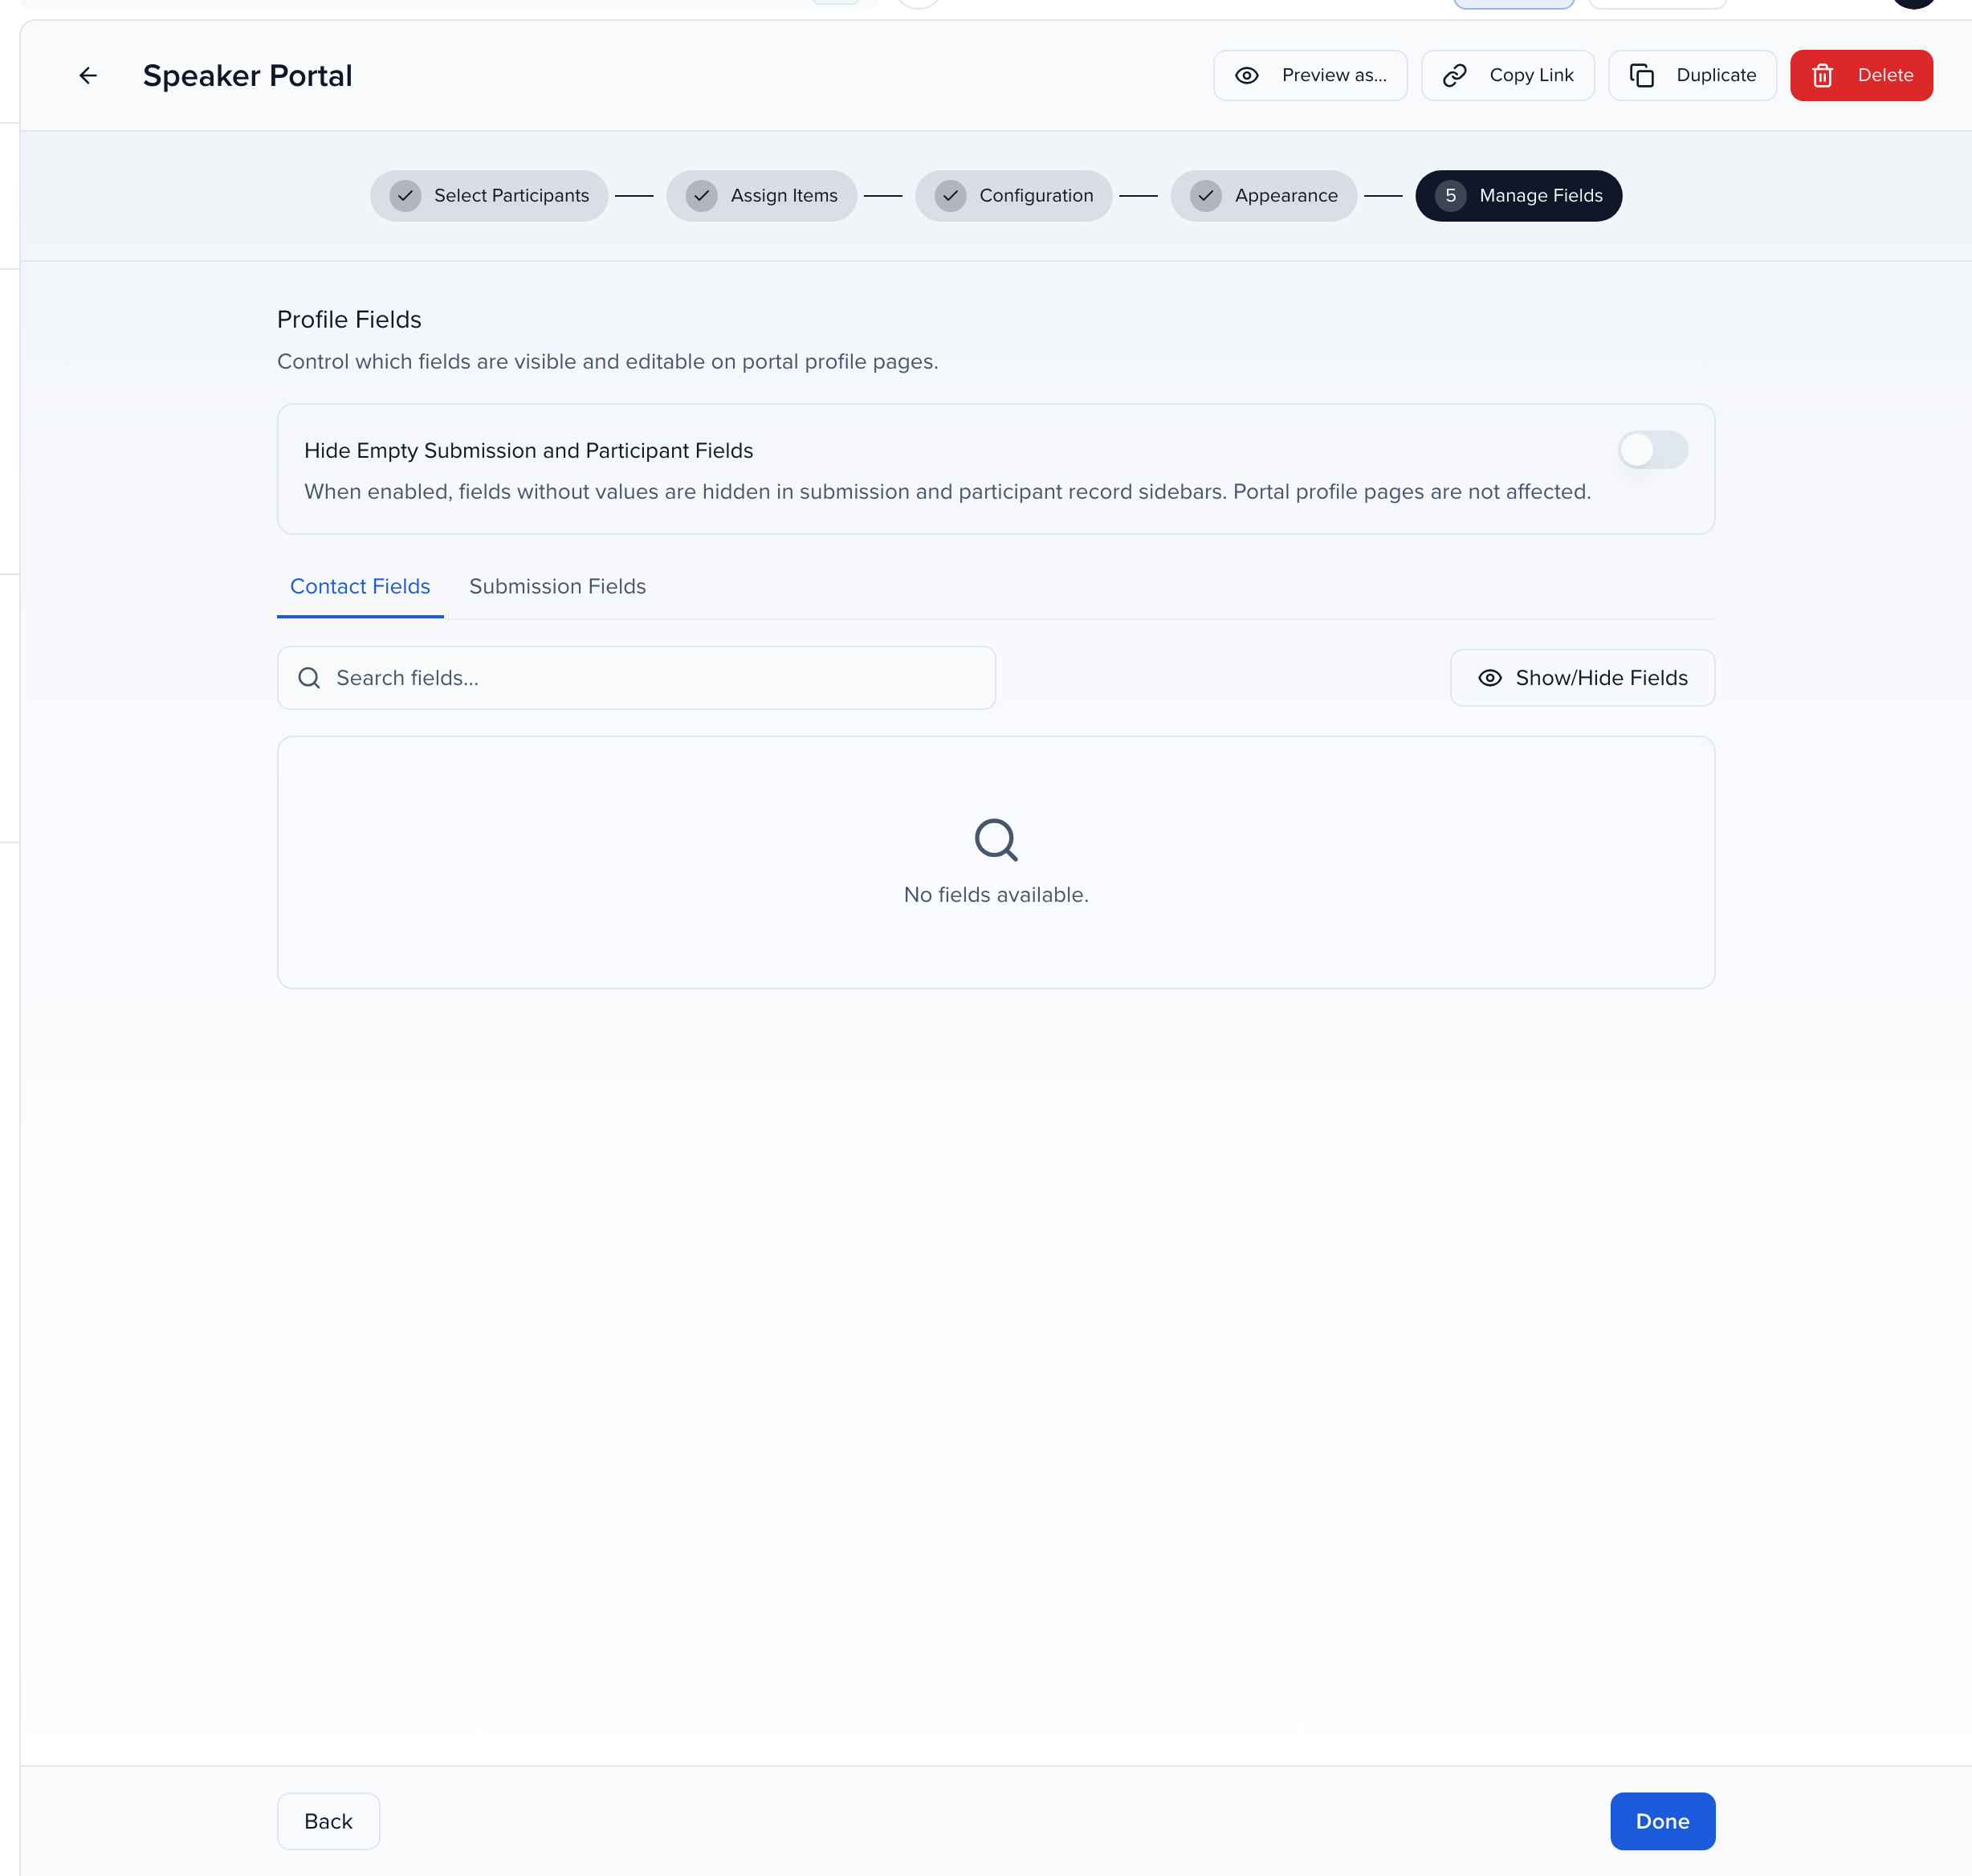
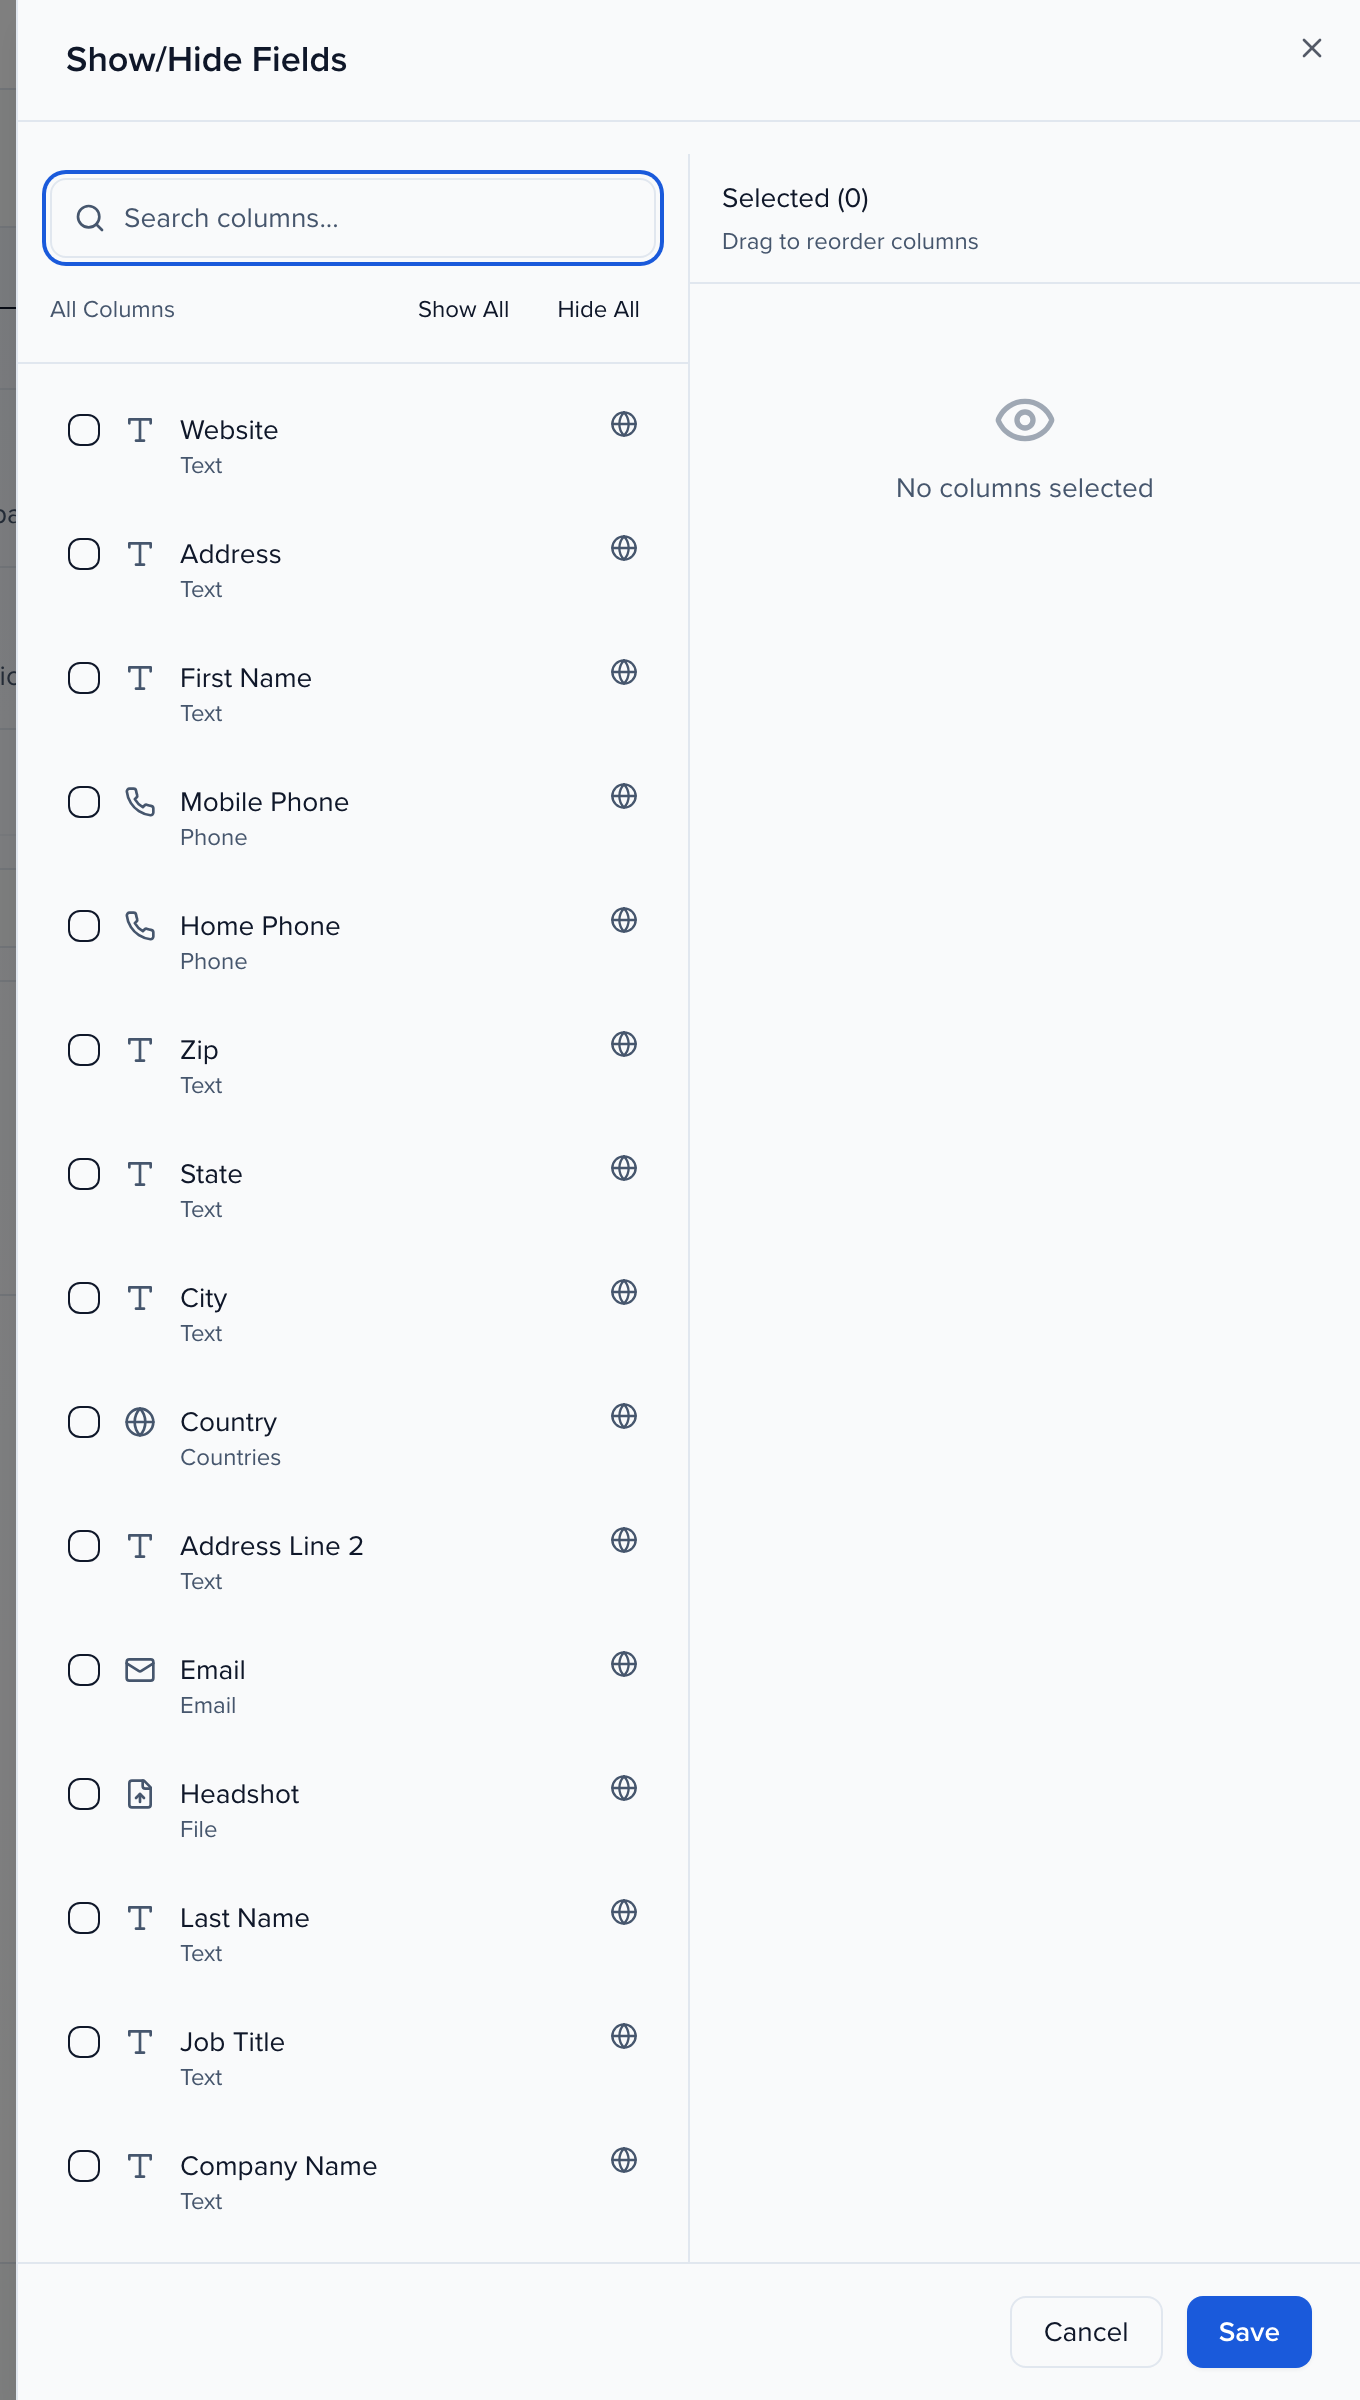
To reorder without a mouse, Tab to a field’s drag handle and press Space or Enter to pick it up. The arrow keys move it one place, Home and End jump to the top and bottom, and Space drops it. Escape puts it back. Save the panel to keep the new order.
Each step ends with Next — it reads Save and Next once you have changed something on the step — and the last with Done. The toolbar at the top holds Preview as… (open the portal as any assigned participant), Copy Link, Duplicate and Delete, and you can click the portal name to rename it.
Configuration
Section titled “Configuration”The Settings section:
| Setting | What it does |
|---|---|
| Control Submission Visibility | Show portal users their assigned submissions. Off, and speakers and submitters see no sessions at all. |
| Visibility filter | Appears under Control Submission Visibility while it is on. Shows only the assigned submissions that match your conditions — see Show only some submissions. Off by default. |
| Session list order | Chronological (agenda order, unscheduled last) or Alphabetical. |
| Add to Calendar | An Add to Calendar option on accepted submissions with start and end dates; the calendar text is set in Program Settings → Agenda. |
| View Submission Form | Let portal users open their submission in the submission form. Turn it off if you did not collect proposals through a form. The button on a session reads Edit Submission while the form still accepts changes, and View Submission once the form has closed or the submission was withdrawn. |
| Always Show Tasks | Show the task section even when there are no tasks assigned. Off, and tasks appear only to speakers with accepted submissions. |
| Show Tasks Widget | Show the Tasks card on the portal home and Tasks in the portal navigation. Turn it off on a portal that assigns no tasks, the same way the Sessions widget can be hidden. Portal users with contact tasks but no submission tasks never see an empty Submission Tasks section. |
| Show Submission Tasks on Subsessions / Show Tasks on Parent Submission | Where submission-level tasks appear when the submission has subsessions. |
| Extend Task Deadlines | Keep tasks open after their due date until a Final Deadline — a number of days after the original, 7 by default. The original date stays visible and the task stays Open. |
| Manage Profile | Let portal users view and edit their own profile. |
| Manage Related Submissions and Participants | Let portal users edit their submissions and the people on them. They can open a co-participant’s profile, but only their own record shows a Tasks tab. Subsessions Only, nested under it and off by default, limits people who are only on a subsession: they can edit that subsession and see its parent submission read-only — no Edit, no participant edits and no Add participant on the parent. Roles That Can Edit, also nested under it, limits editing to participants who hold one of the chosen session roles on that submission, for example only the Speaker. Everyone else on the submission sees it read-only. The check is per submission, so a contact who is the Speaker on one session and a Panelist on another can edit only the first. A submitter who does not hold a chosen role sees their submission read-only too. Leave it empty to let every participant edit. |
| Add Participants to Submissions | Let them add new speakers or contacts to a submission and give them a role; Selectable Participant Roles limits which roles. Needs Sessions 2.0 on the event. |
| Add Contacts to Group | Group portals: let a sponsor or exhibitor add contacts to their group and give them portal access. |
| Use Submission Client ID | Show your client ID instead of the internal submission ID. |

The Submission Tasks section, and its tab on the Tasks page, appear only for a portal user who has at least one submission task. Someone with none sees just My Tasks.
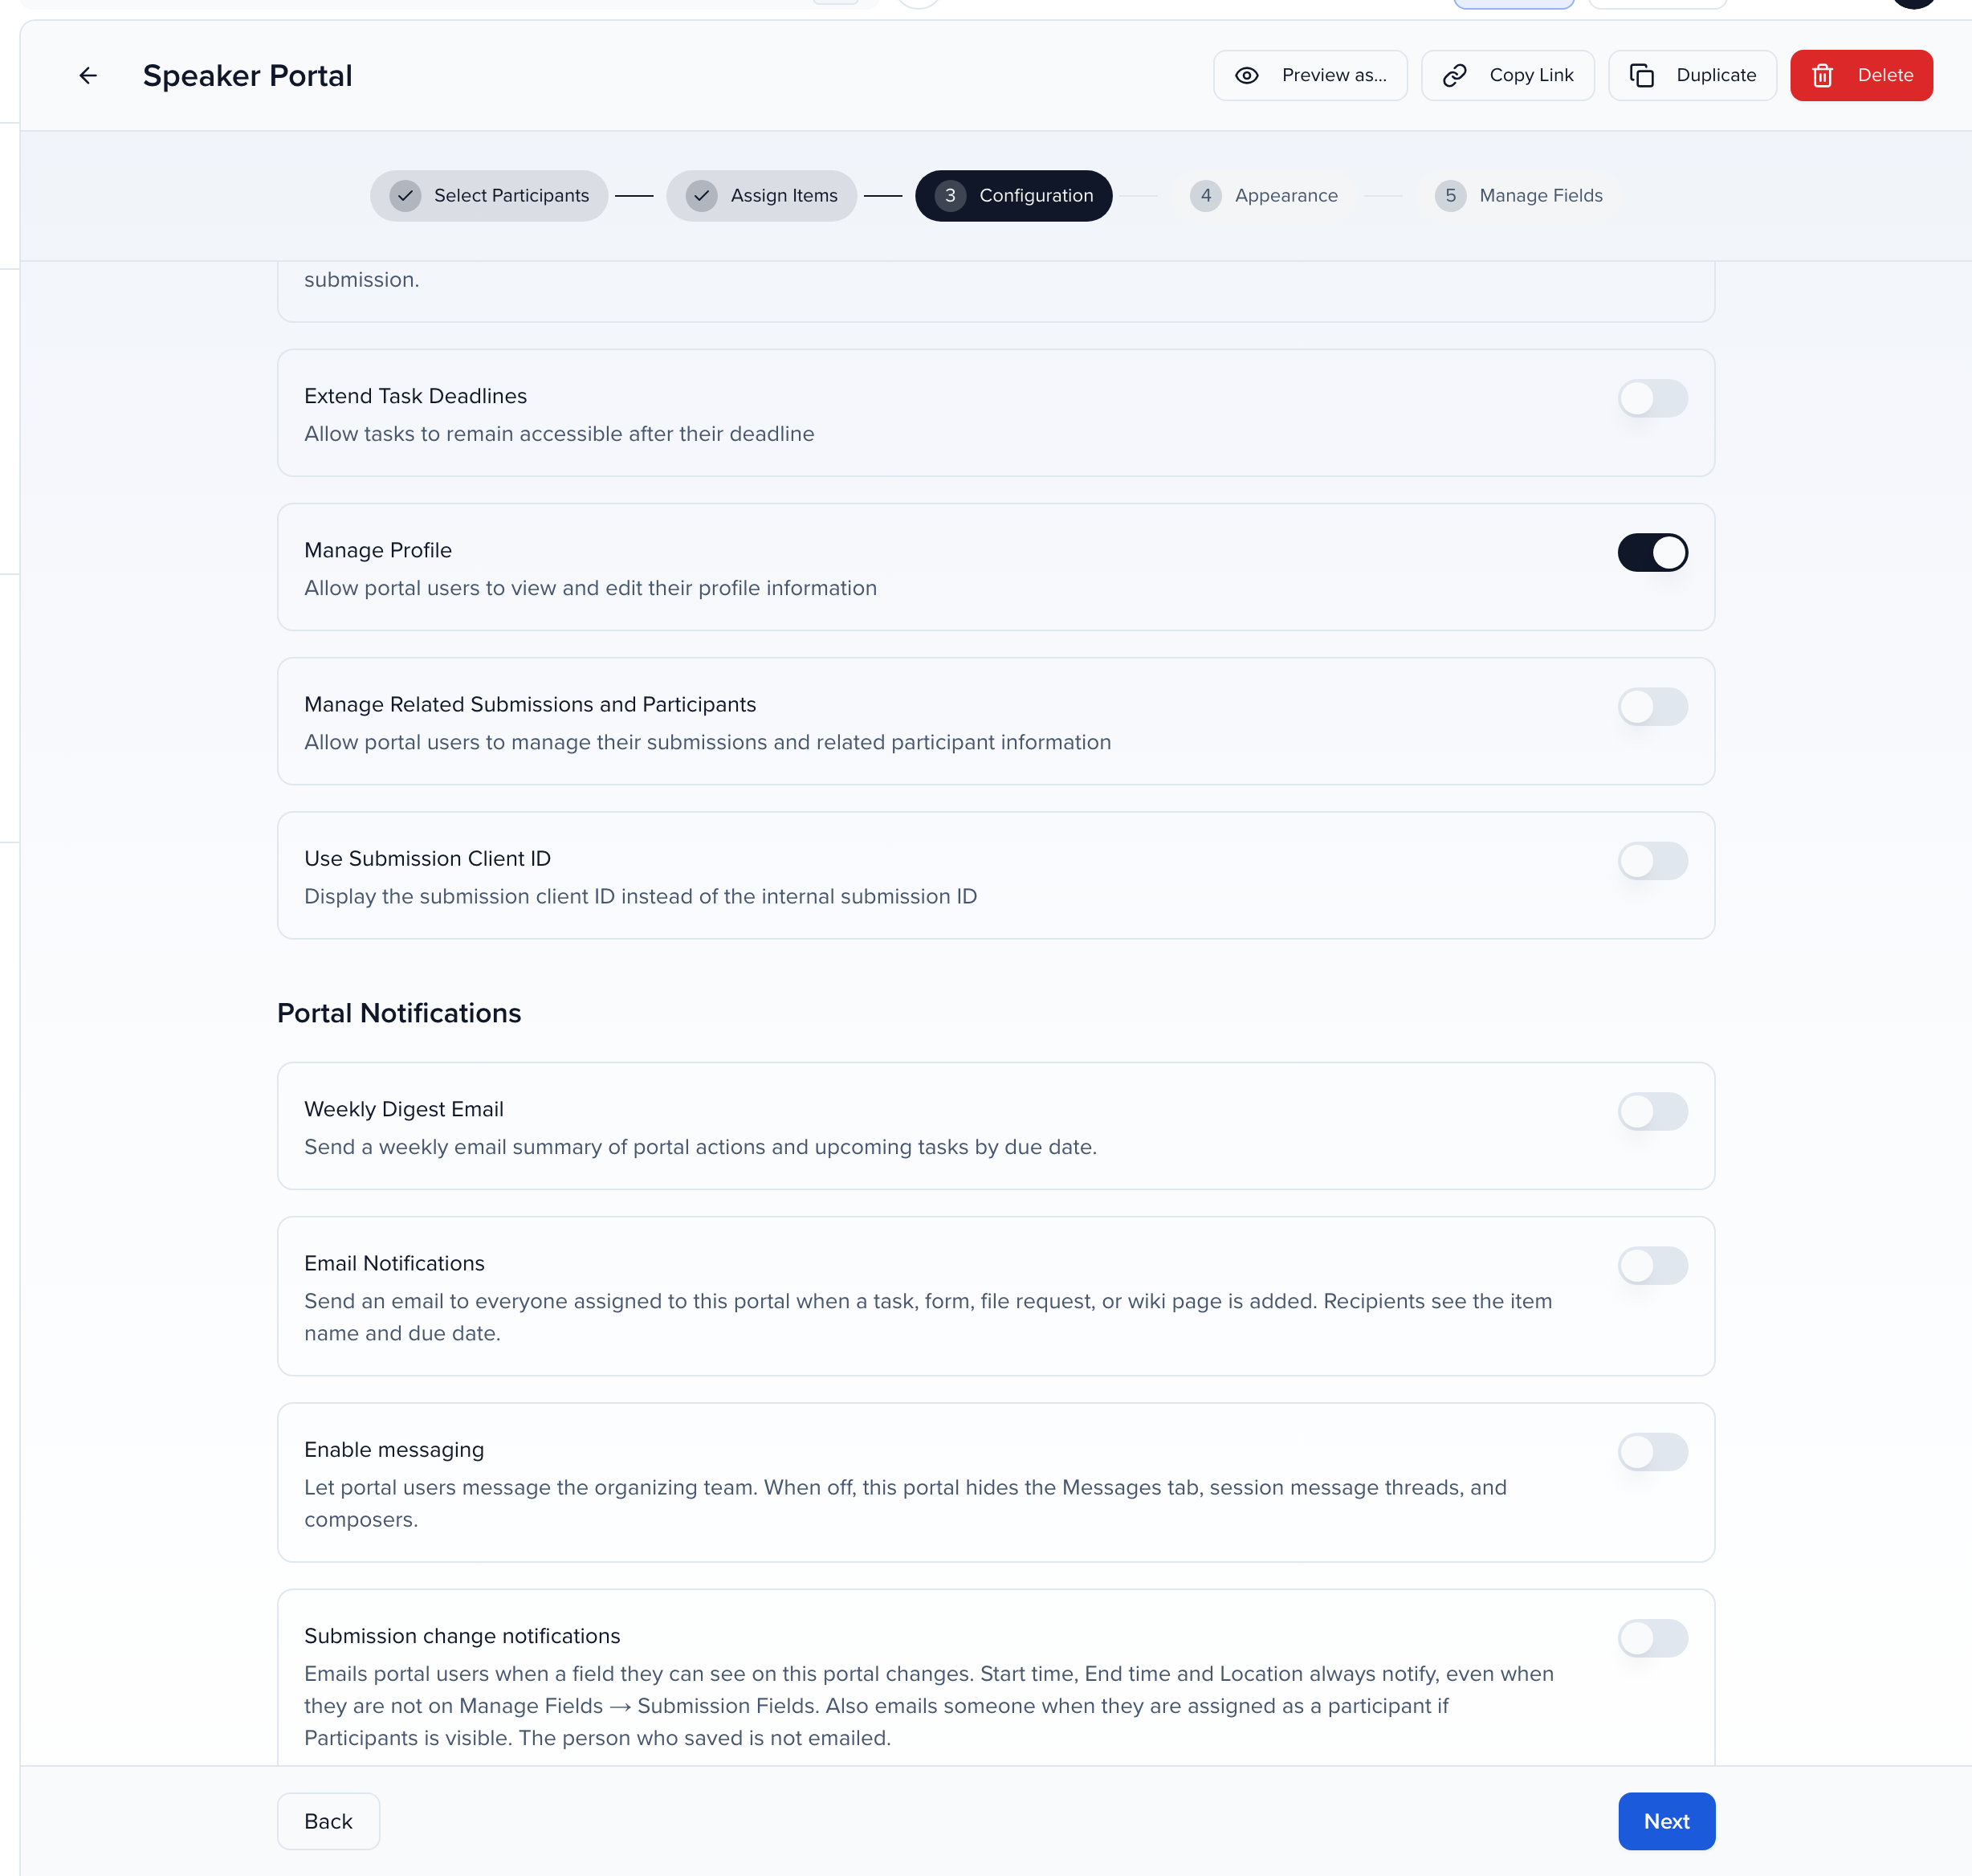
The Portal Notifications section:
| Setting | What it does |
|---|---|
| Weekly Digest Email | A weekly summary of portal actions and upcoming tasks by due date. Portal users with nothing outstanding, required or optional, are skipped — see who gets the weekly summary. To leave out one person, turn the digest off for that contact. |
| Email Notifications | Email everyone on the portal when a task, form, file request or page is added — the item name and its due date. |
| Enable messaging | Let portal users message the organizing team. Off, and the portal hides the Messages tab and session message threads. |
| Submission change notifications | Email portal users when a field they can see changes, when the start time, end time or location moves (those three always notify), or when they are assigned as a participant. See Notify speakers of submission changes. |
| Multi-language | Enable multi-language portal shows a language picker and auto-translates the headers, labels, placeholders and confirmations you tick. |
Assignment, weekly digest, and submission-change emails are listed in automated emails.
Show only some submissions
Section titled “Show only some submissions”By default a portal shows a person every submission they are assigned to. To narrow that — for example, a portal that shows only accepted submissions (Status is Accepted), or only submissions tagged Workshop — turn on Visibility filter under Control Submission Visibility and add conditions with the same filter builder that tasks and resources use. Every condition must match. A live count says how many submissions in the event match.
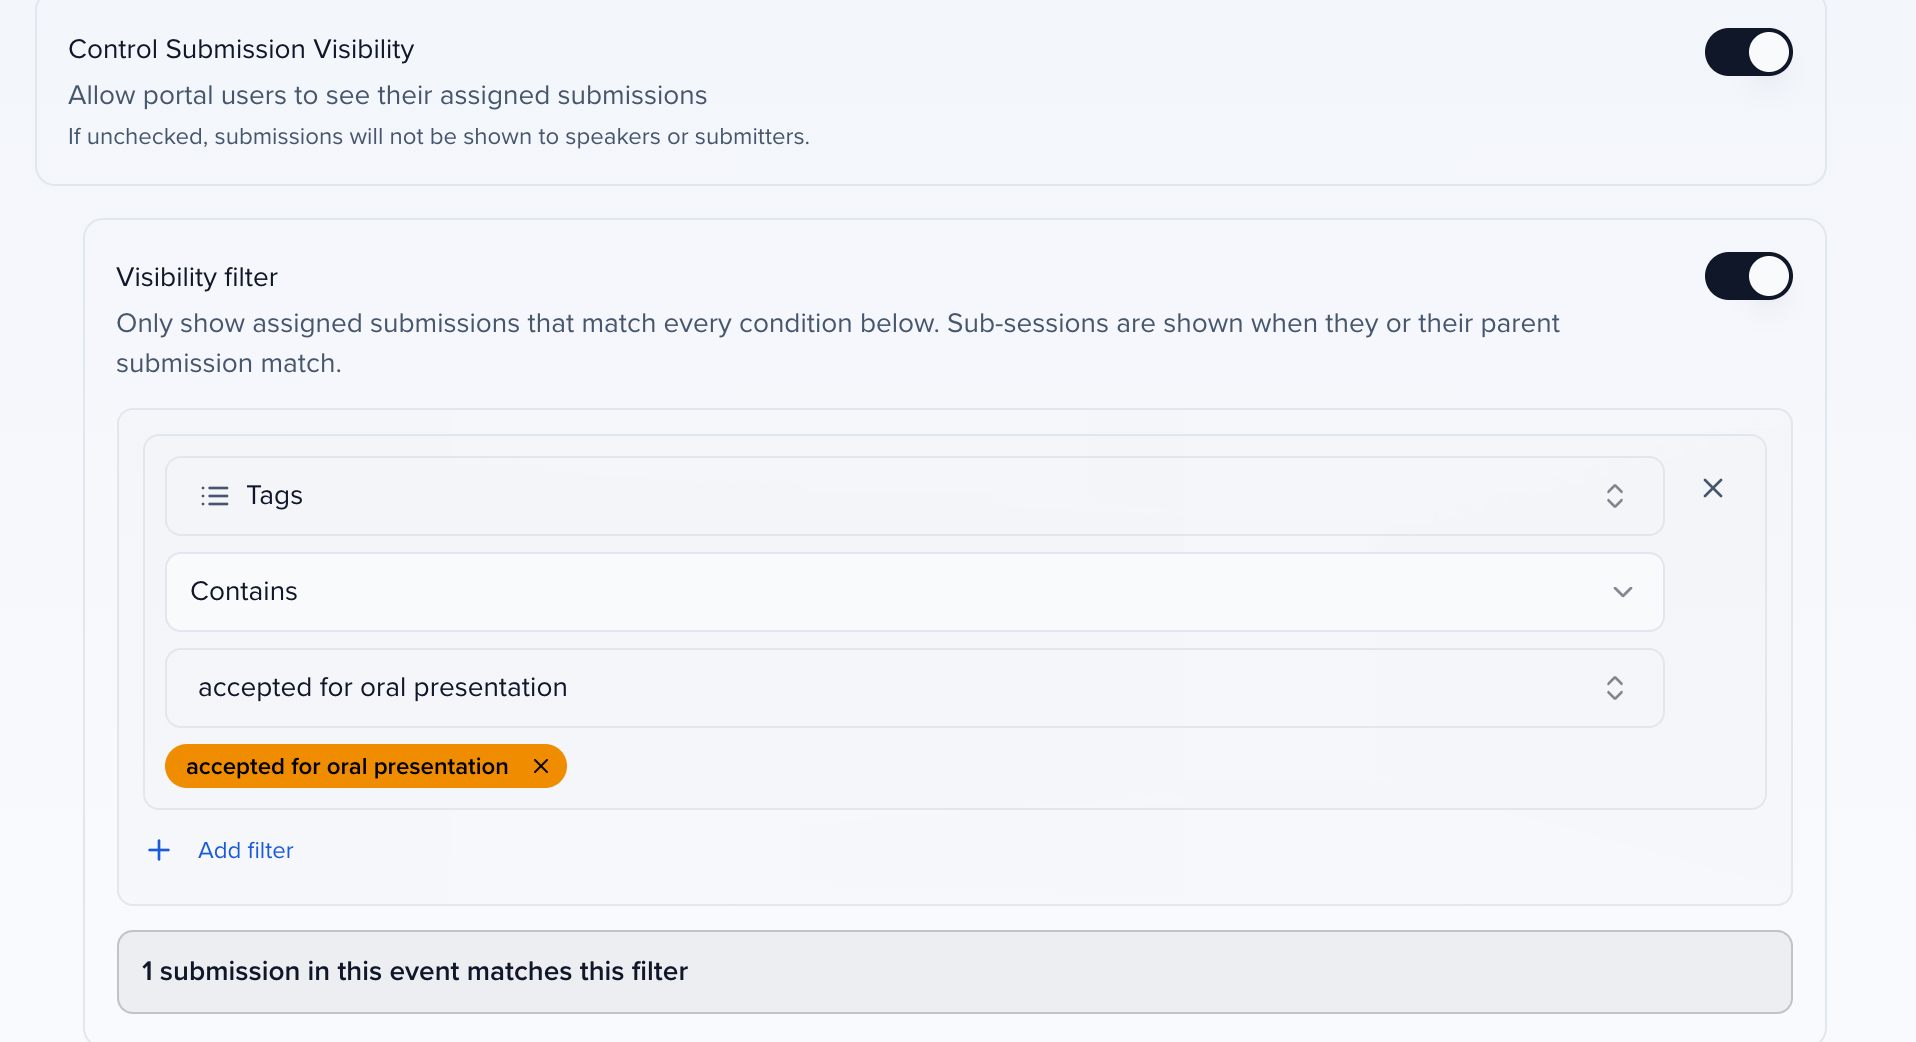
- A subsession shows when it or its parent submission matches; a parent shows when it or any of its subsessions matches.
- A submission the filter hides is hidden everywhere in that portal — the home page, My Participation, tasks and resources tied to it, the weekly digest and change notifications — and its link returns “not found” if someone opens it directly.
- Your team still sees and edits every submission in the admin app. Other portals are not affected.
- Switch the filter off, or remove its conditions, to show every assigned submission again. Turning Control Submission Visibility off still hides all submissions, filter or not.
A filter is saved only once it has at least one complete condition; until then every assigned submission is shown.
My Participation
Section titled “My Participation”Every portal shows a person’s submissions in one My Participation card on the home page and a My Participation tab, grouped by type and status, with a Pending Participant Confirmation group at the top when participant acceptance is on. The grouping is the same for every portal and has no settings. What participants see is described in Navigate your contact portal.
Dates and times in the portal
Section titled “Dates and times in the portal”Every date and time a participant sees is rendered in the event timezone from Event Details — not their own, and not yours — and names the zone it belongs to.
| What a participant is looking at | How it reads |
|---|---|
| Session Starts At and Ends At | The event timezone with its abbreviation: January 20, 2026 9:00 AM EST |
| A custom Date & Time field | The same, in the field’s format |
| A custom Date or Time field | Exactly as entered, with no zone |
Whether those times use a 12-hour clock (2:05 PM) or a 24-hour clock (14:05) comes from Time Format in Event Details, not from the participant’s language. It applies across the portal: task due dates, messages, file deadlines and upload times, the session Starts At and Ends At editors, and time fields on the profile. The language still sets the month and day words, so a German-language portal on a 24-hour event reads Oktober and 14:05, and an English-language portal on a 12-hour event reads October and 2:05 PM. If a participant’s browser opens its own time picker on a time field, that picker follows their device settings.
Daylight saving is worked out per value, so on a New York event a January session reads EST and a July one EDT. If Timezone is blank in Event Details, times fall back to UTC with no zone — set it before you share a portal.
See it as a speaker
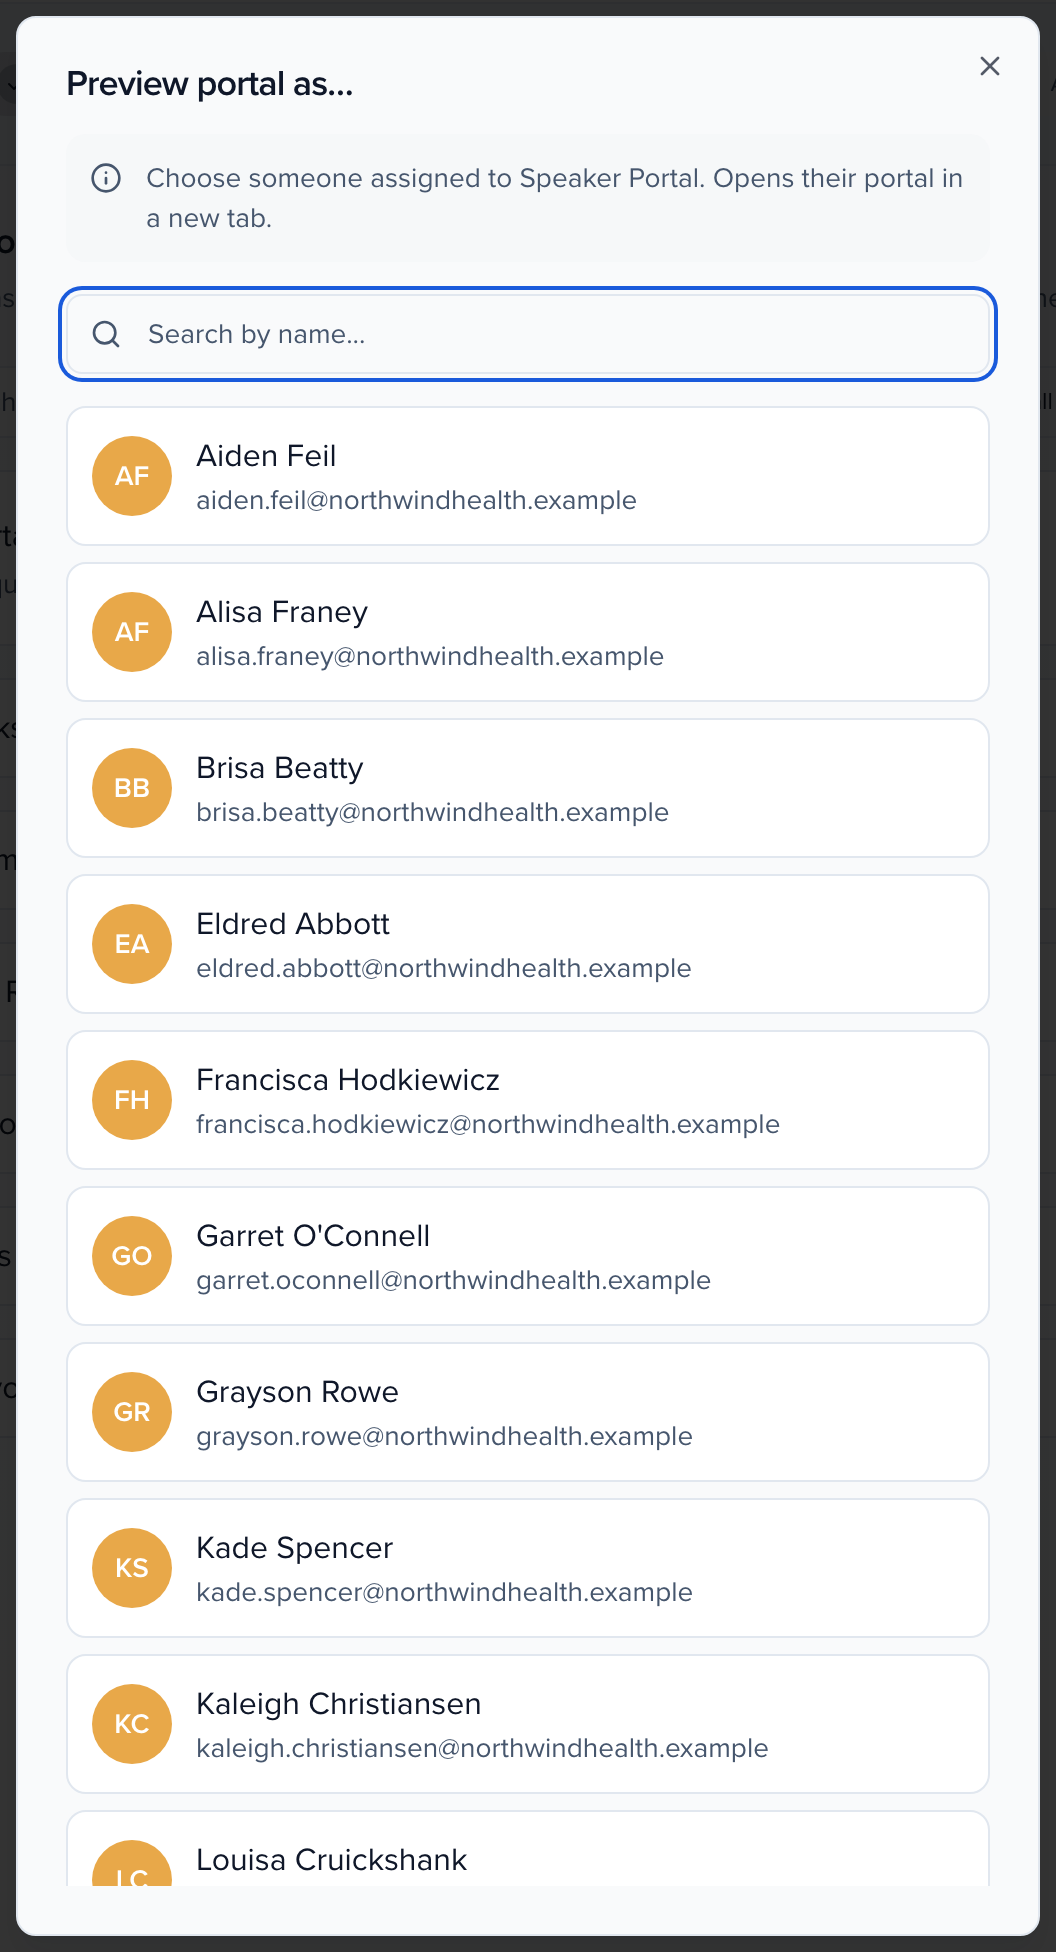
Section titled “See it as a speaker”Click Preview as… in the editor toolbar and pick anyone assigned to the portal. Their portal opens in a new tab exactly as they see it. Do this after every change to assigned items or Manage Fields.
The same view is one click away from any event page: View Portal at the top right opens View my portal and View portal as…, where you search for a contact (or a sponsor or exhibitor) and open their portal. View portal as… needs the impersonate-portal permission; team members without it see the entry disabled.
Share your portal
Section titled “Share your portal”Once configured, invite users to the event portal. Every portal shares one login link; the portal-login merge tag puts it in any email.
To nudge people with open items, select them in Contacts and choose Send → Send Portal Summary. Each person gets the weekly portal summary email right away — what is due this week, overdue, completed and awaiting approval, with a link to the portal — instead of waiting for the Monday digest. Unlike the Monday digest, which skips anyone with nothing outstanding, Send Portal Summary always sends — to everyone in the selection who has a portal login on this event and belongs to a portal. The confirmation tells you how many it had to skip.
Common questions
Section titled “Common questions”The questions event teams ask most while setting up their first speaker portal, with the section or article that answers each.
Can tasks show only to accepted speakers, or depend on role, session type, or status?
Yes, in two layers. Portal filters decide who is assigned to a portal (by role, session type, sponsor tier, or any contact or session field), so a “Keynote speakers” portal carries a different task list from the default one. Inside a portal, turn off Always Show Tasks to show tasks only to speakers on accepted sessions, and use Assign By Filter on a session task to show it only for sessions that match up to three filters, such as Track is Leadership. See create custom portals, Configuration, and create and assign tasks. The two recommended set-ups for an accepted-speakers portal are compared in create a portal for accepted speakers.
What is the difference between a task, a form, and a file request?
A task is an action item with a due date (register, book travel). A file request requires an upload, and admins can approve or decline what arrives (contract, presentation). A form collects structured answers through fields (bio, headshot, dietary needs, disclosures). All three are built in the libraries and assigned in Assign Items. Use a form when you need the answers as data on the contact record; use a file request when you need the document itself.
What can speakers see and edit in their portal?
You decide per portal. Manage Fields (step five) sets each contact and session field to editable, locked (view-only), or hidden. Manage Profile lets speakers edit their own name, headshot, biography, address, and social links; Manage Related Submissions and Participants lets them edit submission details and co-presenters, and Add Participants to Submissions lets them add people. Sessions appear only when Control Submission Visibility is on, and the submission form opens from the portal only when View Session Submission Form from Portal is on. Whether a speaker sees a pending session’s custom status name follows that status’s Show custom status name to external users setting in program settings.
How do we collect bios, headshots, disclosures, and consent?
Add a form to the portal with the fields you need, and mark fields required. Questions that map to contact, group, or session fields (First Name, Company Name, Session Title, and your custom fields) show the existing value for the speaker to review and update, so a biography collected here is the biography your agenda and integrations use. For a signed document, use a file request; for e-signature, use Docusign contracts. See create and assign portal forms and collect documents.
Do speaker agreements need Docusign, or can Sessionboard handle them?
Either. A file request collects a signed PDF and lets you approve or decline it; a form with a consent checkbox records agreement as data; and Docusign sends a pre-filled template from the contact record and tracks the signature back onto it. Choose Docusign when you need a legally executed envelope; choose a form or file request when a recorded acknowledgement is enough.
How do due dates and reminders work?
Each task, form, and file request carries a Due Date. Once it passes, portal users can no longer complete the item unless you set an Extended Due Date (per item) or Extend Task Deadlines (portal-wide, in Configuration). Portal users always see the original Due Date, in the task list, the weekly digest and the message shown when an item has closed; an Extended Due Date or the Extend Task Deadlines window keeps the item open without changing the date shown. Reminders are automatic: the Weekly Digest Email summarizes upcoming and overdue items, Email Notifications announce newly added items, and submission change notifications tell speakers when a visible field, time, or room changes. To chase a specific group, send a targeted email filtered by task status.
How do we see who has finished what, and complete a task on someone's behalf?
Add the task reporting columns to the Contacts, Speakers, Sponsors, Exhibitors, or Sessions view and filter by status; each task shows a status icon. From a contact’s profile, the Portal Tasks section lets an admin complete a task for them. See track task completion and mark tasks complete for portal users.
Do we need separate portals for keynotes, panelists, sponsors, faculty, or external speakers?
Only when the tasks or resources differ. Everyone is assigned to exactly one portal per module, chosen by filters, and the default portal catches anyone who matches no custom portal. Sponsors and exhibitors are groups and use the sponsor and exhibitor portals; people use the People portal. When several custom portals could match the same person, set the portal priority (create custom portals).
How do I put one specific person into a custom portal?
Give them something the portal’s filters match: portals are assigned only by filters, never by hand.
- Create a checkbox contact field, for example VIP portal, in Settings > Library > Fields (custom fields).
- Tick it on the person’s contact record.
- In the portal’s Select Participants step, add that field with Is checked, then Save Filters.
- Check the Assigned Portal column in Contacts. If a portal higher in the list also matches them, move this one up.
Contact records that share an email address always land in the same portal, so tick the field on the record the person actually uses.
A submitter can only edit a co-presenter's headshot. How do we let them edit more?
When a portal user opens a co-presenter on one of their submissions, they see the fields in the portal’s Contact Participants list. The headshot is always shown. If that list is empty, the headshot is all there is, and the portal says The organizer hasn’t chosen which participant details to show here yet.
- Open the portal editor on the Manage Fields step and click the Contact Participants tab. The tab is there only when Manage Related Submissions and Participants is on in Configuration.
- Click Show/Hide Fields, select the fields submitters should see for their co-presenters (for example name, title, organization, biography), drag them into order, and save.
- Back in the table, switch on Locked for any field they should see but not change.
Group Participants is the same list for sponsor and exhibitor groups on a submission. A portal user’s own profile uses Contact Fields, not this list.
Can a page or file show to only some people in one portal?
Not by contact field. Everyone in a portal sees the same files, and pages show to everyone in it unless you filter them by submission:
- Resources (pages): click the pencil on the page in Assign Items and turn on Assign By Filter. The page then shows only to portal users who have at least one submission matching the Submission Filters, for example Format is Poster. It needs Control Submission Visibility on in Configuration.
- Tasks, forms and file requests on submissions: Assign By Filter works the same way, and Participant Roles narrows it to people with a given role on those submissions. See create and assign tasks.
- Files: no per-person setting.
- One text, different details: a page of type Contacts or Groups fills merge tags from the reader’s own record, so one page can show each person their own booth, hotel or session. See portal pages.
To show something only to people picked by a contact field, give them their own portal: add a checkbox contact field, tick it on those people, filter a custom portal on it, and put the page or file there. Duplicate the main portal first so the new one starts with the same content, and move it above the main portal so those people land in it.
My portal filters disappeared after I saved them
Save Filters drops any row that is missing a field, an operator or a value, without a warning. Add the filter again with a value selected, save, and confirm the people under Portal Selection Criteria before you click Save and Next. If you added several filters expecting “either”, remember they all have to match: see how filters combine.
How do invitations, acceptance, and portal access fit together?
Speakers get portal access when they submit through a form, when you grant it from Contacts → More → Manage Portal Access, or automatically on creation when Automatically provision contact portal access is on in Record Settings. Every portal shares one login link, sent with the portal-login merge tag (inviting users to the event portal). Turn on participant acceptance and each speaker confirms or declines every role they hold, with anything waiting on them listed under Pending Participant Confirmation in My Participation.
A speaker says their portal is empty or they cannot log in
Check the role’s Portal Access toggle, confirm they are using the Portal Username on their contact profile (it is separate from the communication email), then reset access from Manage Portal Access. The full checklist is in why can’t a portal user see any tasks assigned to them? and common speaker portal issues.
Can we preview the portal as a speaker before we share it?
Yes. See how can I view a portal as an admin?. Do this after every change to tasks or Manage Fields; what you see is exactly what that person sees.