

Create & assign portal forms
A form is a task with questions. Use one when you need structured answers rather than a single upload: AV needs, terms and conditions, a confirmed bio and headshot, sponsor logos and booth staff. Questions that map to contact, group or session fields are pre-filled with what you already hold, and the answers write back to the record — so a “confirm your details” form is also how speakers fix their own data.
Video transcript
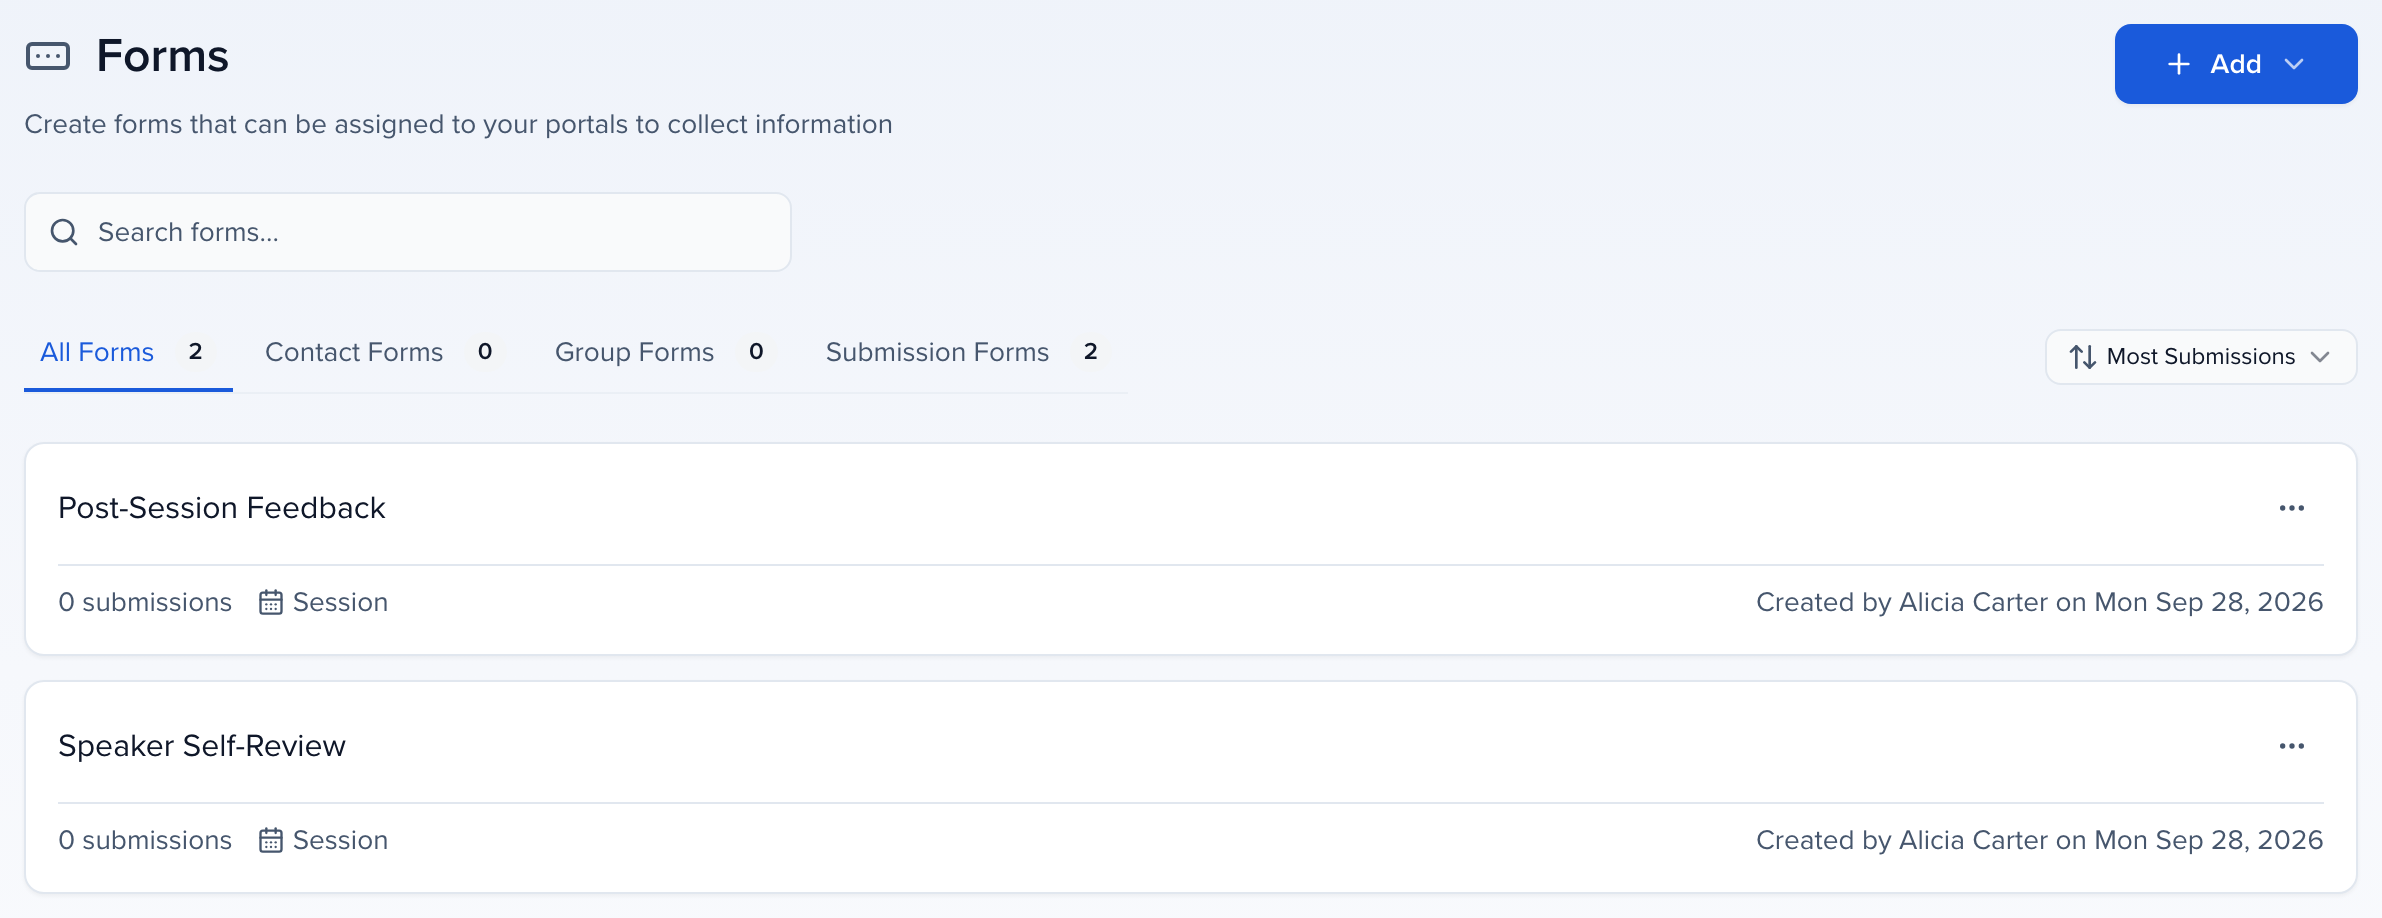
Program, Portals, then Forms. A form is a task with questions. Use one when you need structured answers rather than a single upload, AV needs, a confirmed bio and headshot, sponsor logos and booth staff. This library holds every form on the event, with the tabs filtering by who it’s for. All Forms, Contact Forms for one person, Group Forms for a sponsor or exhibitor company, Submission Forms for each session. Each card shows how many submissions have come in.
Add, then Add Form. Three steps down the left, Form Setup, Form Questions, Settings. Name is internal, what your team sees in the library. Title is what portal users see. Show welcome description adds instructions or a deadline above the questions. Then the Type. Contacts for one person, Groups for a company, Submissions for each session. This decides which fields you can put on the form and where the answers land, so pick it first. This one’s for speakers, so Contacts.
Form Questions. A section title, instructions, and the questions themselves. A contact form starts with the basics already on it, name, email, company, job title, biography, each with a Required switch and a lock to make it view only. Add Field opens every contact field you already hold, or Create Field for a new one. Existing fields arrive pre-filled from the record and write back on submit, so a confirm your details form is also how speakers fix their own data. I’ll add Dietary requirements and Headshot. Preview shows it as a portal user will.
Settings. Send Confirmation Email emails the person when they submit, with a PDF summary of their answers attached and a link back to the submission in their portal. The confirmation message is your text in that email, and it takes merge tags. Create, and the form is in the library, under Contact Forms now, with zero submissions.
A form in the library reaches nobody until it’s on a portal. Portals, the menu on the Speaker Portal card, Edit Tasks. This is the Assign Items step. Each section is one kind of content, tasks, forms, file requests, resources, files. In Forms, Add, tick the form, Add Selected. It’s on the portal, and the pencil under Actions opens its settings.
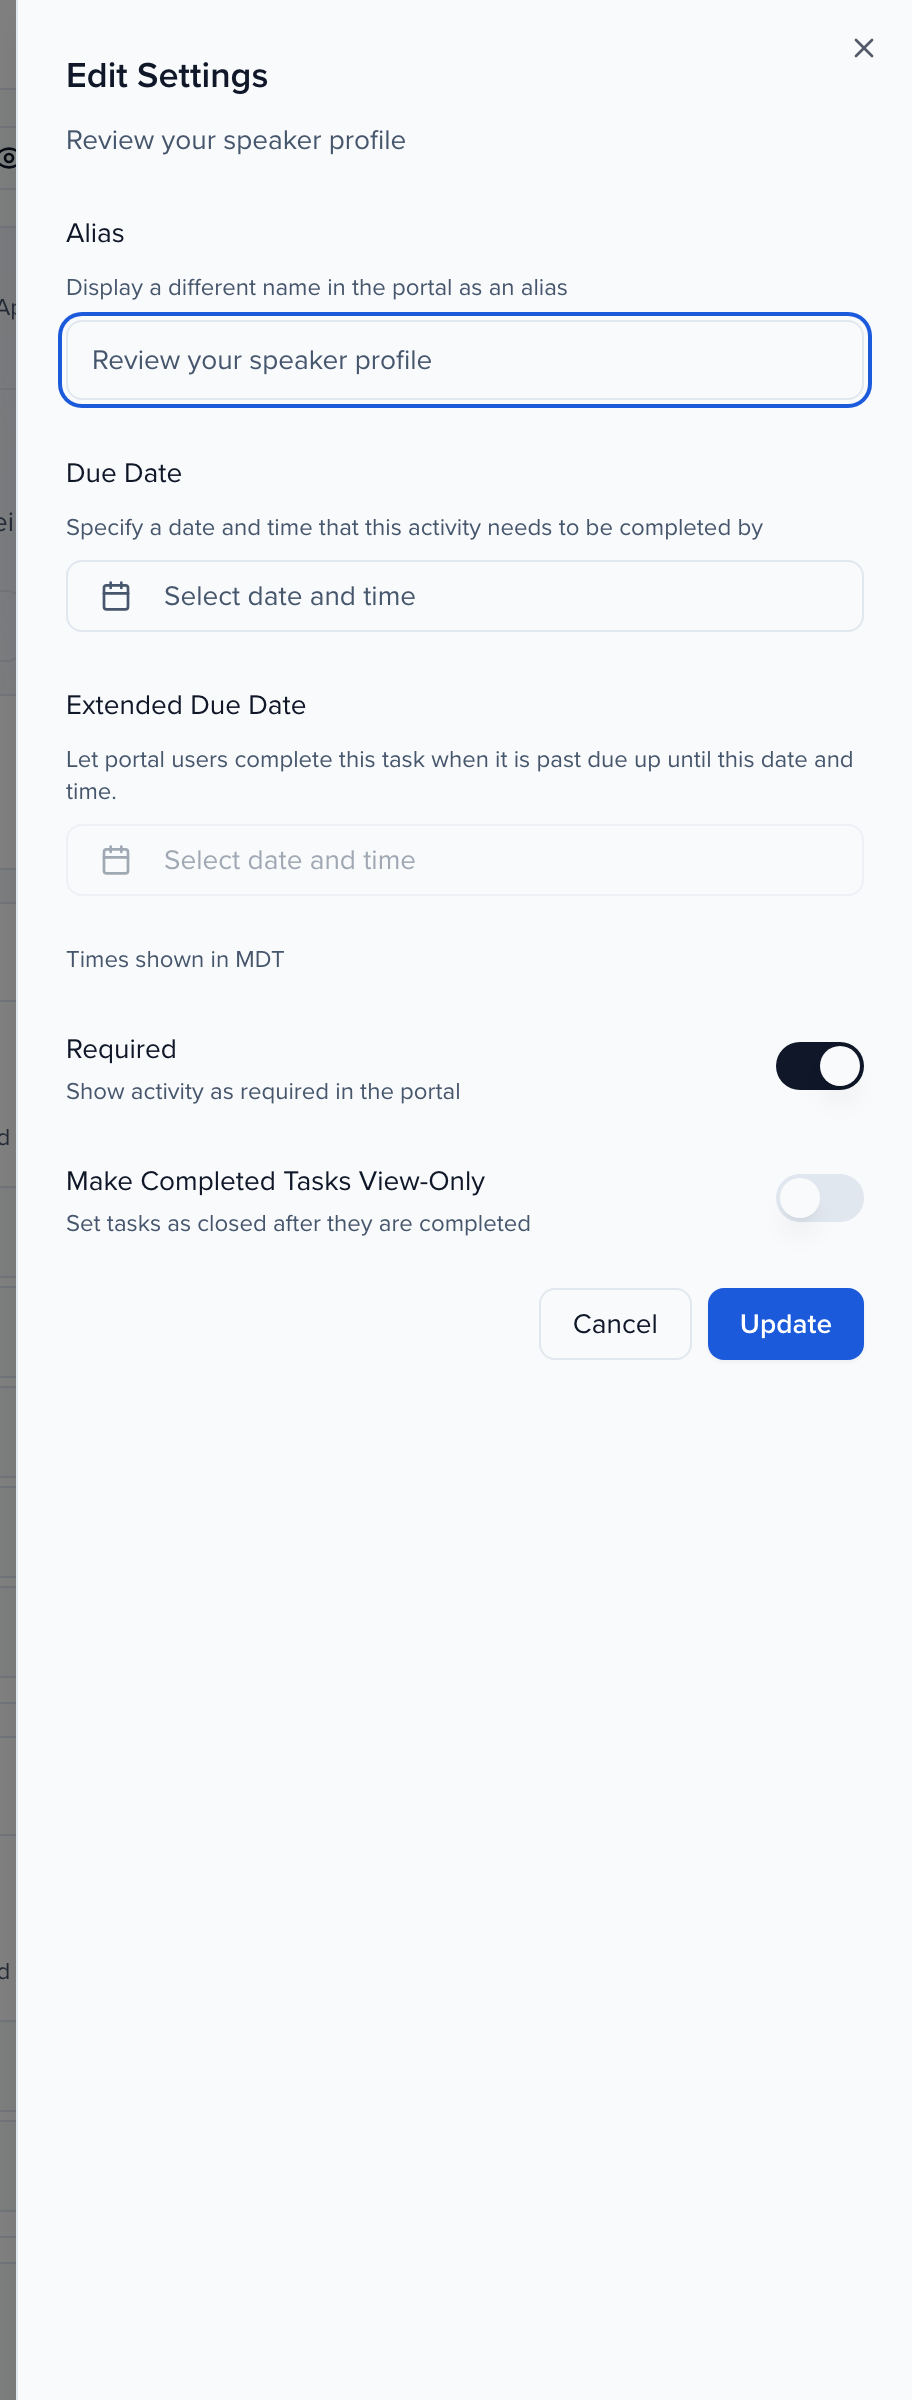
Edit Settings is per portal. An alias, a different title for this portal only. A Due Date, and an Extended Due Date for a grace period, once both pass the form can no longer be submitted. Allow edits lets the person reopen and change their answers. Make Completed Tasks View-Only locks it once it’s in. Update. Back in the row, the Required switch marks it as required on the portal. The same form can sit on several portals with different deadlines, and you can also hand it to a few people directly from Contacts.
What the speaker sees. View Portal, then View portal as, and pick a person. This is the portal through Raymond’s eyes, with the new form sitting in his task list, title, due date, and required. Opening it shows the questions with his name, email and job title already filled from his record. This preview is read-only, the badge at the top says so. When Raymond answers and submits for real, the answers write back to his contact record and the task turns green for him and for you.
Back in the library, the card counts submissions as they arrive. View Submissions shows one row per person, and the answers are columns. Columns, filters and sorting shape the table, and the menu exports it as CSV or Excel. Tick rows and Download Forms gives you a zip of PDF summaries, one per submission. Download files bundles anything uploaded through file questions, like that headshot. The form is also a column in Contacts, so a green check, a blue circle or an amber clipboard tells you who has finished without opening this page.
So, build the form once, put it on a portal with its own deadline, and review the answers in one table. The Help Center’s Create and assign portal forms article has the field table and the download wizard. Assign tasks covers bulk assignment from Contacts, and Portals 101 covers the portal itself. The Speaker portal and tasks video shows the rest of the task list.
Why use it
Section titled “Why use it”A portal form collects the details you need after acceptance, such as travel, AV or disclosures, from the people who have them, in the portal they already use. Each person’s answers land on their record, a due date keeps it moving, and a due date relative to assignment gives people added late their own window.
Create a form
Section titled “Create a form”Go to Program → Portals → Portal forms and click Add → Add Form. The tabs — All Forms, Contact Forms, Group Forms, Submission Forms — filter by who the form is for.
Form Setup
Section titled “Form Setup”The editor has three steps down the left: Form Setup, Form Questions, Settings.
| Field | What it does |
|---|---|
| Name | Internal — what your team sees in the library. |
| Title | What portal users see. |
| Show welcome description | Adds a Welcome description above the questions — instructions, context, a deadline. |
| Type | Contacts (one person), Groups (a sponsor or exhibitor company), or Submissions (each session). This decides which fields you can put on the form and where the answers land. |
Form Questions
Section titled “Form Questions”Give the section a Section Title and Description & Instructions, then click Add Field. Pick an existing field — First Name, Job Title, Headshot, Session Title — or create a new one; existing fields arrive pre-filled from the record and write back on submit.
Layout blocks & multi-page forms
Section titled “Layout blocks & multi-page forms”Hover between fields to insert layout blocks:
- Section Header — a heading that groups related questions.
- Rich Text — formatted text, images and links.
- Divider — a horizontal rule.
- Page Break — splits the form into pages. Give each break a title and portal users see a step indicator, moving with Next and Back; required questions are validated per page. Remove every break and the form is one page again.
Conditional logic works on questions and on layout blocks. Open a question’s or block’s ⋯ menu, choose Use question rules, and build the rule under Show this field when — for example, show travel instructions only when “Attending in person?” is Yes. A rule can only use a question that appears above it.
Merge tags. Type {{event_name}} in the welcome description, a section title or a Rich Text block and it renders as the event’s name.
Click Preview at any point to see the form as a portal user will — pages, rules and merge tags included.
Settings
Section titled “Settings”Send Confirmation Email emails the person when they submit, with a PDF summary of their answers attached and a link back to the submission in their portal. Confirmation message is your text in that email; it accepts merge tags.
Flag over-limit text instead of cutting it off (off by default) lets people paste or type past a Text or Text Area question’s Maximum Length. The full text is kept, the counter turns red, and a message asks them to shorten it; Submit stays blocked until it fits. With it off, typing stops at the limit and pasted text is cut off. See Add a character limit to a field.
Assign the form to a portal
Section titled “Assign the form to a portal”Open the ⋯ menu on the portal card and choose Edit Tasks. In the Forms section of the Assign Items step click Add, tick the form, and click Add Selected. Then use the pencil under Actions to open Edit Settings:
| Setting | What it does |
|---|---|
| Form Title Alias | A different title for this portal only. |
| Due Date / Extended Due Date | A real deadline, and an optional grace period after it. Once both pass the form can no longer be submitted. Portal users see only the Due Date. |
| Due date relative to assignment | Instead of one shared date, give each person their own: N days after they are assigned, or after the assignment email is sent, at the end of that day in the event’s timezone. Works as it does for tasks. |
| Allow edits | Lets the person reopen and change their answers after submitting. |
| Required | Marks the form as required on the portal. |
| Make Completed Tasks View-Only | Locks the form once submitted. |
| Assign By Filter (Submissions forms only) | Show the form only on submissions that match Submission Filters, optionally limited to certain Participant Roles. |
A form only reaches the records of its own module, so a People portal takes People forms and a Group portal takes Group forms. A form added before that rule existed shows a Not for this portal badge in the Forms list; remove it, or assign it to a portal of the form’s module. If adding or reordering forms fails, the error names the form that doesn’t fit.
Click Update. A form can sit on several portals, and can also be assigned to a few people directly — select them in Contacts, then Assign → Forms (Assign tasks (including bulk)).
See who has submitted
Section titled “See who has submitted”The form is a column in Contacts, Speakers, Sponsors or Exhibitors — add it with Columns and save the view (Dashboard views).
| Icon | Status | Meaning |
|---|---|---|
| Green check | Submitted | Done. |
| Blue circle | Assigned Via Portal | Reached them through a portal; not yet submitted. |
| Amber clipboard | Manually Assigned | Assigned to this record directly; not yet submitted. |
| Grey plus | Not Assigned | Click to assign to this one record. |
Review and export the answers
Section titled “Review and export the answers”On Program → Portals → Portal forms, open the form’s ⋯ menu and choose View Submissions. The Submissions table shows one row per person; use Columns, filters and sorting to shape it, then Export .CSV or Export .XLSX from the ⋯ menu.
Tick submissions and click Download Forms for a zip of PDF summaries — one per submission, generated on demand. Download files… opens the bundle wizard below for anything uploaded through file questions.
Download every file a form collected
Section titled “Download every file a form collected”If your form includes a file field (e.g., to collect logos, signed agreements, or other uploaded documents), you can download all submitted files in bulk as a single zip file. Sessionboard will bundle the files and email you a download link when the bundle is ready.
-
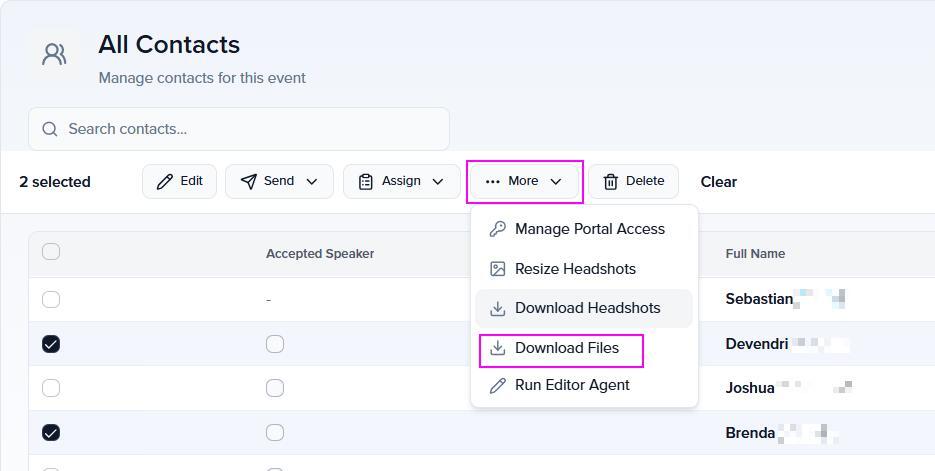
Within the Contacts (or Speakers, Sessions, Sponsors, or Exhibitors) module, select the contacts/records whose files you want to download using the checkbox next to their name.
-
At the top of the page, select More > Download Files.
-
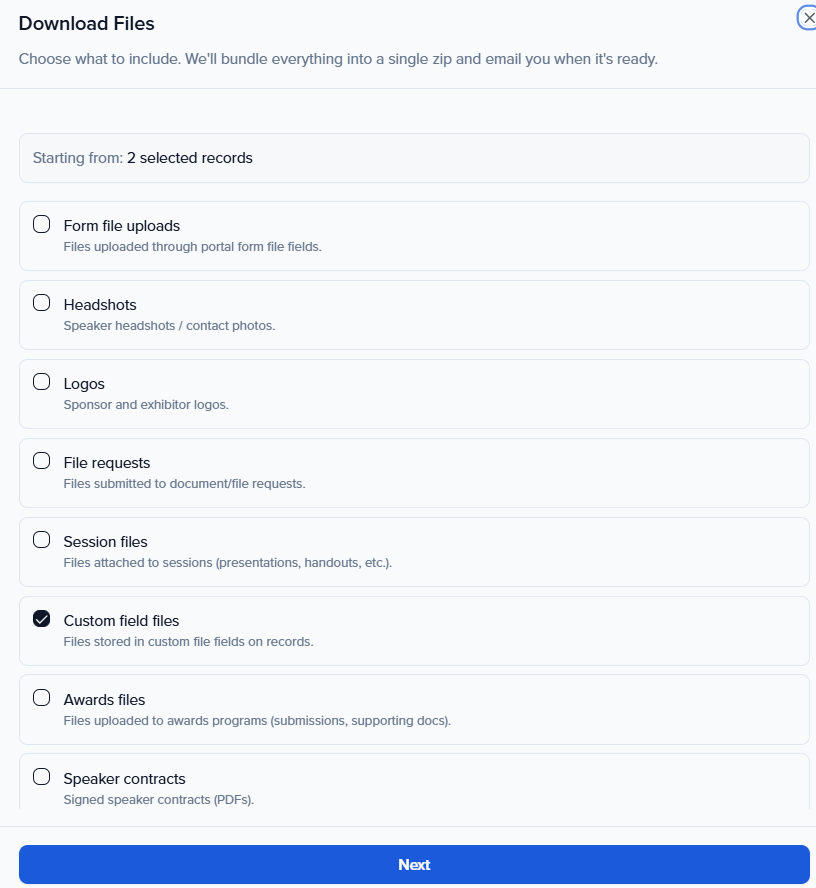
In the Download Files modal, check Form file uploads — Files uploaded through portal form file fields. You can also select any other file types you want to include in the same bundle:
- Headshots — Speaker headshots/contact photos
- File requests — Files submitted to document/file requests
- Session files — Files attached to sessions (presentations, handouts, etc.)
- Custom field files — Files stored in custom file fields on records
- Awards files — Files uploaded to awards programs (submissions, supporting docs)
- Speaker contracts — Signed speaker contracts (PDFs)
-
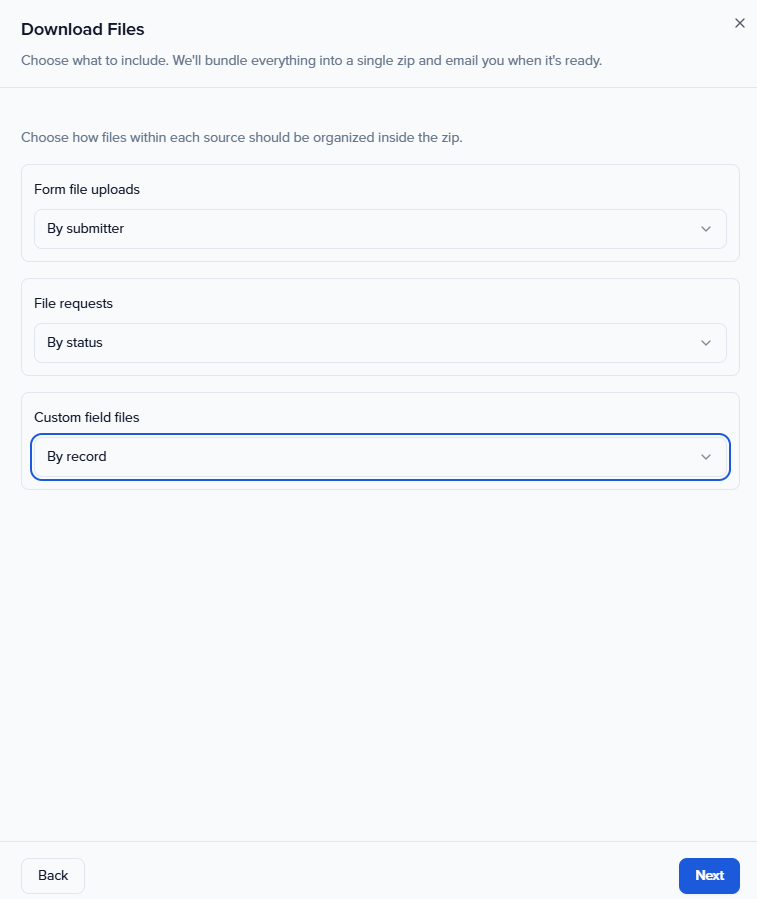
Click Next. Choose how to organize the files within the zip. The options available will vary depending on the file types you selected in the previous step:
- By submitter — files grouped into folders by each contact’s name
- By field — files grouped into folders by form field name
- By record — files grouped by individual record
-
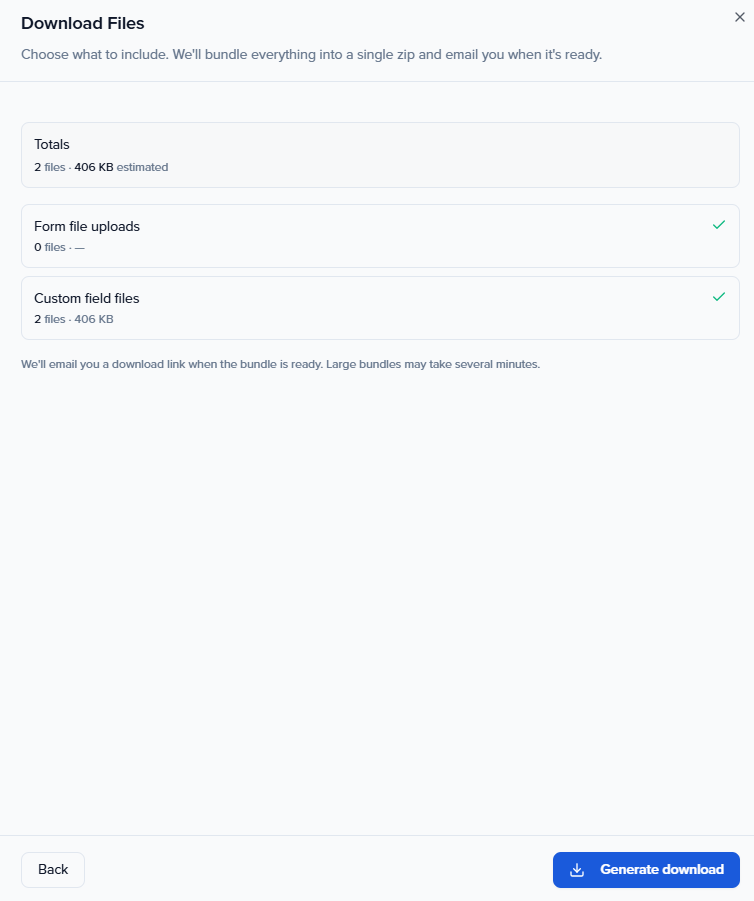
Click Next. Review the summary showing the total file count and estimated size.
-
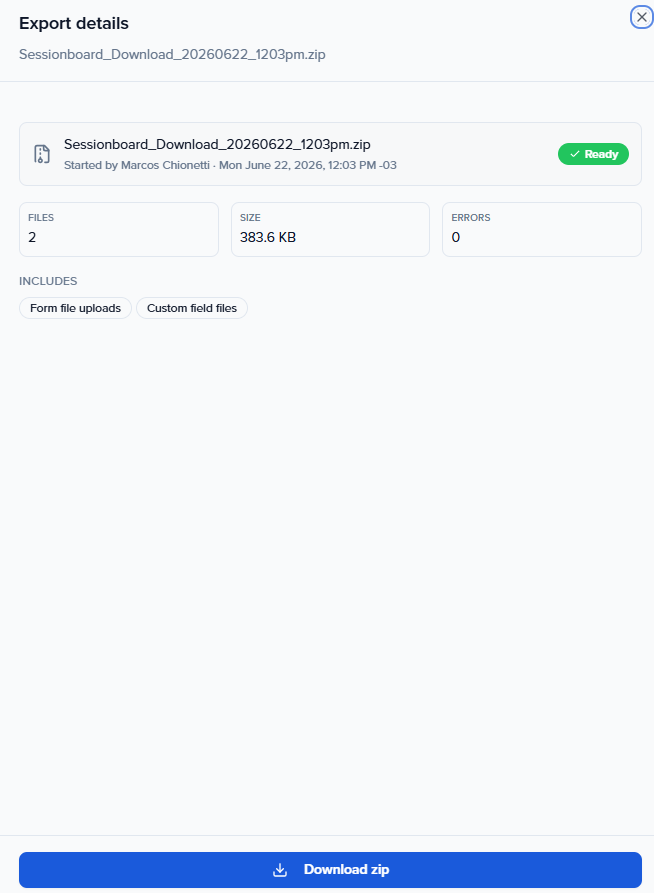
Click Generate Download. Once the bundle is ready, an Export details screen will appear showing the file name, size, and number of files included. Click Download zip to save it to your device.
-
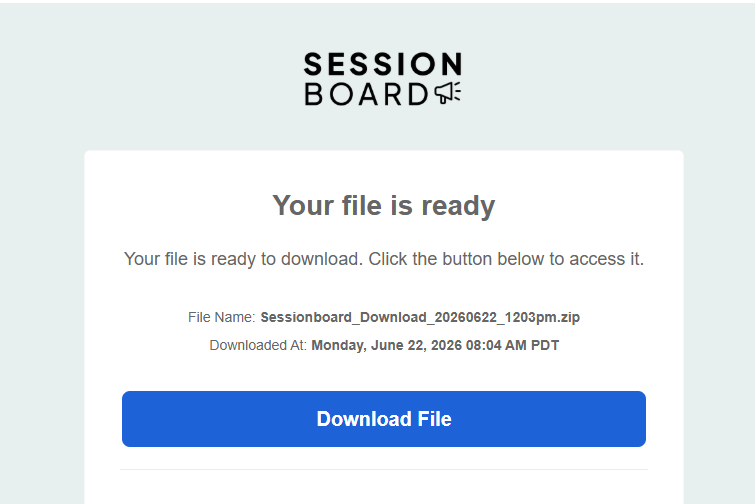
You will also receive an email from Sessionboard with the subject “Your file is ready” containing a Download File link, handy if you close the modal before downloading.
Common questions
Section titled “Common questions”Does an admin get notified when a form is submitted? Not by email. The Submissions page is the record; the task column in your contacts table shows who has finished at a glance.
Is there a limit on the number of forms? No.