

Program site
The Program Site brings program interactions together in one place: submission forms, awards, interest forms, reviewer access, and public voting ballots.
Video transcript
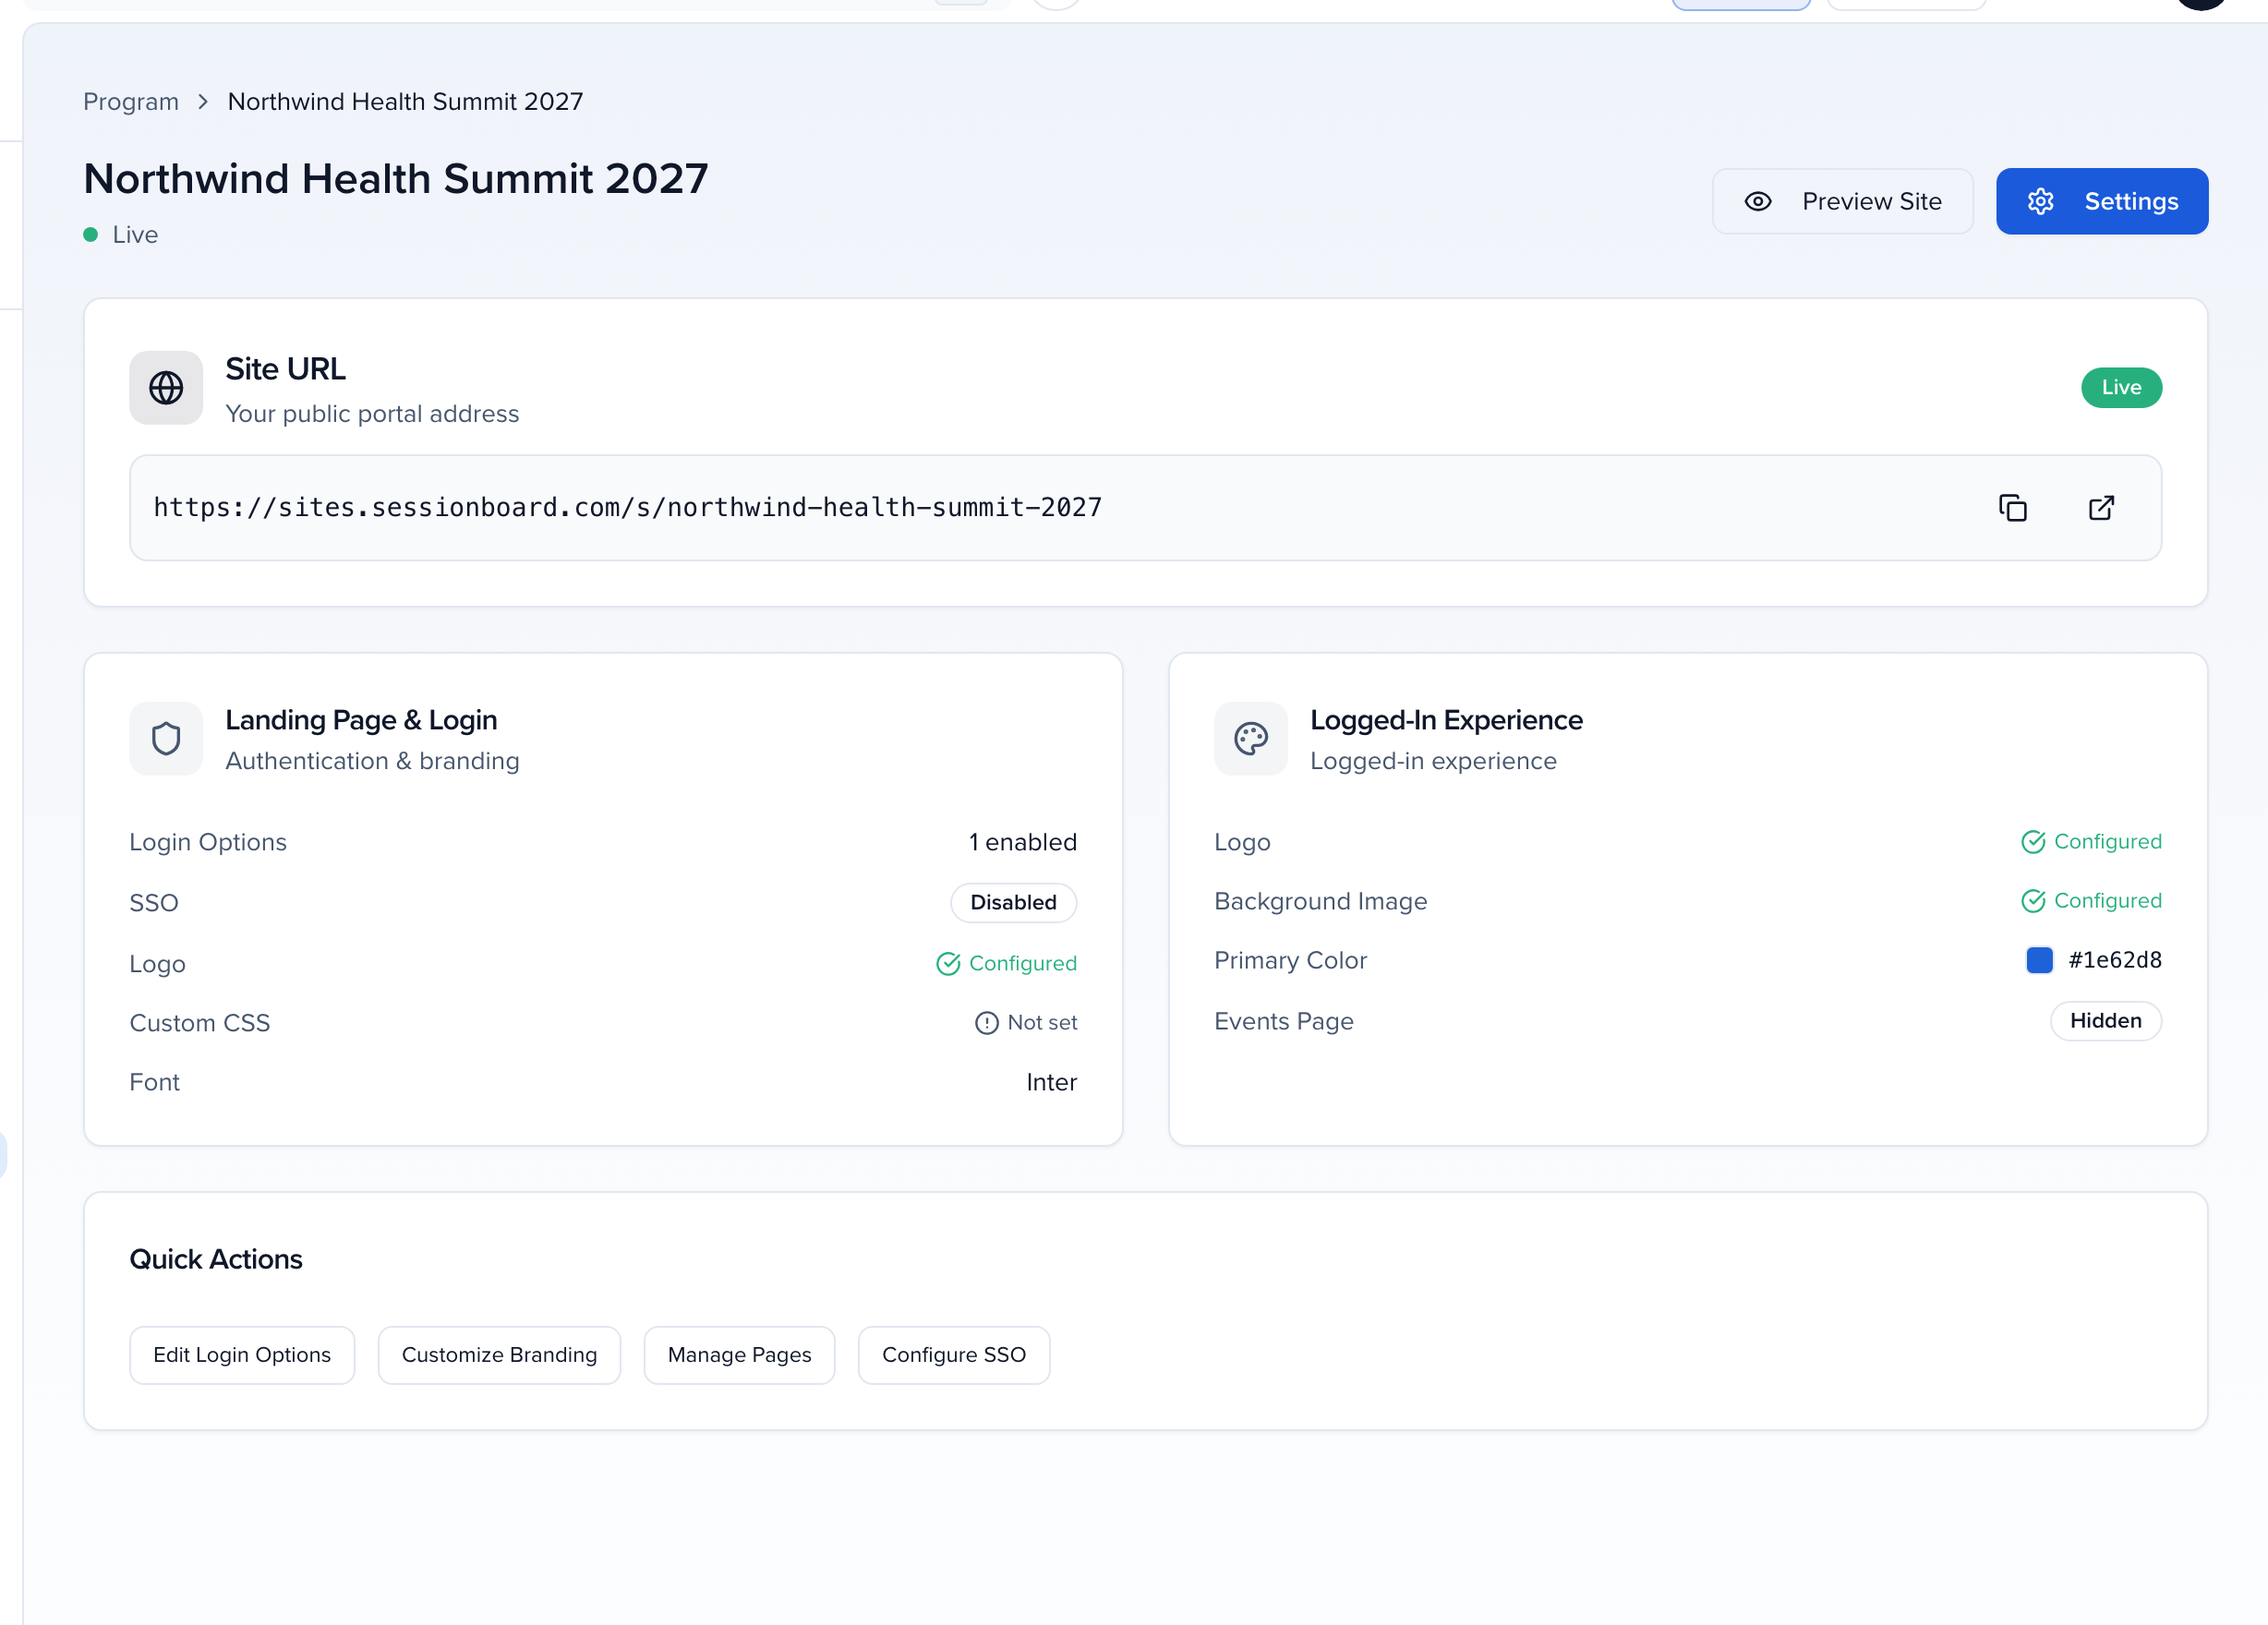
Program, then Site. Everything you’ve built for this event, the forms, the speakers, the agenda, needs one address people can open. This is that address, and this page is its status board. The dot under the name says whether the site is live. Preview Site opens the public address exactly as a visitor sees it, and Settings opens the builder. In between, four cards tell you what’s set, so you can check a site without opening the builder at all.
Site URL is the link you share. The slug at the end is yours, unique across the platform, and you set it in the builder under Site. Live means the address answers right now. The copy button puts it on your clipboard, and the arrow opens it in a new tab. This is the one line that goes into your speaker emails and onto your marketing site.
Landing Page and Login is what a visitor meets before they sign in. Login Options counts the sign-in methods that are on, here one, the standard email link. SSO says whether your members can sign in through your own identity provider. Logo, Custom CSS and Font are the public branding. Configured means it’s set, Not set means the default. If a card says Not set and you expected your logo, this is where you find out.
Logged-In Experience is the other half, what participants see after they sign in. The portal logo, the background image behind the header, the primary color that paints the buttons and the active menu item, and whether the Events Page is shown. Two sets of branding, because the public landing and the signed-in portal are two different moods, and you can tune them separately.
Quick Actions are shortcuts into the builder. Edit Login Options, Customize Branding, Manage Pages, Configure SSO. Each one opens the builder with that section already selected, so you skip the sitemap. Let me take Edit Login Options. The builder opens on Login and SSO. Standard Login is on and locked, there always has to be one way in, and SSO Login is the switch you’d turn on for members. Nothing I do here goes live until Publish, and I’m not changing anything, so Publish stays resting. Back to the overview.
Preview Site. It opens the public address in a new tab, signed out, so you see what a visitor sees and not what an admin sees. Here it is. The header carries the branding from the Landing Page card, logo, gradient, the title and subtitle. Under it, one tab per live page. Welcome, Travel and Venue, and the public Speakers, Agenda and Exhibitors pages, which read straight from your program, so an accepted speaker shows up here without anyone re-publishing.
The sign-in card is on every public page. It asks for an email address, nothing else. Send login link emails a magic link, and opening that link signs the person in. No password to forget, no account to create first. This is the same flow your speakers and reviewers already know from the portal. I won’t send one now. Instead I’ll open the link a speaker would get.
This is Raymond, one of the speakers, after his link. The site has switched to the portal. Sidebar on the left, Home, My Submissions, the same pages a visitor had as tabs, My Profile, and Log Out at the bottom. Home lists the Open Programs you ticked under Programs and CFP in the builder, as cards. This event hasn’t ticked any, so he sees the empty state. My Profile is his details, the ones the Welcome step collected. The logo, background and primary color here are the Logged-In Experience card from a minute ago.
So the overview is the status board, the builder is where you change things, and the public address is where it all lands. The Help Center’s Program Site article walks the overview and the setup steps, and the Site builder article covers every block and page. The Site and CMS video shows the builder in depth, and Portal login methods covers the three ways people can sign in.
You can also surface forms from other events, so it can work as a cross-event hub when you need that.
And it can be more than a hub. With the Site builder you can design it visually — pick a layout, apply a template and color scheme, add content sections, and turn on public Speakers, Agenda, and Exhibitors pages — so the same URL works as your public event website.
Why use it
Section titled “Why use it”The Program Site gives submitters, nominees, reviewers and voters one URL for everything you are asking them to do, so you share a single link rather than a different one for each form, awards program and ballot. With the Site builder, the same URL can also be your public event website, with Speakers, Agenda and Exhibitors pages.
What the Program Site centralizes
Section titled “What the Program Site centralizes”- Call for Papers forms
- Submission forms (abstracts or sessions)
- Awards forms
- Interest and pipeline forms
- Reviewer access (evaluation plans and rounds)
- Public voting ballots (evaluation and awards rounds set to Public voting)
How forms and submissions work
Section titled “How forms and submissions work”The Program Site does not recreate forms inside the platform. When a user clicks a form, it opens in a new window in its native interface. There is no need to rebuild or duplicate form logic.
All submissions are aggregated into a single unified view, regardless of which form they came from. Users can see submissions across interest forms, awards forms, and session or abstract submission forms, all in one place.
From this view, users can open any submission and be redirected to the original form to view their completed responses.
The Site overview
Section titled “The Site overview”Program → Site opens a status page for this event’s Site. The heading shows the Site name with a Live or Draft dot under it, and two buttons: Preview Site opens the public address in a new tab, exactly as a visitor would see it, and Settings opens the Site builder.
Four cards summarize what is set, so you can check a Site without opening the builder:
| Card | What it shows |
|---|---|
| Site URL | The public address, https://sites.sessionboard.com/s/[your-slug], with its Live badge, a copy button, and an open-in-new-tab button. This is the link you share. Once a domain of your own is active, this row, the builder’s Open live button and the vote link copied from a round all use that domain instead. |
| Landing Page & Login | What visitors meet before they sign in: how many Login Options are enabled, whether SSO is on, and whether the public Logo, Custom CSS, and Font are set. |
| Logged-In Experience | What participants see after they sign in: the portal Logo, Background Image, Primary Color, and whether the Events Page is shown or hidden. |
| Quick Actions | Edit Login Options, Customize Branding, Manage Pages, and Configure SSO each open the builder with that section already selected. |
Setting up your Program Site
Section titled “Setting up your Program Site”Open the Site overview
In your event, open Publish → Sites and choose the event’s site (the same page is also listed under Program → Collect & Review → Application site). The overview shows the public URL with its Live badge, a summary of the login and branding settings, and a Quick Actions panel that jumps straight to a section of the builder.
Open the Site builder
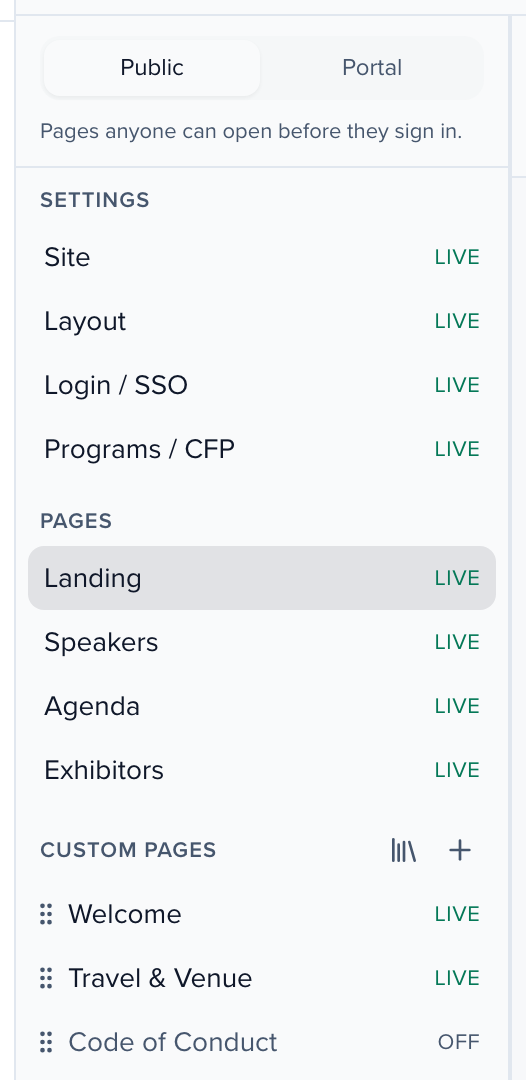
Click Settings in the top right. This opens the Site builder: a sitemap on the left, a live preview in the middle, and the settings for whatever you selected on the right. Changes save to a draft and go live when you click Publish. See Drafts and publishing.
The sitemap has a Public side (what visitors see before they sign in) and a Portal side (what participants see after). Each entry shows Live or Off.
Set the URL and branding under Site
Select Site under Settings.
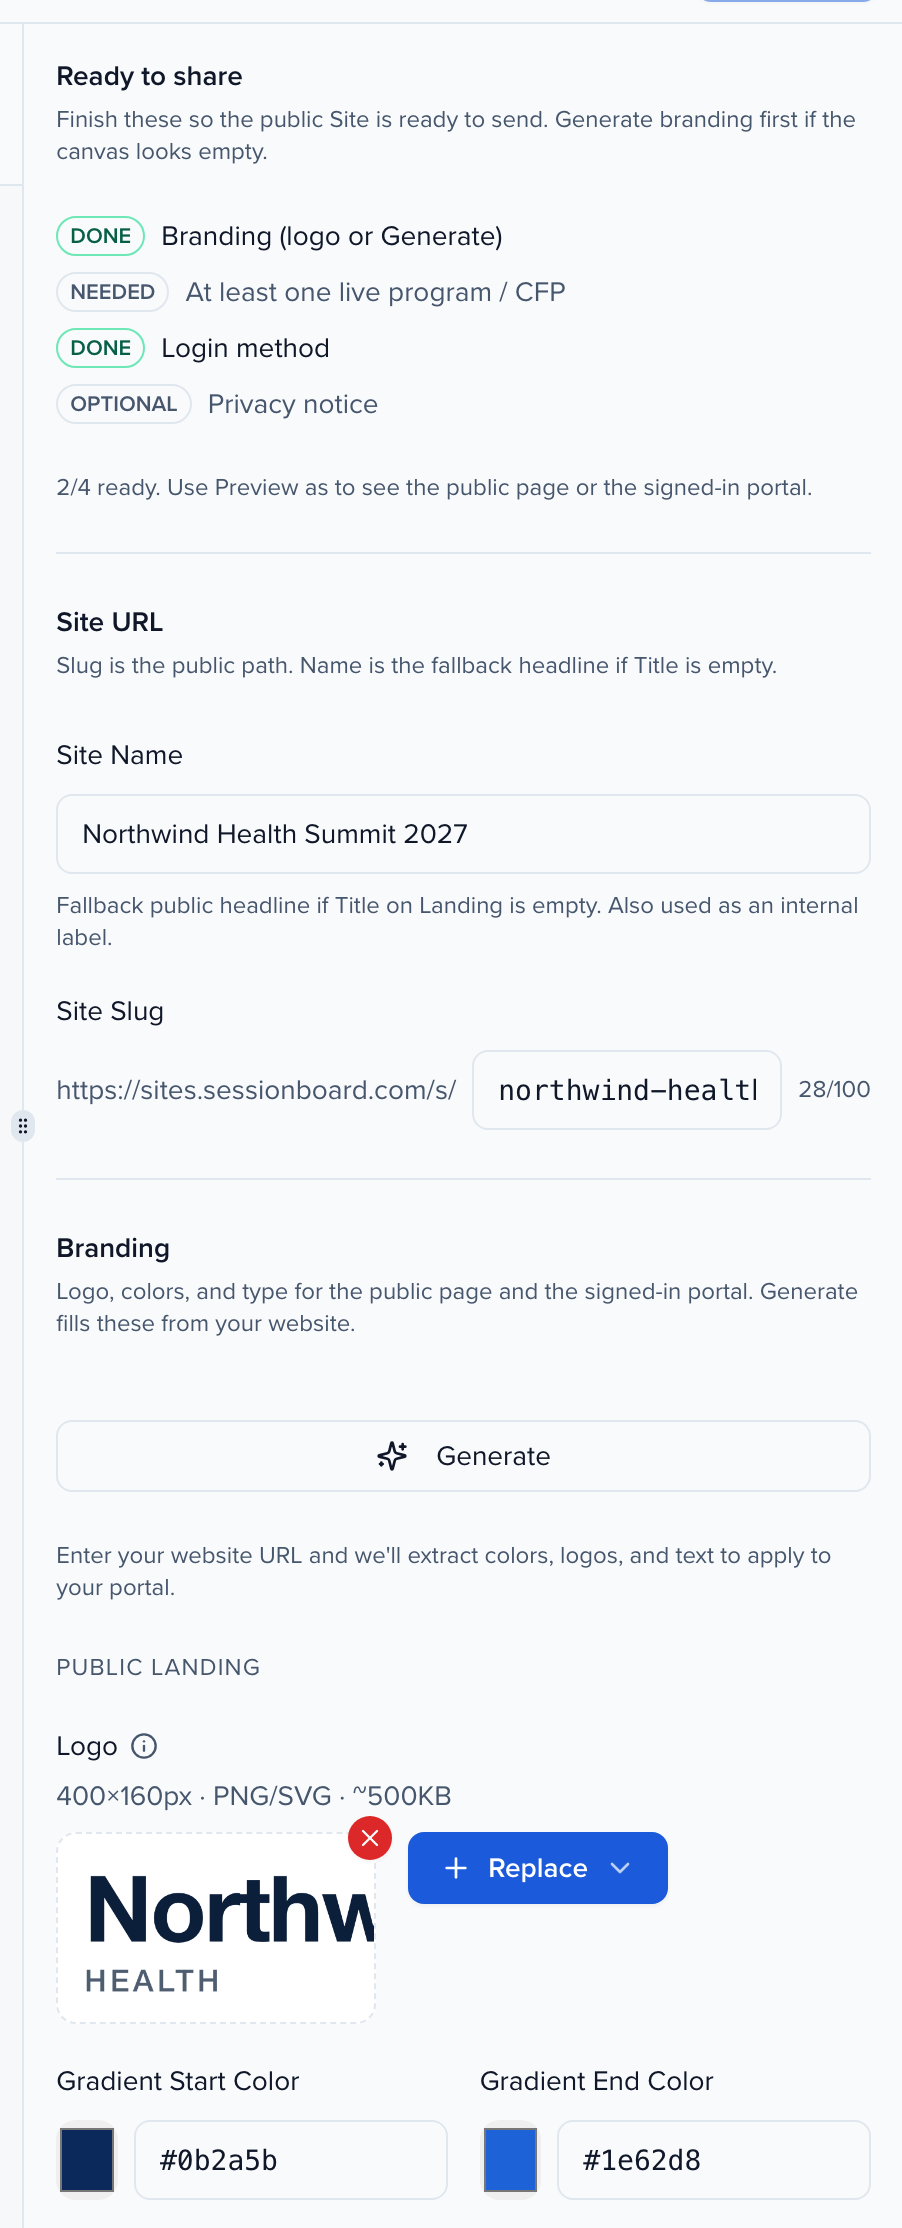
- Ready to share is a four-item checklist — branding, at least one live program or call for proposals, a login method, and an optional privacy notice — so you can see what the public Site still needs.
- Site URL: the Site Name is an internal label; the Site Slug sets your public address,
https://sites.sessionboard.com/s/[your-slug]. Slugs can be up to 100 characters and must be unique — the builder flags the field if another Site already uses it. - Branding has a Public landing group (logo, Gradient Start Color, Gradient End Color, Font Family) and a Signed-in portal group (logo, Background Image, Font Family, Primary Color, Accent Color, Text Color). Primary Color fills section backgrounds and content boxes; Accent Color colors the buttons, radio buttons and checkboxes applicants use — see Site URL & Branding. Generate fills these from your website URL as a starting point.
Write the landing page headline
Select Landing under Pages for the Title and Subtitle shown at the top of the public page, and the Advanced section for custom HTML, CSS, and JavaScript. On the marketing layout the landing page is built from blocks — see The landing page.
Choose how people sign in
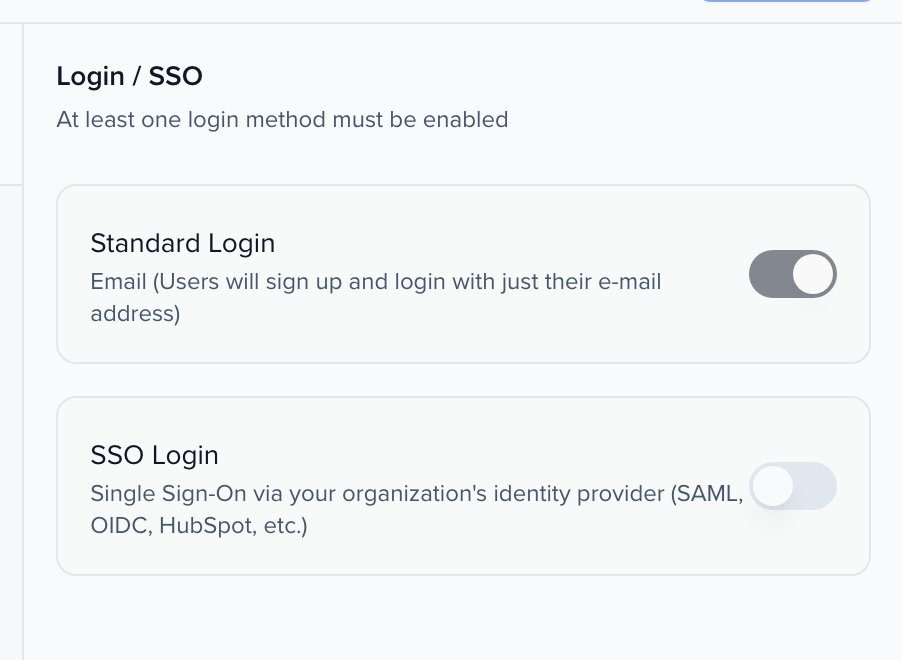
Select Login / SSO. At least one method must stay on.
- Standard Login: email-based. People sign up and sign in with just their email address.
- SSO Login: single sign-on through your organization’s identity provider (SAML, OIDC, and others). Ask your Customer Success Manager to enable it.
On the marketing layout you can also hide the sign-in card from the landing page; the Sign in menu button then opens it as a dialog. See Sign-in options.
Pick the programs to show
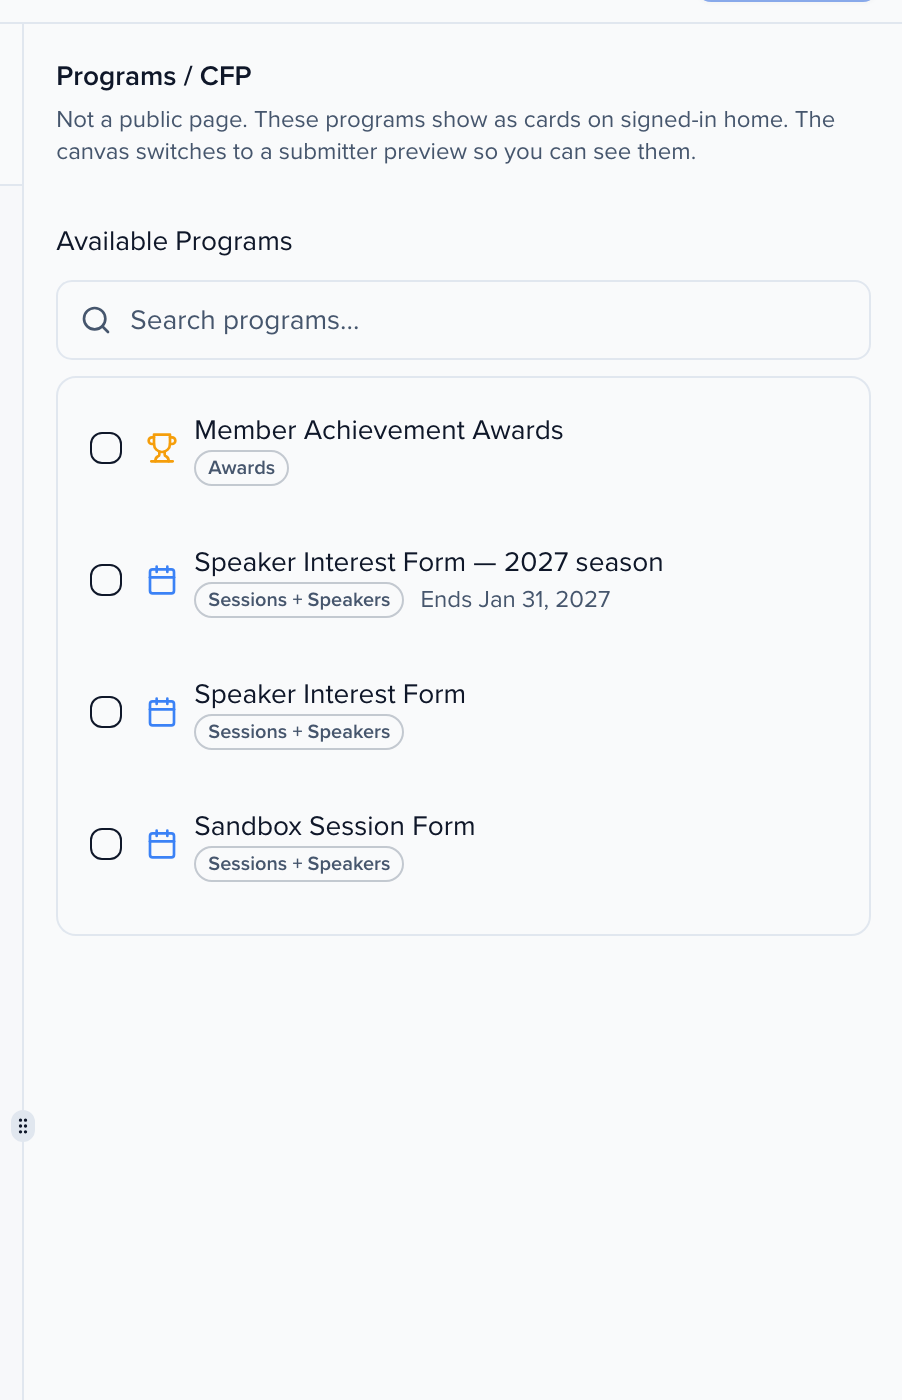
Select Programs / CFP. Search across every program in your organization and tick the ones that should appear as cards on the signed-in home page; the preview switches to a submitter’s view so you can see them.
Forms that don’t require login open straight from the public Site. Forms that do send visitors through sign-in first, then to the form. To link a form from the menu, a hero button, the footer, or a page, choose the Form link type. See Blocks.
Set up the portal side
Switch the sitemap to Portal.
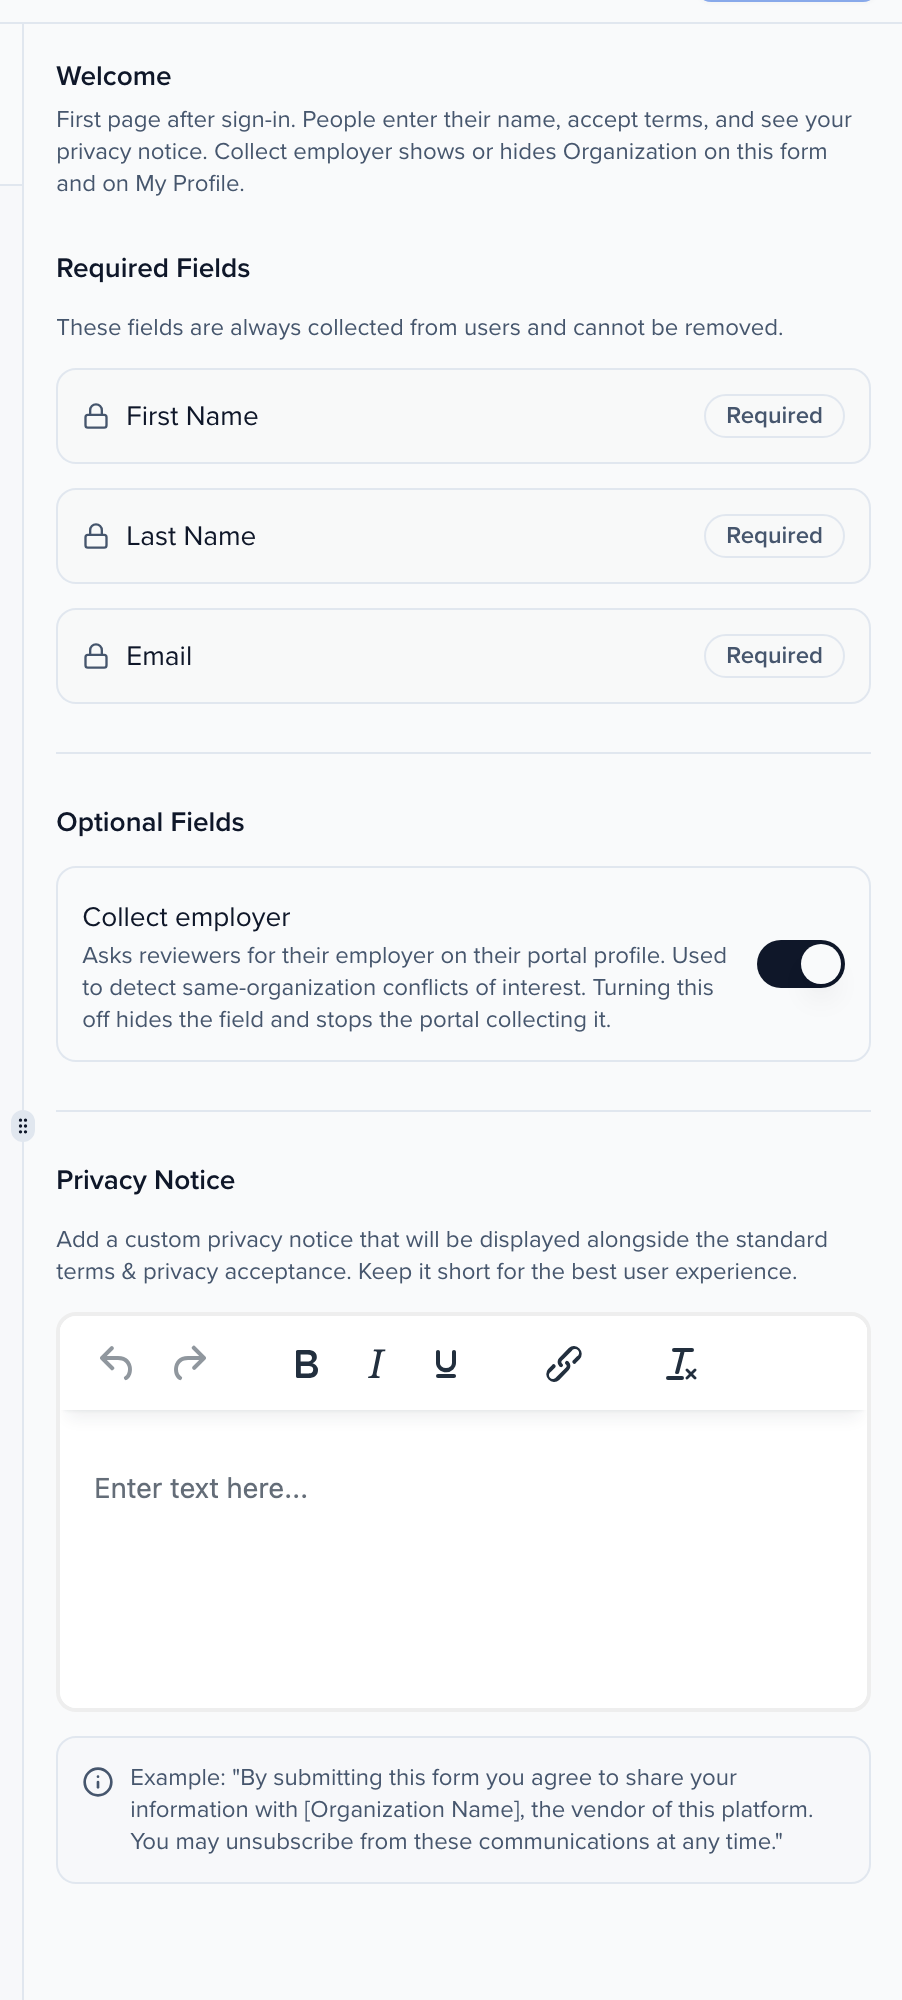
- Welcome is the first page after sign-in. First Name, Last Name and Email are always collected. Collect employer adds an Organization field, used to spot same-organization conflicts of interest in reviews. The Privacy Notice is shown beside the standard terms and privacy acceptance — keep it short, for example “By submitting this form you agree to share your information with [Organization Name], the vendor of this platform.”
- Home holds the signed-in Title and Description (reviewers see them too, above their rounds on the reviewer home), plus the Portal widgets switches — My Submissions and My Contracts in the sidebar, Notifications and My Reviews on the home panel.
- Review workspace is where evaluators land from their magic link; submitters never see it. My Profile is the signed-in profile page.
Add custom pages
Click + next to Custom pages in the sitemap. Pages appear in the header of the landing page and in the sidebar of the signed-in portal — useful for FAQs, instructions, or any static content participants should reach from the navigation.
Start from a blank page or from one of ten ready-made templates, including Call for papers, Evaluator guide, and Speaker & partner hub. Pages are built from blocks, like the landing page, and each page’s URL slug must be unique within the Site — reuse one and the builder adds a number, such as call-for-posters-2. You can also copy a page from another event and drag pages to reorder them. See Custom pages.
Set up reviewer access
For evaluators, the Program Site becomes their main interface. Reviewers access it via a magic link sent from their evaluation plan; no admin account or platform onboarding is required.
Once logged in, reviewers can:
- See all assigned evaluation plans and rounds
- Track pending vs completed reviews
- Access all submissions they need to review
From within each submission, reviewers can:
- View submission details and participant information
- Access uploaded files
- Complete scorecards (ratings, written feedback, and more)
Admins control what metadata is visible to reviewers and which filters are available (for example: track, level, language, tags), ensuring reviewers get the right context without information overload.
Publish and share the URL
Click Publish in the builder header, then share the Site URL from the overview with your submitters and reviewers. For a public-voting round, share the copied vote link from that round — it is unlisted, so only people with the URL can open the ballot.
Public voting
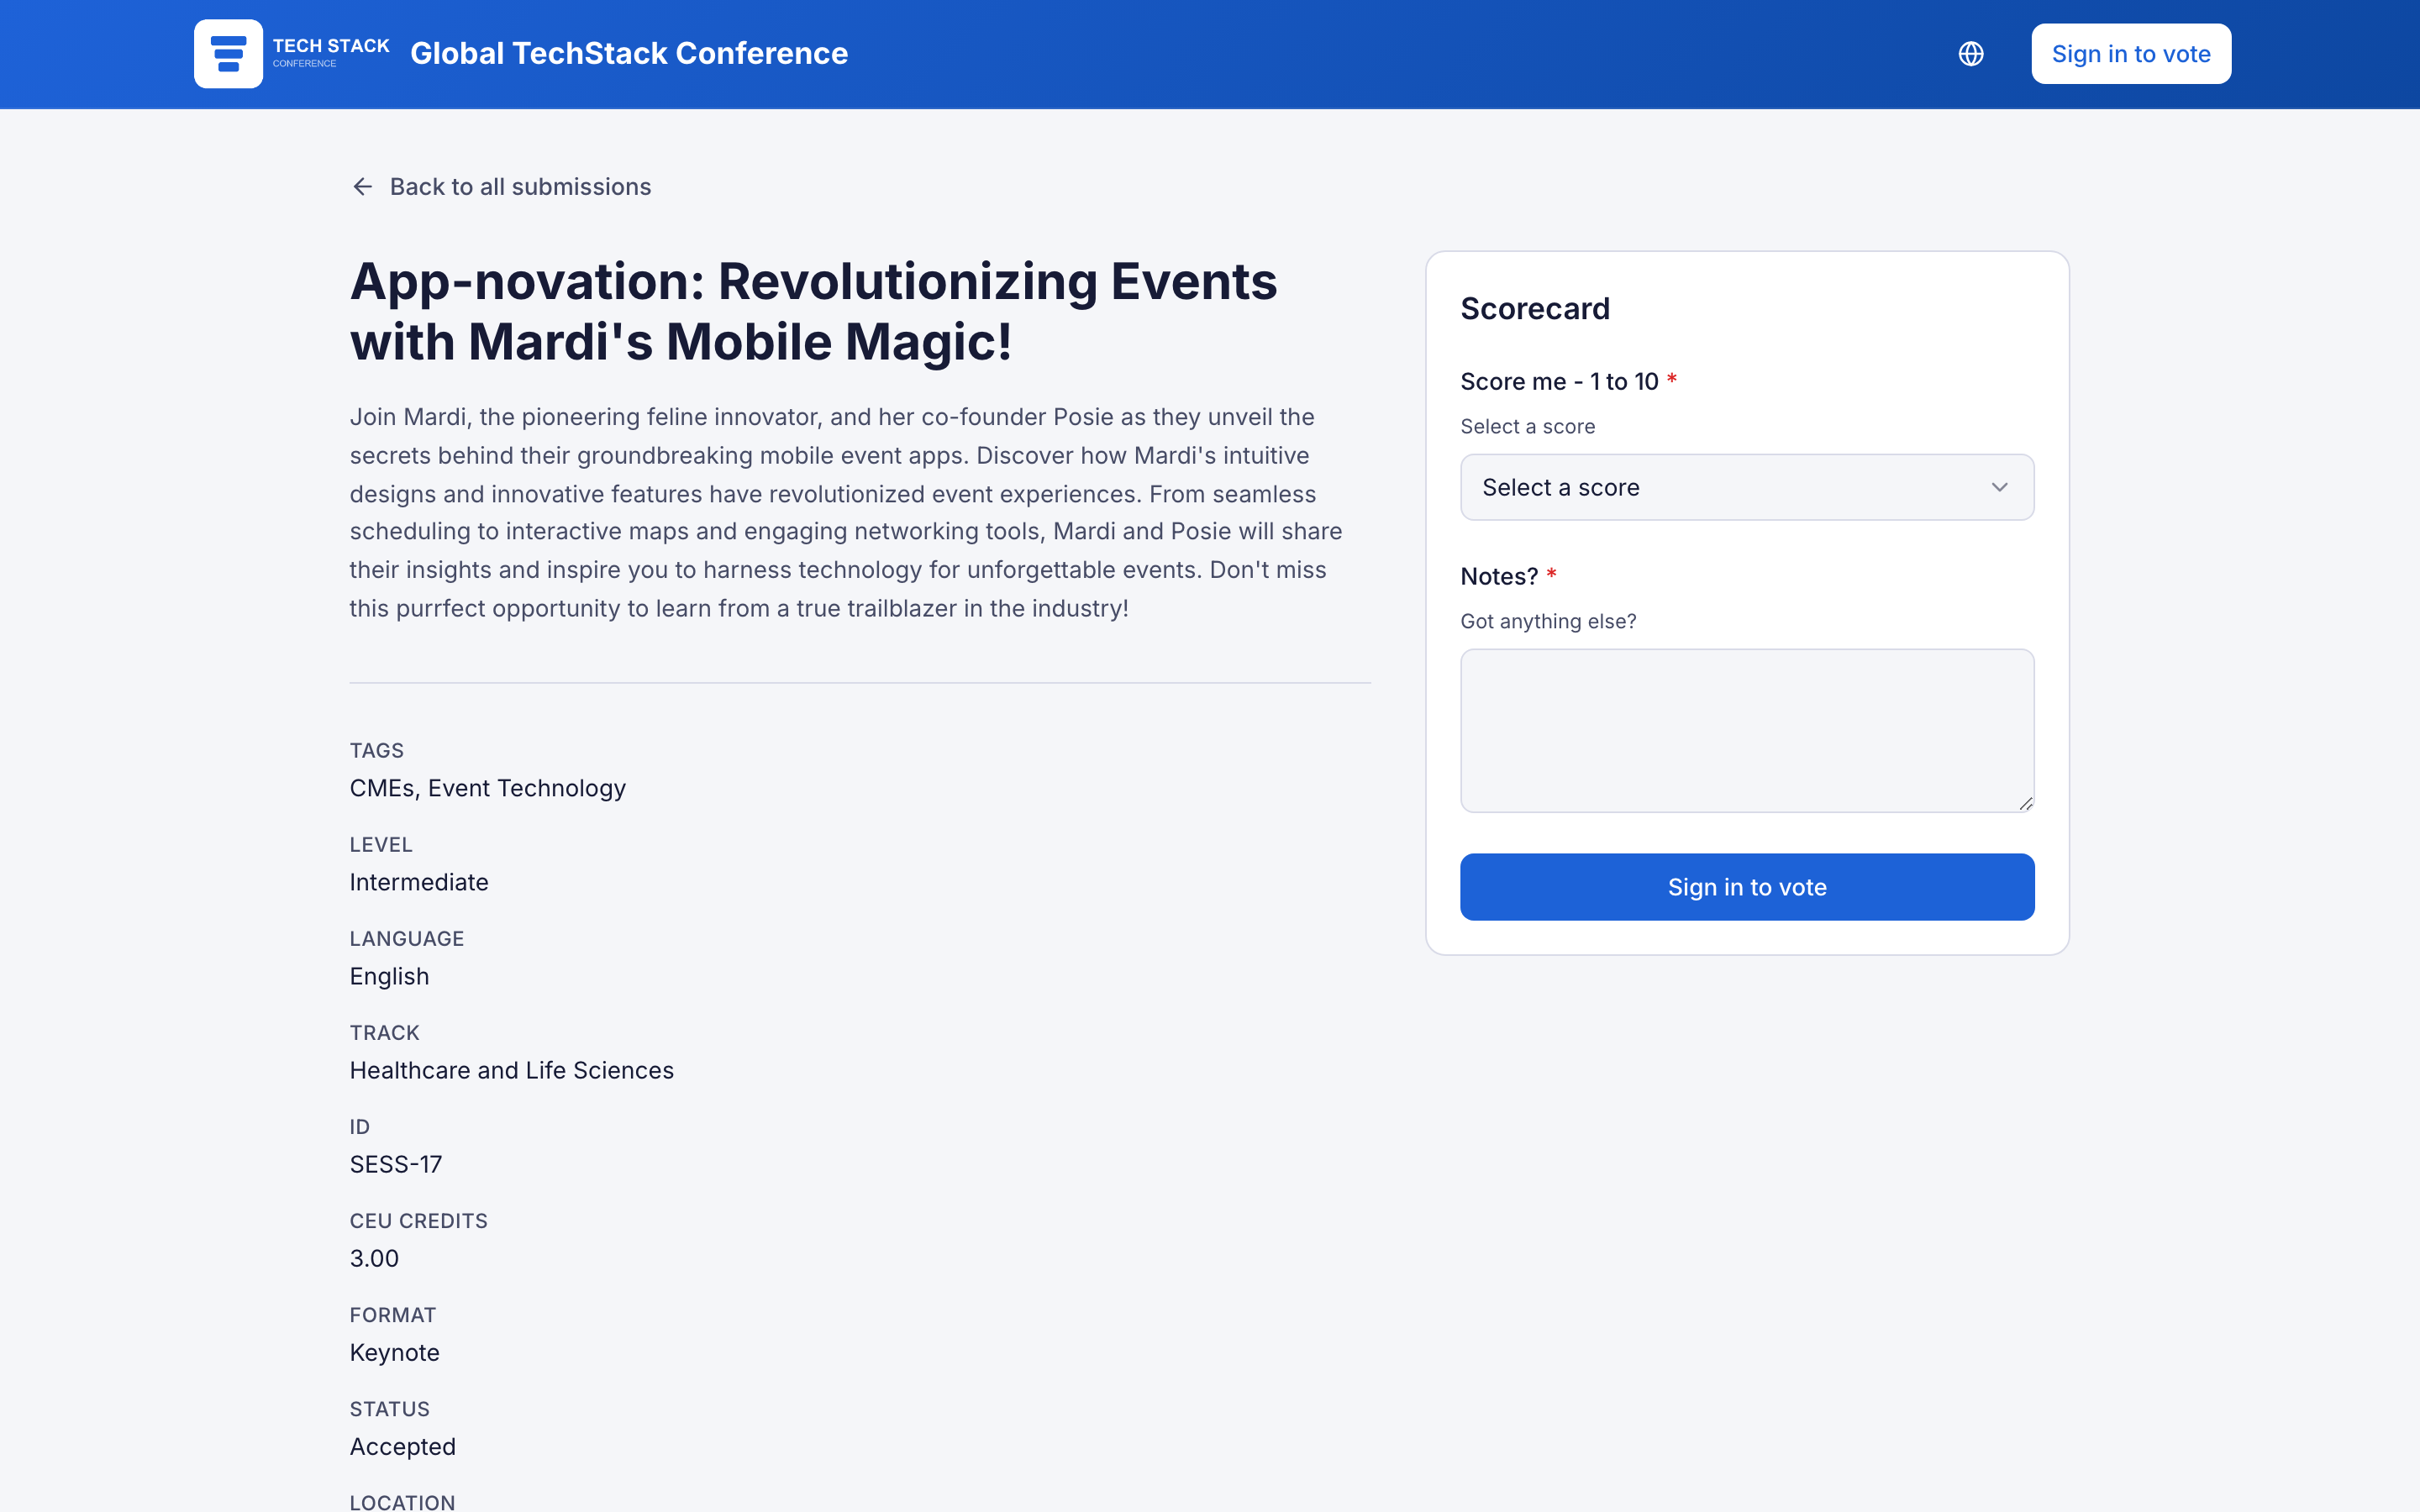
Section titled “Public voting”When an evaluation or awards round is set to Public voting, the ballot lives on this Program Site. Copy the link from the round (Copy link) and share it. Voters open the URL and score submissions on that round’s scorecard. The round’s Voter sign-in setting decides whether they sign in with a magic link or SSO first, or vote immediately with no sign-in (IP address only). Rounds can also cap how many submissions each voter votes for (Votes per voter).
Voting is open from the round’s start date to its end date. The dates are counted in the event’s timezone, or in the organization’s timezone for Interest Form and awards rounds. Closing the evaluation plan also closes voting, even if the end date is still ahead.
The ballot’s heading is the evaluation plan’s name — or the awards program’s name — and the text under it is the instructions written for the round, formatting included, so voters see what they are voting on and how before they start. A round with no instructions shows a short default line instead.

Public voters are not invited evaluators. They are not assigned a queue under My Reviews — they use the vote link only. They join the round when they save a score.
What voters see once they have voted
Section titled “What voters see once they have voted”- Submissions a voter has already scored carry a Voted badge on the ballot, and the ballot header counts them — 3 of 12 voted. Filters narrow the list to Voted or Not voted, so a voter can find what is left.
- Inside a submission, Previous and Next step through the ballot in order and Back to all submissions returns to the list, the same way evaluators move through their queue.
- A voted submission shows its saved score. The voter can change their answers and submit again to update it, or click Undo vote to take the vote back — the score is removed and, on a round with Votes per voter, the vote is returned to their budget. Undo is available only while the round is open for voting.
Pasting the vote URL into Slack, LinkedIn, or similar shows a branded preview of the round — the Site’s Social share image when one is set, otherwise its logo — and the round name. Opening a single submission in that link shows that item. If the round uses blind review, the preview never includes a name or headshot. Search engines and AI assistants do not index these URLs.
See Round-based evaluations and Managing submissions, reviewers & rounds for how to set a round to Public voting and copy the link.
What each user sees
Section titled “What each user sees”On the Portal layout, a visitor who opens the Site URL sees the branded header, a tab for each live page (the landing page first, then any custom pages and the public Speakers, Agenda, and Exhibitors pages that are on), and the Sign in card. The card asks for an email address only: Send login link emails a magic link, and opening it signs the person in.
After sign-in the Site switches to the portal: a sidebar with Home, My Submissions, the same custom pages, My Profile, and Log Out. Home lists the Open Programs you ticked under Programs / CFP as cards. Staff accounts are not meant to sign in here; to check the participant view, use Preview as in the builder or sign in as a test participant.
| User | Experience on the Program Site |
|---|---|
| Submitters | All available submission forms and a unified view of all past submissions across forms |
| Reviewers | All assigned evaluation plans, pending rounds, and submissions to review |
| Public voters | The vote link for that round: sign in (when the round requires it), browse submissions, and complete the scorecard |
Frequently asked questions
Section titled “Frequently asked questions”Why does the Site look different from the speaker portal?
They are two separate places with separate branding. The Program Site is your organization’s hub for submitters, reviewers and voters. Its logo, colors and fonts are set under Branding in the builder’s Site settings. The speaker portal belongs to one event and is where confirmed speakers finish their tasks. Its logo and Accent Color are set in that event under Settings → Portals → Portal Appearance (Portal settings). If you change one, the other stays as it was.
The Site is only for reviewers. What happens to Open Programs?
Home always has an Open Programs section. If nothing is ticked under Programs / CFP, it reads No Open Programs. To give reviewers a clearer start, turn on the My Reviews portal widget so their queue appears on Home, and use the signed-in Title and Description to tell them what the Site is for.
Can I add Google Analytics or a tag manager to the Site?
Yes. In the builder, select Landing in the sitemap, open Advanced, and paste the snippet into Custom JavaScript, with or without its <script> tags. Then publish. The script runs on every page of the live Site, before and after sign-in. It doesn’t run in the builder preview. Portals and submission forms have their own Advanced Scripts box (Portal settings, Submission form settings). For embeds, add the tag to the page that hosts the embed.