

Program settings
Program Settings is where you configure your program’s agenda, criteria, personas, rooms, tracks, tags, levels, formats, languages, files, roles, and statuses.
Video transcript
Before anyone fills in your submission form, come here. Program, then Settings. This page is the vocabulary of your program. Anything you define here shows up as a dropdown on the submission form, a filter on the sessions list, and a color on the agenda. The overview groups it all into tiles, program structure, schedule and venue, review and workflow, content, and the rail on the left opens each section in order. Fill these in before the form goes live. Adding a format after fifty submissions means fifty sessions with a blank.
Agenda holds the defaults the agenda views read when you schedule. Time Settings, the day start and end times, and the interval a drag snaps to. Agenda content, sessions, abstracts, or both. Program Statuses, which statuses appear on the public agenda, usually Accepted. Program Format Durations, a default length per format, which new agenda drafts and the Scheduler start from. A session you drag on yourself lands as a one hour block. Room Visibility, Add to Calendar templates, and how subsession participants show on their parent. Save Changes, and it applies immediately.
Personas opens under Settings, Library. These are AI evaluators that review sessions from a chosen perspective, a technical expert, a first time attendee, an executive. Three default personas are provided and can’t be edited. Add Persona creates your own, with a name, a role, a biography, a feedback style from positive to critical, and up to three likes and dislikes. Assign one to an evaluation plan and it scores every submission with feedback in its own voice, a comparison point for your human reviewers.
Rooms are the physical rooms or virtual locations sessions can be scheduled into. Each has a name, a capacity, the most people it holds, which the agenda’s Rooms view shows so you can match big sessions to big rooms, and a display order, how rooms line up left to right in the agenda embed. Like every table here, Add opens a menu, add one or copy the list from another event, and the actions menu on a row edits or deletes it. Deleting a value sessions still use warns you first.
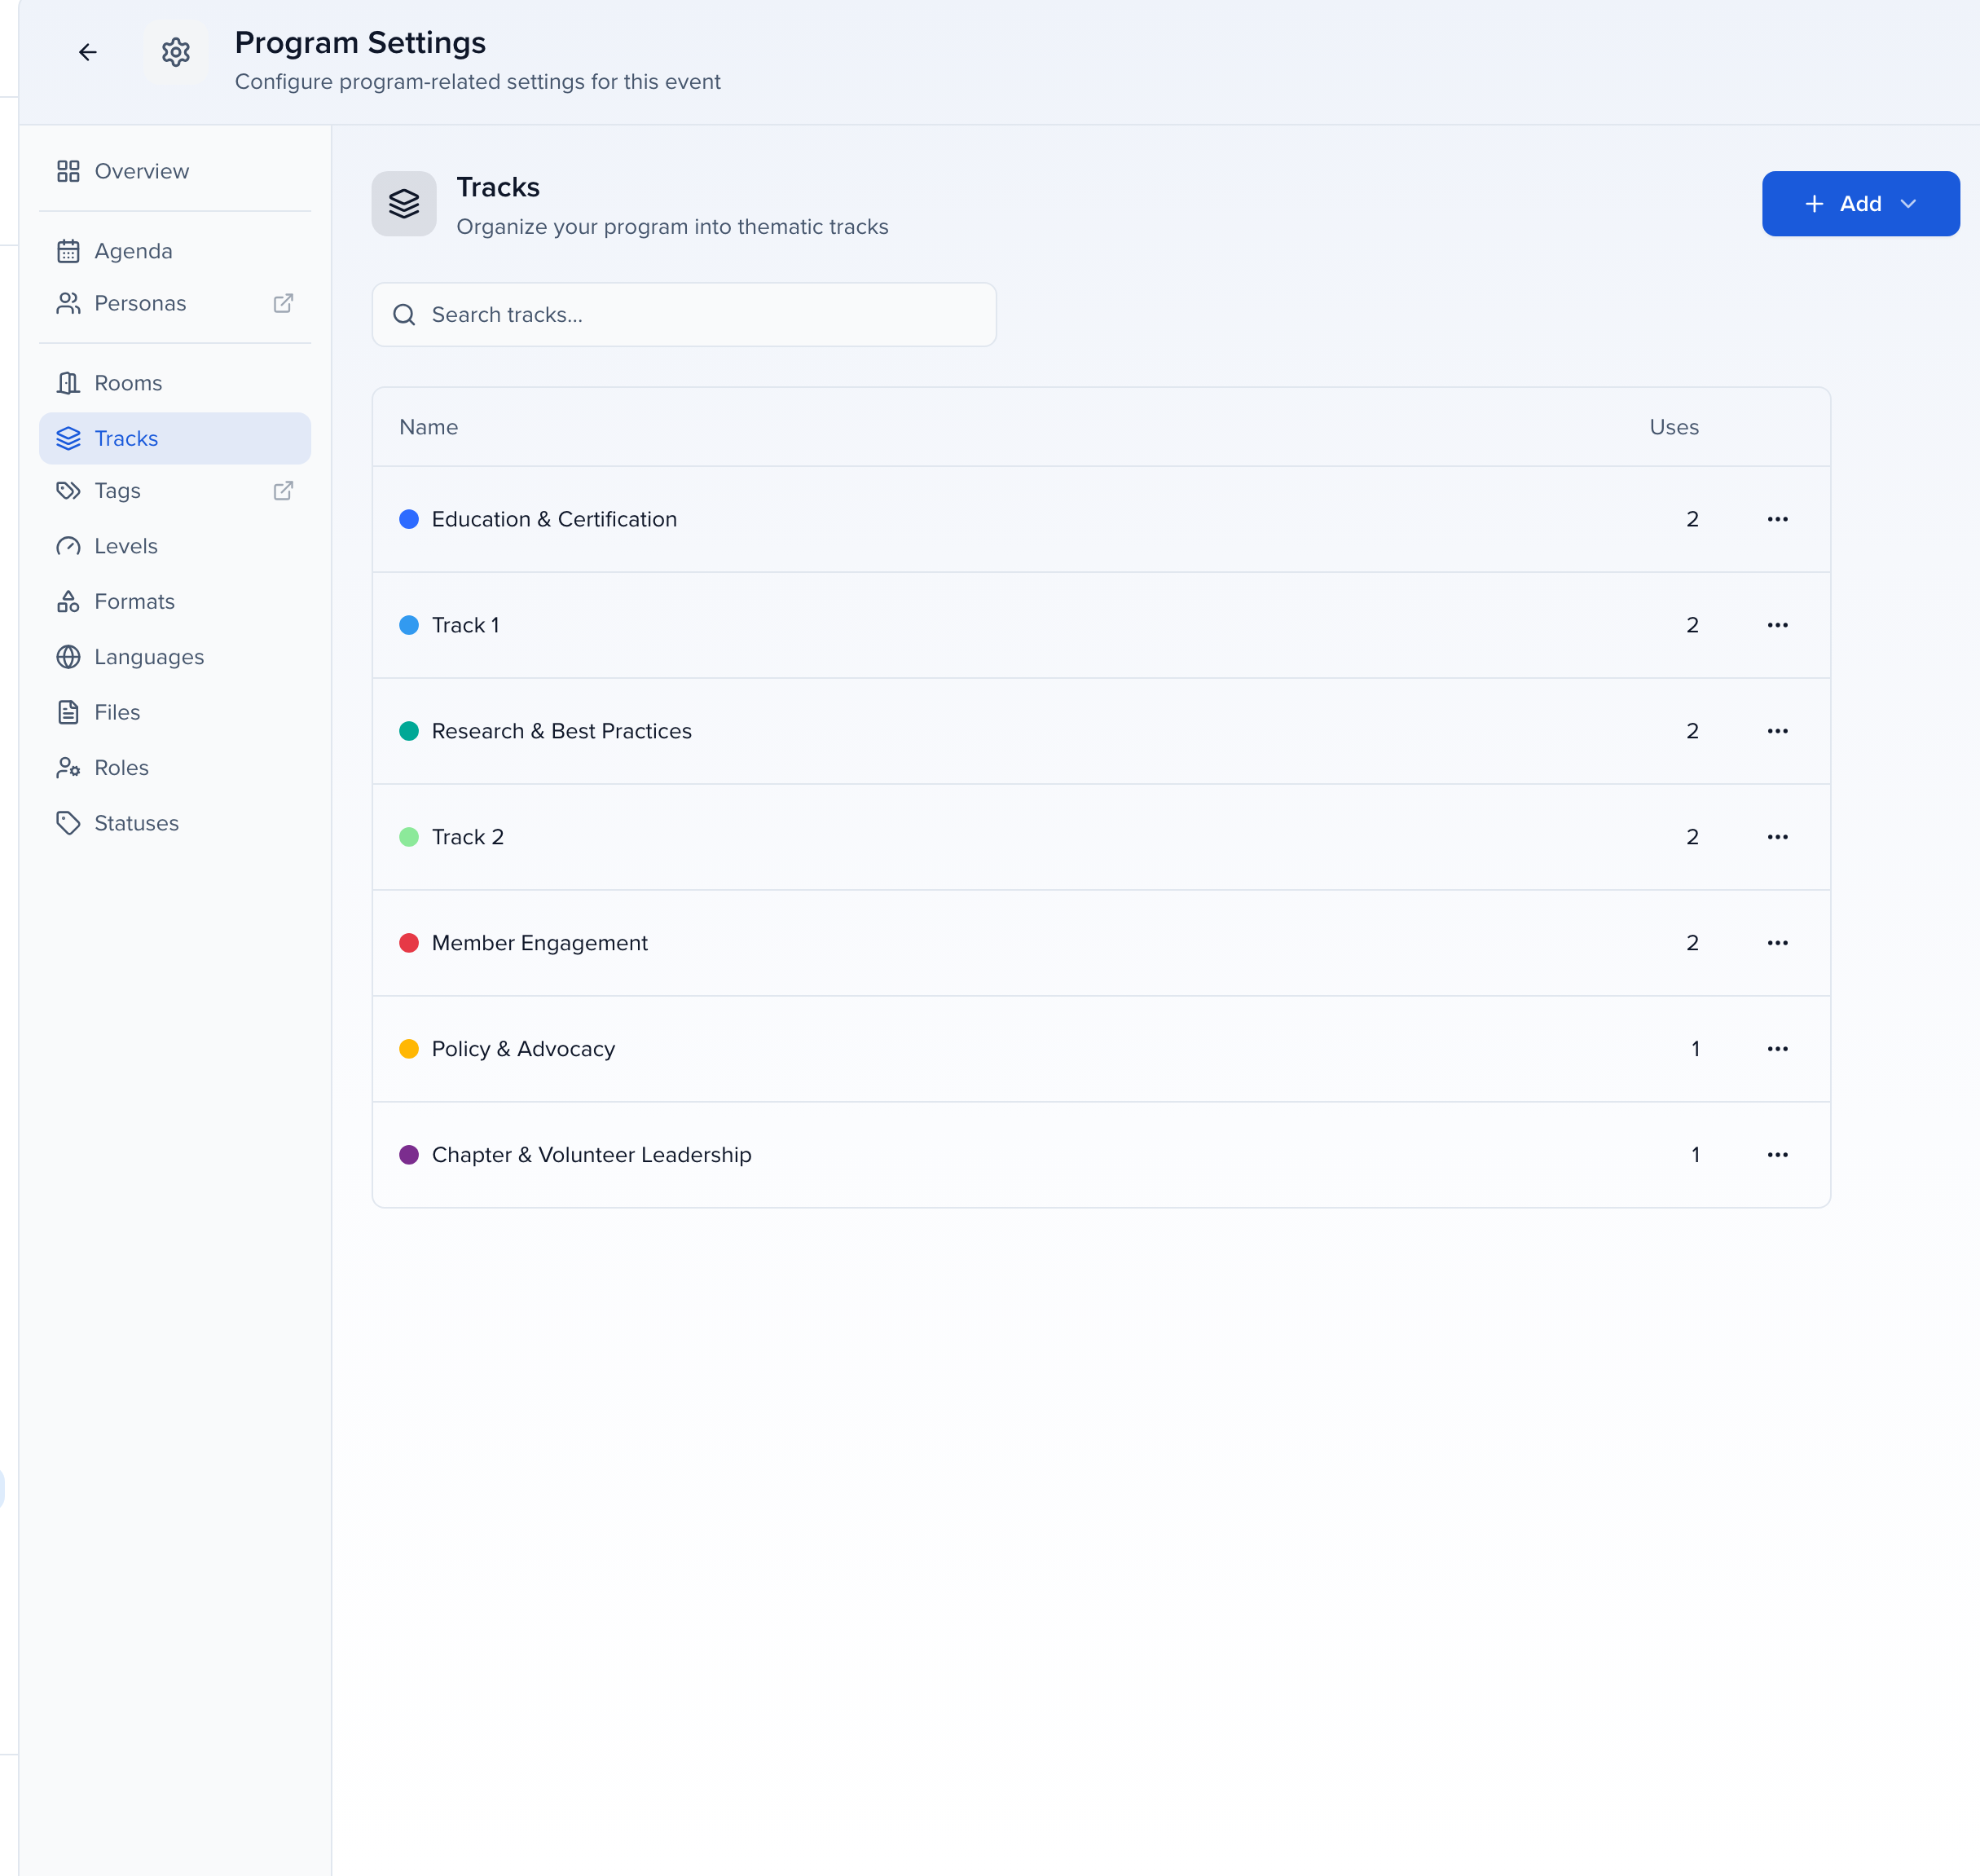
Tracks are the broad themes attendees filter by. Education and certification, research and best practices. Each track carries a color, and that color is what the agenda and the embeds paint session cards with when you color by track. Uses tells you how many sessions carry each one, so you can see a track nobody chose before you delete it.
Tags is the loose end. Keywords for anything the other fields don’t cover, sponsored, live streamed, on demand, and a session can carry several. The link opens the event’s tag library under Settings, where each tag can have a color, or no color for a neutral chip. On the agenda, coloring by tags keeps the cards white and shows each tag as a small square.
Levels is the expertise a session expects of its audience. Beginner, intermediate, advanced. A single choice on each session, so it’s one dropdown on the form and one filter on the sessions list.
Formats is the shape of the session. Keynote, workshop, panel, poster. Give each format a default duration back under Agenda, Program Format Durations, and agenda drafts and the Scheduler plan sessions of that format at the right length. On the form it’s the question that tells you what kind of session someone is proposing.
Languages is the language a session is delivered in. English, Spanish, French. That’s a property of the session, a single choice, like track and level. It has nothing to do with the language the portal is shown in, which is portal translation, and lives elsewhere.
Files controls what speakers upload to their sessions through the portal. Enable File Upload turns it on, then File Requests decides what you ask for. Use upload slots off, it’s one due date, one file limit and one list of file types for every session. On, it’s a list of slots, Poster, Presentation, Handout, each with its own deadline, accepted types and sessions, and a poster gallery needs a Poster slot. New events have slots on; older ones keep the single request until you flip it. Form file questions are separate and don’t inherit these.
Roles are the parts people play on a session. Speaker, chairperson, moderator to start, each mapped to a category that decides how the role is represented in integrations and embeds. Participants counts who holds it, and Manage, on, gives the role its own page under CRM, alongside Speakers. Add Role takes a singular and plural name, a category, an icon, and whether it gets its own page. The order of the list is the order the Participants tab groups them in. These are the roles the submission form offers under Participant roles.
Statuses is the workflow a session moves through. Pending, Accept Queue, Accepted, Decline Queue, Declined can be reordered but not renamed. If your committee thinks in stages, add a custom status. It takes a name, a color, and a category, which decides how it behaves. A status in the Accepted category syncs, shows on the agenda and opens portal tasks exactly as Accepted does. The Portal Name column shows whether submitters see your name or the category label. Custom statuses are archived rather than deleted, and archiving asks where to move existing sessions.
So that’s the whole rail. Every value you set here becomes a question on the form, a filter on the sessions list, and a color or a label on the agenda and the embeds. The Help Center article mirrors this page section by section. The Call for Papers chapter picks up from here, with the form that turns this vocabulary into the questions submitters answer.
Why use it
Section titled “Why use it”Program settings are the vocabulary your whole program uses. Every track, format, room or status you define here becomes a dropdown on the submission form, a filter on the sessions list and a color on the agenda. Set them up before your submission form goes live, because a format you add after fifty submissions leaves fifty sessions blank.
Overview
Section titled “Overview”Open Program → Settings. This page is the vocabulary of your program: anything you define here shows up as a dropdown on the submission form, a filter on the sessions list, and a color on the agenda. Fill it in before the form goes live — adding a format after fifty submissions means fifty sessions with a blank.
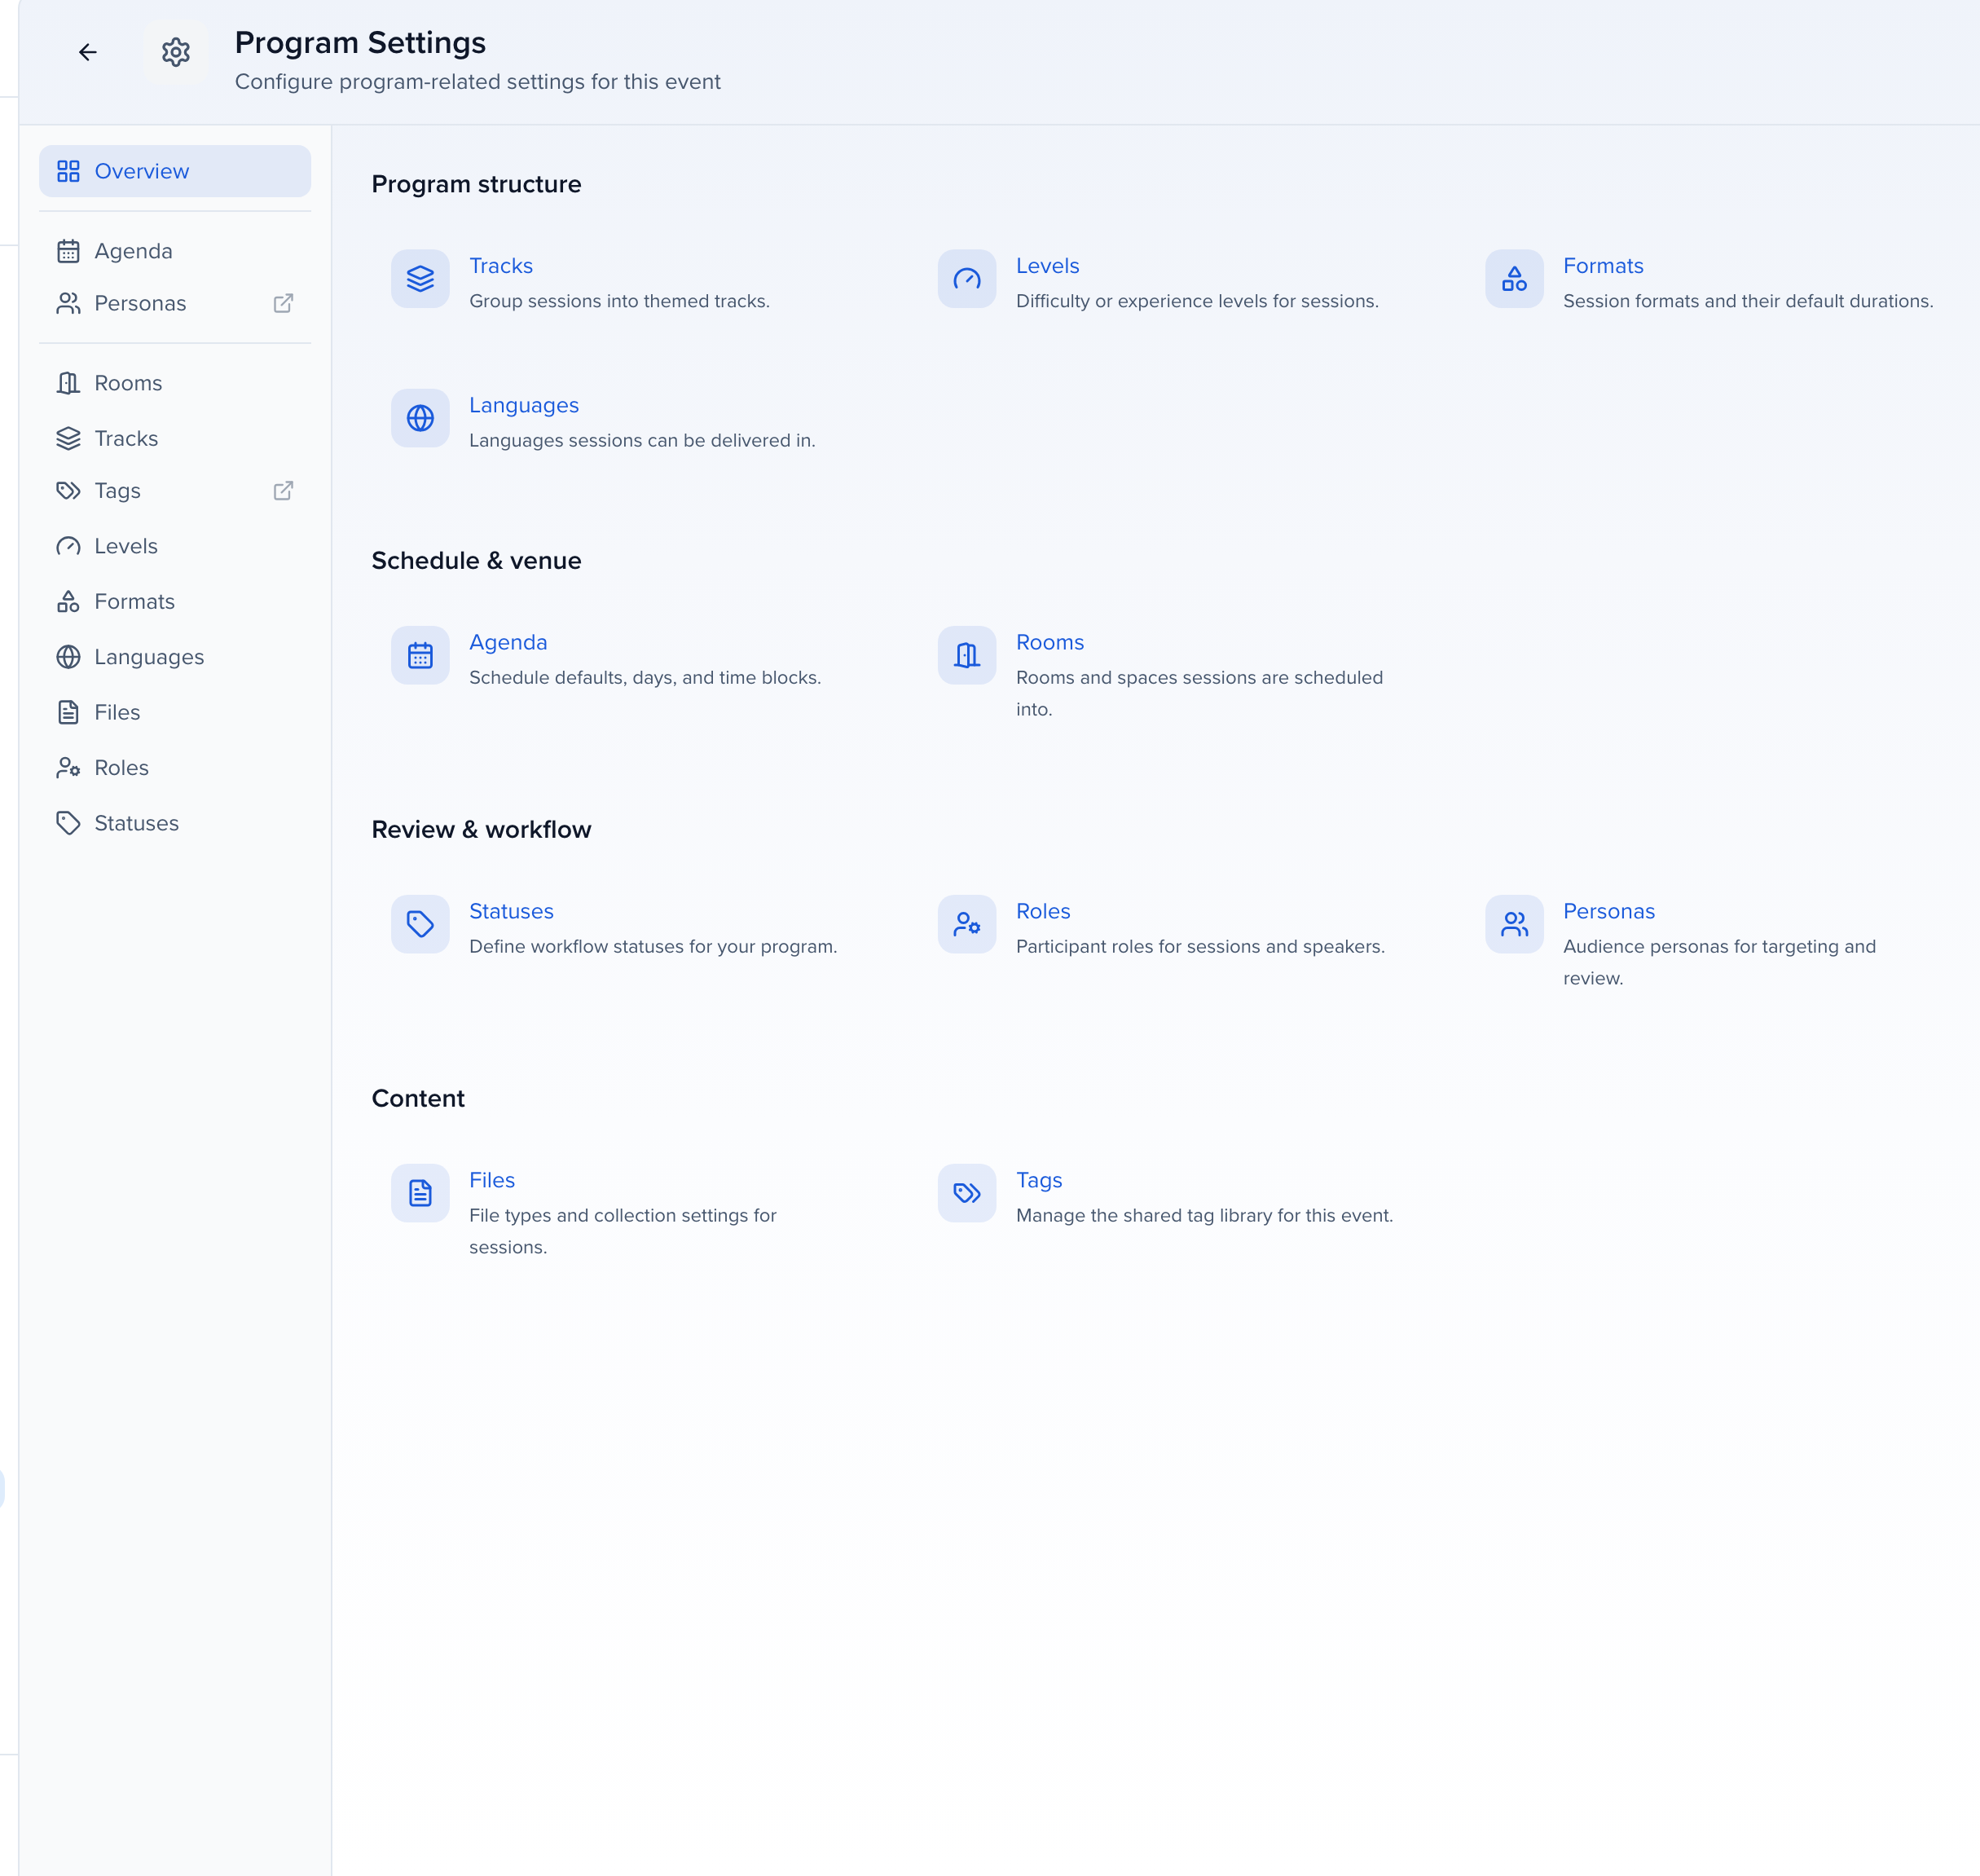
The overview groups the settings into tiles; the rail on the left opens each one, in this order: Overview, Agenda, Personas, Rooms, Tracks, Tags, Levels, Formats, Languages, Files, Roles, Statuses. Personas and Tags open their pages under Settings → Library; every other entry is a tab on this page with its own URL, so you can link a teammate straight to it.
| Group | Settings |
|---|---|
| Program structure | Tracks, Levels, Formats, Languages |
| Schedule & venue | Agenda, Rooms |
| Review & workflow | Statuses, Roles, Personas |
| Content | Files, Tags |
Tracks, levels, formats, languages, and rooms all work the same way: a table with Name and Uses (how many sessions carry the value), a search box, an Add button, and an Actions menu (⋯) on each row to Edit or Delete. Deleting a value that sessions still use warns you first. Deleting it clears the value from those sessions — the sessions themselves stay — and deleting a track or format also removes it from any role’s session filters. To keep the sessions categorized, move them to another value first with bulk edit, using Uses to see how many there are. Add opens a short menu: Add Track (or Level, Format, Language, Room) creates one, and Copy from… pulls the list from another event in your organization instead of retyping it.
Agenda
Section titled “Agenda”Defaults for the agenda views — the same settings the agenda reads when you schedule.
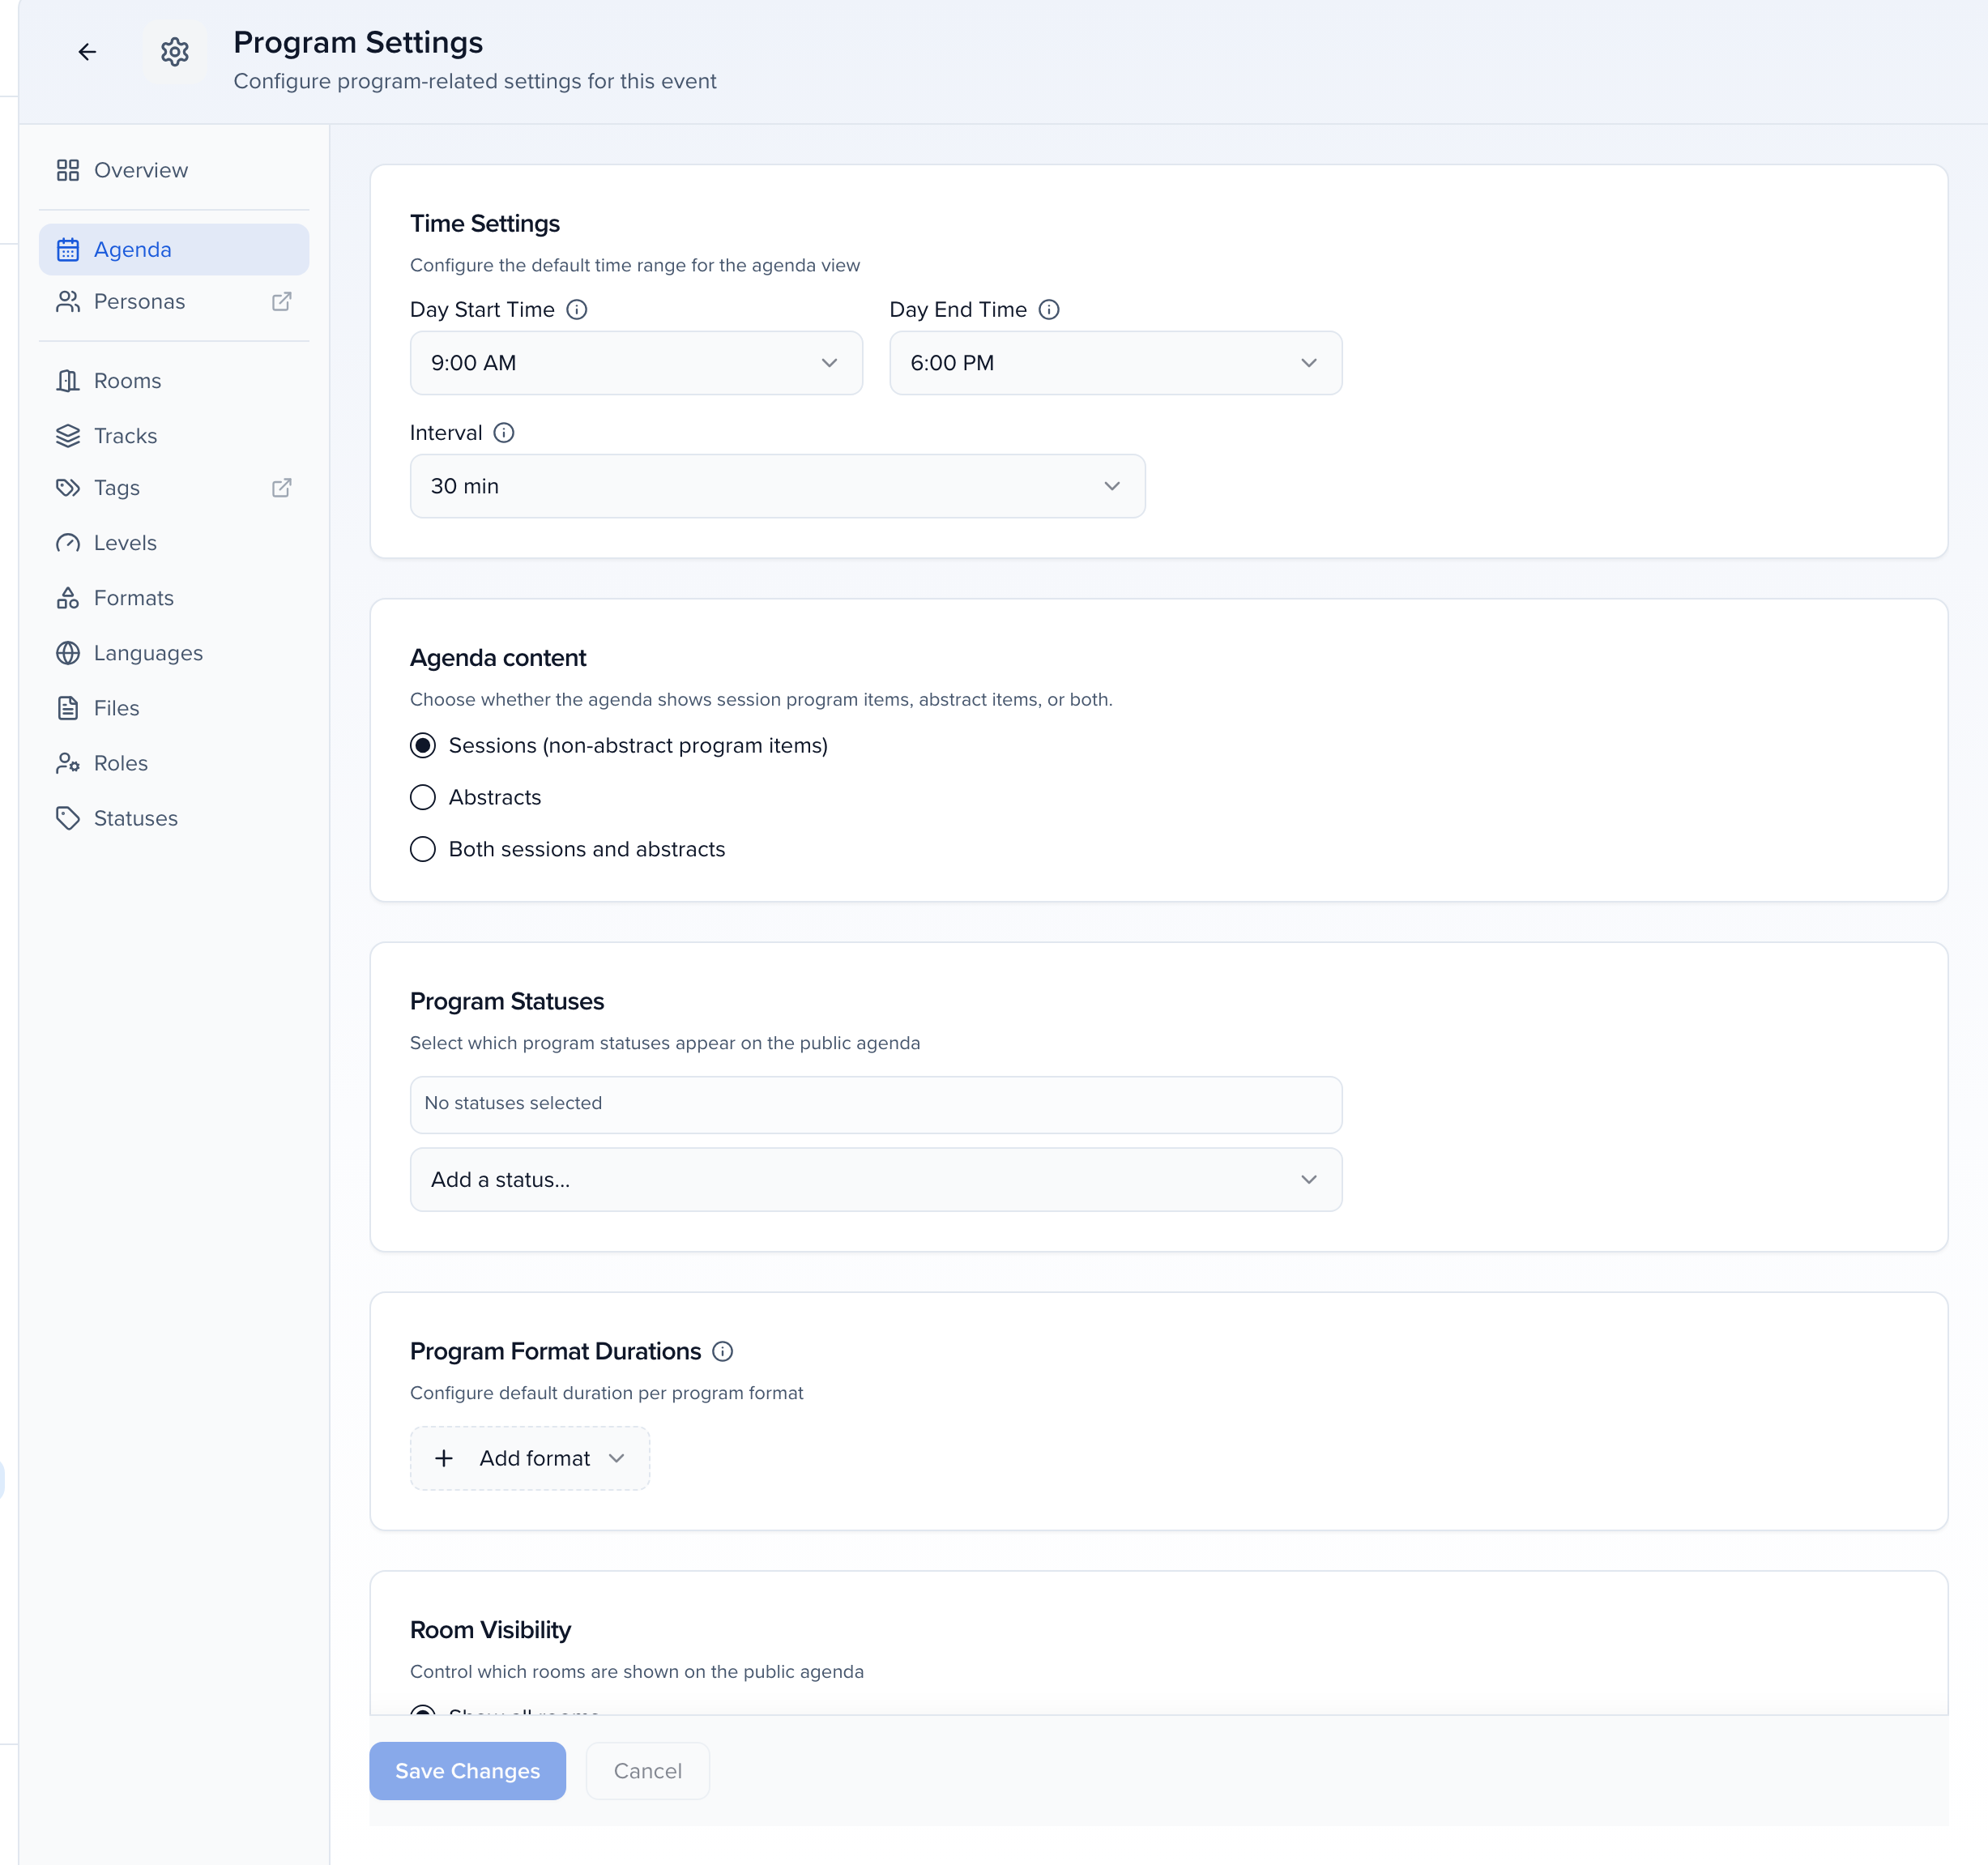
| Setting | What it does |
|---|---|
| Time Settings | Day Start Time and Day End Time are the earliest and latest times shown on the agenda each day. Interval is the step used when you drag to create or resize a session. |
| Agenda content | Whether the agenda shows Sessions (non-abstract program items), Abstracts, or Both sessions and abstracts. |
| Program Statuses | Which statuses appear on the public agenda. Typically Accepted, sometimes Accept Queue and Pending while the program is taking shape. |
| Program Format Durations | A default duration per format — a 20-minute lightning talk, a 90-minute workshop. New Agenda Drafts and the Scheduler start from these lengths. Dragging an unscheduled session onto the agenda does not use them; it lands as a one-hour block you resize. |
| Room Visibility | Show all rooms or Select individual rooms for the public agenda. |
| Add to Calendar | The title, location, and description sessions carry into a speaker’s or attendee’s calendar, built from session merge tags. Preview as… shows the result for a real session. |
| Subsessions | Participants shown on the parent session decides which subsession participants also appear on the parent: All participants (default), Presenting author only, or None. The create-subsession panel starts from this setting and lets you override it each time. |
| Participant Inventory | Enable participant inventory to set minimum and maximum participant targets per session and track assignment status on the Sessions grid. Off by default; the panel appears once Sessionboard support has enabled the feature for the event. See Track participant inventory on sessions. |
Click Save Changes when you’re done; the agenda picks the new defaults up immediately.
Tracks
Section titled “Tracks”Broad themes attendees filter by — “Facilitation and Programming”, “Industry and Business”, “Post-Conference”. Each track has a color, and that color is what the agenda and embeds paint session cards with when colored by track.
Levels
Section titled “Levels”The expertise a session expects of its audience — “Beginner”, “Intermediate”, “Advanced”.
Formats
Section titled “Formats”The shape of the session — “Keynote”, “Workshop”, “Panel”, “Poster”. Give each format a default duration under Agenda → Program Format Durations so agenda drafts and the Scheduler plan each session at the right length.
Languages
Section titled “Languages”The language a session is delivered in — “English”, “Spanish”, “French”. Unrelated to the language the portal is shown in; that is portal translation.
The physical rooms or virtual locations sessions can be scheduled into.
- Name — “Ballroom A”, “Exhibit Floor 1”, “Main Stage”.
- Capacity — the most people the room holds, up to 100,000. Shown in the agenda’s Rooms view, not in embeds.
- Display Order — how rooms are arranged left to right in the agenda embed, lowest first. Rooms with the same order value fall back to alphabetical.
Statuses
Section titled “Statuses”Program Statuses are the workflow a session moves through. The standard statuses — Pending, Accept Queue, Accepted, Decline Queue, Declined — can be reordered but not renamed: open one and only Display Order is editable. If your committee thinks in stages like “Shortlisted” or “Needs Revision”, add a custom status.
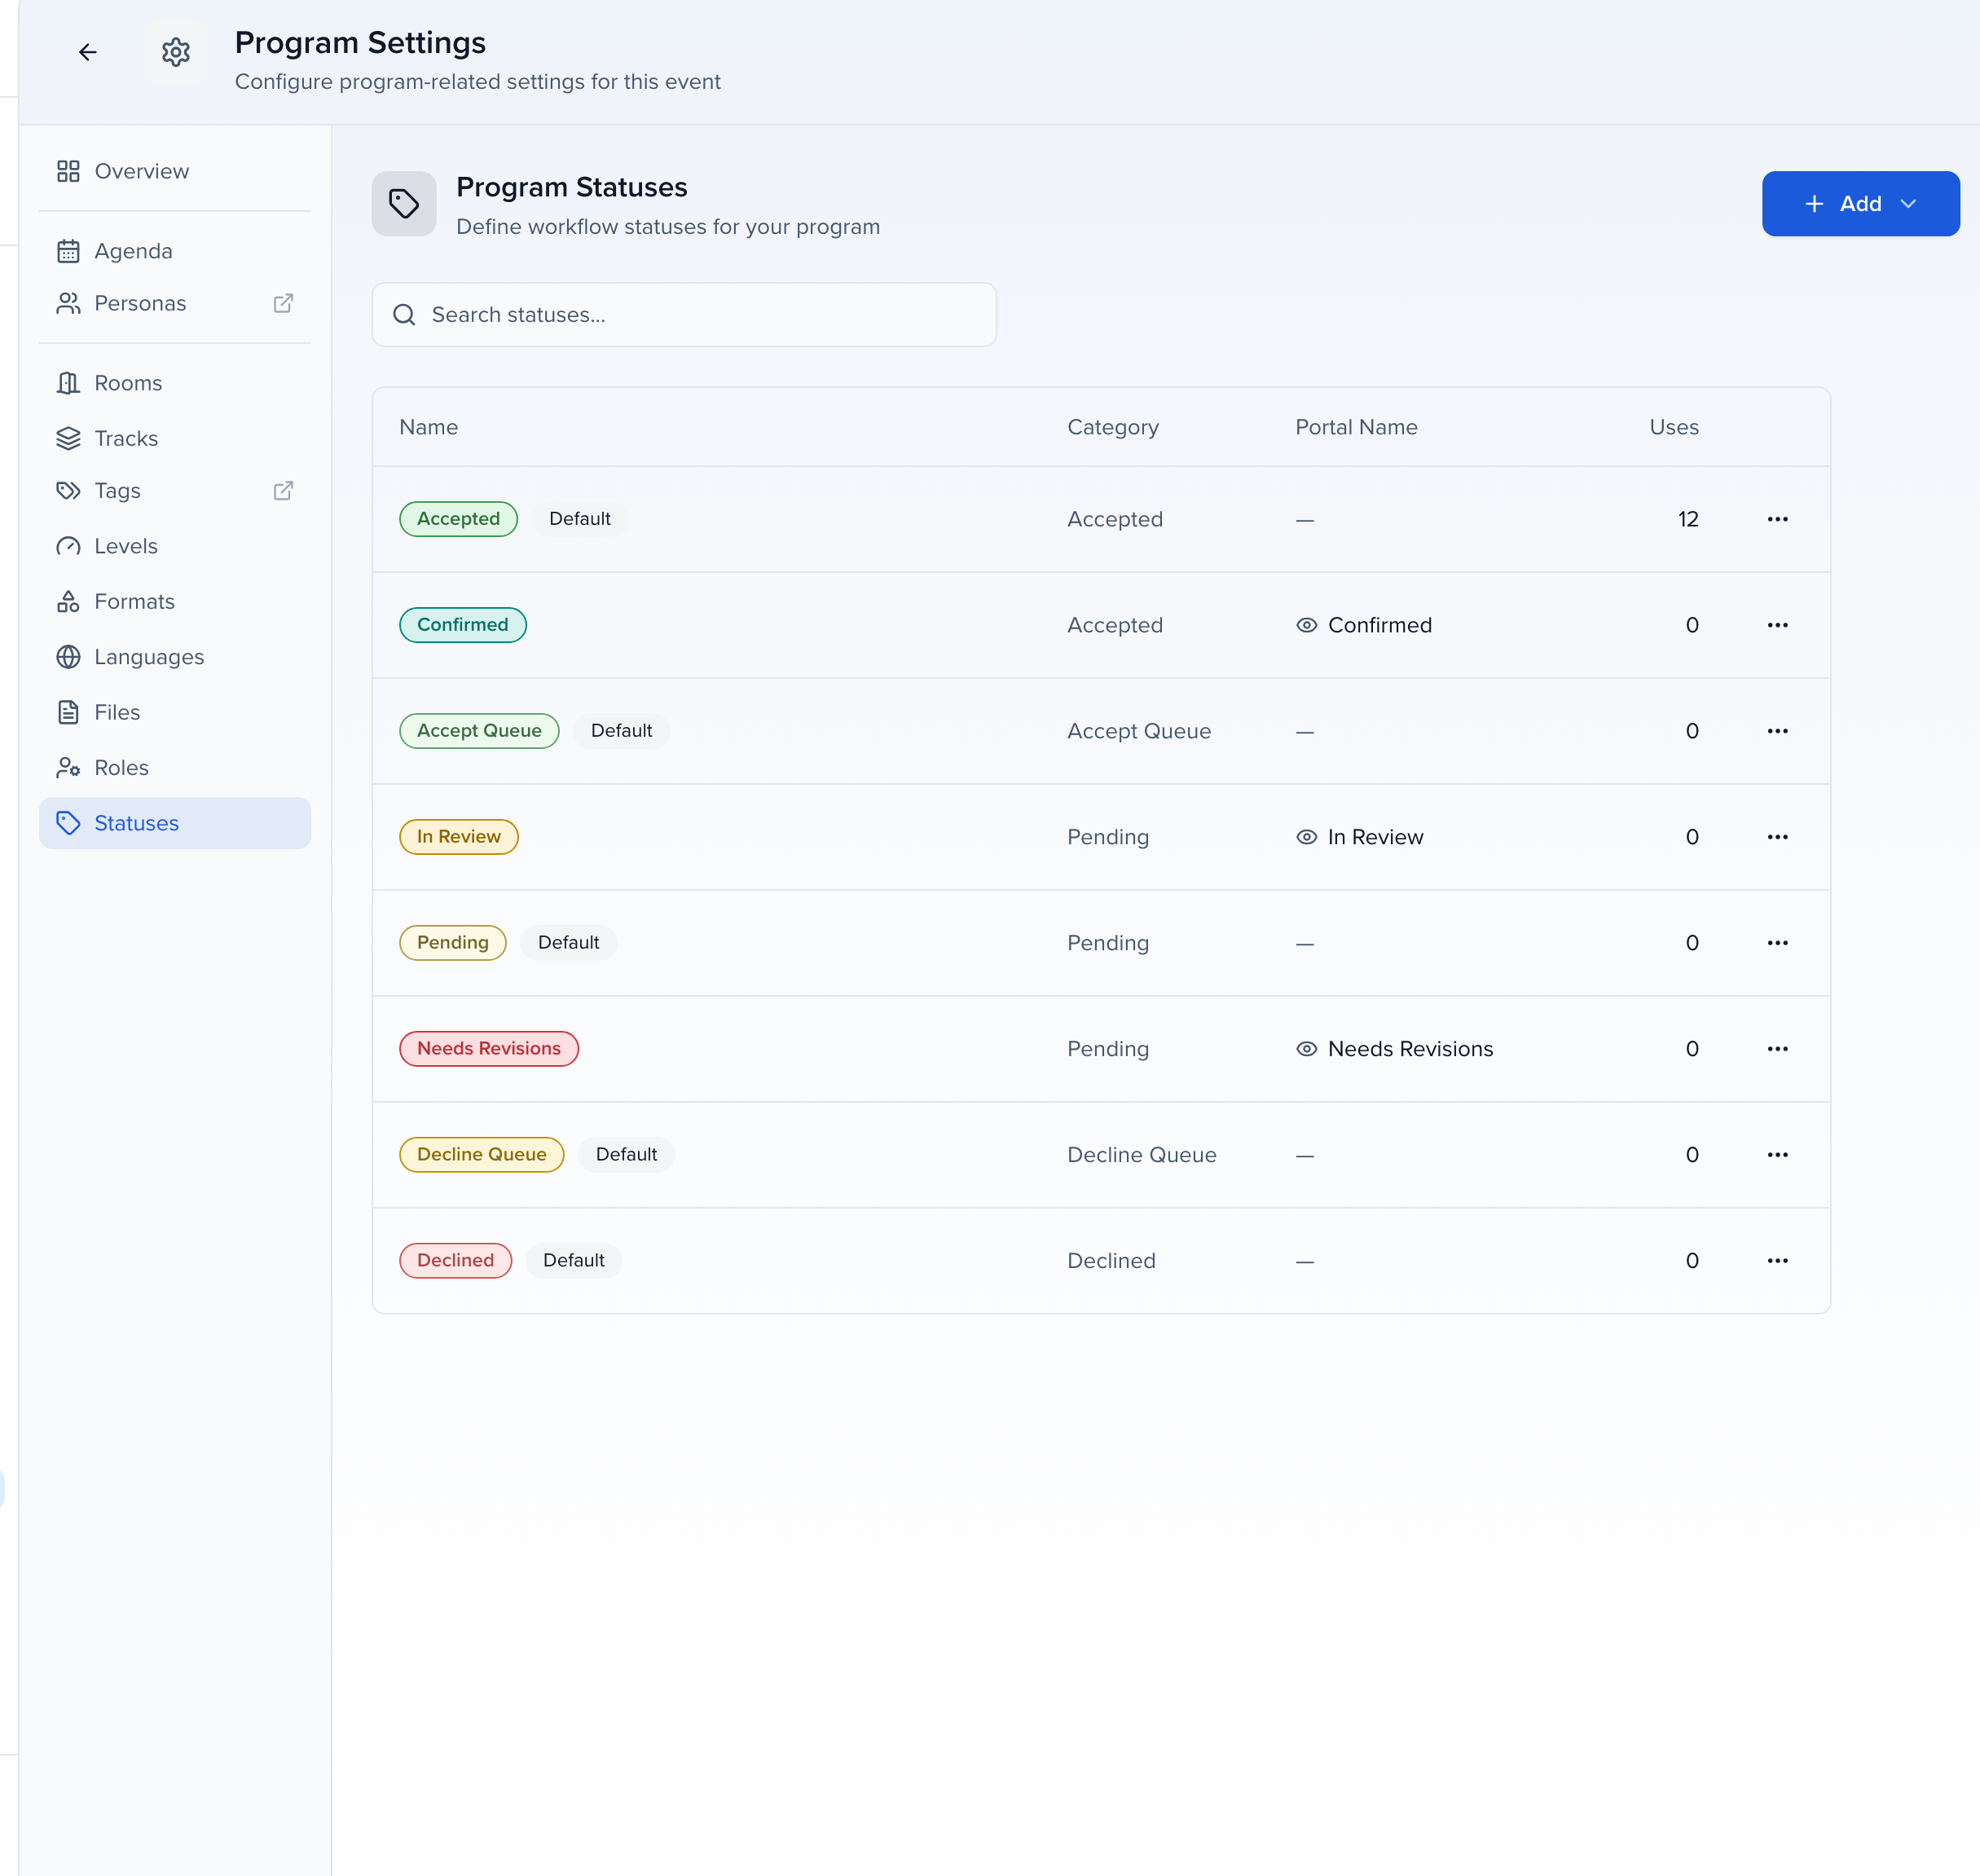
Add Status
Click Add above the table, then Add Status. (Copy from… on the same menu brings the custom statuses over from another event.)
Name and categorize it
- Name — what your team sees, for example “Pending Review”.
- Category — every status maps onto one of the five standard statuses and behaves like it. A custom status in the Accepted category syncs to integrations, shows on the agenda, and opens portal tasks exactly as Accepted does.
- Color and Display Order — how the status looks and where it sits in dropdowns.
- Show custom status name to external users — whether submitters see your name (“Shortlisted”) or the category label (“Pending”) in the portal. The Portal Name column shows what they’ll get.
Create
Click Create. The status is available in the Status field on every session and as a form’s Default status for new submissions under Form Settings.
Custom statuses are archived rather than deleted. Archive asks which status to move existing sessions to (Replace with status), so nothing is left without one; submission forms that defaulted to the archived status fall back to Pending.
Participant Statuses on the same page are the speaker-acceptance statuses — the answer a participant gives when asked to confirm. They map onto Pending, Accepted, or Declined in the same way, so a custom “Backup Speaker” status can behave as Accepted.
Build statuses
Section titled “Build statuses”Build statuses appears in Program Settings once a review plan in the event has reviewer session builds turned on. It holds your own labels for builds on the plan’s Builds tab, for example “On hold” or “Needs chair review”, so your team can sort builds without making a decision the team lead sees.
Every build status maps onto one of the build’s own statuses: Submitted, Approved, or Declined. The label is for admins only. Team leads keep seeing the mapped status in their session builder, and a label never approves, declines, or returns a build.
Add Status
Click Add Status. You can also get here from any plan’s Builds tab with Manage statuses.
Name and categorize it
- Name: what your team sees on the Builds tab.
- Category: the build status the label belongs to. The Team lead sees column shows what team leads get instead.
- Color and Display Order: how the label looks and where it sits in menus.
Create
Click Create. On the Builds tab, the tag button on a Submitted, Approved, or Declined build offers the labels of that status.
The four standard statuses (Draft, Submitted, Approved, Declined) are listed but can’t be edited. A label comes off a build when the build’s status changes, for example when you approve or return it. You can’t change the category of a label that builds are using; move those builds to another label first. Archive removes the label from its builds, which keep their status. Adding, editing, and archiving build statuses, and changing a build’s label, are recorded in the event’s History.
Reviews
Section titled “Reviews”Reviews holds settings that apply to every review plan and round in the event. Changing one is recorded in the event’s History.
| Setting | What it does |
|---|---|
| Count abstains as completed reviews | On by default. An abstain counts as a finished review in progress bars, review counts and reports, which is how Sessionboard has always counted them. Turn it off and an abstain is left out of those counts entirely: it is neither completed nor outstanding. |
With Count abstains as completed reviews off:
- A submission with two scores and one abstain shows 2 reviews, and a minimum or “all reviews in” check needs real reviews to pass.
- A reviewer who reviews 9 submissions and abstains on 1 shows 9 of 9, not 10 of 10.
- Plan and round progress, the reviewers and submissions lists, the session’s Reviews panel, the reviewer’s own My reviews progress, the review summary and Insights reviewer fields all count the same way.
- Abstains are still shown as abstains everywhere they are listed, with their reasons. An abstention whose reason names a conflict still becomes a declared conflict as before; other abstentions stay plain abstentions.
- Nothing about reminders changes. A reviewer is never reminded about a submission they abstained on, whichever way this is set.
Nothing is rewritten when you change it. Counts are worked out when you open a page, so switching it back restores the earlier numbers.
Roles are the parts people play on a session. Sessionboard starts with three — Speaker, Chairperson, Moderator — and each maps to a Category that decides how the role is represented in integrations and embeds.
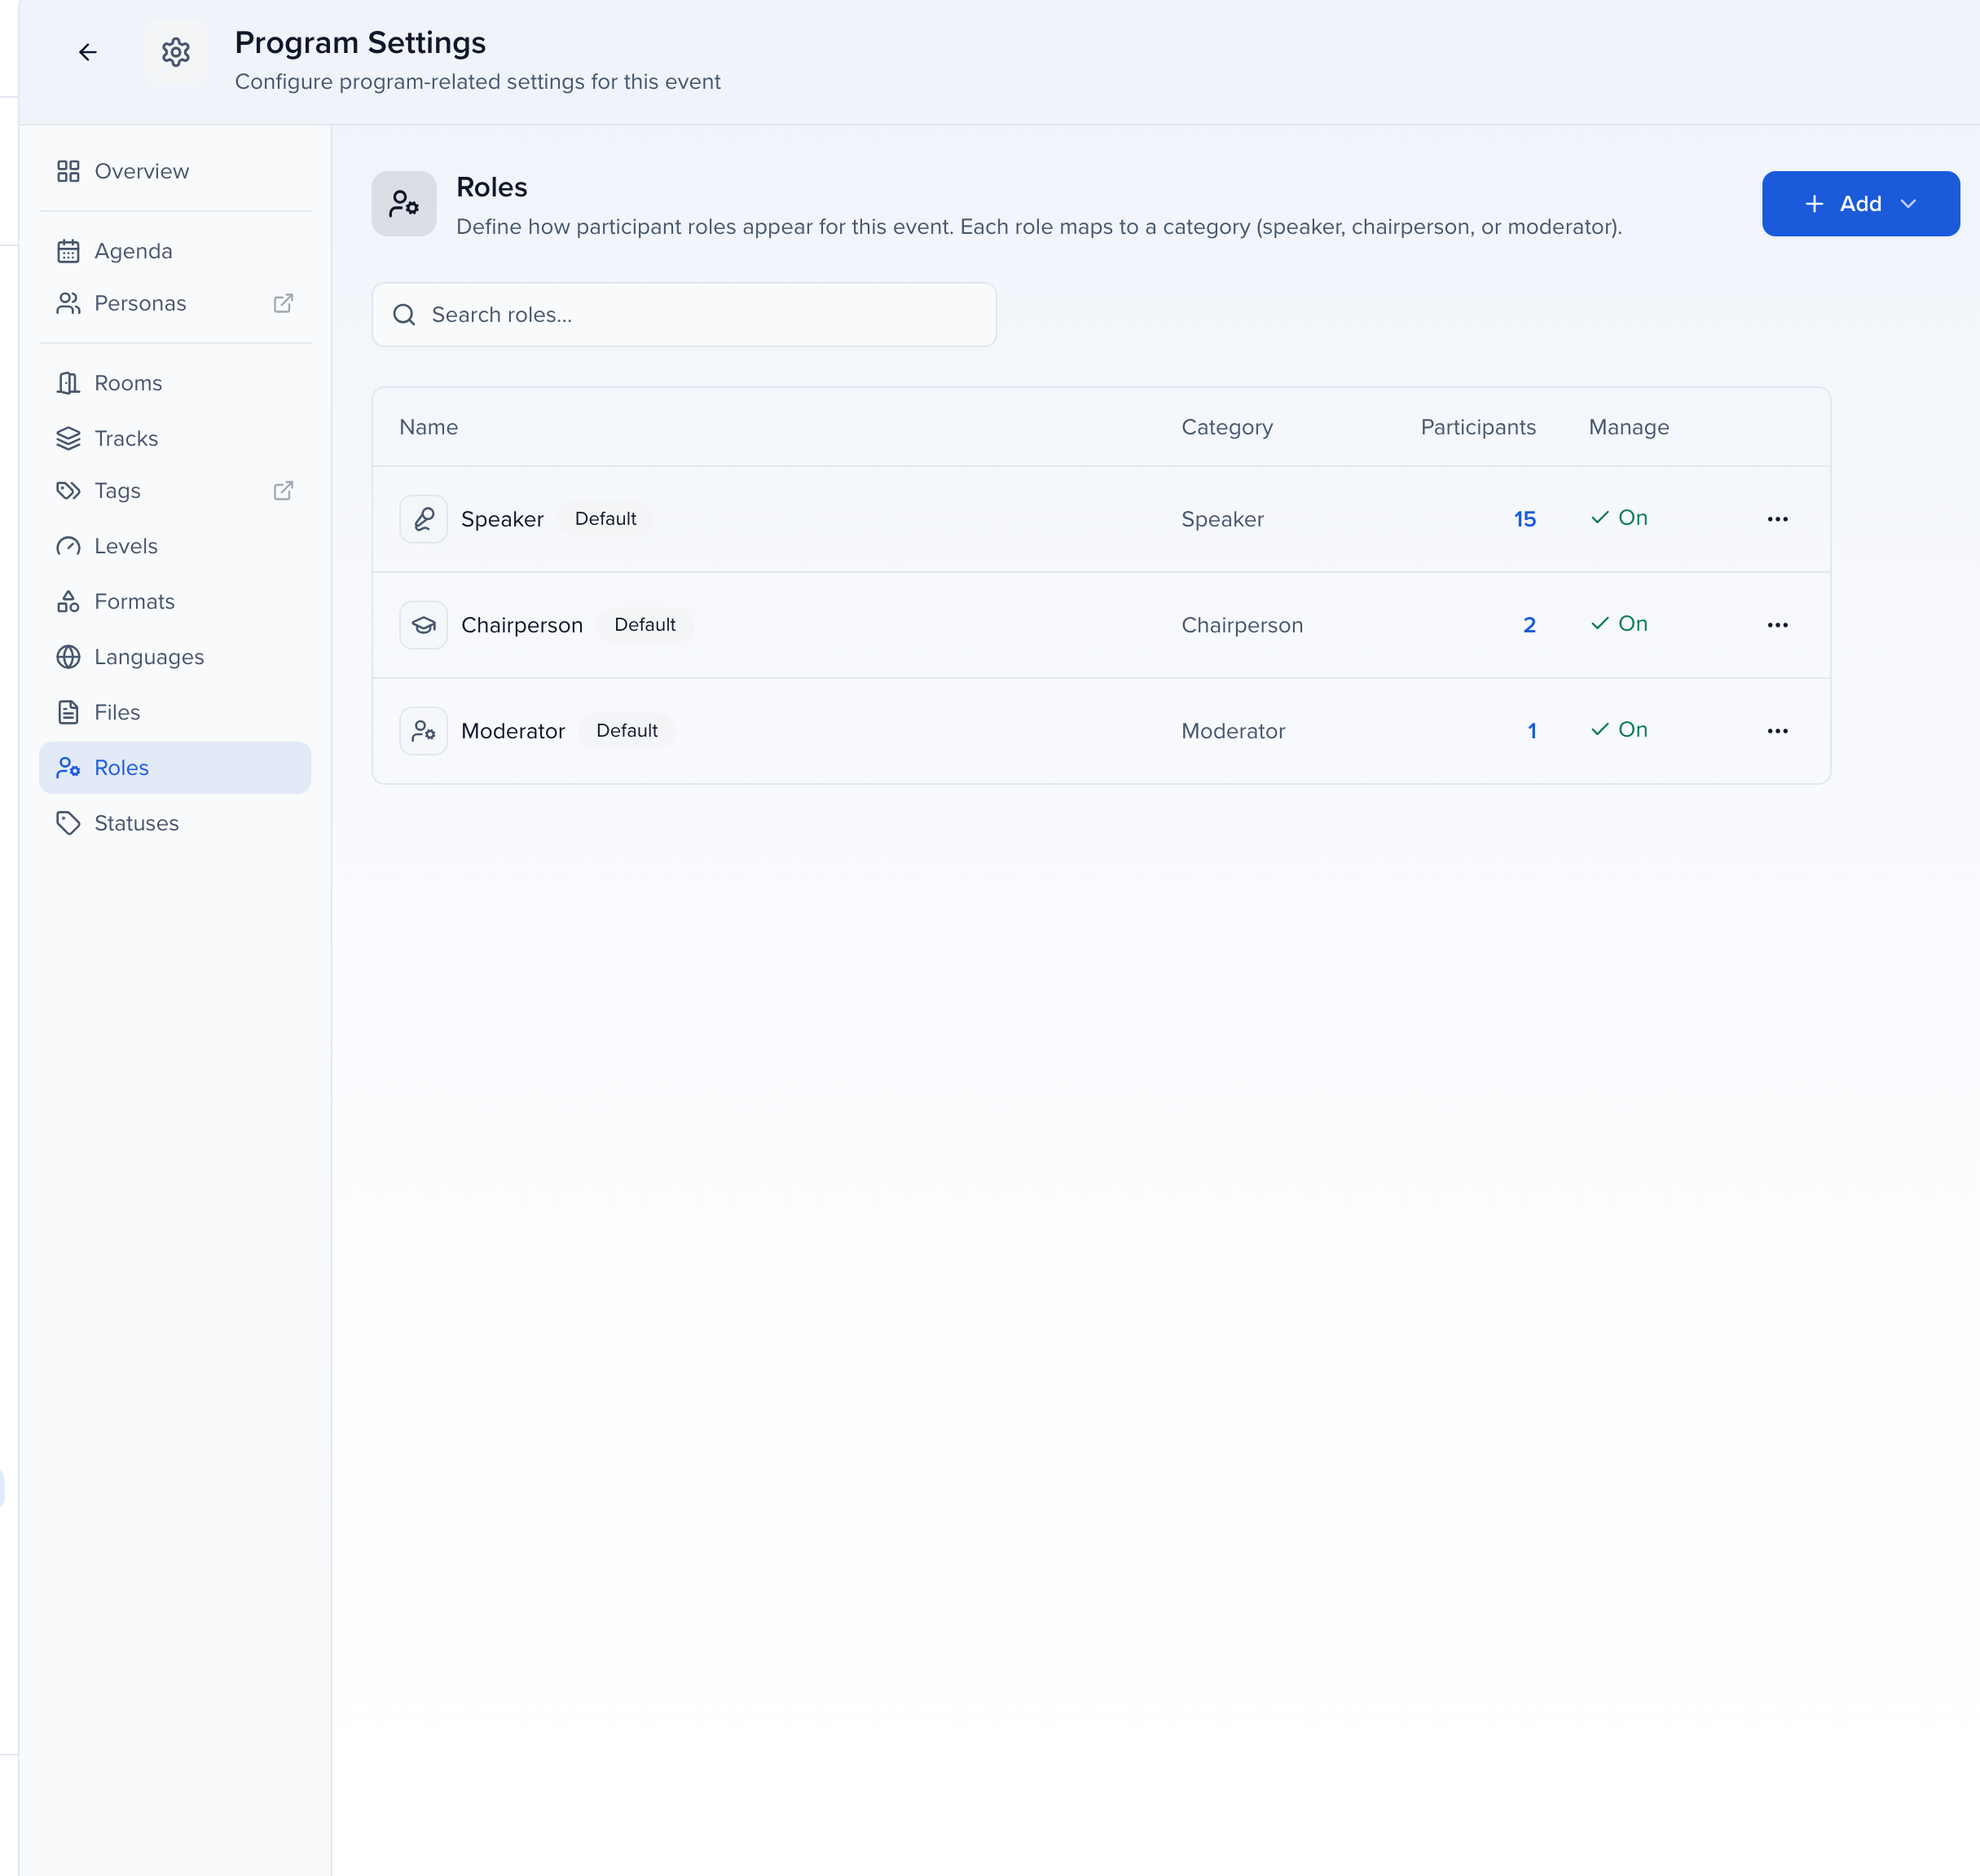
- Participants — how many people currently hold the role.
- Manage — On gives the role its own page under CRM, alongside Speakers.
The Actions menu (⋯) renames a role to your own terminology. Add → Add Role creates a new one:
| Field | What to enter |
|---|---|
| Role Name | A Singular and Plural form — “Co-author” / “Co-authors”. |
| Category | Speaker, Chairperson, or Moderator. |
| Role Icon | The icon shown next to the role. |
| Manage in Contacts | Whether the role gets its own CRM page. |
| Language variants | Only on events with more than one language. A singular and plural name for each of the event’s other languages — “Coautor” / “Coautores” in Spanish. Leave a language blank to show the name above. |
Role names in other languages
Section titled “Role names in other languages”On an event with more than one language (see Language variants), each role’s edit panel has a Language variants section with one row per language. What you type there is what reviewers, submitters and speakers see when they pick that language: on the Review portal’s cards, in Print all and on the submission page, in the submission form’s participant roles, and on the speaker portal’s Participants tab. Any role can have one, including the roles your team created and the three starting roles. A language left blank shows the role’s own name; Speaker, Chairperson and Moderator, while they keep their original names, still read in Spanish, French and German without one.
Track names in other languages are set on the Track field instead: open Settings → Library → Fields, edit Track, and fill in its Language variants and the value for each track. On a multi-language event the Tracks tab links there.
New roles have portal access, so people you add in a new role can sign in to the portal for their session and are tracked as active portal users (the hint next to Add says so). Reach out to support if you need a role without portal access.
Deleting a role asks where to Reassign participants to, so nobody is dropped from a session.
Role order and participant display order
Section titled “Role order and participant display order”Roles are listed in the order the session’s Participants tab and reports group them. The lock icon beside Add means role ordering is in limited release for your event; its tooltip says so, and you can ask Sessionboard to turn it on.

With Participant Ordering Controls enabled, the lock is replaced by two things:
- Drag handles on each role row. Drag a role up or down to change where it sits on the Participants tab, in the portal and in reports. Handles go inert while a search is typed, since a filtered list can’t express the full order — clear the search to reorder.
- Participant display order, a choice between By role (the default — one block per role, in the order above) and As submitted. As submitted shows every participant on a session in one list, in the order the submitter listed them on the submission form — author order on an abstract, for example — with a badge for each person’s role. Changing the setting applies to every session in the event; the setting itself re-sorts nothing in the data, so switching back restores the role blocks. To reorder participants by a rule instead, see Bulk edit participant order.
In As submitted mode the session’s Participants tab is that one list. Drag a person up or down to set the order, including across roles, and each role has its own Add button on the list.
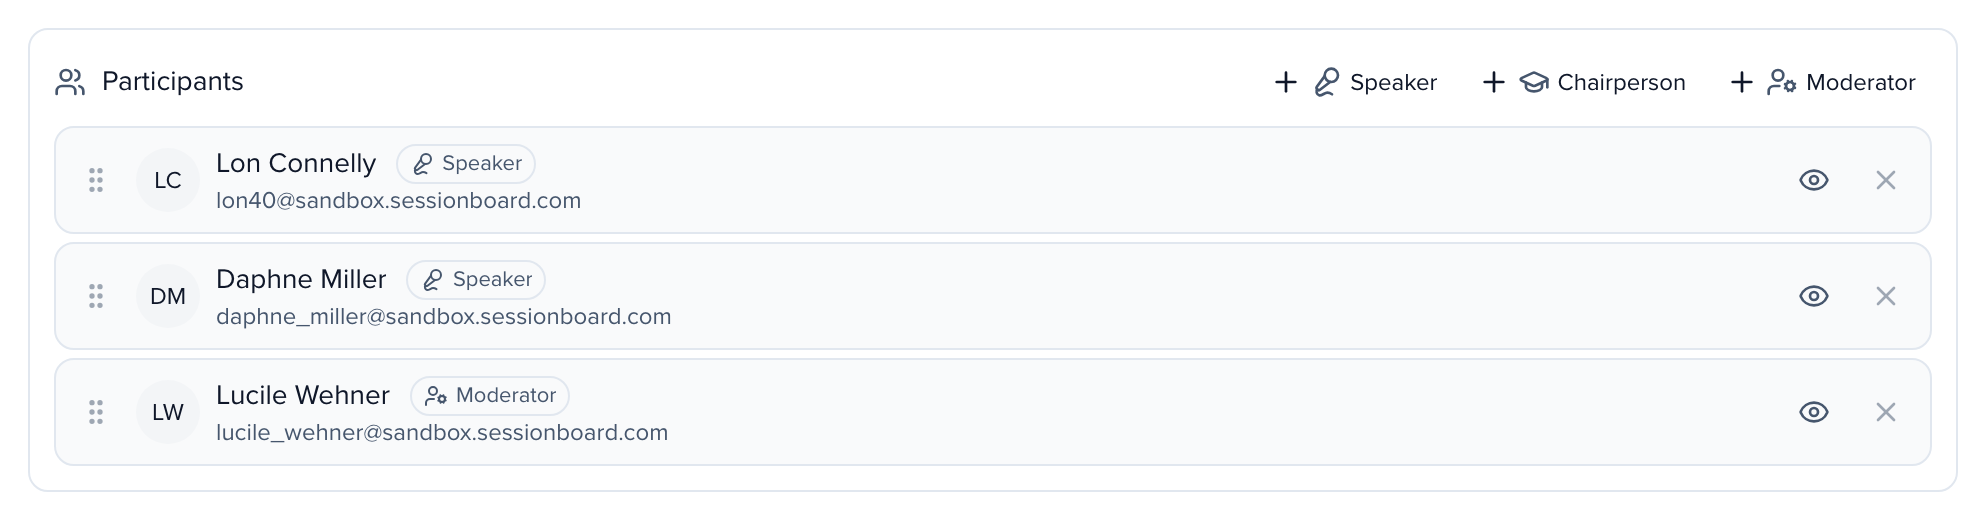
Reports built in the Report Builder sort participants by that same order and expose it as Display order on participant contacts, so an authors-in-order export matches what the session shows. Website embeds whose Session speakers sort order is As listed on the session follow it too.
Bulk edit participant order
Section titled “Bulk edit participant order”When submitters list people in whatever order they like, you can set one rule — Moderators first, then Chairpersons, then Speakers, alphabetical by last name within each role, for example — and apply it to every session at once instead of dragging each one.
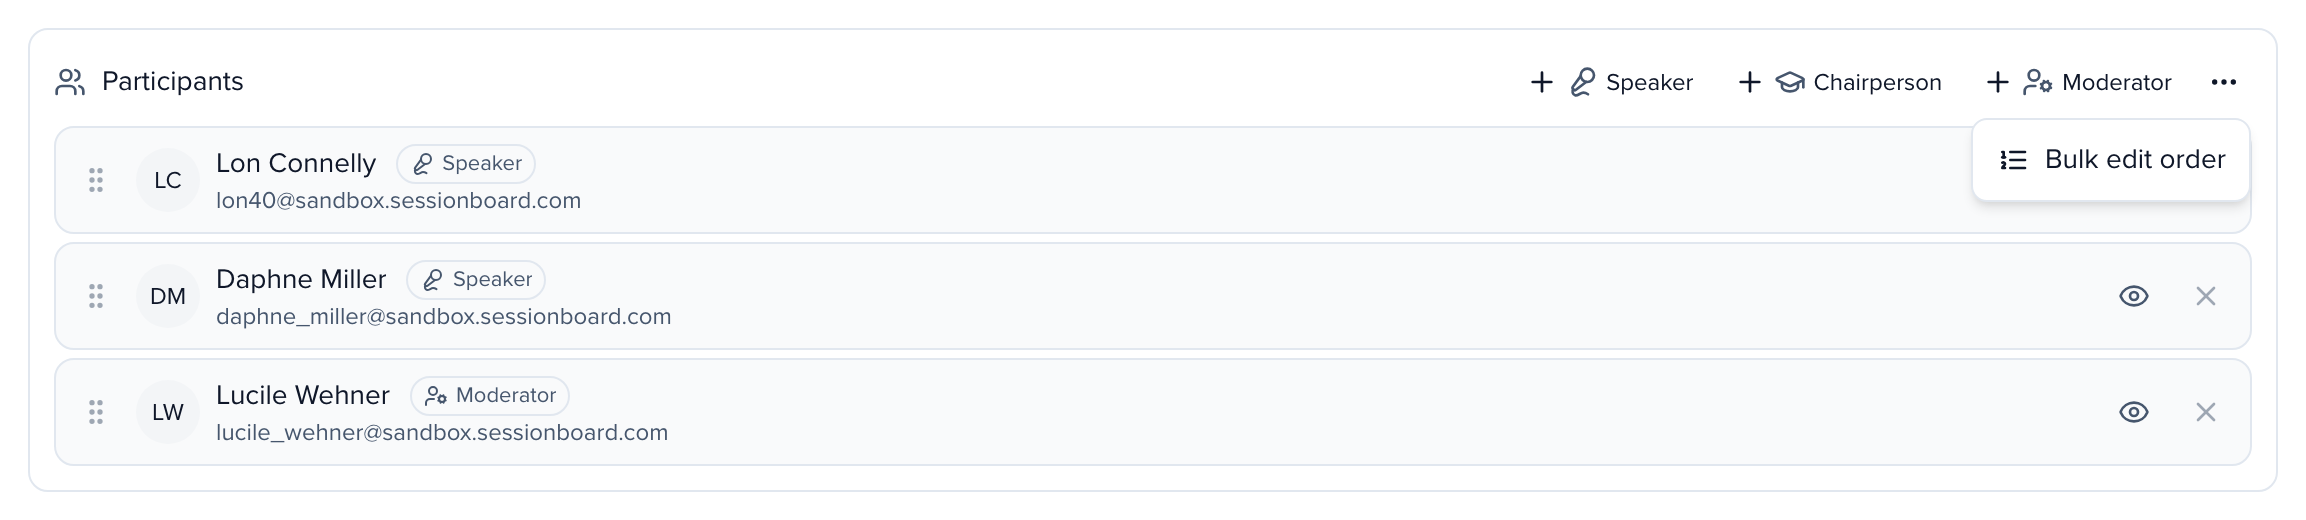
On any session’s Participants tab, open the ⋯ menu beside the Add buttons and choose Bulk edit order. The menu only appears in As submitted mode and for people who can edit sessions.
The Participant order page has the rules on the left and the sessions on the right:
- Role order — drag roles (or use the arrows) into the order they should appear. It is used by the Role sort.
- Sort by — First by one key, Then by others. Each sort breaks ties left by the one above it: Role (in the order above), Last name, First name, Affiliation (the person’s first listed affiliation), Primary participants (first or last), or Submitted order. Text sorts go A → Z or Z → A, and people with a blank value go last. Anyone still tied keeps their current order.
- Save rules stores the rules on the event, so the next person who opens the page starts from them.
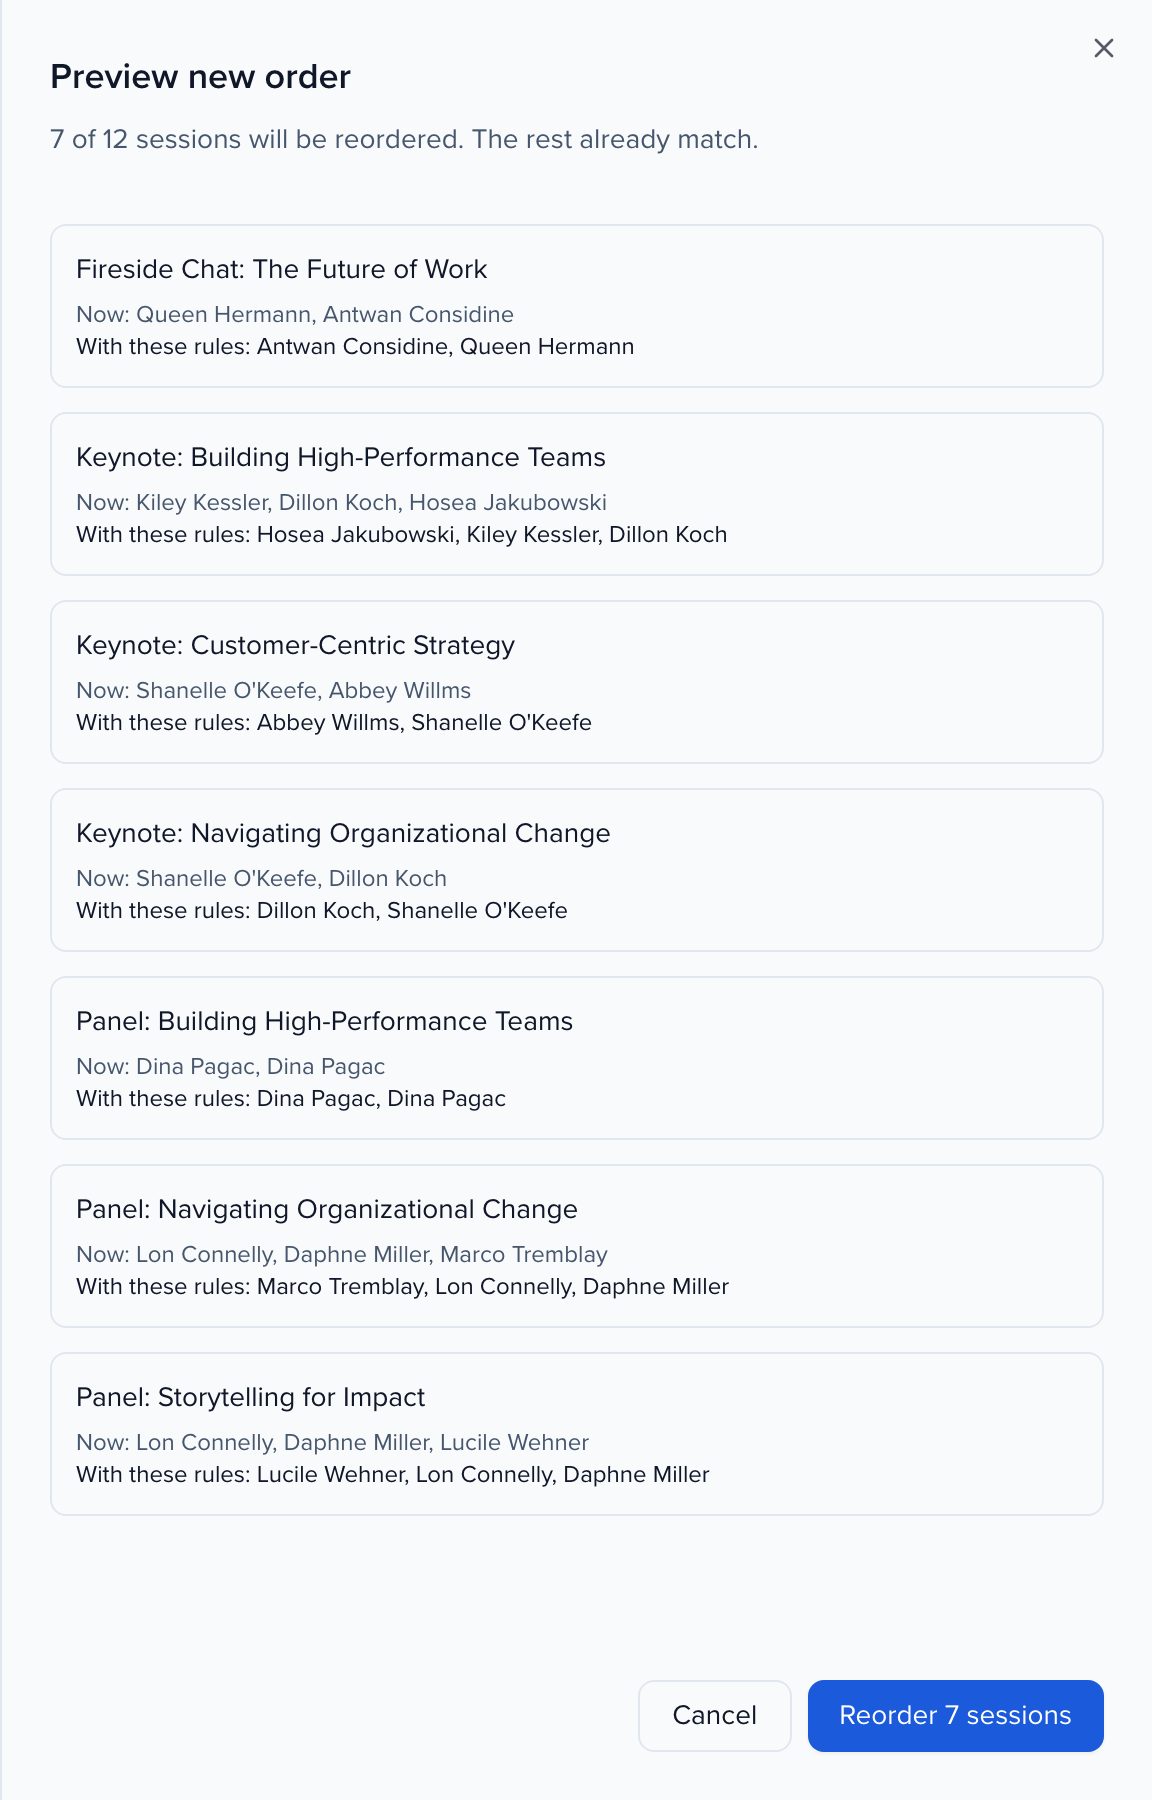
The right side pages through the sessions one at a time — Previous and Next, the J and K keys, or Jump to a session. Each session shows its order Now next to the order With these rules, and a Differs from rules badge when the two don’t match. Apply rules to this session reorders just that one; Open session goes to it. Turn on Hide sessions with fewer than 2 participants to skip the ones there is nothing to sort.
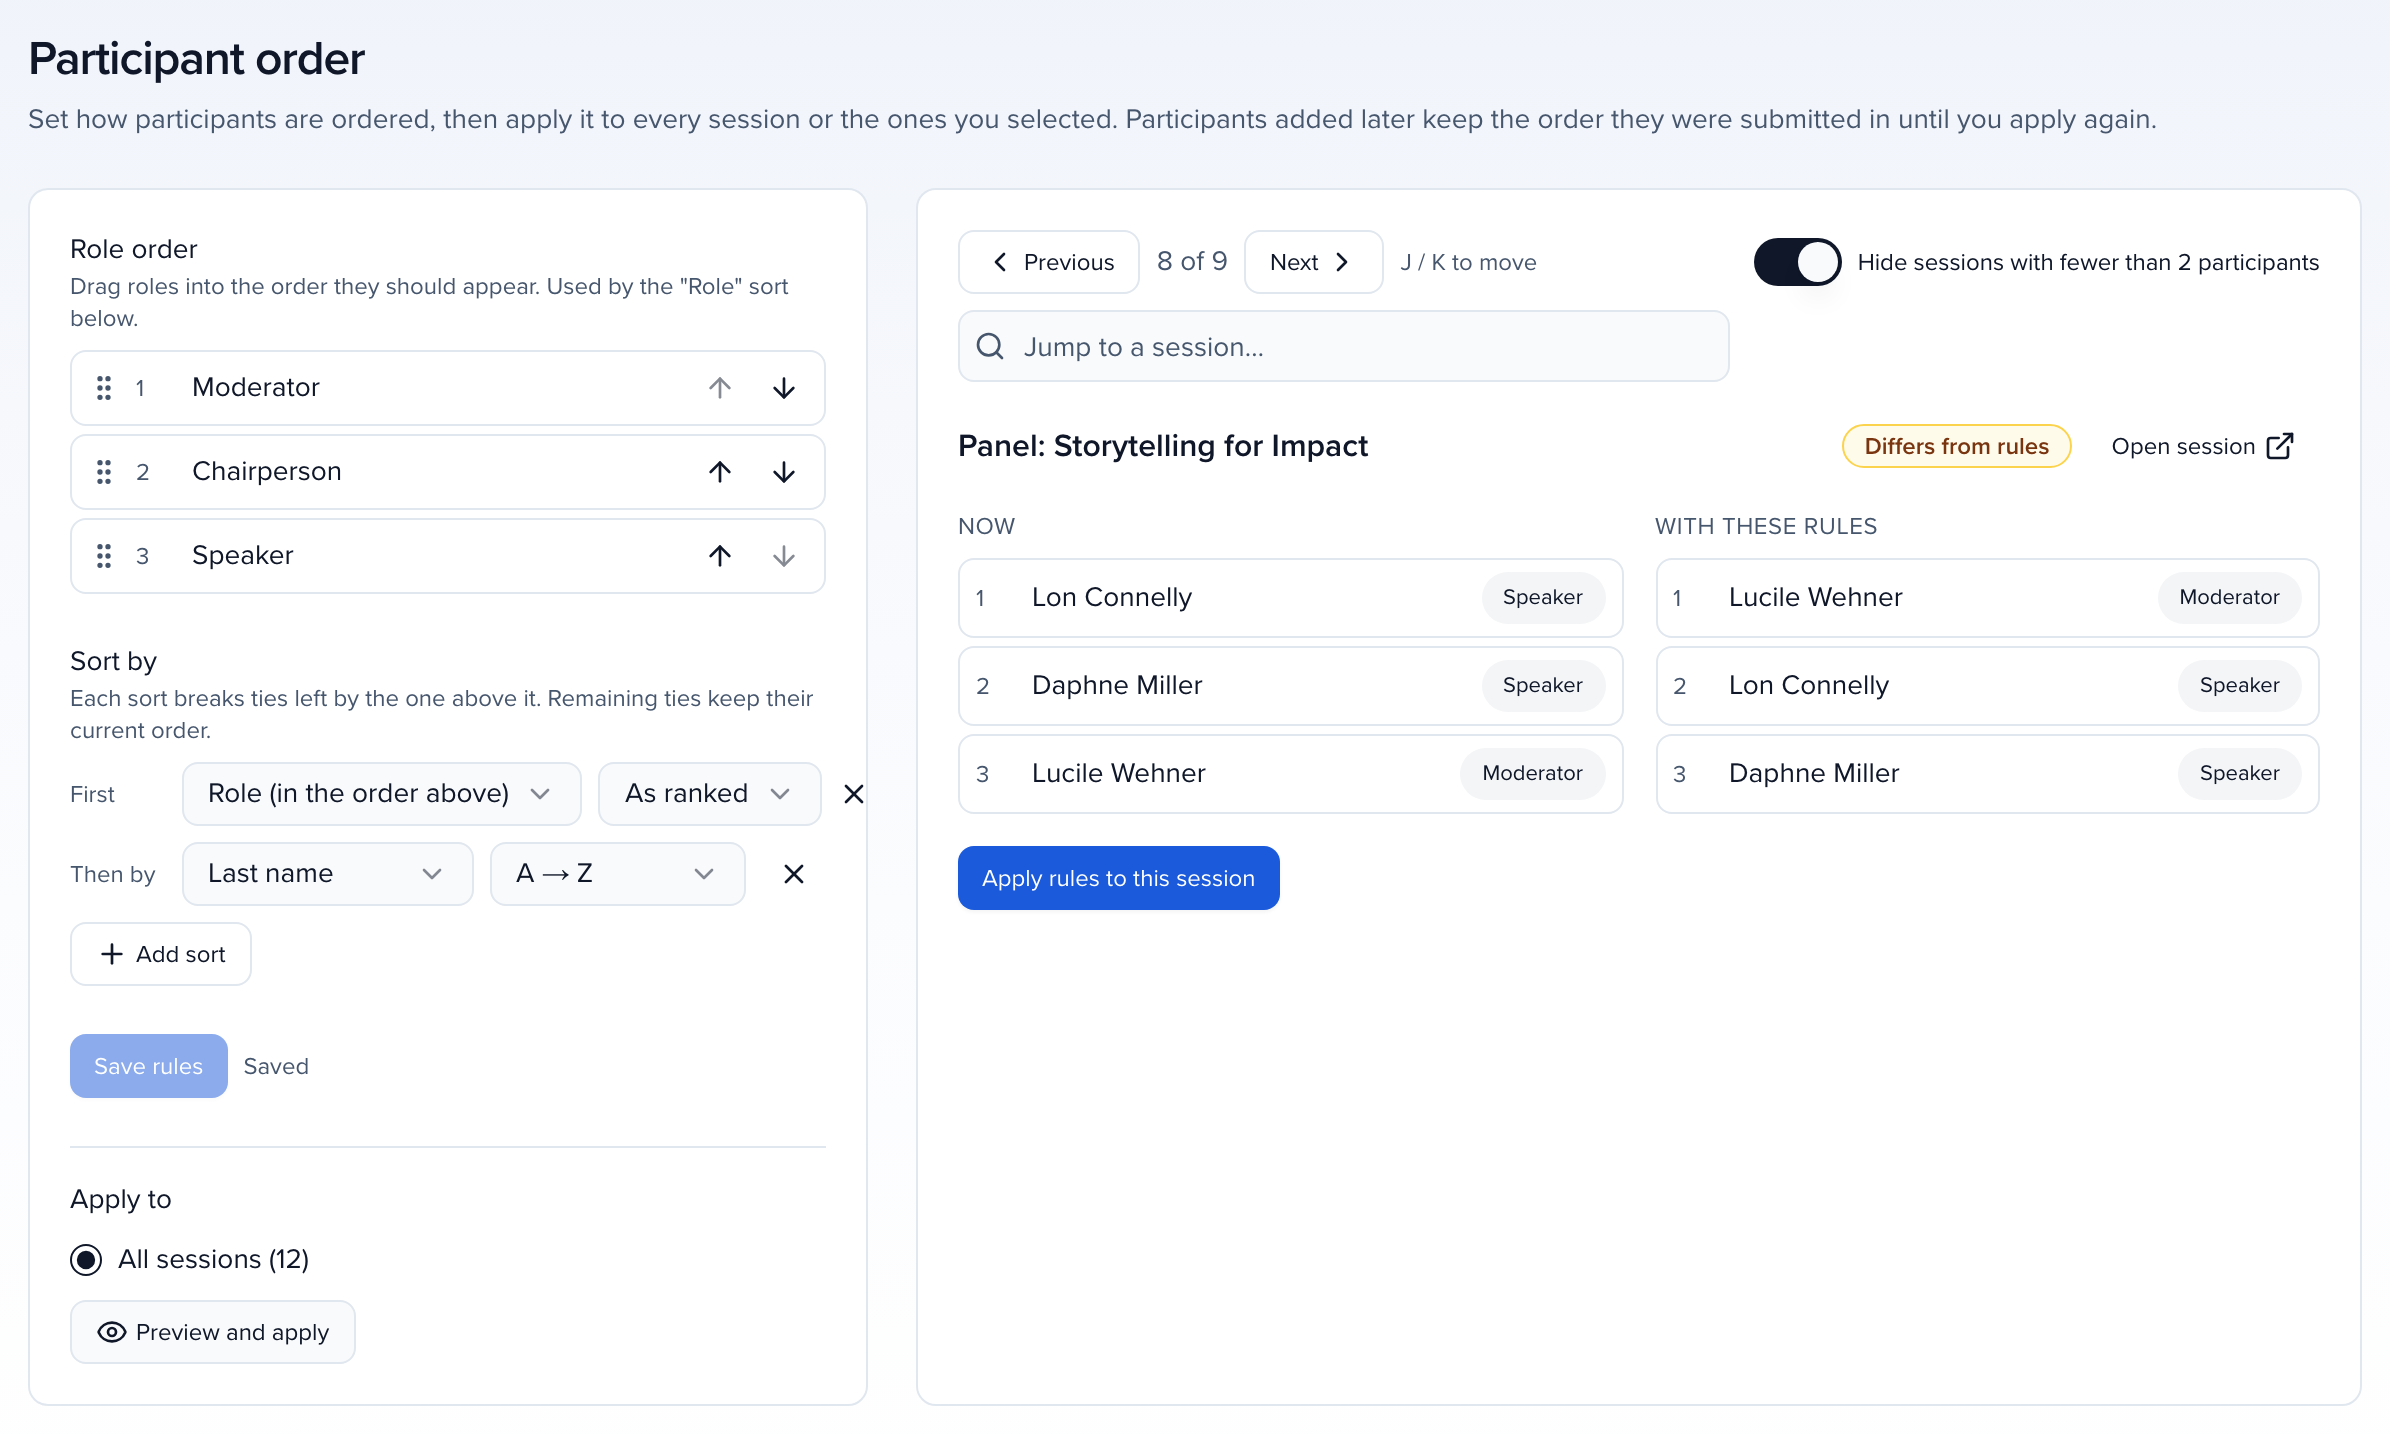
To reorder many sessions at once, pick All sessions under Apply to and click Preview and apply. The preview lists every session that would change, with its order now and after. Reorder N sessions saves any unsaved rules, then reorders them in the background with a progress bar. Sessions already in order are left untouched.
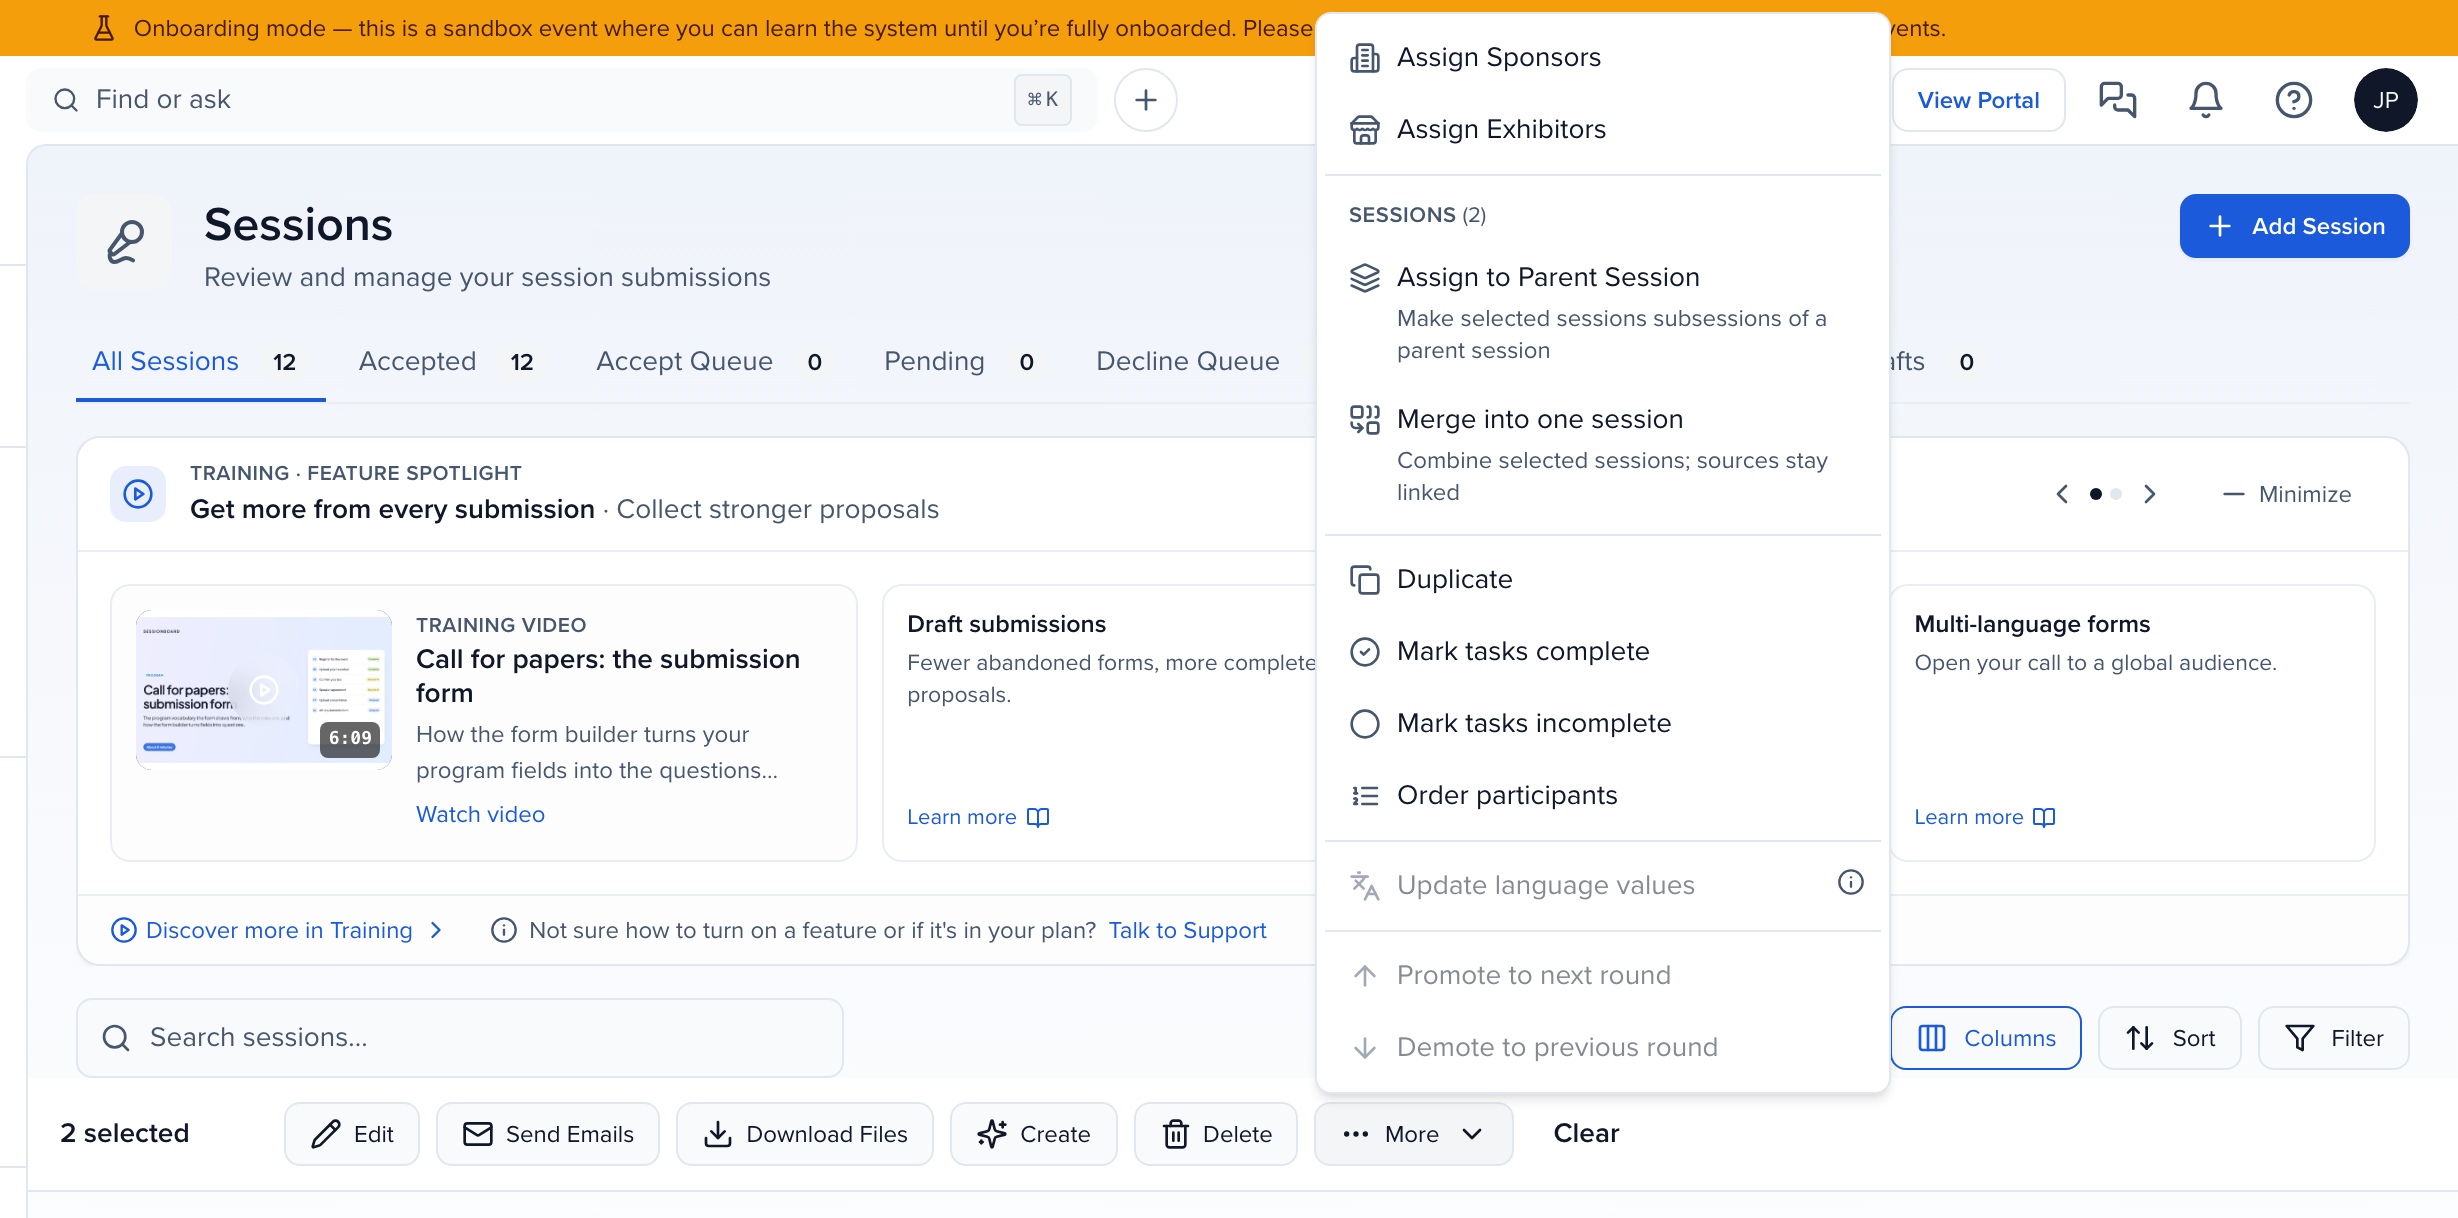
To reorder only some sessions, check them on the Sessions list and choose More → Order participants in the bar at the bottom. The page opens with Selected sessions as the scope.
Applying the rules is a one-time reorder. Participants added afterwards are placed in the order they were submitted, and you can still drag anyone by hand; apply the rules again whenever you want everything back in line. Participants whose contact was deleted stay at the end of the list.
To get that order into a spreadsheet, add the All participants (in order) column on the Sessions list and export. It lists everyone on the session in their current order, each followed by their role — for example Cora Coauthor (Coauthor); Pat Presenter (Presenting Author) — where the per-role columns group people by role.
Attributes
Section titled “Attributes”When Role Attributes is enabled for your event (an Enterprise feature that sits with Speaker Affiliations — ask your Customer Success Manager or support@sessionboard.com), the Roles page gains an Attributes tab. Attributes are extra pieces of information collected about each participant on each session — a presentation title for presenting authors, a contribution statement for everyone — defined once here and collected on submission forms next to affiliations. They behave like a small fields list for participants.
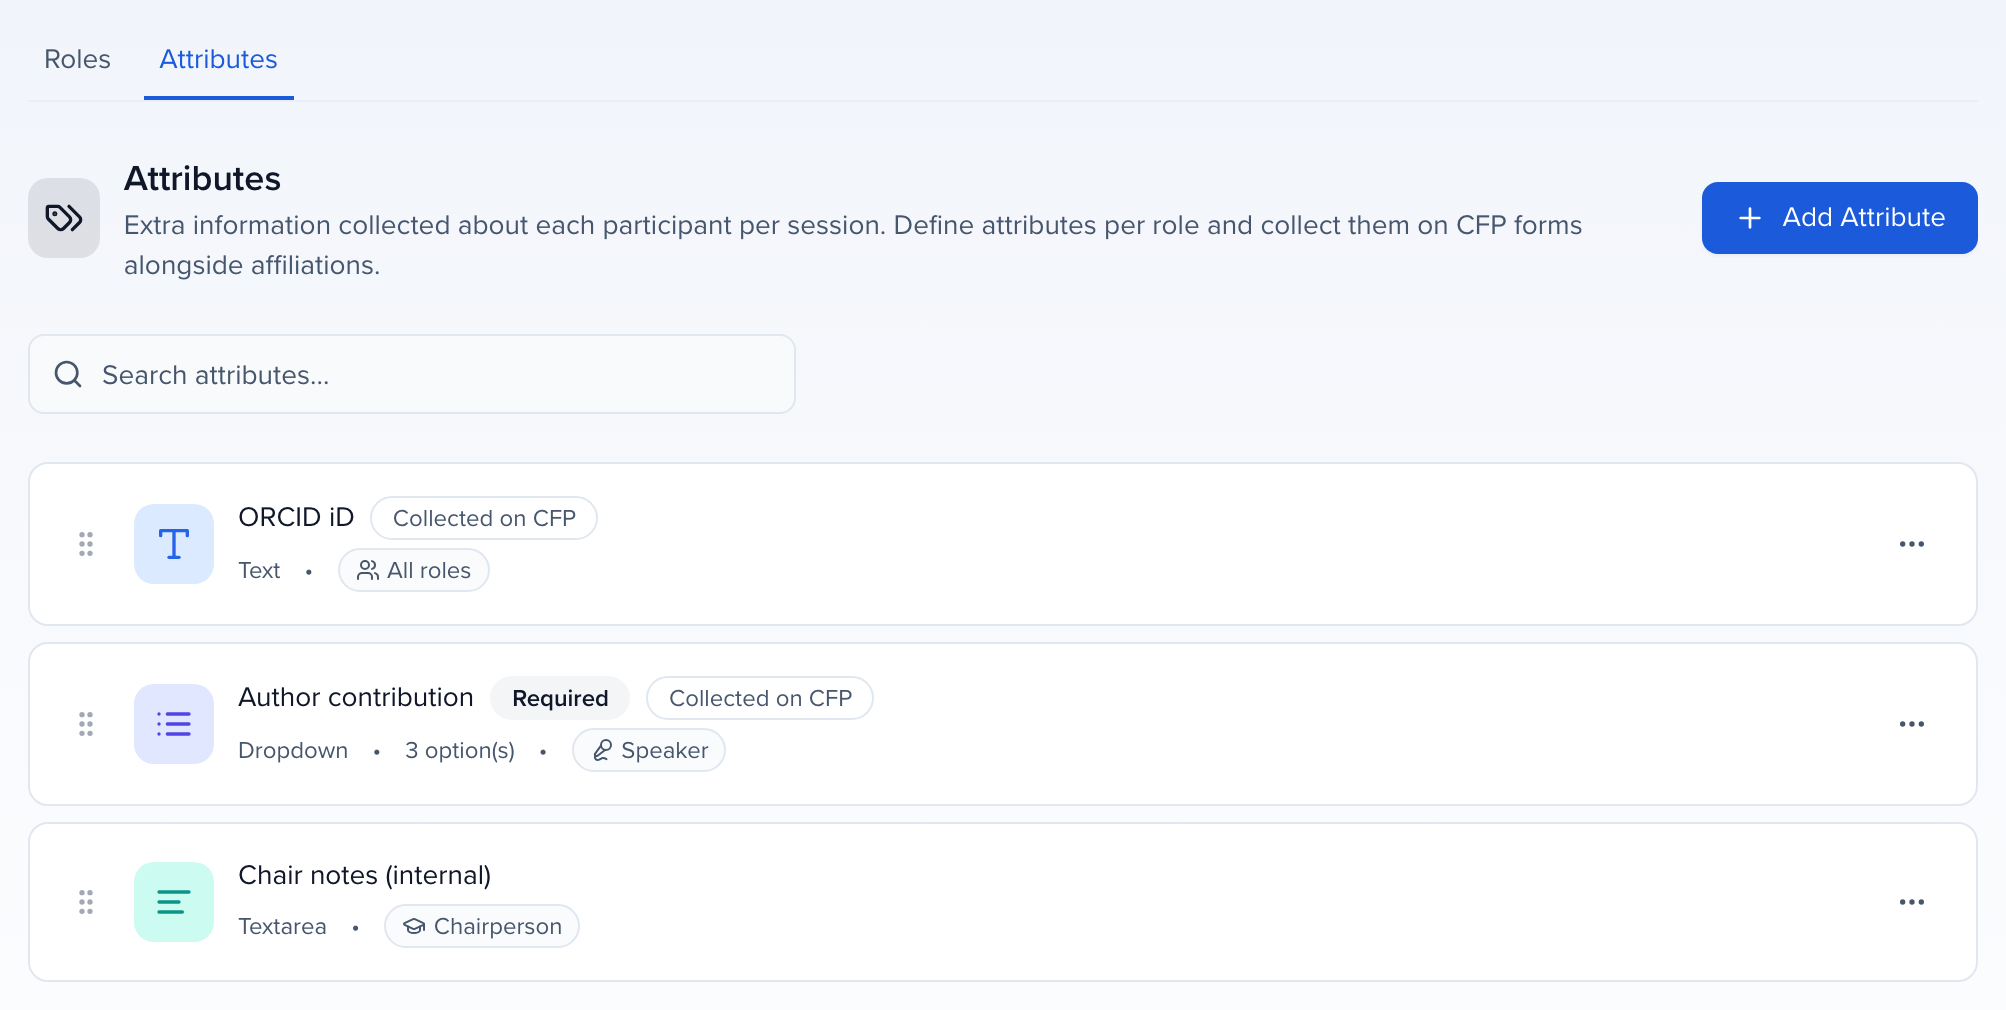
Add Attribute opens the editor:
| Field | What to enter |
|---|---|
| Name | What admins and submitters see — “Presentation title”. |
| Type | Text, Textarea or Dropdown. The type is locked once the attribute exists. |
| Options | Dropdown only — add one at a time or Add multiple by pasting one per line; drag to reorder. |
| Applies to | All roles, or a single role. A role-specific attribute only appears for participants holding that role. |
| Description and Placeholder | Helper text under the input and the hint inside it. |
| Required | Submitters must answer before the submission form can be sent. |
| Collect on CFP forms | Ask for it on submission forms that have Collect role attributes on. Off keeps it admin-only. |
Rows drag to reorder, which is the order inputs appear in. Deleting an attribute hides it from sessions and forms; values already collected stay stored.
Where values show up:
- Session Participants tab — each participant row shows the attributes for their role beneath their affiliations. Text saves when you leave the field, dropdowns on change.
- Submission forms — under Participant Information, the Collect role attributes switch (on by default for new forms) adds the attributes marked Collect on CFP forms to every participant the submitter adds, beside the affiliation field, with required attributes enforced on submit. The review step and submission receipt list them.
- Reports — each attribute is available on participant contacts in the Report Builder as a sortable, filterable column, so you can list presenting authors with their presentation titles.
Personas
Section titled “Personas”Personas are AI evaluators that review sessions from a chosen perspective — a technical expert, a first-time attendee, an executive. Assign them to an evaluation plan and each one scores every submission with feedback in its own voice, which gives your human reviewers a comparison point.
When AI features are off for your organization, the persona actions are locked. To turn AI on, contact your Sessionboard customer success manager or Sessionboard support.
Three Default Personas are provided and can’t be edited. Add Persona creates your own:
| Field | What to enter |
|---|---|
| Name (required) | The persona’s name. |
| Role (required) | Their professional role or perspective — “Thought Leader”, “Practice Manager”. |
| Biography | Background and expertise, which gives their feedback context. |
| Feedback Style | Positive, Neutral, Constructive (specific, actionable guidance), or Critical (names shortcomings without necessarily saying how to fix them). |
| Likes / Dislikes | Up to three qualities each — “Data-backed insights”, “Generic content”. |
Delete Persona on a custom persona’s card removes it from every evaluation plan and deletes its reviews and scores from reporting and the session Reviews tab, so they no longer change averages. This can’t be undone. Removing a persona from a single evaluation round is different — completed reviews stay on the submission.
Settings for the files speakers upload to their sessions through the portal: Enable File Upload, Enable Comments, Enable participant assignment, File Size Limits, and under File Requests the Use upload slots switch. Off, one File Due Date, File Limit and Allowed File Types list covers every session. On, you define Upload slots — Poster, Presentation, Handout — each with its own due date, accepted file types, file count, session filters and roles; poster galleries collect from a Poster slot. New and cloned events start with slots on; existing events keep the single request until you turn it on. The whole flow — enabling uploads, slots, what speakers see, versions and comments — is in Enable, upload, & download files.
File questions on a submission form are separate: they use Customize question → Maximum file size and don’t inherit these settings.
Loose keywords for anything the other fields don’t cover — “Sponsored”, “Live-Streamed”, “On-Demand”. A session can carry several. Each tag can have a color, and the chip shows that color everywhere tags appear; choose No color for a neutral chip. On the agenda, coloring by tags keeps cards white and shows each tag as a small square — see card colors. Tags are managed in the event’s tag library, which the Tags link on this page opens.
Frequently asked questions
Section titled “Frequently asked questions”Can a speaker show a different company or job title on each session?
Company and Job Title are contact fields, so one value follows the person into every session and event. For a different institution on each session, use Speaker Affiliations: a participant can hold several affiliations, and each session records which of them apply.
- On a session, open the Participants tab and use + Affiliations under the person to pick theirs for this session, or type a new one.
- On a submission form, switch on Collect affiliations per participant under Participant Information so submitters pick them as they add each person.
Affiliations show on the session’s Participants tab and the submission receipt, and come through the Public API. Website embeds show the contact’s Company and Job Title, not affiliations.
Speaker Affiliations is an Enterprise feature. Ask your Customer Success Manager to turn it on, then switch on Enable Speaker Affiliations in the event’s Record settings.