

Building your awards submission form
In pictures 7
Why use it
Section titled “Why use it”The form is the applicant’s first experience of your program, and it is also what your reviewers will read. A well-built form collects exactly the evidence each category needs, keeps nominations complete with required fields and file limits, and tells applicants what happens next on the success page — which cuts the “did it go through?” emails that otherwise follow every submission deadline.
What the Form Builder is for
Section titled “What the Form Builder is for”Form Builder is the third step of the program setup wizard. It is where you decide what a nominee or applicant is asked, in what order, and under which conditions. Open it from the program dashboard with Edit, then Form Builder in the step list on the left, or continue into it from Categories while creating a new program.
With the Form Builder you can:
- Organize questions into sections, each with its own title and introduction
- Add pre-built fields from Quick Add, or your own fields of fourteen types
- Set a custom label, placeholder, help text, character limit and required state per question
- Show or require a question based on the category or an earlier answer with Use question rules
- Keep some fields for staff only with Mark as admin field
- Cap the combined length of several written answers on the Rules tab
- Greet applicants with long instructions before they choose a category on the Welcome page tab
- Replace the default confirmation text on the Success page tab
Changes are saved when you click Continue at the bottom of the step, or when you switch to another step in the list on the left.
Sections
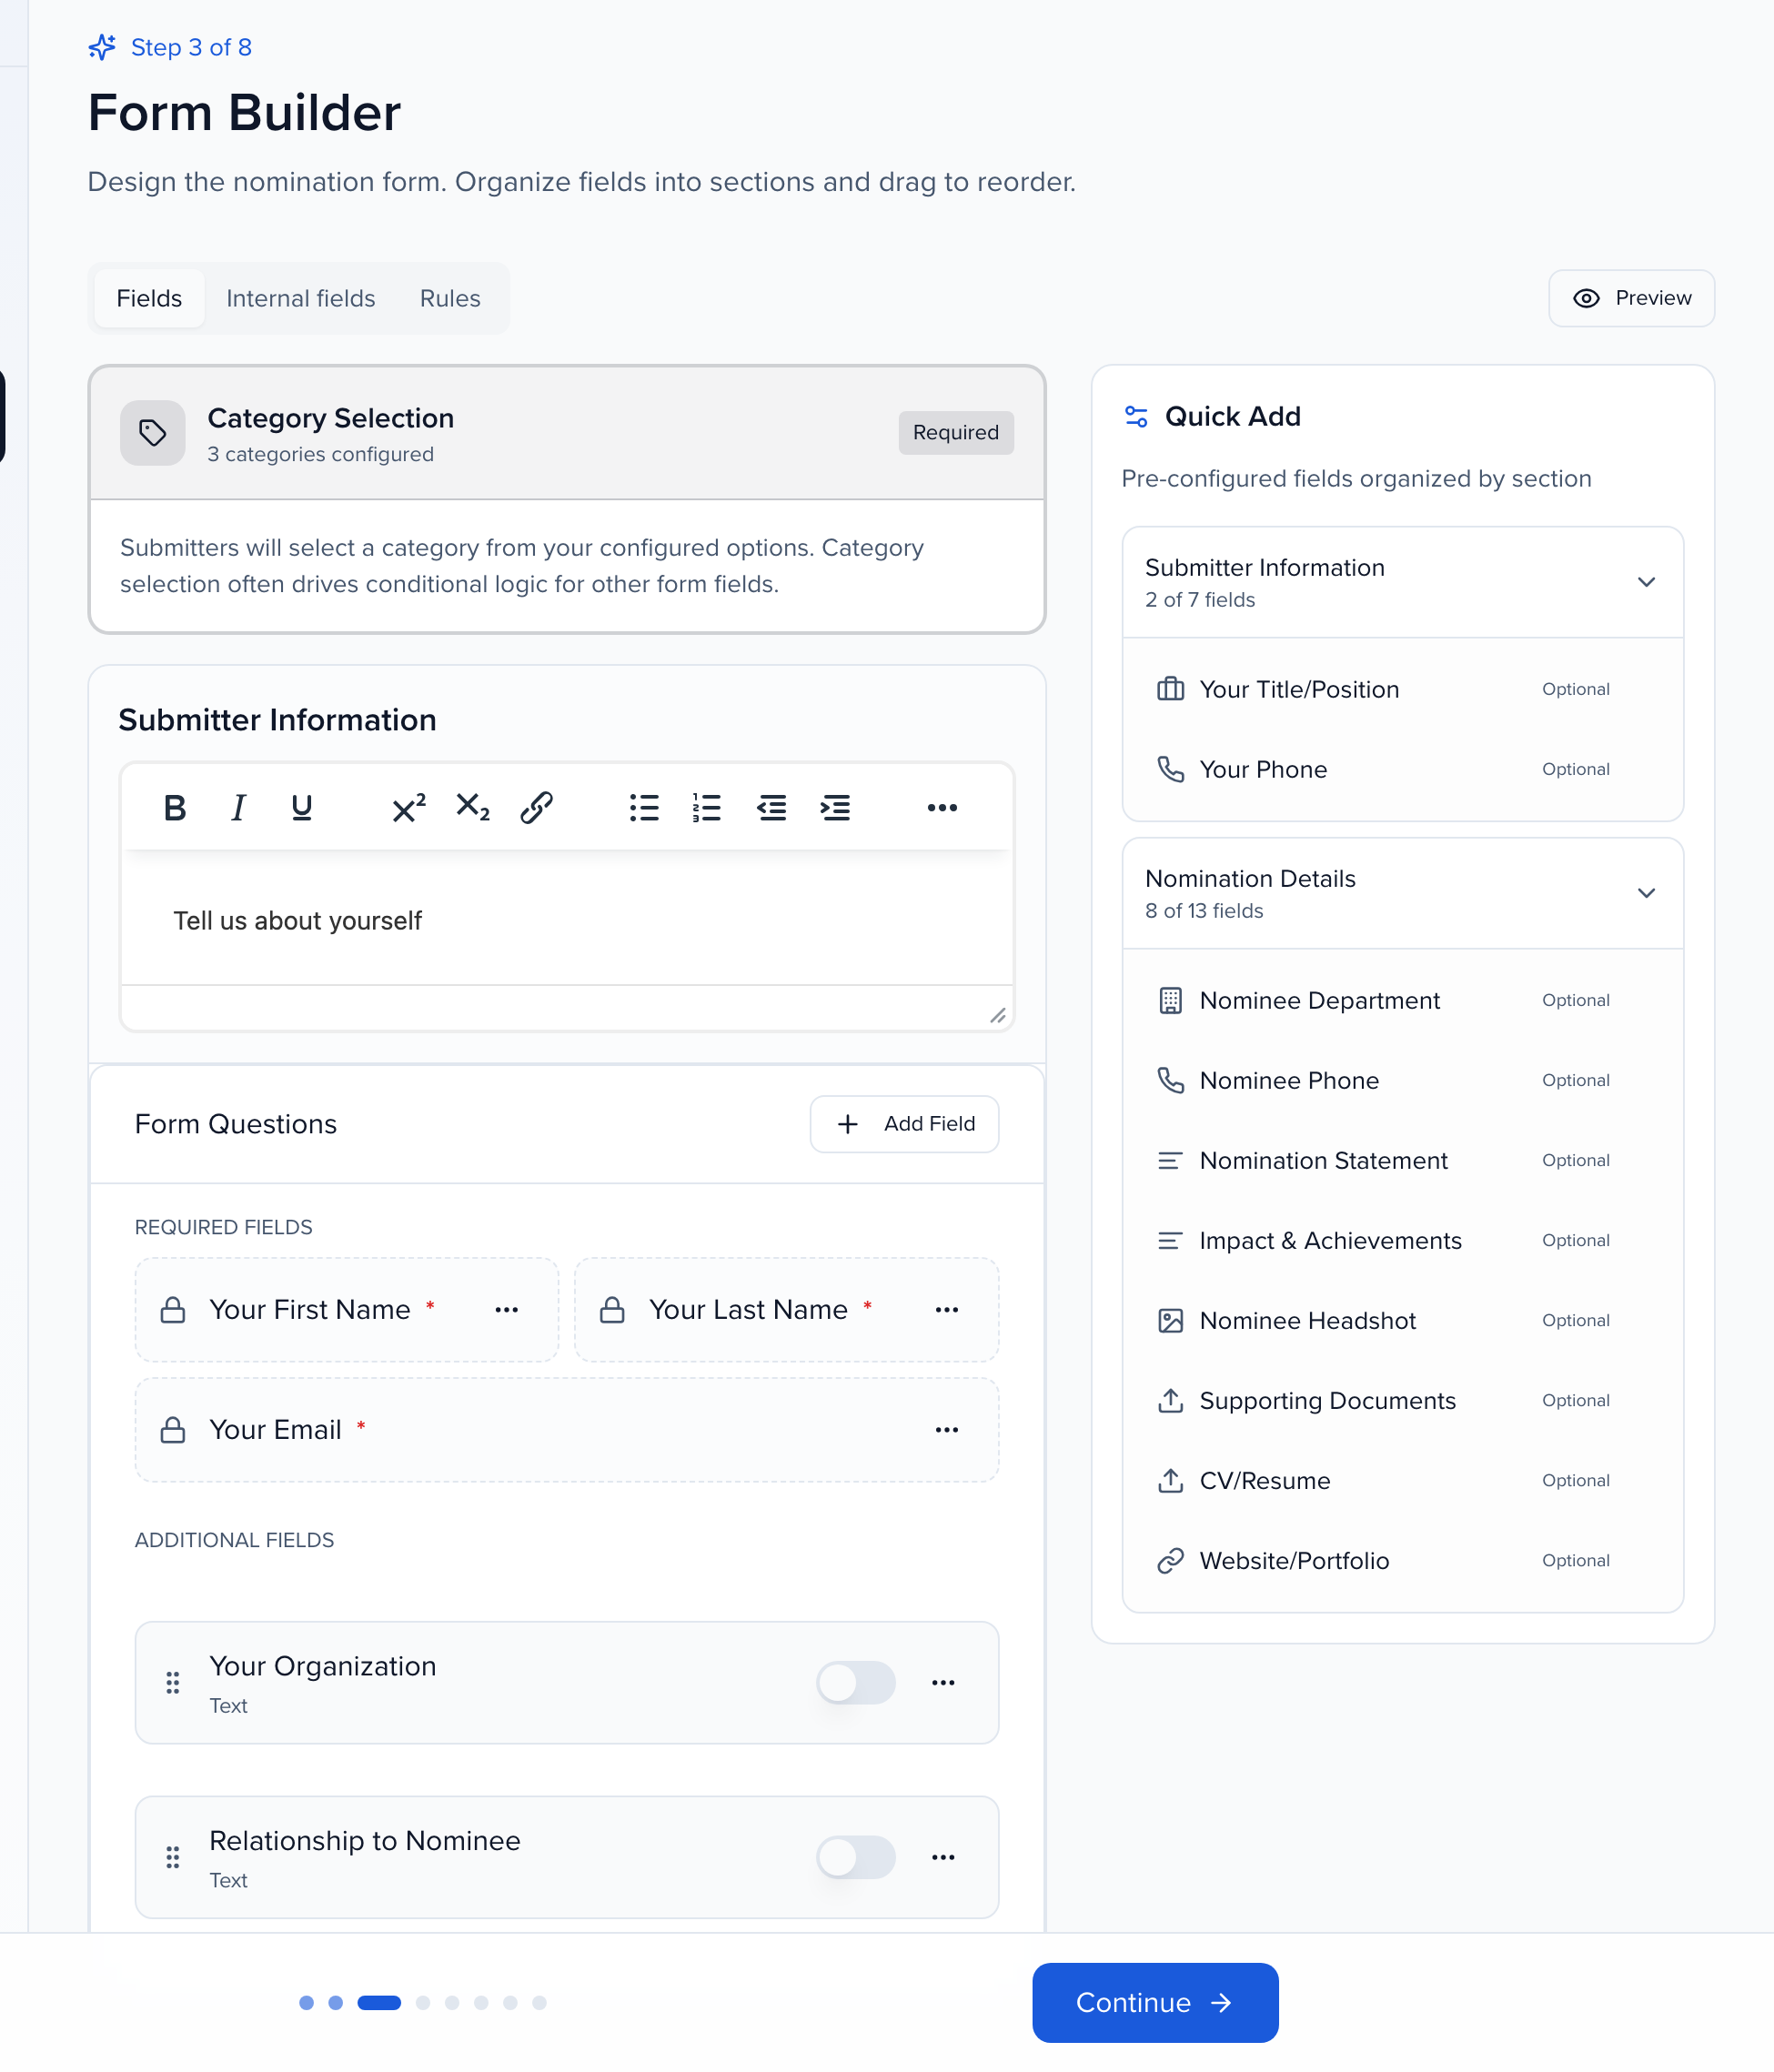
Section titled “Sections”Category Selection always sits at the top of the form and is always required. Submitters pick one of the categories you configured in the Categories step, and that choice is what most question rules key off.
Below it, the form is a list of sections. Every new program starts with two:
- Submitter Information — who is filling in the form
- Nomination Details — who or what is being put forward
Each section has:
- A title, edited in place (Section title…)
- A description, written in a rich-text editor with bold, italic, underline, superscript and subscript, links, lists and indentation, alignment, images, clear formatting and a Source code view; the … button holds whatever the toolbar width cannot show. This is where instructions, eligibility notes or examples go.
- Its own Form Questions list, split into Required Fields and Additional Fields
Drag the handle on the left of any additional field to reorder it within its section.
Standard fields and Quick Add
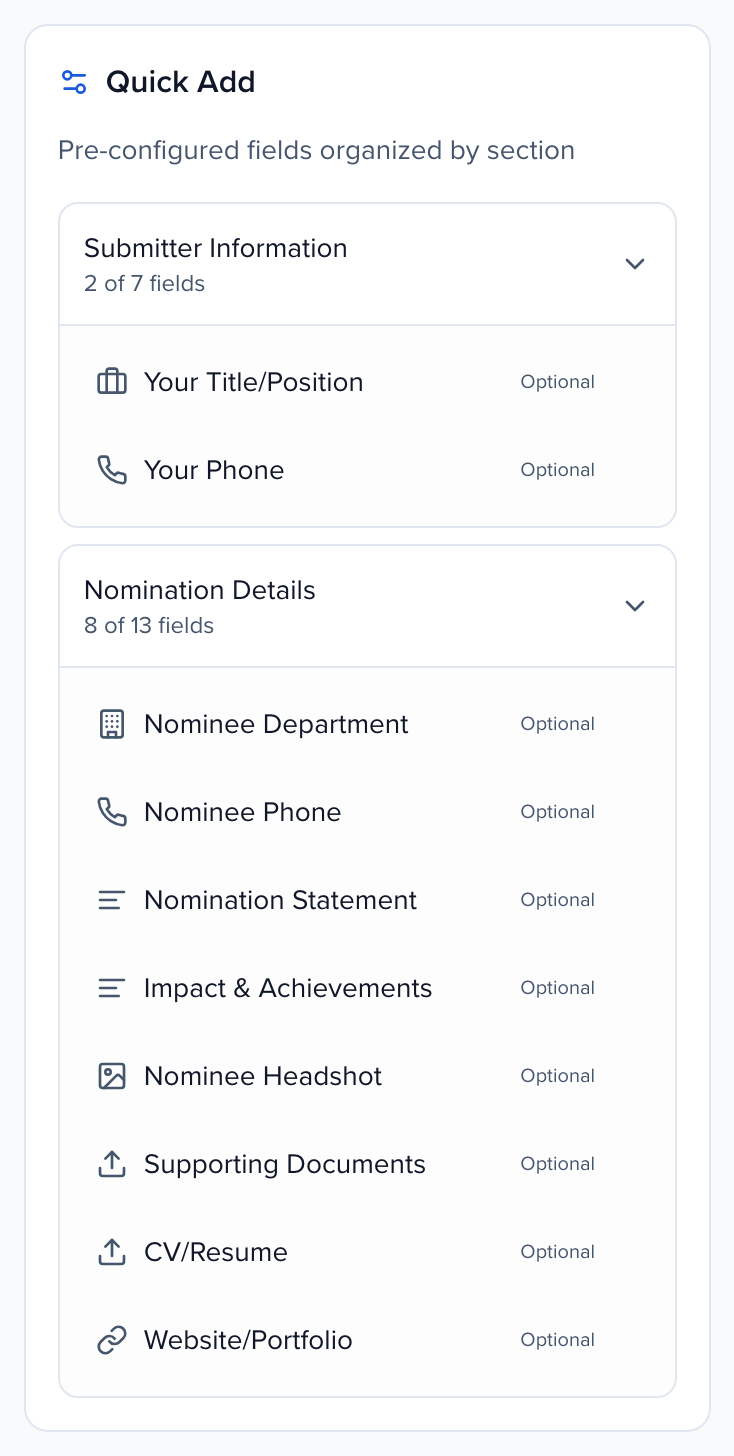
Section titled “Standard fields and Quick Add”The Quick Add panel on the right lists pre-configured fields grouped by section. Click a field to add it to the matching section; the counter on each group shows how many of its fields are already on the form.
Submitter Information: Your First Name, Your Last Name, Your Email, Your Title/Position, Your Organization, Your Phone, Relationship to Nominee.
Nomination Details: Nominee First Name, Nominee Last Name, Nominee Email, Nominee Title/Position, Nominee Organization, Nominee Department, Nominee Phone, Nomination Statement, Impact & Achievements, Nominee Headshot, Supporting Documents, CV/Resume, Website/Portfolio.
Six of these are locked as Required Fields and cannot be removed: the submitter’s first name, last name and email, and the nominee’s first name, last name and email. They are what the platform uses to identify the submitter and to match the nominee across entries. If one is missing from the form, a warning at the top of the step lists what to add from Quick Add before you can continue.
Nominee Headshot is a single-image upload (JPG, PNG or GIF) that the platform recognizes as a headshot rather than a generic file, so it shows up as a photo in review and exports.
Custom fields and section elements
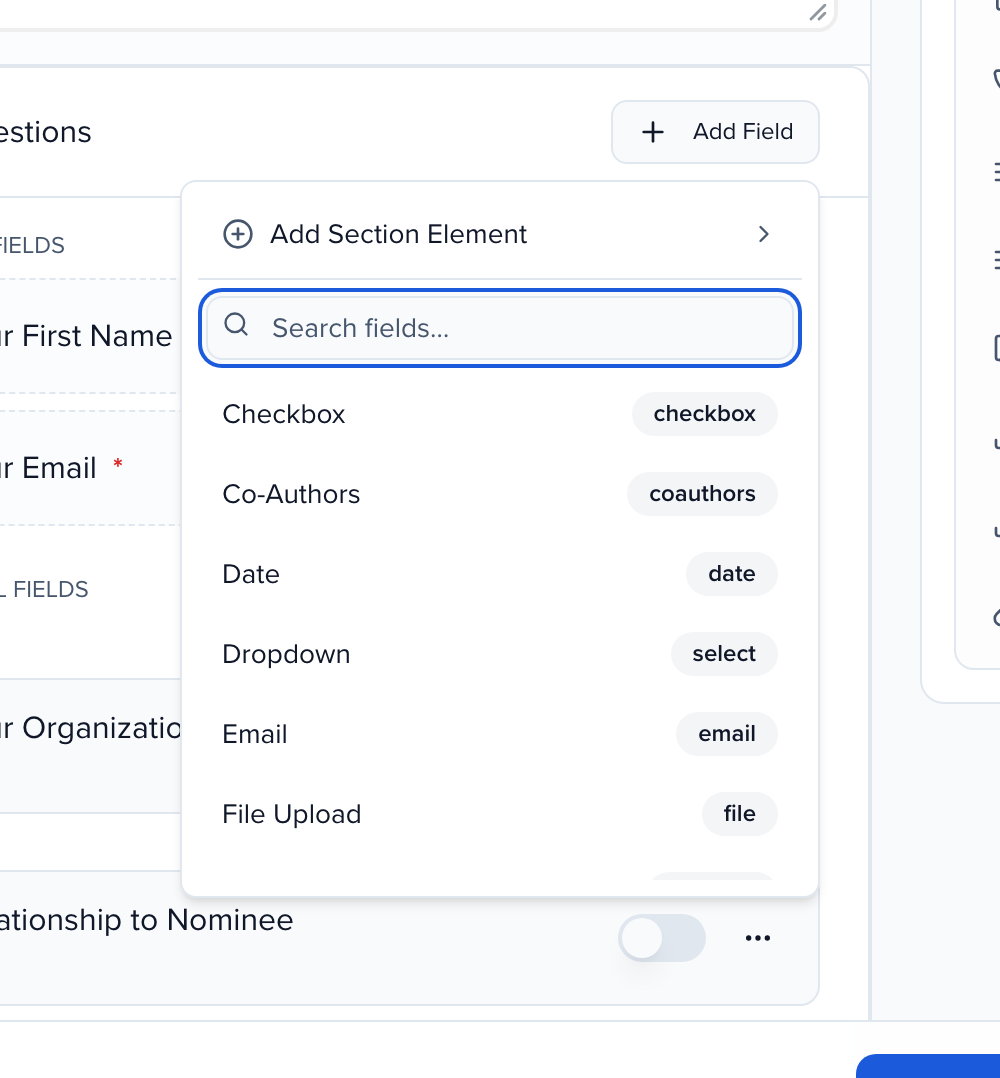
Section titled “Custom fields and section elements”Add Field in a section’s Form Questions header opens the field picker. Search by name, or pick a type:
- Short Text, Long Text, Rich Text
- Email, URL, Phone Number, Number
- Dropdown, Multiple Select, Checkbox
- File Upload, Date, Signature
- Co-Authors — lets the submitter name additional people on the entry
A question added from one of your existing fields keeps that field’s type on the submitter’s form, including radio buttons, tree pickers and language pickers. A required Rich Text question is checked like any other: an answer with no text in it counts as empty.
Add Section Element at the top of the same picker inserts layout rather than a question: a Section Header, a Rich Text block for instructions between questions, or a Divider.
Per-question options
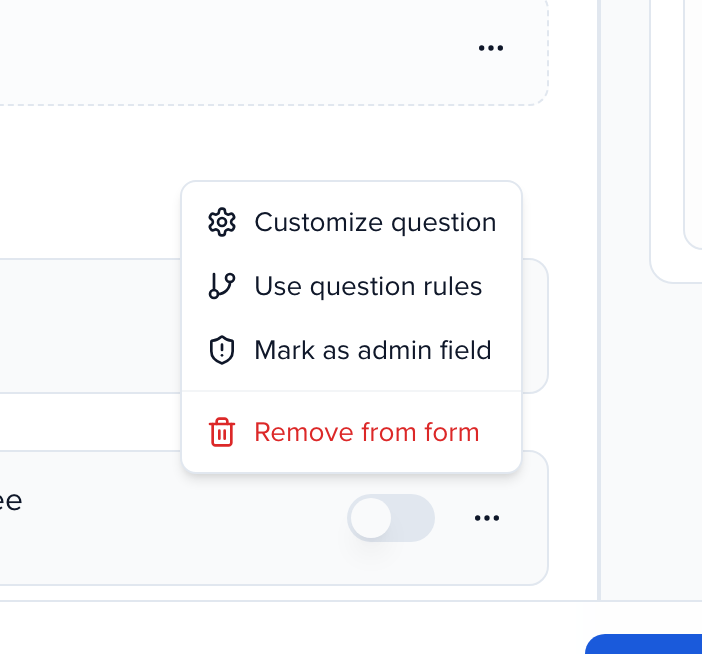
Section titled “Per-question options”Every additional field has a Required switch and a … menu:
- Customize question — label, placeholder, help text and limits (below)
- Use question rules — show this question only for certain categories or answers. Open it on a later field to set when it appears, or on a dropdown or checkbox to choose every later field that answer should show. To write other field values when the submission is saved, use an Assignment Field Rule instead.
- Mark as admin field — hide the question from submitters. Staff fill it in from the submission in the admin, and it is listed on the Internal fields tab of the Form Builder.
- Remove from form
The locked required fields have the same menu without Remove from form.
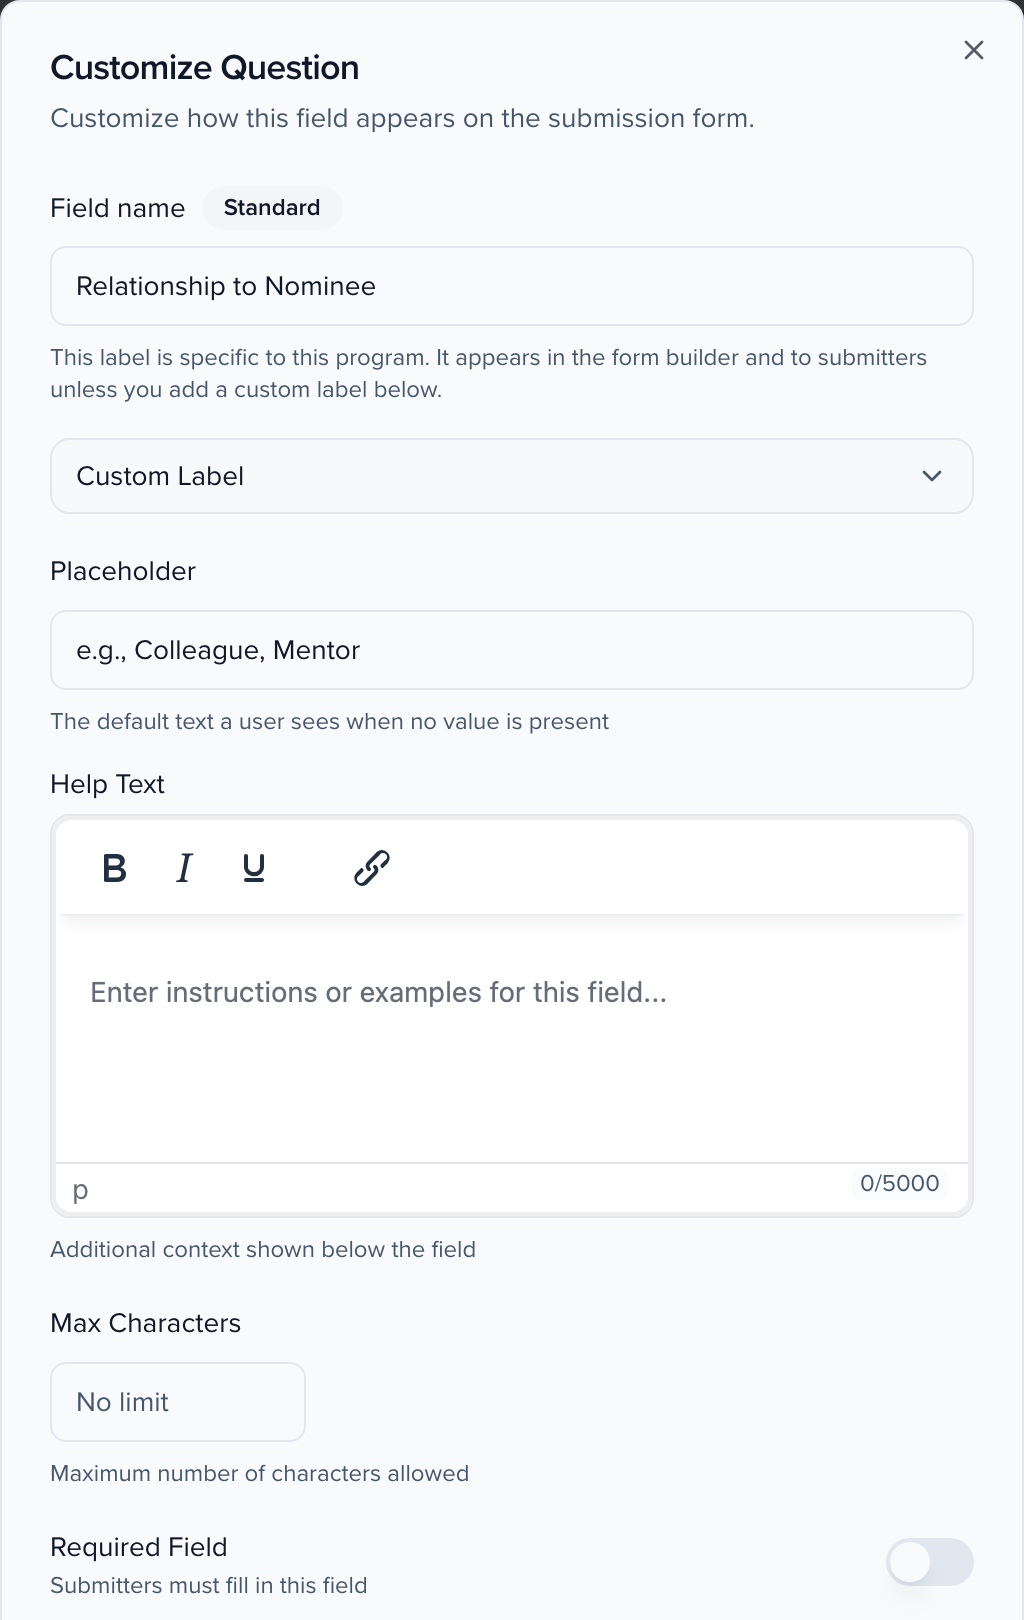
Customize Question
Section titled “Customize Question”- Field name — the program-specific name shown in the builder and to submitters. Standard fields carry a Standard badge.
- Custom Label — override the name for submitters only, so the builder keeps the recognizable field name
- Placeholder — example text shown inside the empty field
- Help Text — rich text shown under the field
- Max Characters — a per-field limit; leave empty for no limit. For a limit shared across several answers, use the Rules tab.
- Required Field
- Require secure links (https://) — URL questions only. When it is on, a link entered with
http://, or with no scheme, is saved ashttps://— whether it comes from the submission form, an admin edit, a CSV import or the public API. Off by default; turn it off andhttp://links are kept as entered. A value that is not a web link at all, such asftp://…, is never saved: the submission form on your Site asks the submitter to enter a web address before they can submit, the public API answers400, and a CSV import fails that row (the Column shows the question name) and keeps the link already stored. Submitters can type a link with or withouthttps://on any URL question.
What submitters can upload
Section titled “What submitters can upload”A File Upload question takes documents, slides, spreadsheets, images, video and audio, up to 5 GB a file. Submitters click the box to choose a file or drag one onto it. Set Accepted file types on the question to narrow that list, and the submission form says which types it takes. HTML and SVG files and programs are never accepted. The same rules apply when your team adds a file from the submission sheet.
Apply at the bottom of the dialog updates the question on the page only. Click Save at the bottom of the Form Builder to keep your changes.
Saving your changes
Section titled “Saving your changes”If you have unsaved changes and click away, for example to the sidebar, the top bar or the organization and event switcher, Sessionboard asks whether to Save and leave, Leave without saving or Stay on this step. Moving between steps without changing anything saves nothing, and each step loads the latest saved form when you open it.
If someone else saved the form after you opened it, your save is refused and This form was changed somewhere else appears. Choose Reload the form to see their changes, then make yours again. Removed questions are kept on the server, so a question removed by mistake can be recovered; contact support.
Form Rules
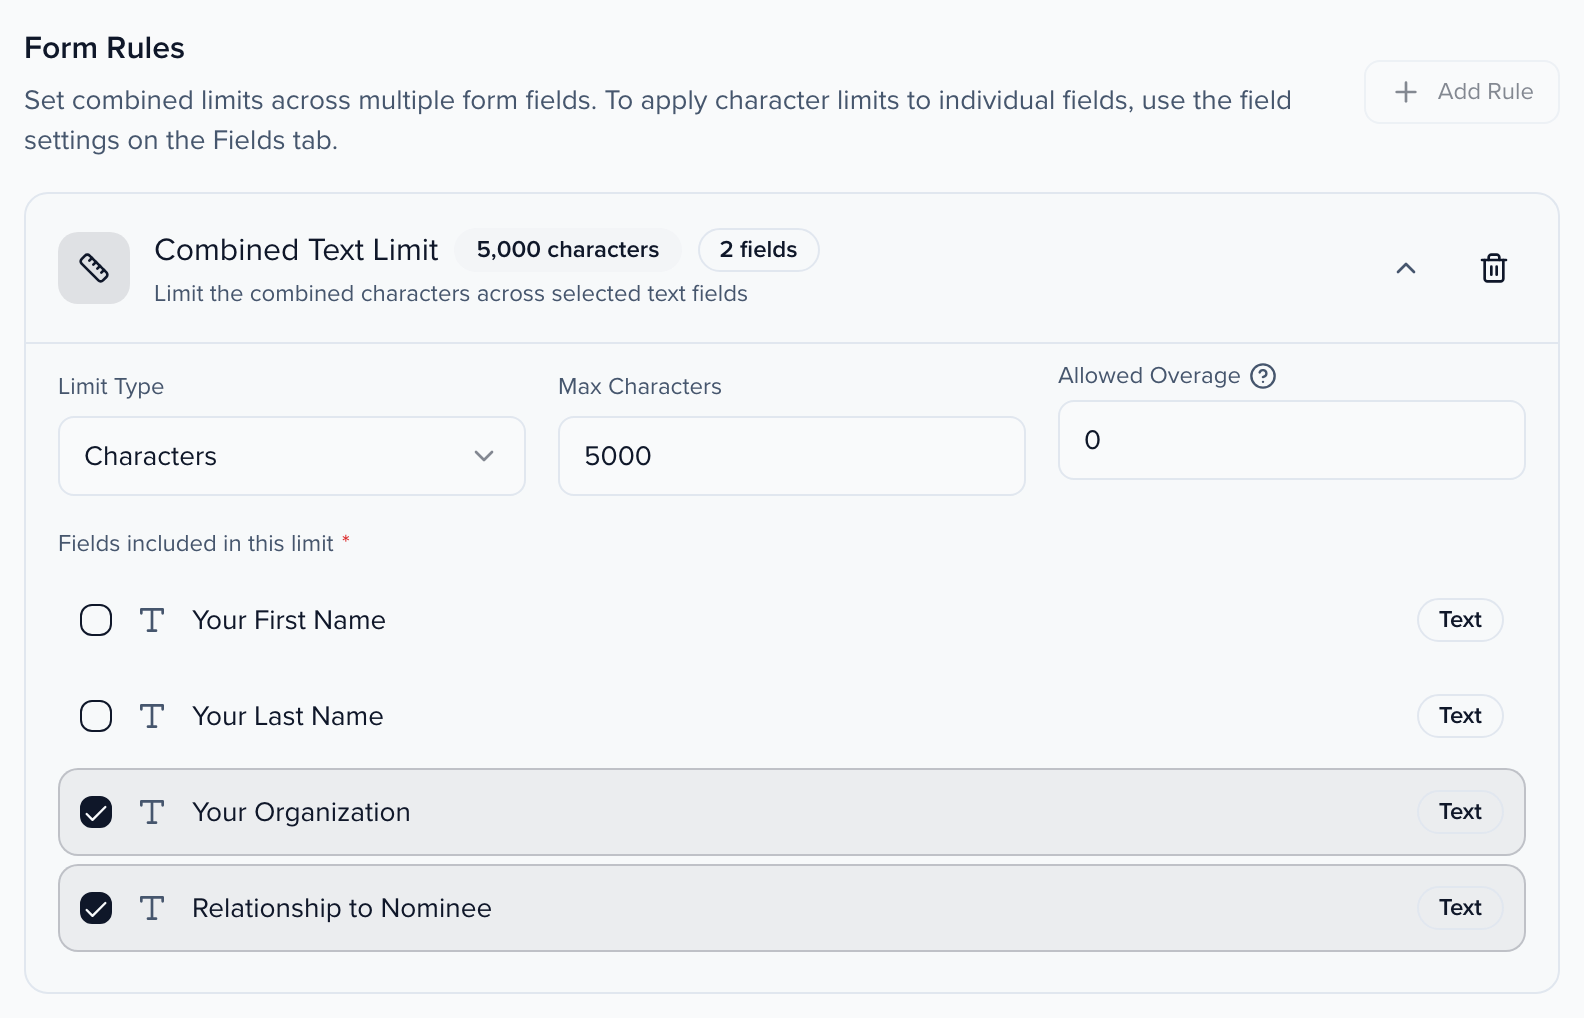
Section titled “Form Rules”The Rules tab holds one Combined Text Limit that applies across several written answers, for example “3,000 words across the nomination statement and the impact section”. Add Rule creates it; the tab badge shows a red dot until the rule has both a limit and at least one field.
- Limit Type — Characters or Words
- Max Characters / Max Words
- Allowed Overage — how far over the limit a submitter can go before the form blocks submission
- Fields included in this limit — tick the short text, long text and rich text fields that count toward it
Above the rule, Flag over-limit text instead of cutting it off (off by default) decides what happens at a single question’s own limit. On, applicants can paste or type past a Text or Text Area question’s Maximum Length: the full text is kept, the counter turns red, a message asks them to shorten it, and Submit stays blocked until it fits. Off, typing stops at the limit and pasted text is cut off. See Add a character limit to a field.
Welcome page
Section titled “Welcome page”The Welcome page tab adds an optional page that applicants read before they choose a category. Use it for instructions that are too long for the program description: a program overview, who is eligible, what to prepare, and how entries are reviewed. It is off for every program until you turn it on.
Open the tab
Open the Welcome page tab, or choose Set up on the Welcome page card above Category Selection.
Turn it on
Turn on Show a welcome page before category selection.
Add a title
Enter a Page title. Left empty, the page uses the program name.
Write the message
Write the Welcome message. Headings, lists, links, tables, images and video embeds are kept, and there is no length limit comparable to the program description.
Name the button (optional)
Change the Button text if you like. Left empty, the button reads Continue.
The Live preview beside the editor shows the page as applicants see it, in your Site’s colors. Save the step as usual.
When the page is on, applicants who start a new application land on it first and reach the categories only after they choose the button. The progress steps on the form, payment and confirmation pages then begin with Welcome. Applicants changing the category of an application they already started skip it. With the page off, or on with no title and no message, applicants go straight to the categories as before. The program description still shows above the categories either way.
Success page
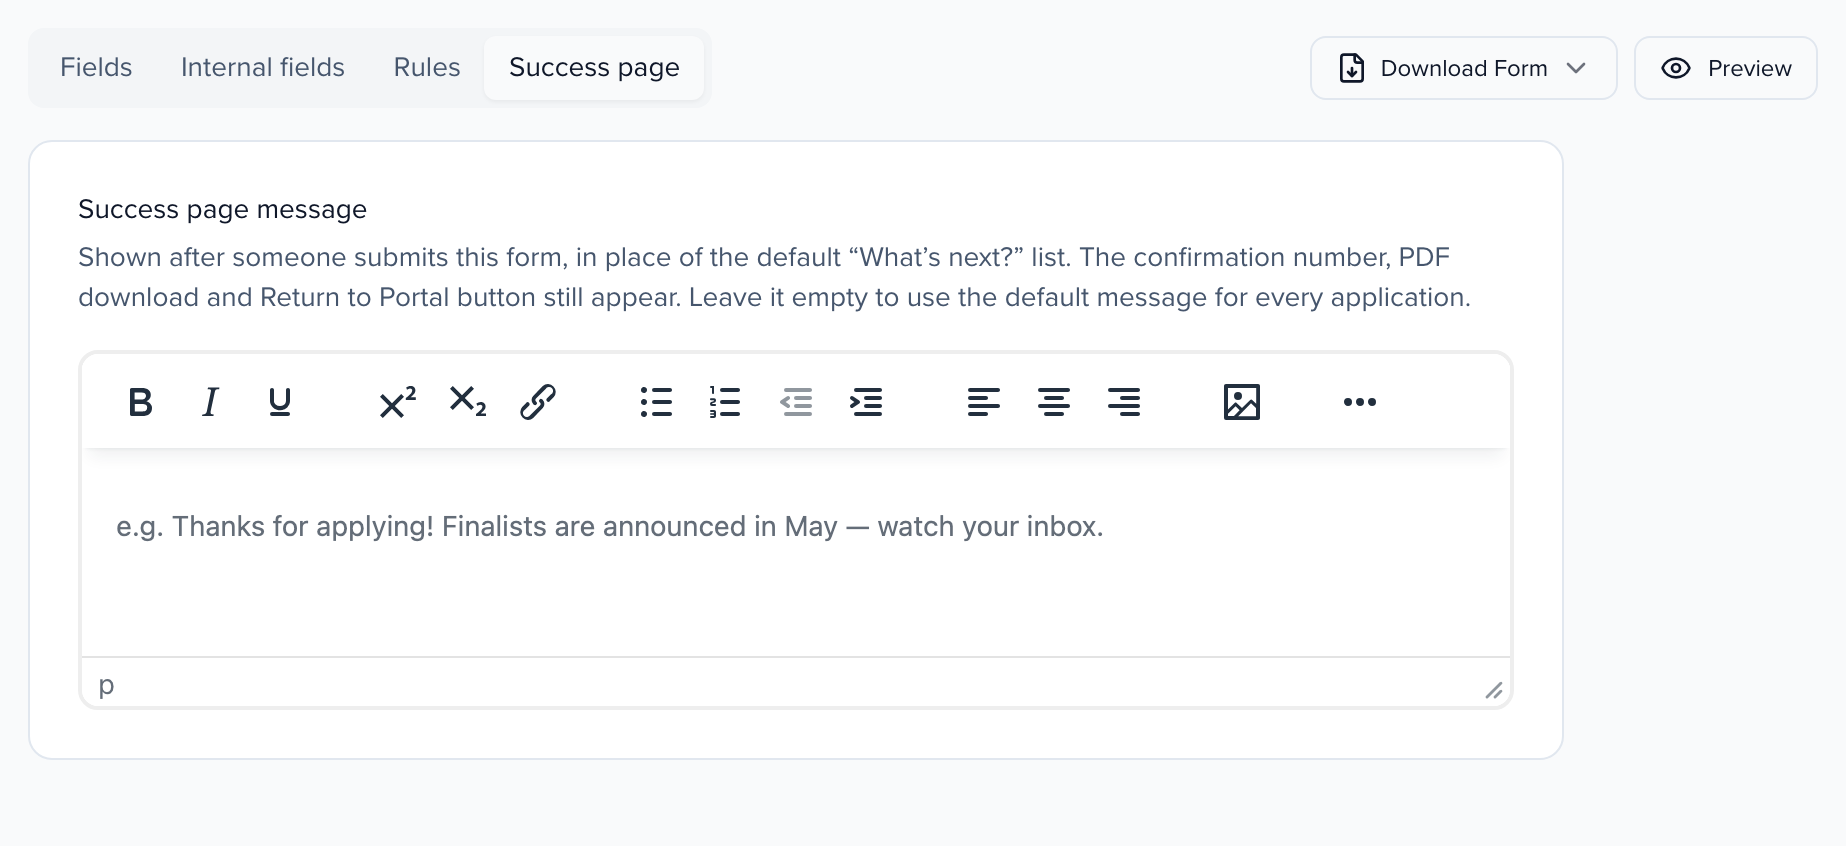
Section titled “Success page”The Success page tab sets what an applicant reads after they submit. Write a Success page message in the editor, for example when finalists are announced or what to prepare next. It replaces the default “What’s next?” list on the confirmation page; the confirmation number, the PDF download and Return to Portal still appear. Leave the editor empty to show the default list.
Preview
Section titled “Preview”Preview at the top right of the step renders the form as a submitter will see it, starting with the welcome page when it is on and then the category picker, so you can check section copy, required marks and question rules before the program goes live. Exit preview returns to the builder.
Download Form, next to Preview, saves a blank copy of the form as a PDF or Word document, with every section and question, including the ones that a category or a form rule shows. See Download a blank copy of a form.
Next steps
Section titled “Next steps”- Pricing — entry fees, early-bird tiers, pricing rules and promo codes
- Rounds, reviewers and submissions — the review timeline and who reviews
- Notifications — the emails sent through the program’s lifecycle
- Your Sessionboard Site — where submitters sign in and apply