

Email campaigns
A campaign is a send to a segment rather than a selection. Where Create & send emails starts from rows you ticked in a table, a campaign starts from a definition — speakers on accepted sessions who have never logged in to their portal — and can be scheduled, repeated on a cadence, and told to skip anyone it already reached. Both use the same templates, merge tags and themes.
Video transcript
Program, Send. This is Email Campaigns, and it is one of two ways to email people from an event. The other is to select rows in a table and send. Both open a composer, both use your templates, merge tags and themes, and both land in the same History. The difference is how you describe the recipients. A table send is a selection: the people in front of you, once, now. A campaign is a segment: a rule that can be scheduled, repeated, and told to skip anyone it already reached.
Here is the selection kind. Program, Sessions. Tick a few rows, and the action bar offers Send Emails. Who should receive this email decides whether it goes to everyone on those sessions or just the submitters. Template pulls in a saved message, Merge Tags personalises it, and Review shows it rendered for each person before you send. It finishes as soon as you confirm. When the list you can see is the list you mean, this is the fastest path. Cancel for now.
Back in Send. Reach for a campaign when the recipients are a rule rather than a list: speakers on accepted sessions who have never logged in. When it should go at a set time, or repeat weekly. When you want to re-send and skip everyone who already got it. Or when you want opens and clicks for the send as a whole. The tabs follow a campaign through its life: Drafts, Scheduled, Sending, Sent, Paused, Cancelled. Settings holds what campaigns depend on: templates, themes, history, analytics, unsubscribes and the suppression list.
New Campaign. Who are you reaching? People sends one email per person: speakers, chairs, your team. Companies sends one per exhibitor or sponsor company. Sessions picks sessions and emails their participants with that session’s title, time and track merged in, one email per session they are on. Everything downstream follows from this choice, including which merge tags exist, so pick the audience before you write. People, for this one.
An internal name, which recipients never see. Then the message. Start from a template pulls in one of your saved emails, subject and body together. The merge tags on the right drop a field in at the cursor, first name, portal link, any custom contact field. Write with AI drafts a body if you are starting from nothing. Sender and reply default to the event’s settings. The look of the email, header, footer, colours, comes from your default email theme, not from the campaign.
Recipients is where a campaign earns its keep. Quick filters cover role in the event, submission status, participant acceptance and portal activity. Tick Speakers, and the panel on the right shows how many match, with a sample of names to spot-check. Add Portal activity, never logged in, and the count narrows. You can filter on any contact or session field too, or describe the list in plain English and let the wizard build the filters. Under Recipient handling, Omit past recipients skips anyone this campaign already reached, so a re-send only finds new people.
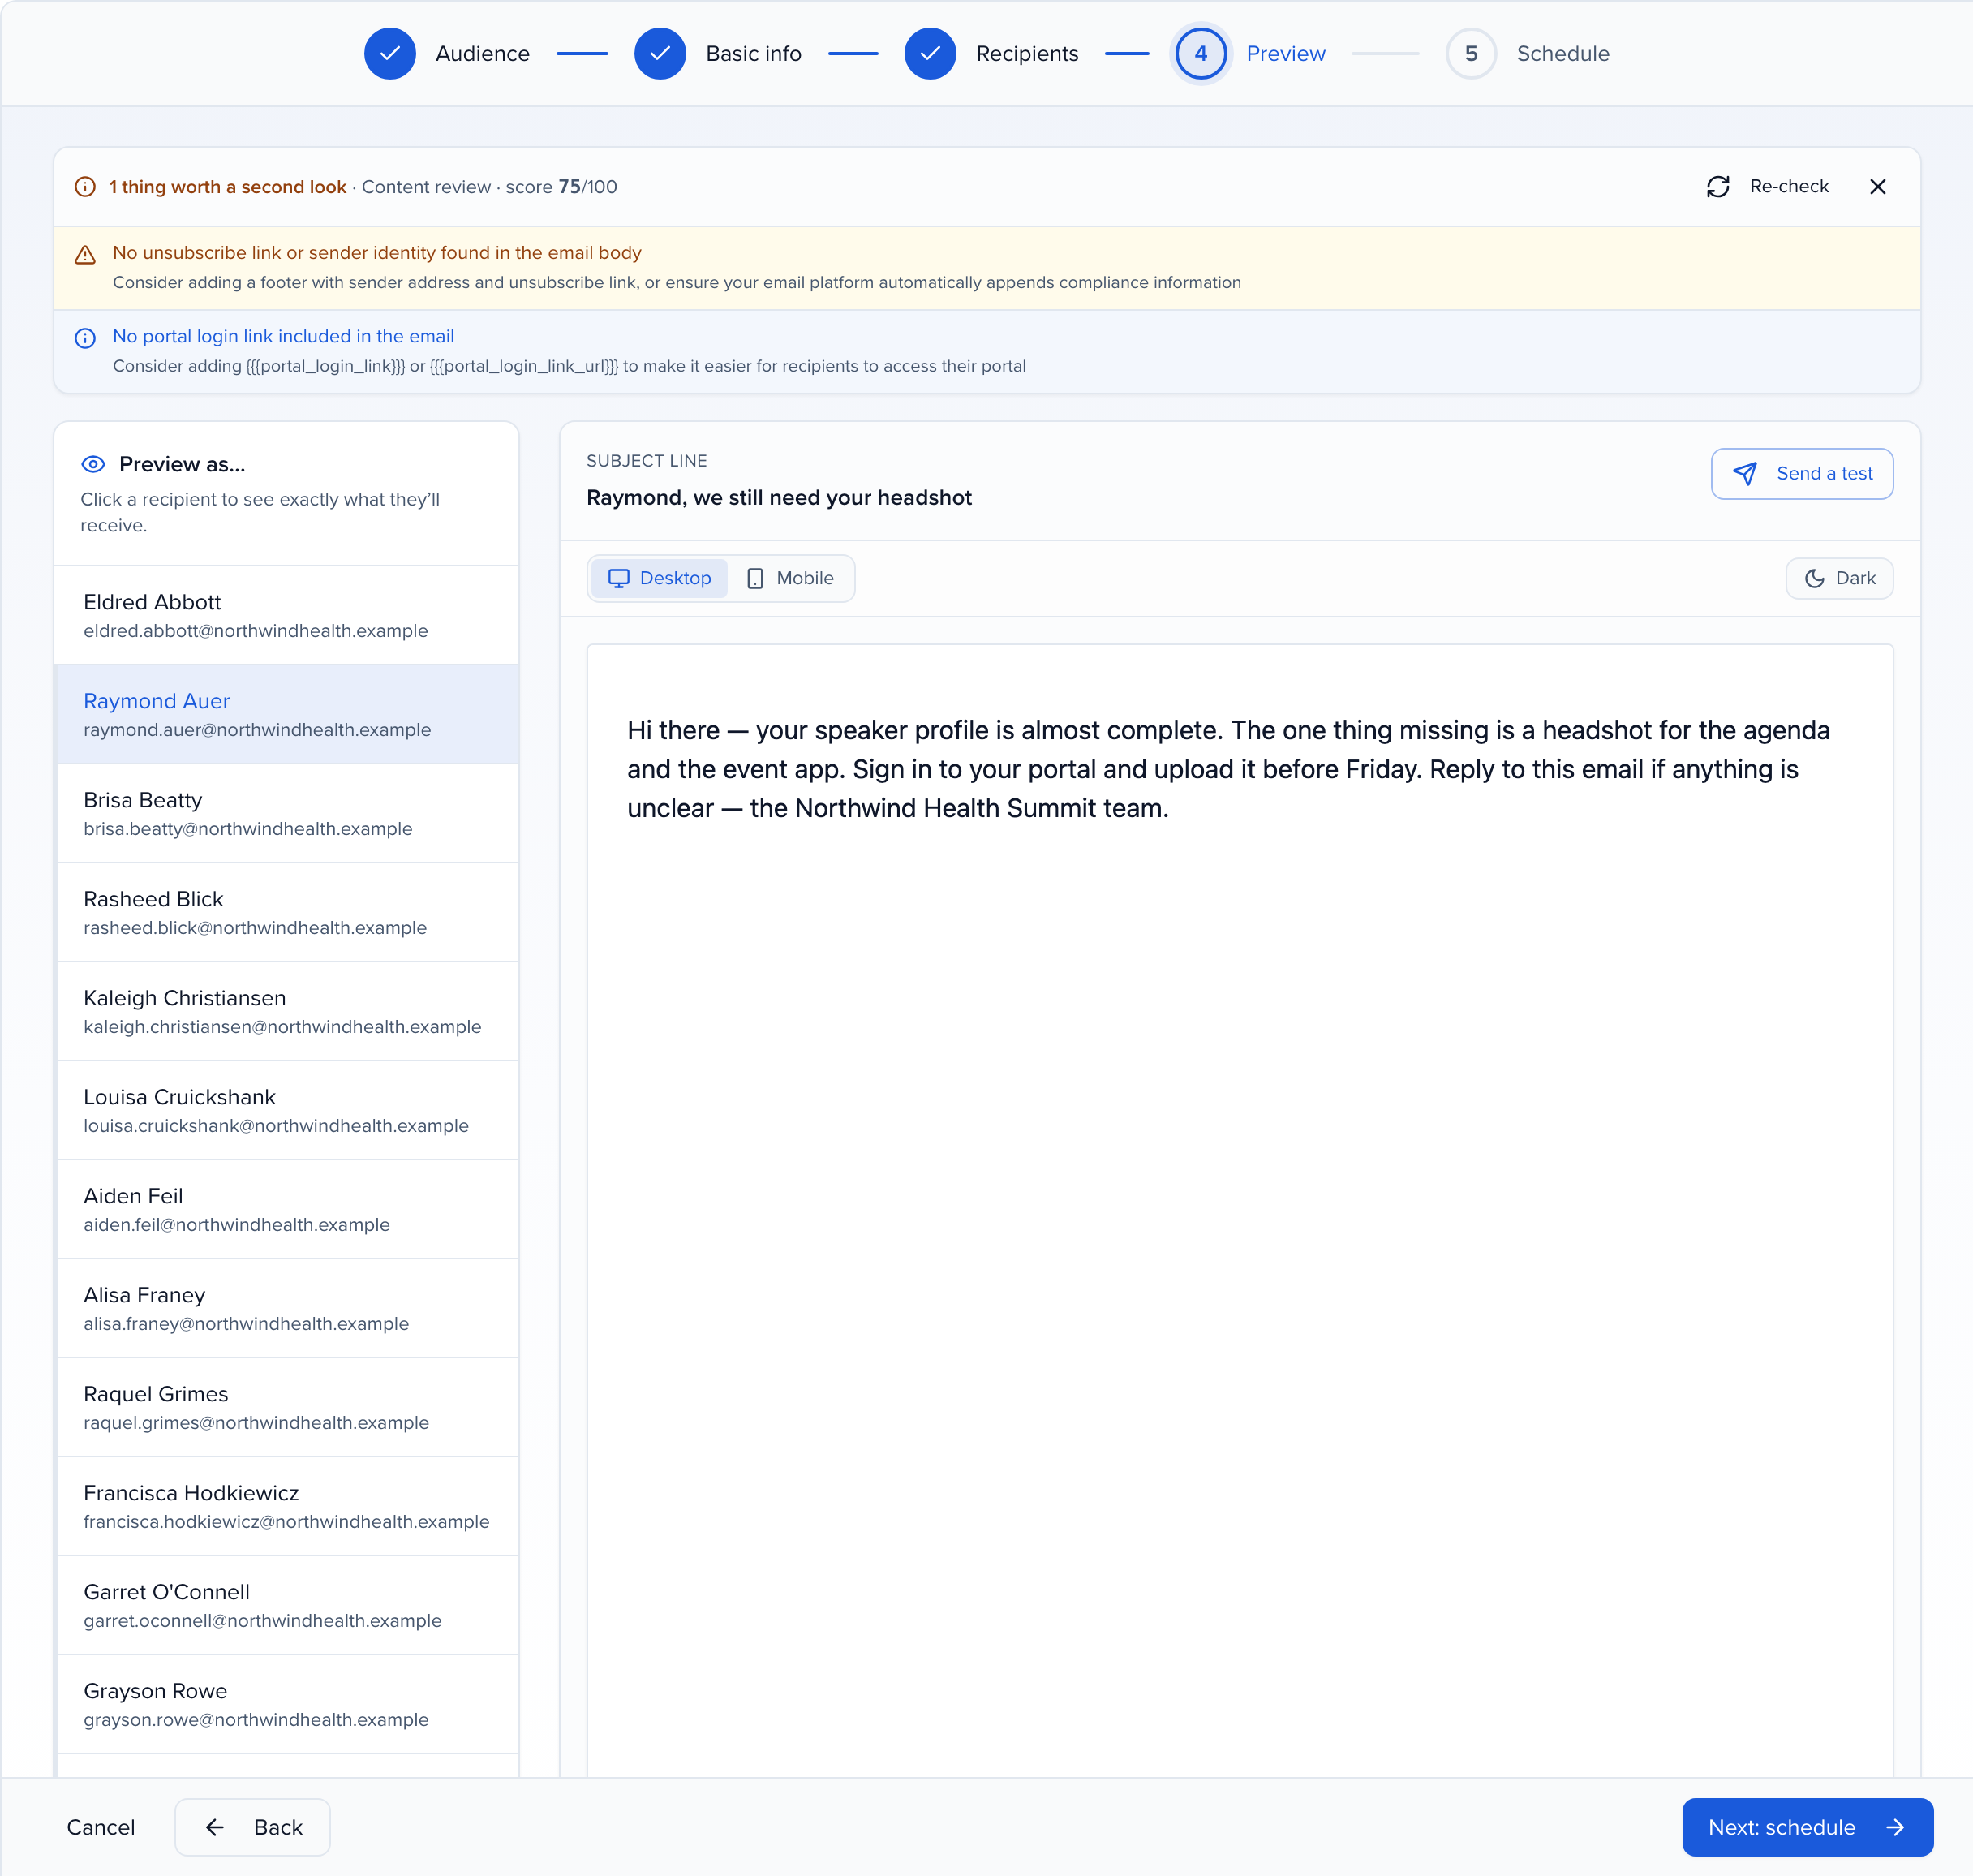
Preview renders the email wrapped in your theme, and runs a quick content review as it opens, flagging a very short body or a missing sign-off. Preview as lists the actual recipients. Click one, and the merge tags fill with their values, so you see exactly what Raymond gets. Switch between Desktop and Mobile, try Dark, and Send a test emails it to any address before anything real goes out.
Schedule. Send now starts delivery within about a minute. Schedule for later takes a date and time. Recurring takes a frequency, daily, weekly or monthly, and re-evaluates the filters on every run, so a weekly nudge to people who have not logged in reaches whoever still matches that week. Pair it with Omit past recipients and each person hears from you once. Ready to send shows the subject, the resolved count, and when it goes. I will cancel rather than send; the draft is kept.
Settings, Analytics. Emails sent, delivery rate, open rate, click rate, rolled up across every completed campaign, and one row per campaign underneath. Those figures arrive from the email provider over the minutes after a send, so a campaign you just sent waits for them rather than showing zeros. For one person’s email, History. Email Campaigns is one row per campaign; Sent Emails is one row per recipient with its delivery status, and that is where table sends appear as well.
So: select rows and Send Emails when the list in front of you is the list you mean. Build a campaign when the recipients are a rule, when it should go later or repeat, or when you want to skip people you already reached. And when an email should go out the moment a field changes, to that one record, that is an automation.
Why use it
Section titled “Why use it”An Email Campaign reaches exactly the people a filter describes — speakers who haven’t uploaded slides, moderators of today’s sessions, everyone who hasn’t logged in — with merge tags, a preview, scheduling and a count you can trust before it goes. Bundling sends one email per session with everyone on it, and the number you confirm is the number of emails that go out, so a per-session send never surprises you.
Campaign or module send?
Section titled “Campaign or module send?”Both paths open the same composer, fill the same templates and land in the same History. Pick by how you would describe the recipients.
| You want to… | Use |
|---|---|
| Email the people you can see in front of you — a filtered table in Contacts, Sessions or Submissions, sent once, now | Send from that module (Create & send emails) |
| Describe the list as a rule — a role, a submission status, portal activity, a contact or session field — and let it re-evaluate | A campaign |
| Send at a set time, or repeat on a cadence (a weekly “you have not logged in yet” nudge) | A campaign with Schedule for later or Recurring |
| Re-send later and skip everyone who already received it | A campaign with Omit past recipients |
| Send one email per session, with every participant of that session on it | A campaign with the Sessions audience and Bundle session participants onto one email (details) |
| Add a few named people (a sponsor contact, a colleague) to a filtered list | A campaign — Also send to specific people |
| See opens, clicks and bounces for the send as a whole | A campaign — the Analytics view |
A module send finishes as soon as the confirmation closes; large ones run in the background and appear under Send with their progress. A campaign stays in the list as a Draft from the moment you pass Audience, so you can stop partway and come back.
Accessing email campaigns
Section titled “Accessing email campaigns”In the event sidebar, click Send (under Collect & Review). The page lists every campaign for the event; New Campaign at the top right starts the wizard.
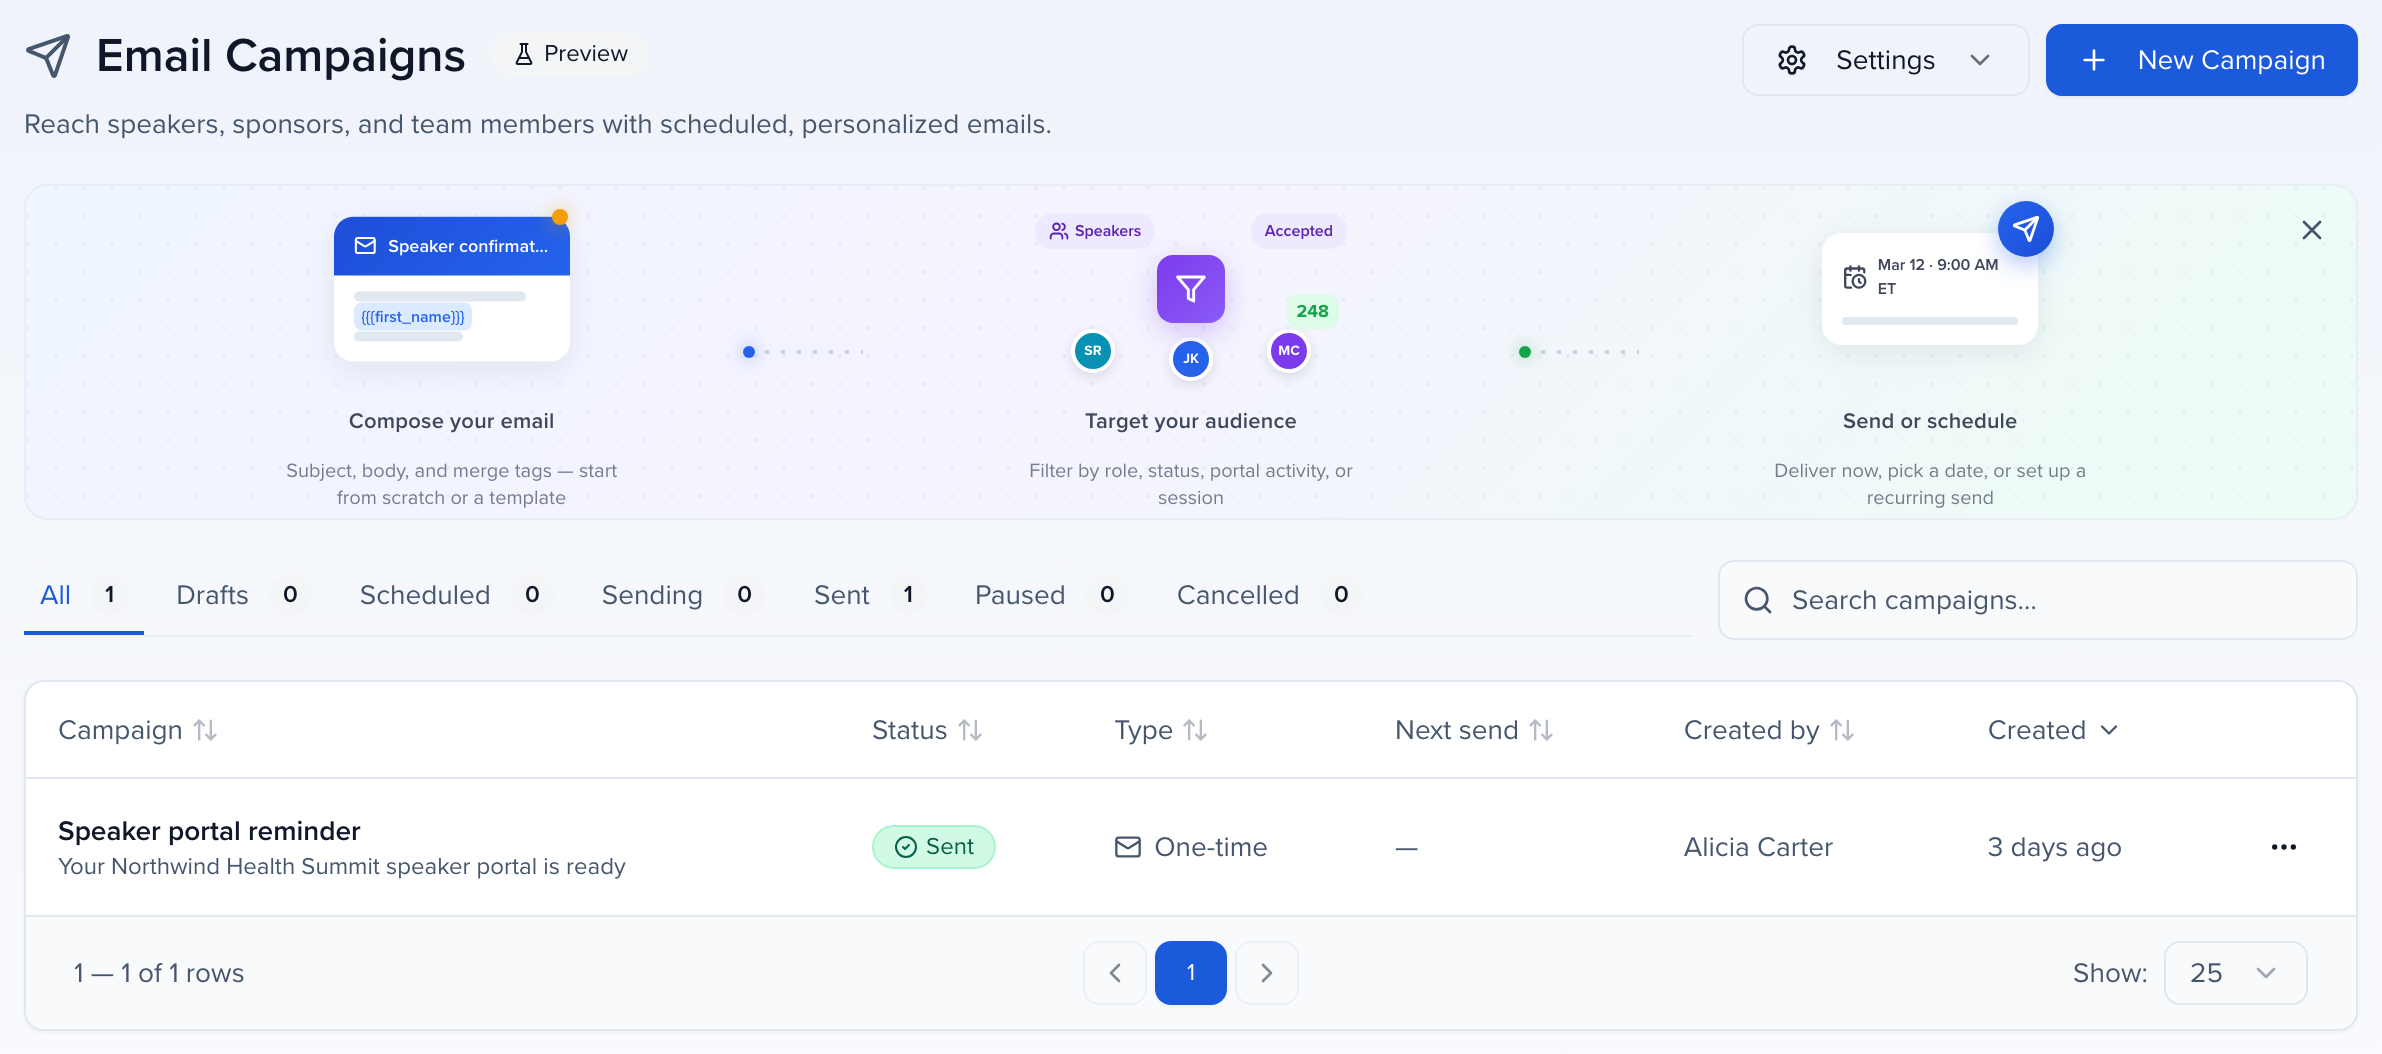
Tabs organize campaigns by status:
- All: every campaign regardless of status
- Drafts: campaigns in progress, not yet sent or scheduled
- Scheduled: campaigns queued for a future send
- Sending: campaigns currently in delivery
- Sent: completed campaigns
- Paused: campaigns that have been temporarily stopped. A scheduled recurring campaign’s row menu (…) has Pause, and a paused one has Resume; nothing sends while it is paused.
- Cancelled: campaigns that have been cancelled
Two further statuses show on the campaign card but have no tab of their own: Partially sent, when a send finished with some recipients failing, and Failed, when the send could not complete at all. Look for those under All.
Filter by Campaign name, Status, Type, Send date, or Creator.
The Settings menu at the top right leads to the pages campaigns depend on:
- Email Templates: the reusable messages — see email templates
- Email Themes: the header, footer, colours and fonts wrapped around every send — see email themes
- History: every email, per recipient, with its delivery status — see History
- Analytics: open, click and bounce figures across campaigns
- Unsubscribes: contacts who opted out
- Suppression List: addresses blocked because mail to them failed, and where you clear a block — see suppression list
Copy campaigns from another event
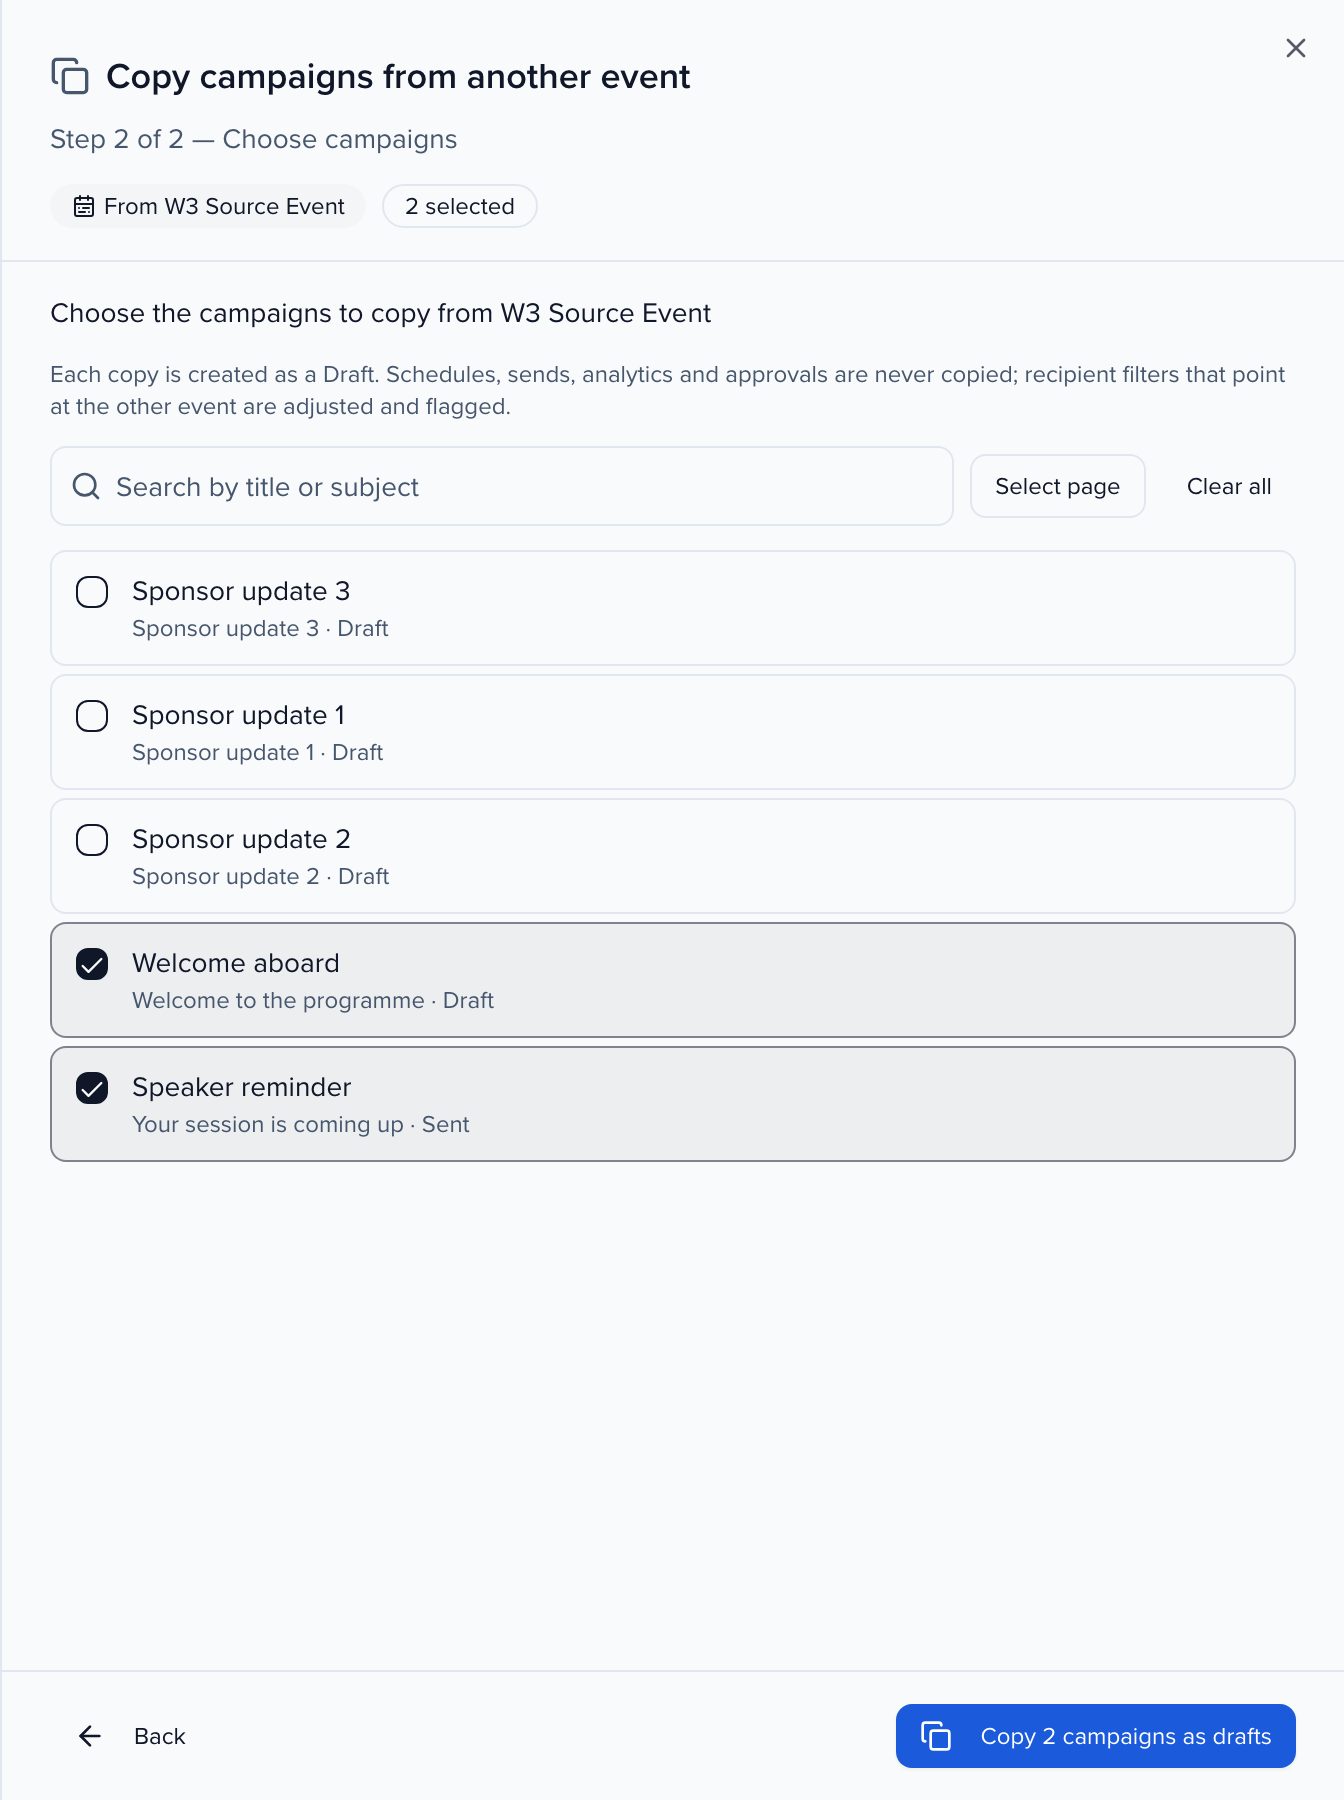
Section titled “Copy campaigns from another event”Running the same programme again? Instead of rebuilding last year’s reminders, copy them. Next to New Campaign, click Copy from event.
- Choose the event. The list shows the other events in your organization that you belong to and can read campaigns in, each with the number of campaigns it has to copy. Pick one.
- Choose the campaigns. Search by title or subject, tick the campaigns you want (up to 100 at a time; Select page ticks everything on the current page), and click Copy … as drafts. Nothing is written until you click.
- Review the result. Each copy appears in Drafts with the original’s subject, body, attachments, title, audience, theme and recipient filters. The done screen lists anything Sessionboard had to adjust so you can check Recipients before scheduling.
What a copy carries, and what it never carries:
- Always a Draft. No copy is sent or scheduled on its own. The schedule, the send history, opens and clicks, test sends and any approval state stay with the original.
- Recipient filters are re-pointed at this event. Participant roles, session tracks, formats, levels, languages, tags and event-specific custom fields are matched by name in the destination; the email theme is matched by name too, and organization-wide fields and themes are kept as they are. A filter that has no match here is removed and listed as a warning — 1 role filter has no match here and was removed — and a theme that does not exist here falls back to the default theme.
- Session scope is cleared. A campaign that was tied to one session in the other event becomes a normal campaign; choose the session again if you need one.
- Hand-picked contacts are kept within the same organization.
Copying needs permission to create campaigns in this event and to read campaigns in the source event. Only Send campaigns are offered — automations live under Automations and are not copied this way. To copy within the same event, use Duplicate on the campaign’s menu instead.
Creating a campaign
Section titled “Creating a campaign”Click New Campaign. The wizard has five steps — Audience, Basic info, Recipients, Preview, Schedule — and saves a draft as you go.
Step 1: Audience
Section titled “Step 1: Audience”Who are you reaching? Everything downstream — merge tags, recipient filters, the preview — follows from this.
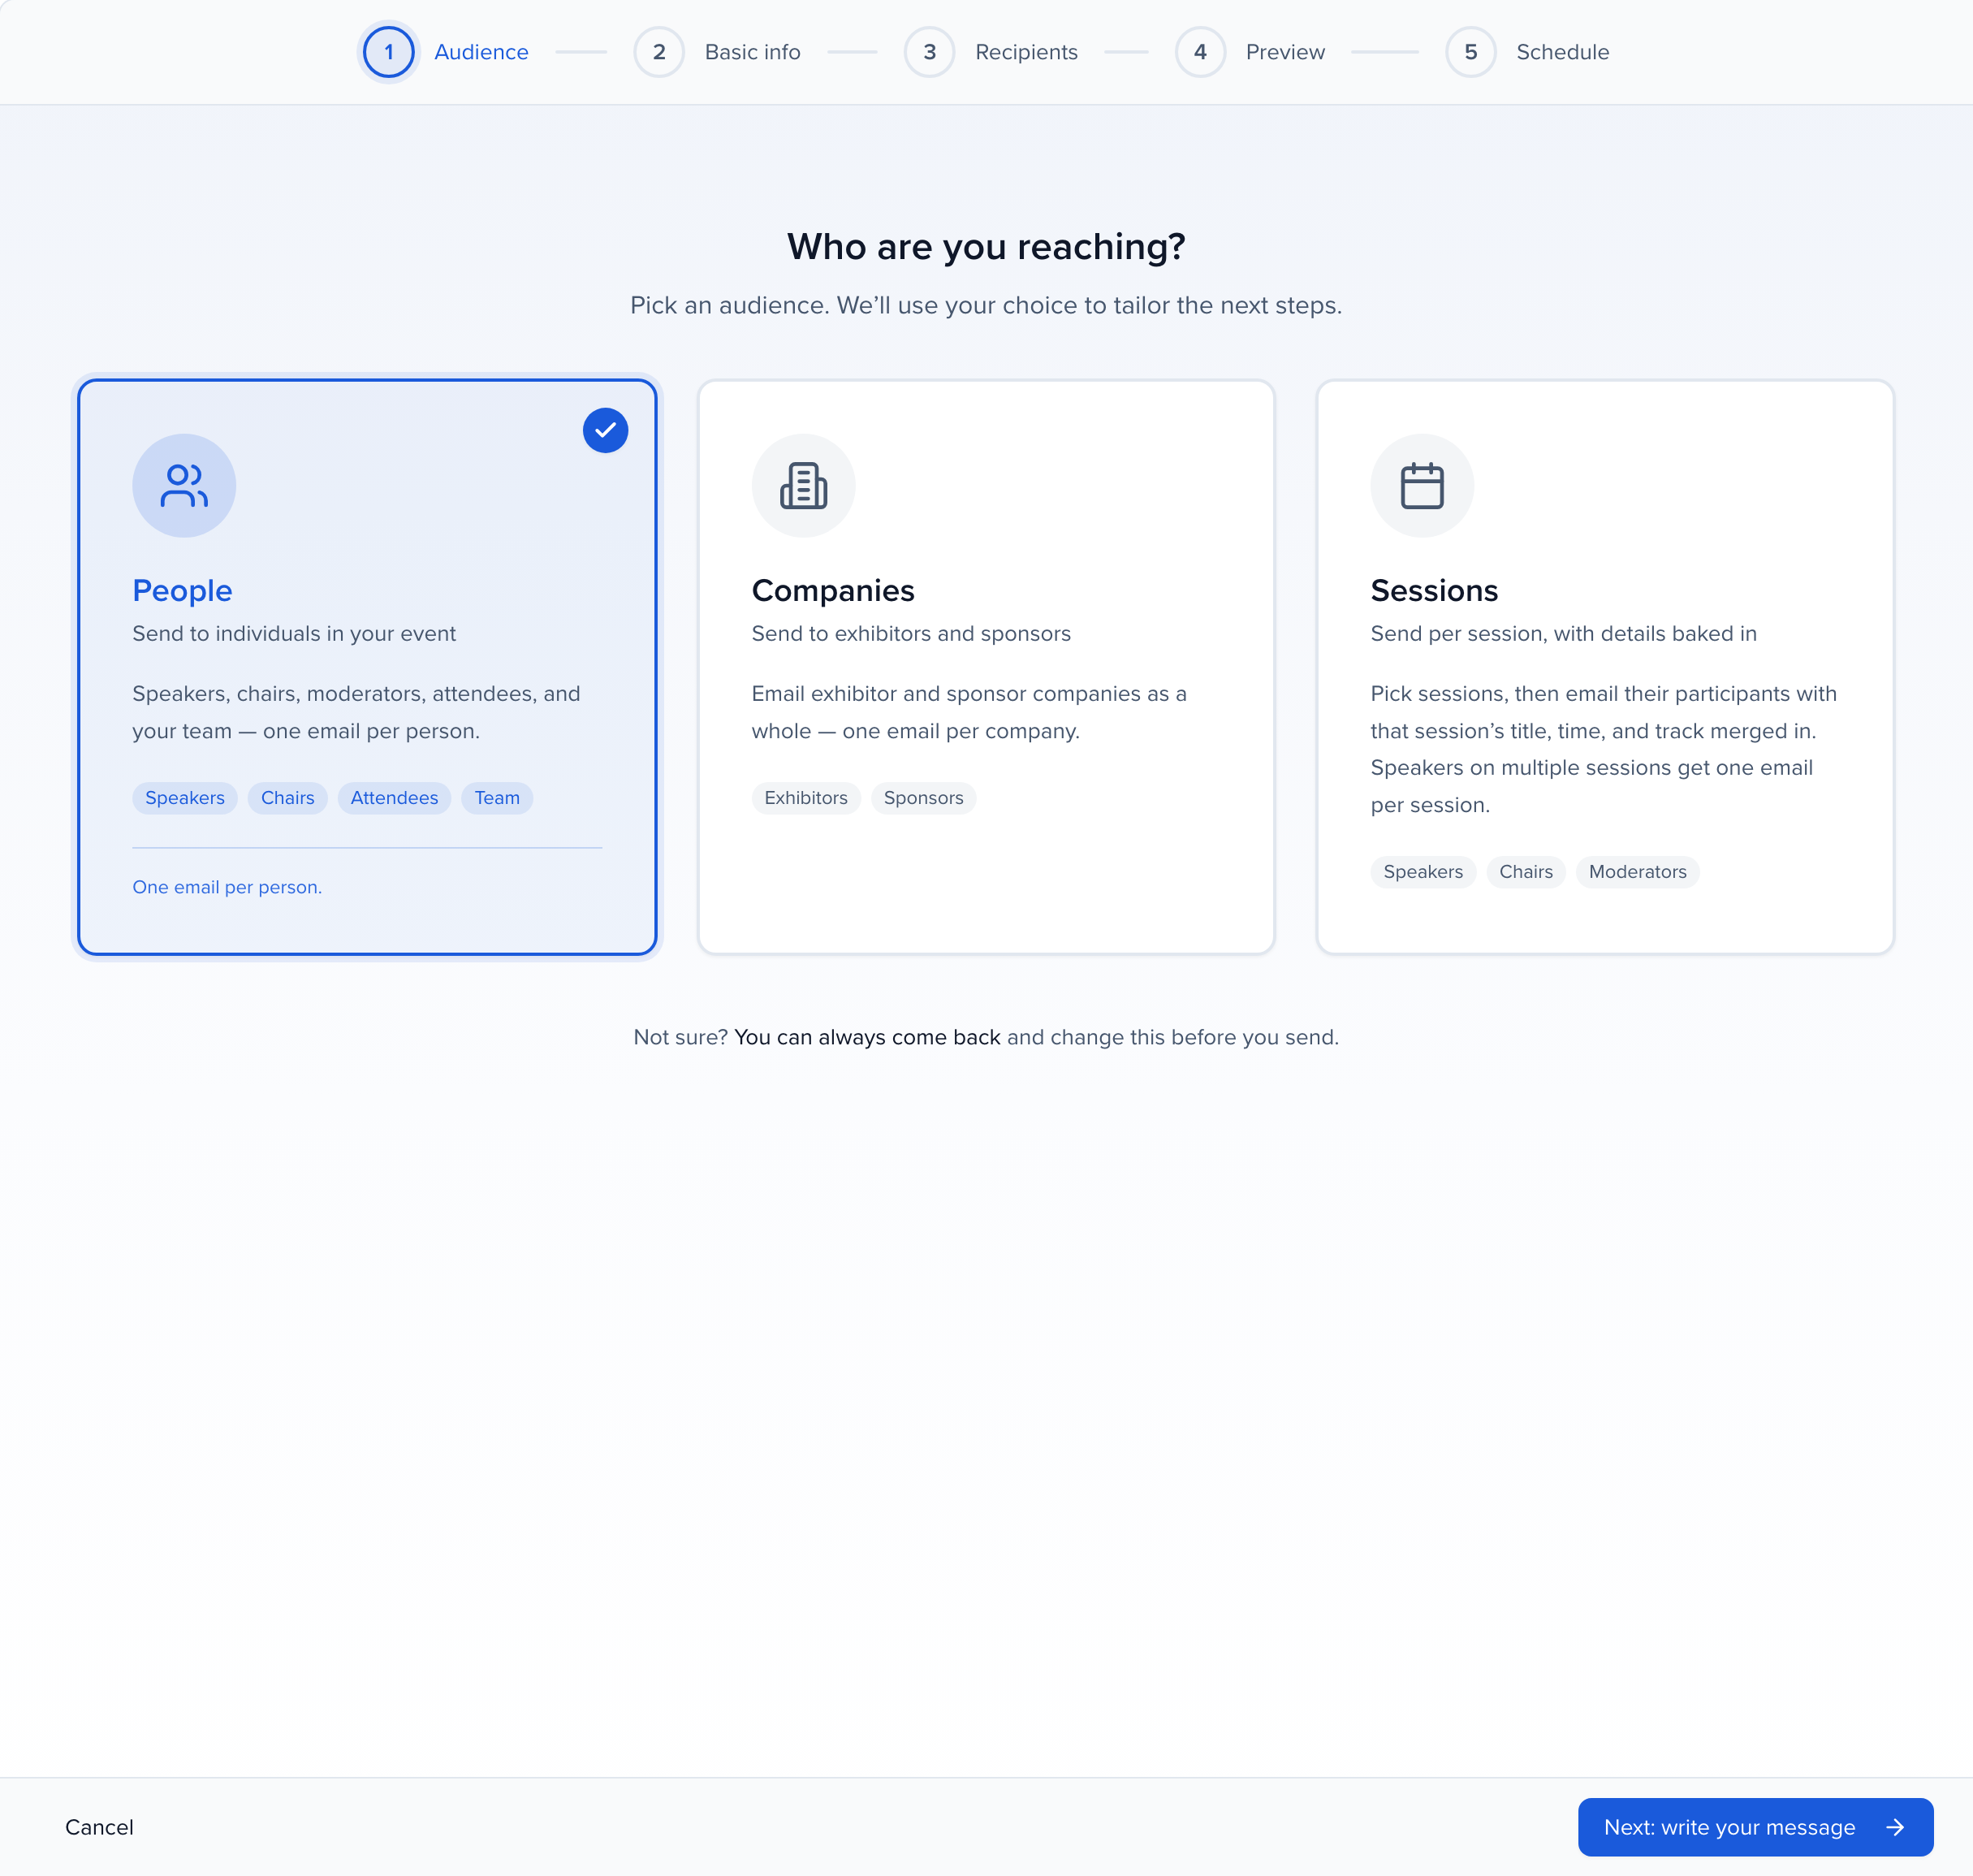
| Audience | Who | How it sends |
|---|---|---|
| People | Speakers, chairs, moderators, attendees, your team — any contact. | One email per person. |
| Companies | Exhibitors and sponsors. | One email per company. |
| Sessions | Pick sessions, then email their participants with that session’s title, time and track merged in. | One email per session-participant pair — a speaker on three sessions gets three emails, each about its own session. |
Step 2: Basic info
Section titled “Step 2: Basic info”An Internal name for the campaign (recipients never see it), then the message: Subject line and Email body. Start from a template pulls in one of your saved email templates; Write with AI drafts the body for you to edit, and Suggest subjects proposes subject lines once there is body copy to work from. Under the body, Attachments adds files that go with every email in the campaign — the same limits and file types as any send. Starting from a template replaces the attachments with the template’s, the same way it replaces the subject and body. Under Sender & reply, set Sender name, Reply-to, CC and BCC — leave them blank to use the event defaults. Send from appears here only when your event has a custom email domain. The merge-tag sidebar on the right inserts a tag at the cursor.
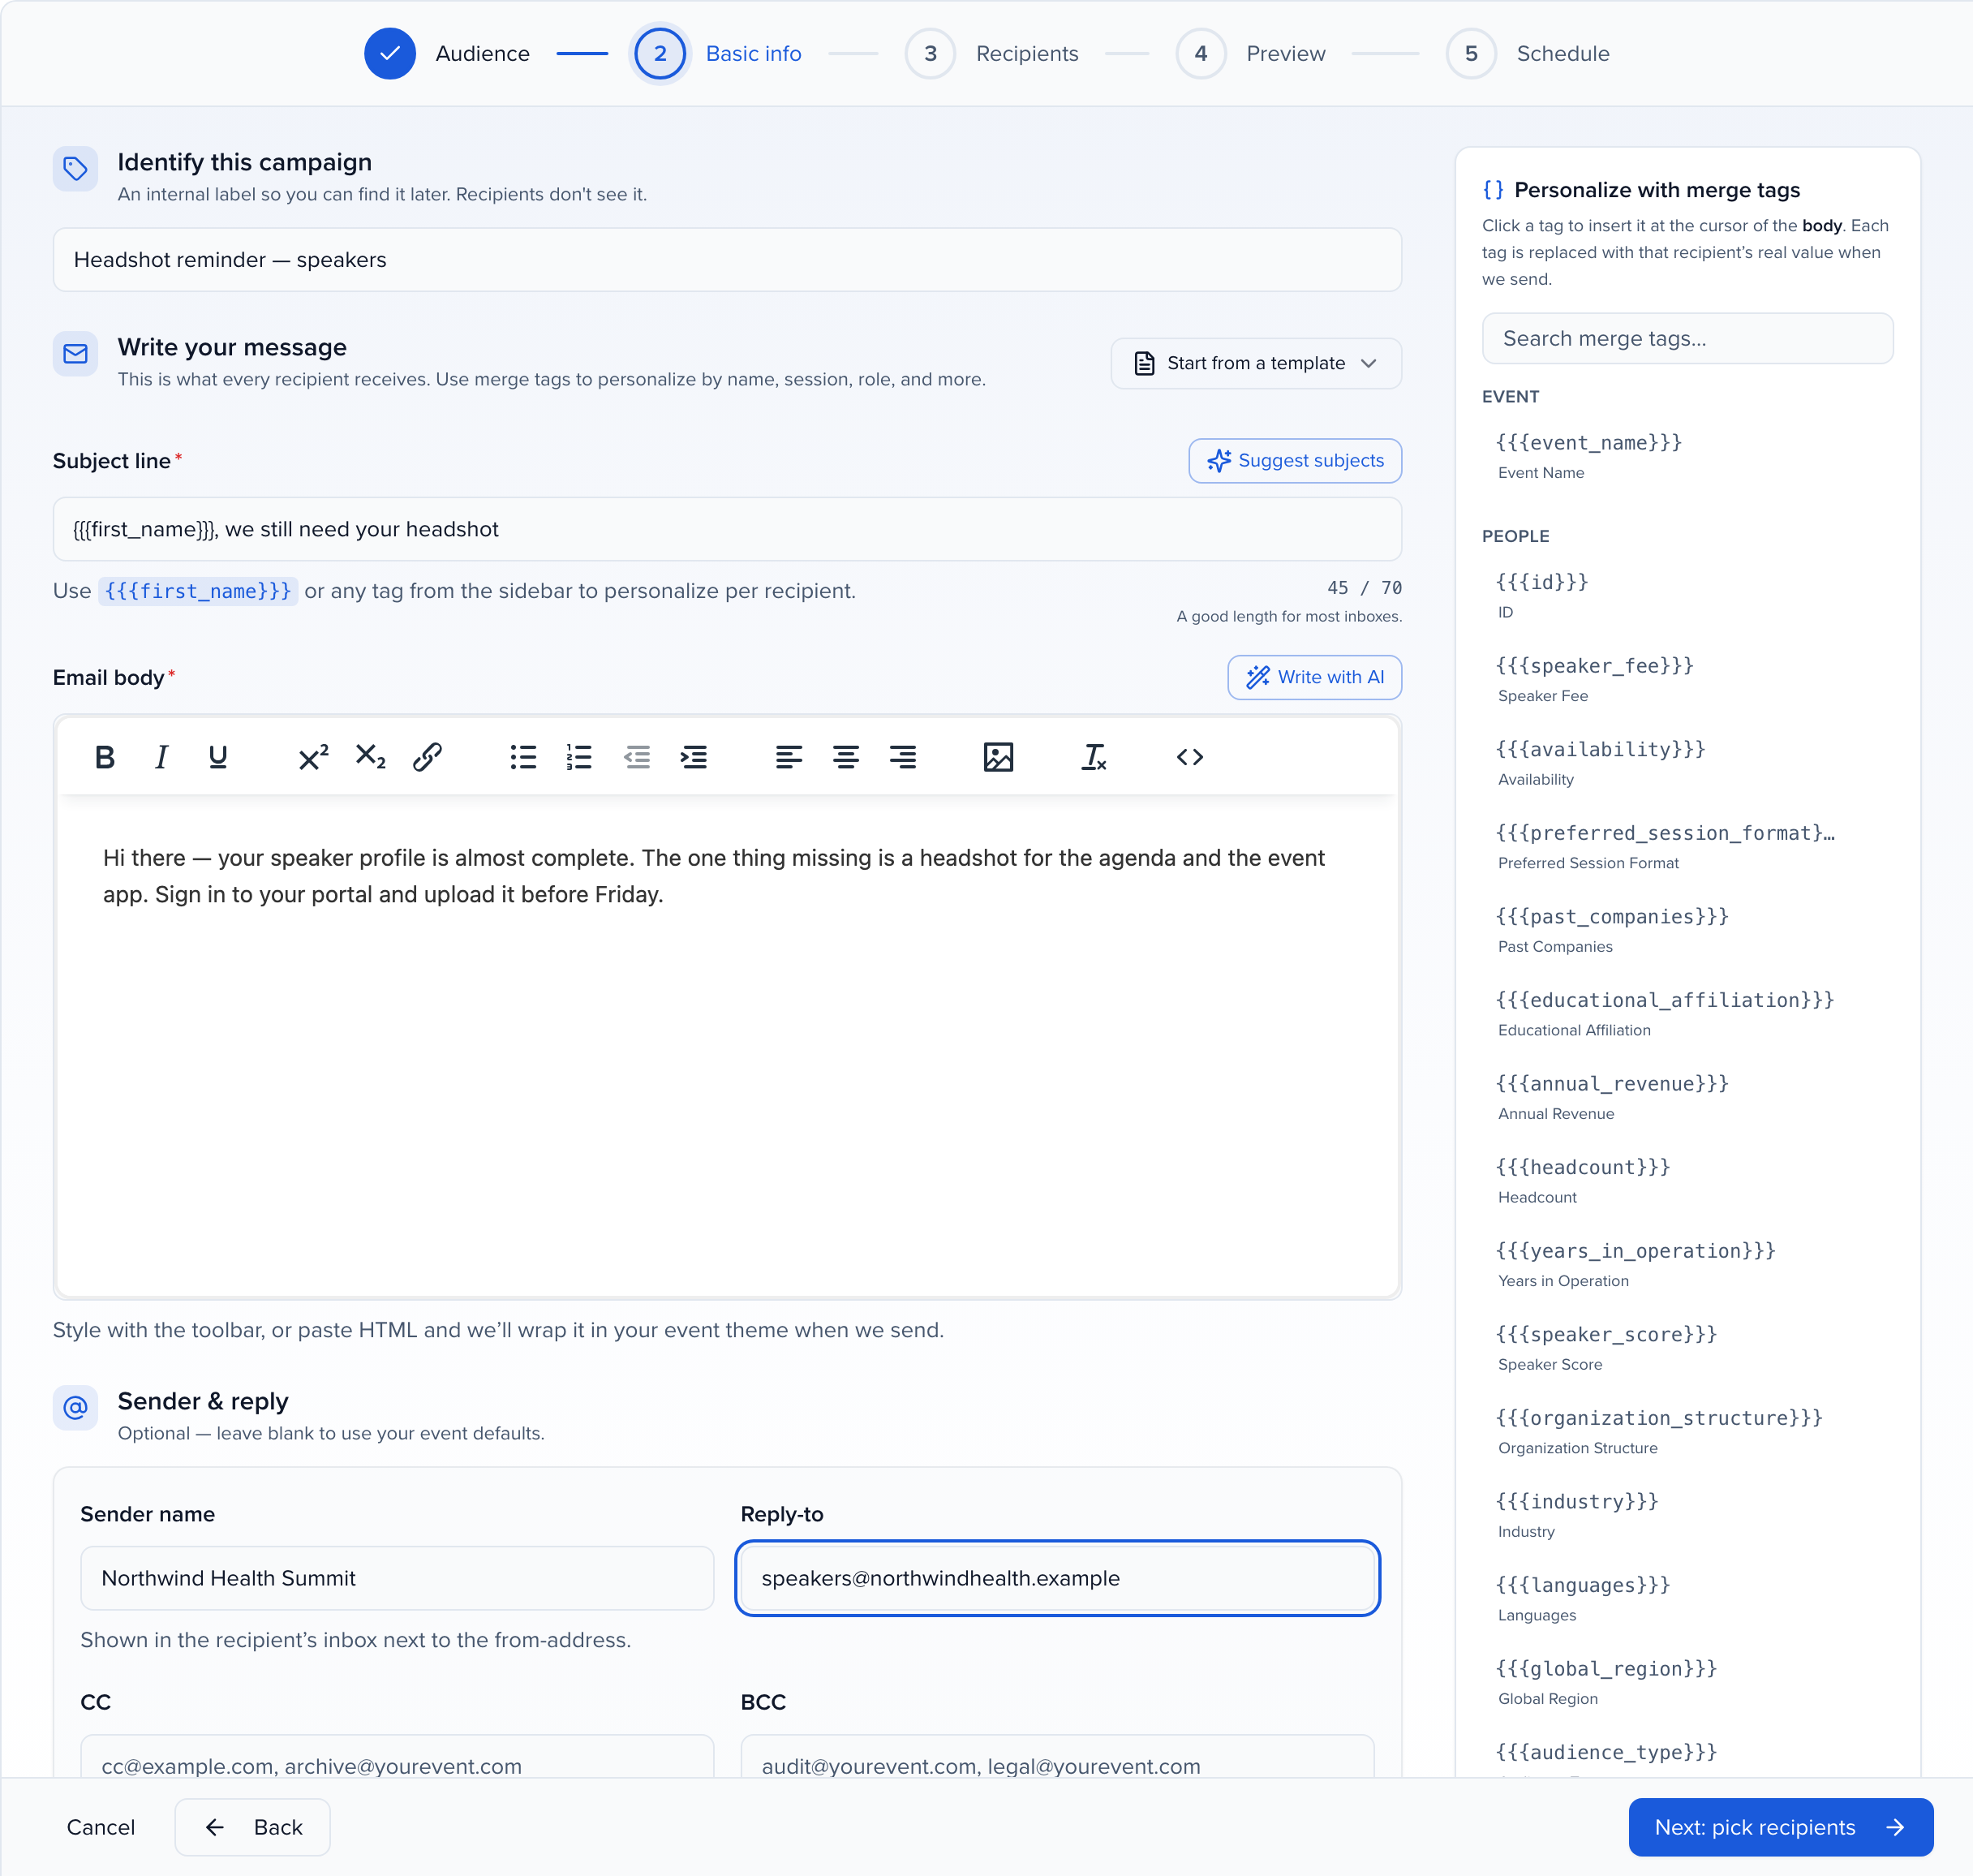
Use merge tags to personalize the message. The merge tags reference below lists them.
Accessibility suggestions
Section titled “Accessibility suggestions”After a save, the wizard checks the email and, when it finds something, shows N accessibility suggestions on the Basic info and Preview steps. It looks for:
- images without alt text, or with alt text that doesn’t describe the image;
- links without text, or with unclear text such as “click here” or a bare web address;
- low-contrast text;
- skipped heading levels.
Show me selects the part of the email the suggestion is about. For low-contrast text, Use followed by a color applies a color that passes. The list reflects your last save, so save again after a fix. Suggestions never stop you from saving or sending.
The same suggestions appear in the email theme editors (see Email themes) and when you edit or preview a system email.
Step 3: Recipients
Section titled “Step 3: Recipients”Define who receives the campaign. The panel on the right shows the number of matching recipients, the Filters applied, and a Sample of matching names and emails so you can spot-check — all three update as you add filters.
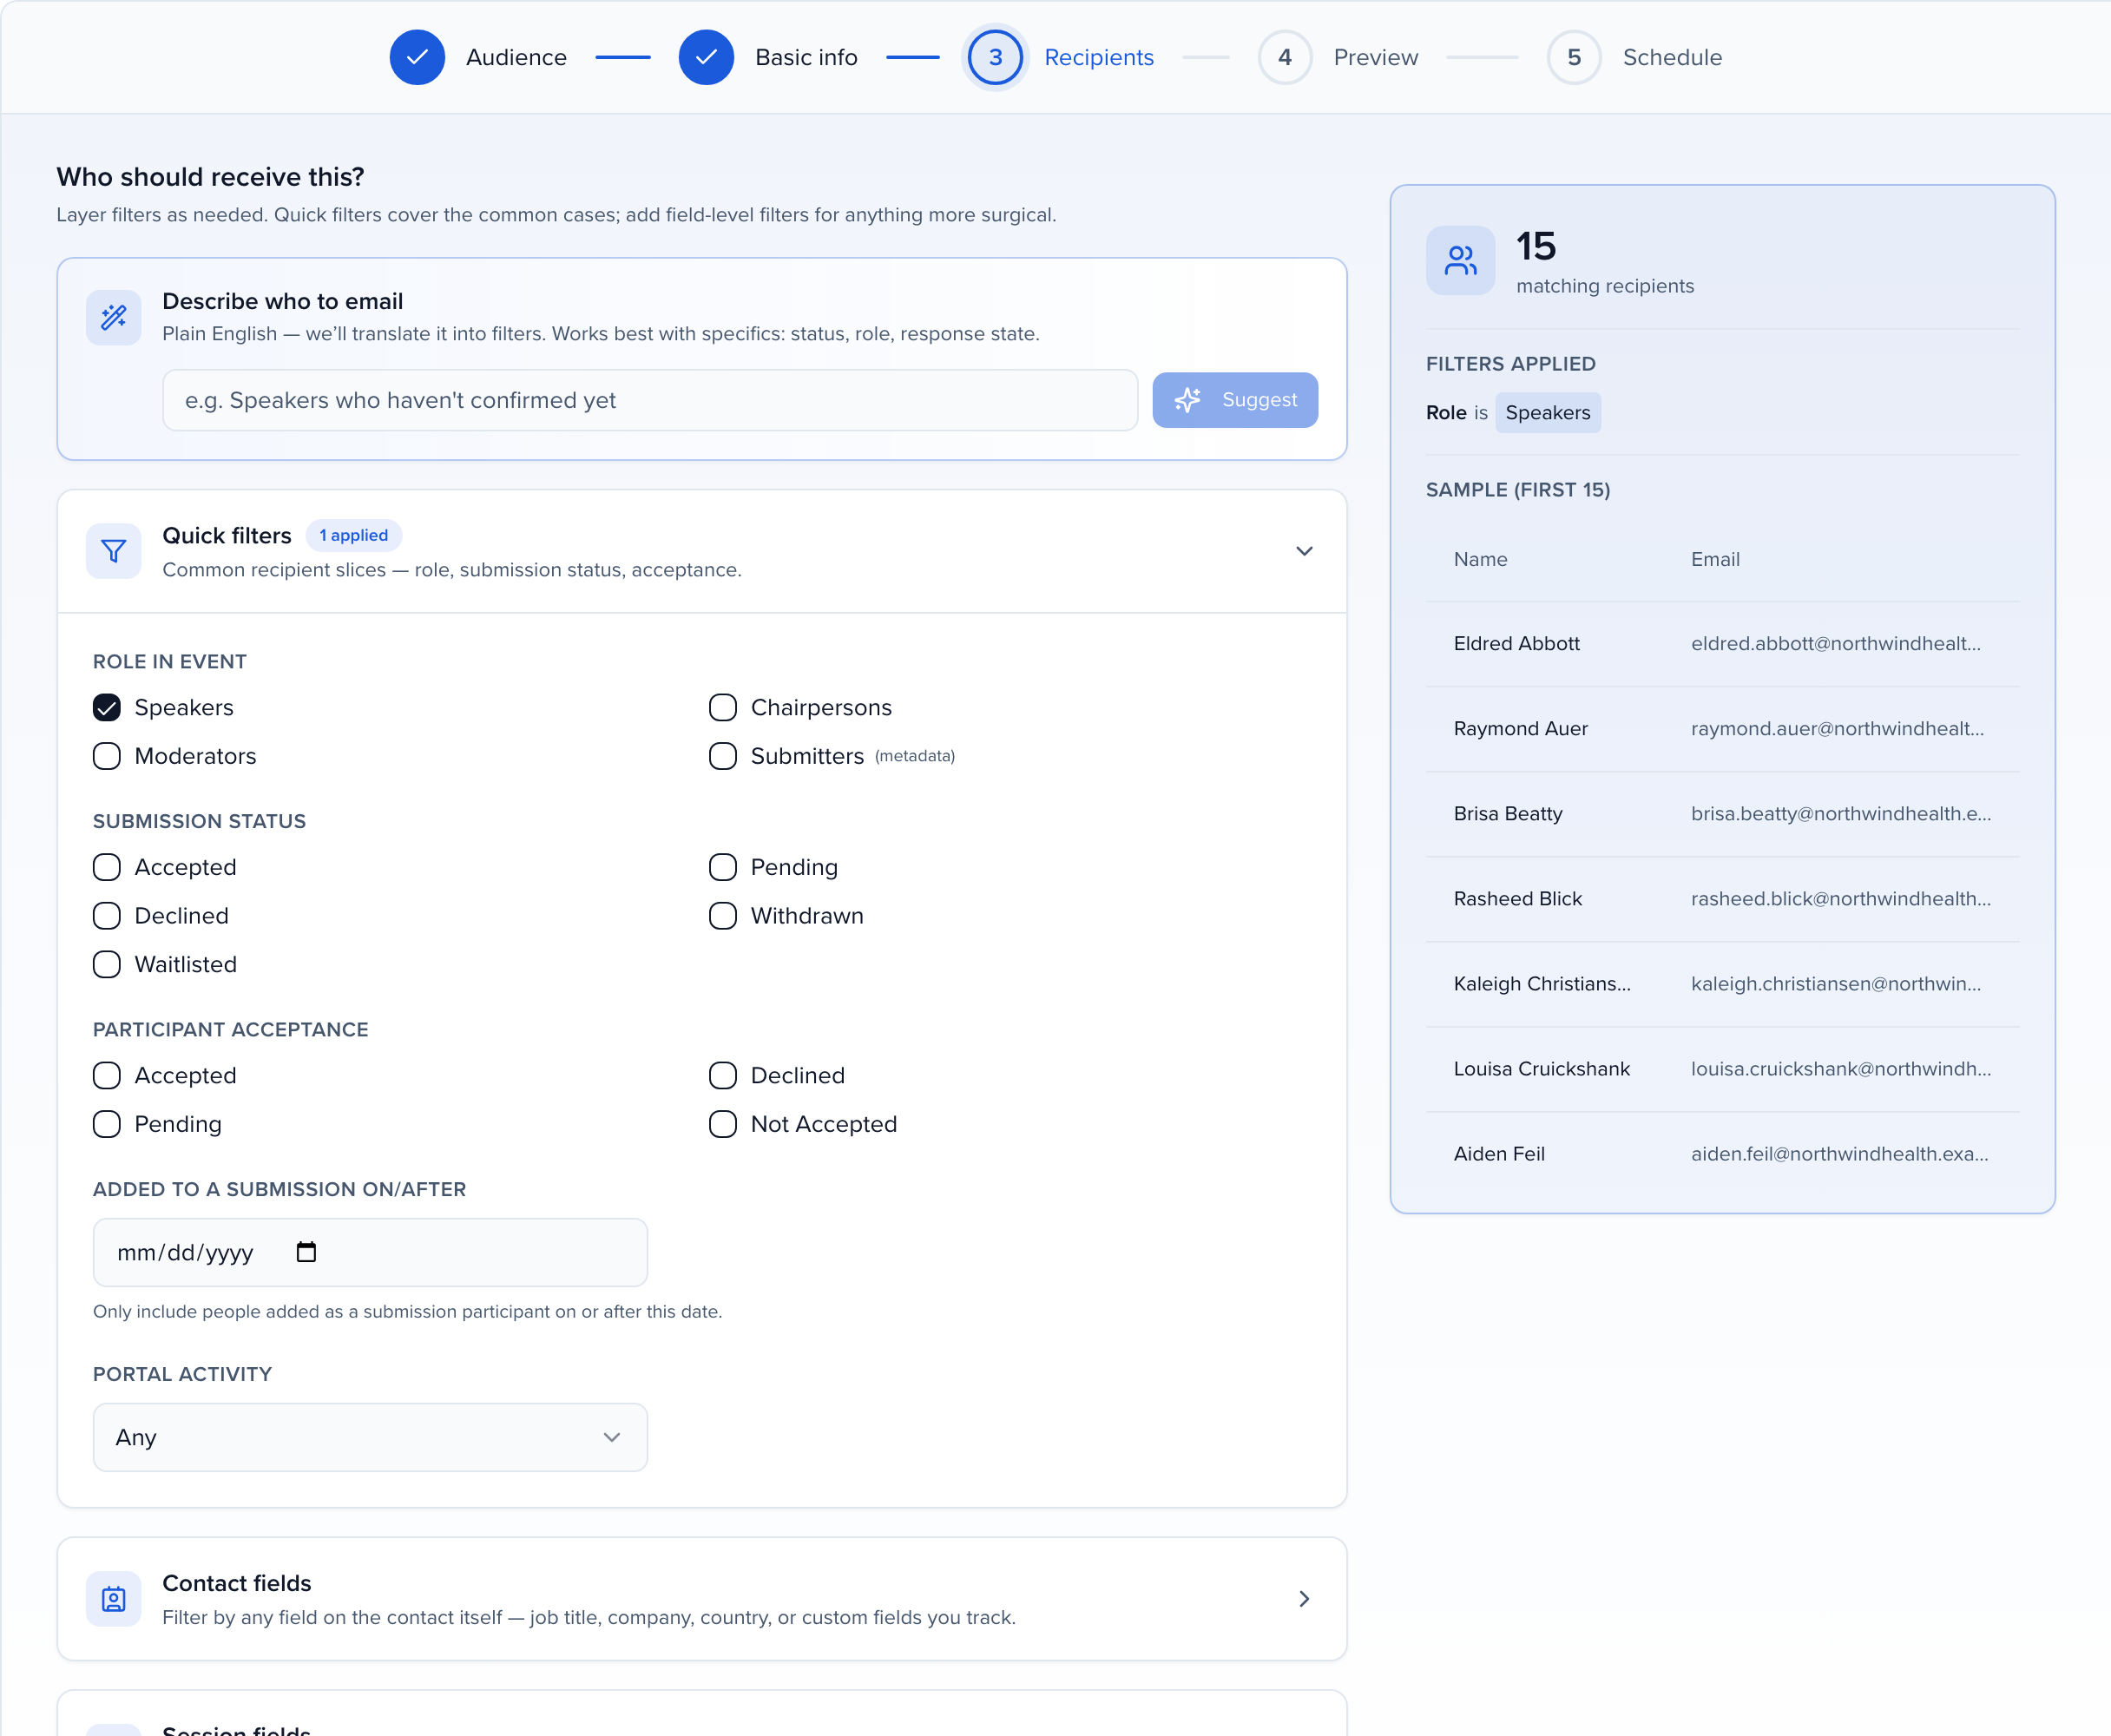
Three ways to narrow the list, and they stack:
- Describe who to email — type it in plain English (“speakers who haven’t confirmed yet”) and click Suggest; the wizard translates it into filters you can then adjust.
- Quick filters — the common slices:
- Role in event — Speakers, Chairpersons, Moderators, Submitters
- Submission status — the statuses configured for this event under Program Settings → Statuses: the built-in Accepted, Accept Queue, Pending, Decline Queue and Declined, plus every custom status you added, each with its colour. A built-in status also reaches the custom statuses built on it, so Pending includes a submission sitting in a custom “In Review”. Withdrawn submissions is a separate switch under the list, because withdrawn is a flag on the submission rather than one of its statuses. A status the event no longer has — an archived custom status — stays visible and ticked on a saved campaign so you can clear it.
- Participant acceptance — whether the person has confirmed their participation: Accepted, Declined, Pending, Not Accepted
- Added to a submission on/after — only people added as a submission participant on or after a date. Useful for “welcome” sends that should only reach people who joined since your last campaign.
- Portal activity — Any, Logged in or Never logged in, for chasing people who have not opened their portal
- Portal assignment — a named portal Task or Form, plus Incomplete or Complete. Use this for a reminder that only goes to people who still owe that item.
- Contact fields and Session fields — filter by any field on the contact (job title, company, country, your custom fields), or narrow to contacts who participate in at least one session matching a session filter.
When you add more than one field filter, choose how they combine: All filters (AND) requires a recipient to satisfy every filter, while Any filter (OR) includes anyone who satisfies at least one. The recipient count and the filter summary update to reflect the logic you pick, so “Speakers in Track A or Track B” is one send, not two.
Campaigns use All filters (AND) unless you change it, so each filter you add narrows the audience rather than widening it. Switch to Any filter (OR) before adding the second filter when you mean “either of these”.
Also send to specific people (optional) adds up to 100 people alongside the filtered list — Add from my team picks a teammate, Enter an email takes anyone else, such as a venue contact or an agency.
Omit past recipients skips anyone who already received this campaign, so a re-send only reaches new people. You can scope it to the entire send history, the last send, or a number of days. The send confirmation shows the resolved recipient count — the number the send will actually reach after skipping past recipients — so the number you confirm is the number that goes out.
One email per session
Section titled “One email per session”A Sessions campaign can send one email per session instead of one per person. Open Recipient handling and turn on Bundle session participants onto one email and each session gets a single message: its primary speaker on the To line, every other participant of that session on CC.
A few things follow from that, and they surprise people:
- Everyone on the session is reached, whether they’re on To or CC, and each of them gets their own row in History with their own delivery status.
- Someone on several sessions appears on each session’s email. A moderator across three panels is CC’d on all three, rather than receiving one email about one panel. They are not sent a separate email of their own.
- The count on Ready to send and the confirm screen is emails, not people. Three sessions of four participants reads as three, because three emails go out. The count first leaves out contacts who have bounced or unsubscribed, the same way the send does, so the number you confirm matches Sent in the run history. Turn bundling off and the count goes back to the number of people.
- Session merge tags resolve per email.
{{session.title}}renders that session’s title on that session’s message. - Drafts are skipped. A participant’s unpublished draft session never becomes one of these emails.
- “Omit past recipients” applies per session. Someone who already received this campaign for one session is still emailed for their other sessions — otherwise the first session they happened to land in would silence the rest. The run history notes when this happened, so an apparent double-send is explainable.
To send about one specific session instead, set the session on the campaign. Bundling then produces exactly one email, for that session only.
Subsession participants
Section titled “Subsession participants”When a parent session’s subsessions are how you rank candidate speakers — one speaker per subsession, each subsession in a custom status such as 1st Choice, 2nd Choice or Declined — a Sessions campaign can invite the speakers of a given rank for the parent session in one send.
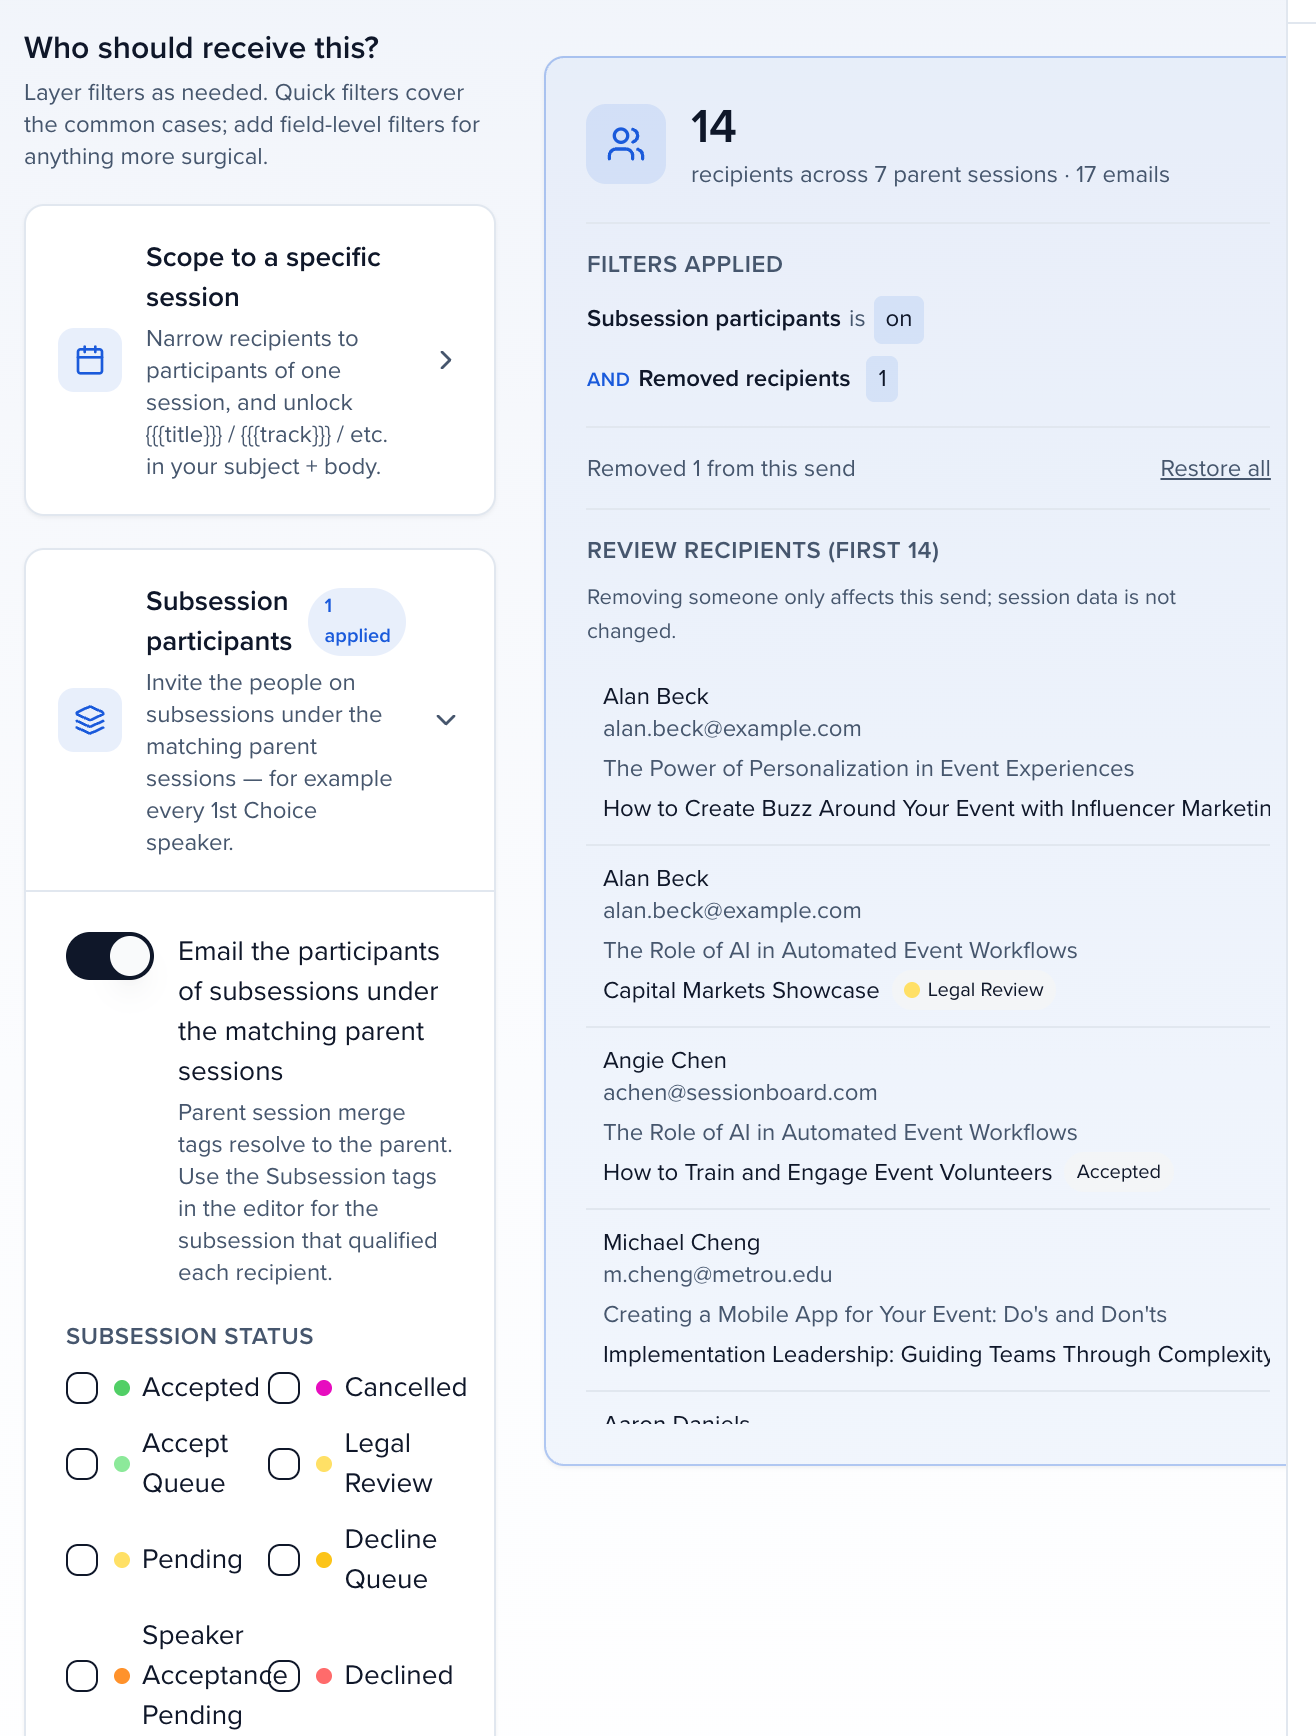
On the Recipients step of a Sessions campaign, open Subsession participants and turn on Email the participants of subsessions under the matching parent sessions. Two things change:
- Who is reached. The parent-level filters — the session scope, Parent submission status and any session field filters — choose the parent sessions. The campaign then emails the participants of those parents’ subsessions, narrowed by Subsession status, which lists the same configured statuses as the parent filter. Pick 1st Choice and every first-choice speaker under the matching parents is included; pick two statuses to include either.
- What merges. The message’s session merge tags resolve to the parent session, so
{{session.title}}and{{session.starts_at}}describe the session the person is being invited to. The tag picker gains a Subsession group —{{subsession.title}}and friends — that resolves to the subsession that qualified each recipient.
The count reads recipients across parent sessions. Each person gets one email per parent session they qualify for: a speaker ranked on two subsessions of the same parent receives one email for that parent, and a speaker ranked under two different parents receives one email per parent, each merged from its own parent. When more than one subsession under a parent qualified the same person, the subsession tags use the first subsession by order, and the review table flags that row so you can check it.
The Sample panel becomes a review table in this mode: one row per email — recipient, parent session, the matching subsession and its status — and a Remove action on every row. Removing a row takes that one email out of this send: a speaker ranked under two parents keeps the email for the other parent. It never changes the session or the subsession, and the count updates. Restore all brings them back. On the Preview step, Preview as… lists one entry per email, each rendered with its own parent session and subsession. History records each email against its parent session and the subsession that qualified the recipient: View Recipients shows both, and the email also appears on the subsession’s Activity tab.
You can also start from the session list: in Program > Sessions (or Submissions), select the parent sessions, choose Send Emails, then Choose subsession participants. The campaign wizard opens on a Sessions campaign with subsession participants on and only the sessions you selected in scope (Use all sessions clears that); anything you had typed carries over.
Step 4: Preview
Section titled “Step 4: Preview”Review the campaign exactly as recipients will see it, wrapped in your default email theme. With no theme, emails go out in the standard event wrapper — your event logo as the header, plus the standard footer — and the preview shows that wrapper too. Organization campaigns use the organization’s logo. The wizard runs a content review as the step opens and reports Looks good to send or lists what is worth a second look — a very short body, a missing sign-off. Preview as… lists the recipients; click one to render the message with their values. Switch the Preview viewport between Desktop and Mobile, toggle Dark, and click Send a test to email it to any address. A test carries the campaign’s attachments, so you can check them in your own inbox.
Personalize as decides whose data fills the merge tags in the test:
- Pick a contact or a session and the test email renders with that record’s values — the closest thing to what a real recipient receives.
- Leave it on Don’t personalize and the merge tags stay exactly as written, as literal
{{ }}text. That is useful for proofreading the template itself, and it means a test can no longer arrive carrying a stranger’s session title because Sessionboard guessed a record for you.
Step 5: Schedule
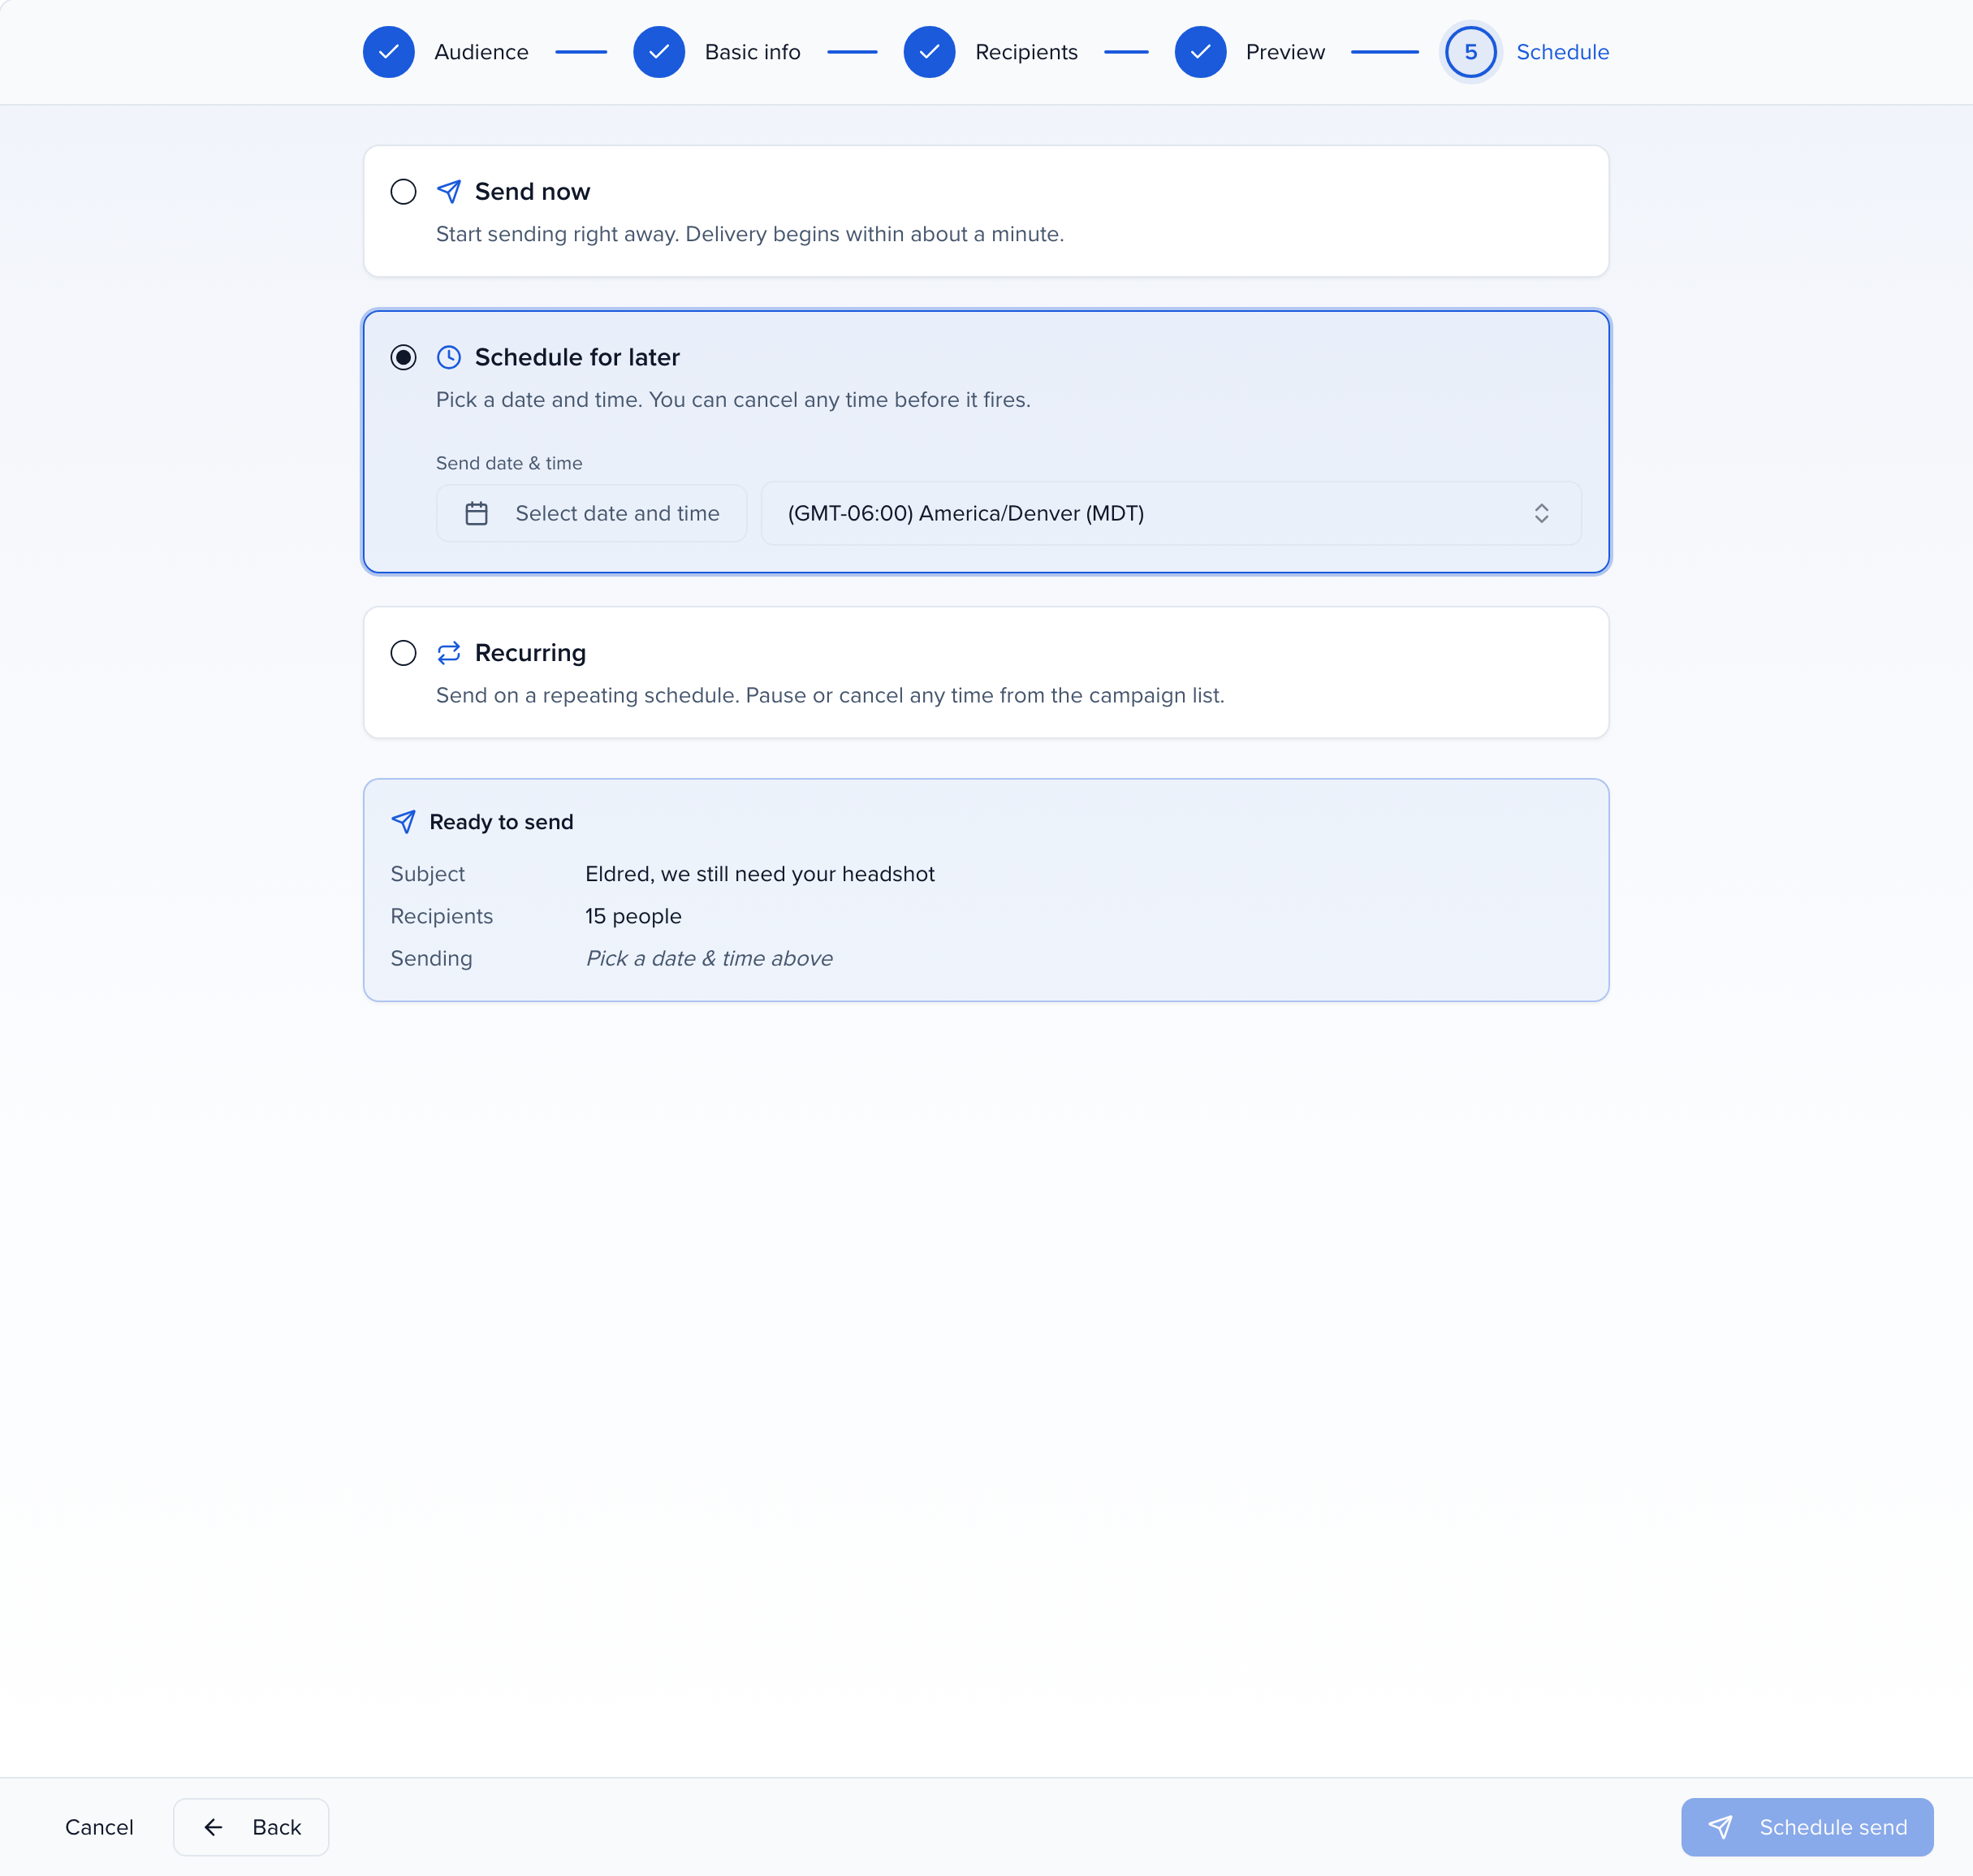
Section titled “Step 5: Schedule”Choose how it goes out; the Ready to send summary on the right shows the Subject, the resolved Recipients count and when it is Sending.
- Send now: delivery begins within about a minute.
- Schedule for later: pick a Send date & time.
- Recurring: choose a Frequency — Daily, Weekly (with a day of week) or Monthly (with a day of month) — and a Send time. The campaign re-evaluates its filters on every run, so a weekly “you have not logged in yet” reminder reaches whoever still matches, and combines naturally with Omit past recipients.
Merge tags reference
Section titled “Merge tags reference”Merge tags insert personalized data into your emails. Available tags vary by audience (set in Step 1); click Merge tags above the body and search to insert one.
All audiences
Section titled “All audiences”- Event Name — the name of the event (for organization-level campaigns, the organization name)
- Email Send Date (
{{email_send_date}}) — the calendar day the email actually goes out, in the event’s timezone (the organization’s for organization-level campaigns, UTC only when neither has one). A recurring campaign uses that run’s send day, not the day you wrote the draft. The date is written in the date part of the event’s Export Date Format setting (the organization’s when the event is set to Organization default, or for organization-level campaigns) — a format of “Sunday, June 15, 2025 2:00 PM” writes “Sunday, June 15, 2025”. With no format set it is written2025-06-15. - Email Send Date + 7 / 14 / 30 Days (
{{email_send_date_plus_7}},{{email_send_date_plus_14}},{{email_send_date_plus_30}}) — the same send day plus that many calendar days. Use these for “reply by” copy that stays correct on a repeating send.
People
Section titled “People”- First Name
- Last Name
- Full Name
- Email Address
- Job Title
- Company Name
- Portal Link
- Custom contact fields
- Matched session tags (
{{session.title}},{{session.status}},{{session.speakers}}and the other session fields): when the campaign’s quick filters select sessions (for example Submission status = Accepted), these render the session that matched for each person. With no session filter they are empty. - Sessions Summary (
{{{sessions_summary}}}): a table of the person’s sessions. When the quick filters select sessions it lists only the sessions that matched, so an “accepted” email does not list a pending submission; with no session filter it lists all of them.
The portal link merge tag
Section titled “The portal link merge tag”Portal Link inserts a link to the portal for the person receiving that email, so one send gives each recipient their own. Three things to know when it doesn’t behave:
- In the draft and in History you may see the event’s general portal sign-in page. For follow-ups drafted by Ask, Sessionboard swaps that general link for a personal sign-in link at the moment of sending, so the recipient lands in their own portal. See the portal link in each follow-up.
- A personal link sent in a follow-up works for seven days. After that the recipient signs in from the portal page with the same email address.
- The tag fills in a link, not a contact field. If the email shows another value, check you inserted Portal Link and not a custom contact field with a similar name.
Companies
Section titled “Companies”- Company Name
- Point of Contact Name
- Point of Contact Email
- Portal Link
Sessions
Section titled “Sessions”- Session Title
- Session Date & Time
- Session Duration (minutes) — the session’s length, worked out from its start and end times
- Session Room / Location
- Session Track
- Speaker Name(s)
- Moderator, chairperson, and custom role name(s) — every role your event uses gets its own tag, listed together under Session Roles in the tag picker. Each one has a “with titles” version that adds each person’s job title and company.
- Accept By Date (
{{accept_by_date}}) — the recipient’s earliest open participant acceptance deadline for that session, in the event timezone. Empty once they have answered, or when no accept-by rule applies. - Portal Link
Sessions summary
Section titled “Sessions summary”Sessions Summary ({{{sessions_summary}}}) inserts a table of every session the recipient is on, as a speaker, moderator, chairperson or other participant. It is offered where an email is about a person rather than one session, such as a send from Contacts. On a Sessions send the same table is {{{recipient.sessions_summary}}}.
On its own the tag shows six columns: session_id, status, title, starts_at, ends_at and speakers.
Choose the columns
Section titled “Choose the columns”The quickest way to change the columns is the Customize window. In Merge Tags, click Sessions Summary (the row says Choose columns, then insert) and Insert Sessions Summary opens:
- Columns is a checklist of every column the table can show. Tick the ones you want and untick the rest; at least one must stay ticked.
- Preview shows the table as it will look, using a session from this event, or sample data when the event has none yet.
- Insert puts the tag, with your choice of columns, at your cursor.
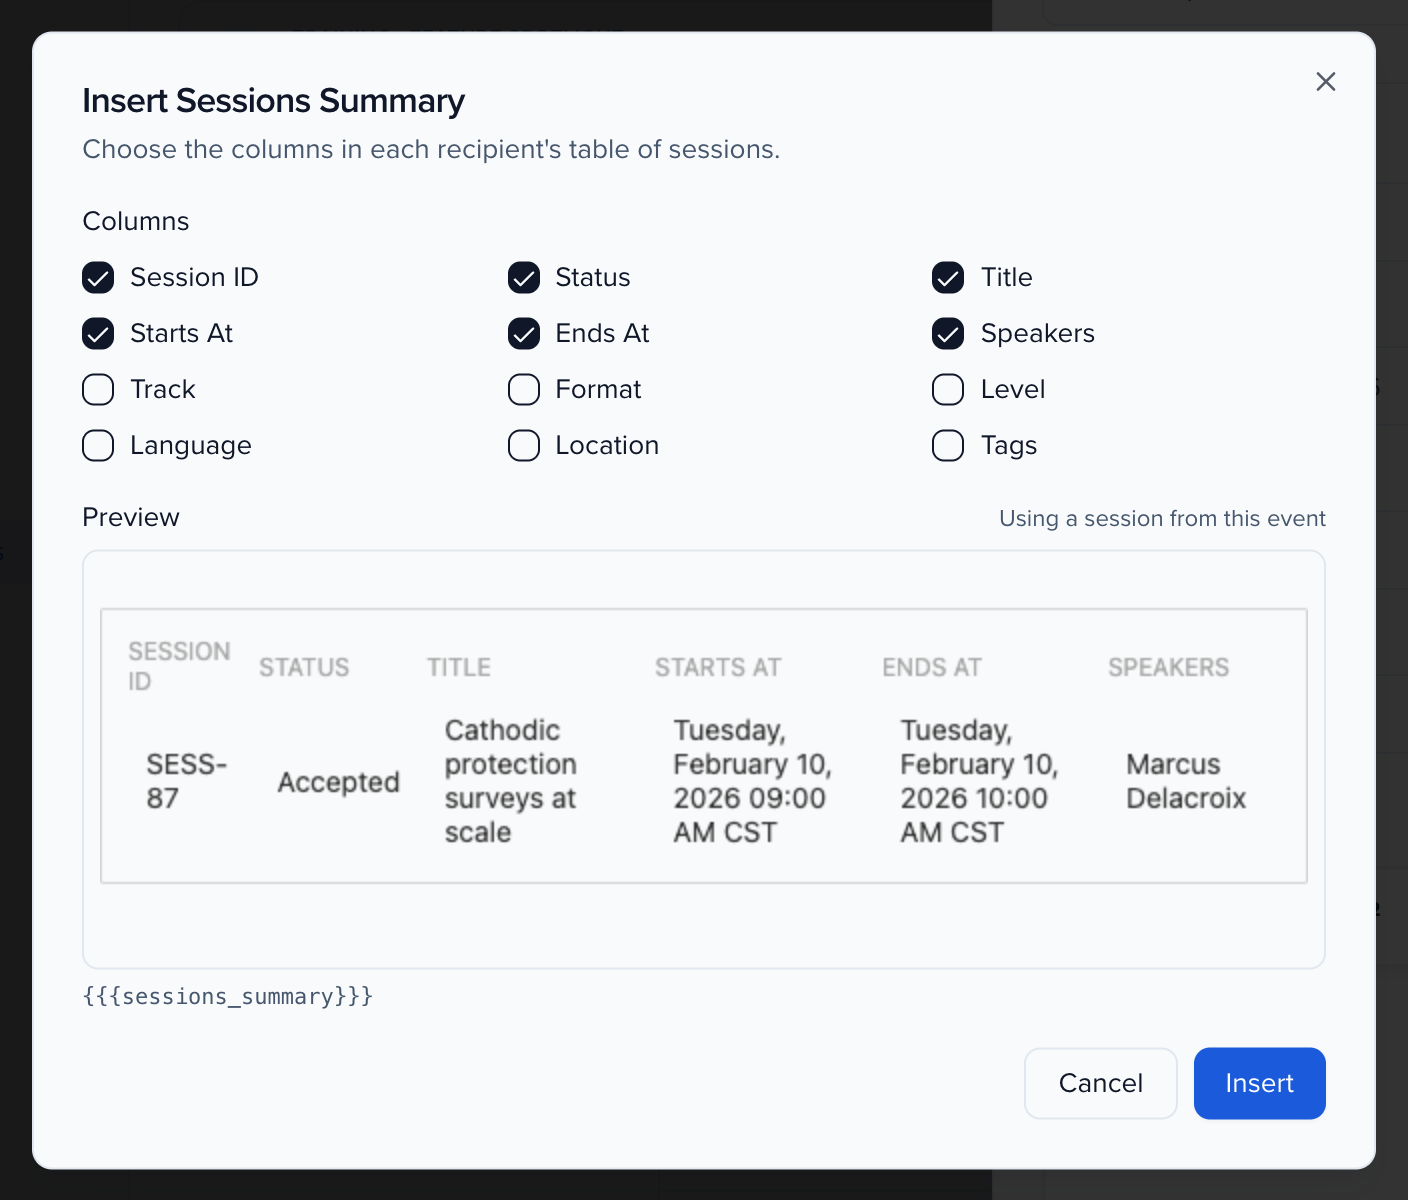
To change a tag that is already in the message, click it in the editor and choose Customize summary. Customize Sessions Summary opens with the tag’s current columns ticked. Columns the window does not list but the tag already names are kept, and shown under Also kept from the tag.
The window works in Send Email, the Email Campaigns wizard and the event and organization template editors, for anyone who can compose the email.
Type the options yourself
Section titled “Type the options yourself”The window writes ordinary tag options, so you can also type them. Add them after the tag name, a colon, then exclude= or include= with a comma-separated list:
{{{sessions_summary:exclude=status,session_id}}}— the default table without the status and ID columns.{{{sessions_summary:include=title,starts_at,track}}}— exactly these columns, in this order.{{{recipient.sessions_summary:exclude=status}}}— the same on a Sessions send.{{{sessions_summary:status=accepted}}}— only the recipient’s sessions in that status. List several statuses separated by commas to include sessions in any of them. A system status such as Accepted also includes the custom statuses built on it; a custom status lists only its own sessions. A recipient with no session in those statuses gets no table. The status filter is separate from the columns, so{{{sessions_summary:status=accepted;exclude=status}}}lists Accepted sessions without a Status column.
In the Insert Sessions Summary dialog, tick statuses under Only sessions with status, next to Columns, instead of typing the option. The list shows the event’s statuses, custom statuses included. The preview uses one of your sessions in a ticked status. Tags without a status option keep listing every session.
Besides the default six, you can include track, format, level, language, location and tags, or any Sessions field by its internal name or its label, such as Room Setup. An option or column name the tag does not recognize is ignored, so a typo shows the table without that column rather than breaking the email. Check the result in Preview or with a test send before you send.
Subsession
Section titled “Subsession”Listed for Sessions campaigns. Each session tag has a Subsession twin — Subsession title, Subsession date & time, Subsession room, and so on — that resolves to the subsession that qualified the recipient when the campaign targets subsession participants. On any other campaign these tags render empty.
Subsession and parent session tags
Section titled “Subsession and parent session tags”Use these on any email about sessions — Send Email from Sessions, a Sessions campaign, or a Sessions email template — to name an abstract and the session it belongs to, for example “Your {{{subsession_title}}} has been accepted for {{{parent_session_title}}}.”
| Tag | Shows |
|---|---|
{{{subsession_title}}} | Subsession title |
{{{subsession_id}}} | Subsession ID, such as ABC-100-2 |
{{{subsession_starts_at}}}, {{{subsession_ends_at}}} | Start and end, in the event’s timezone and time format, like Session Date & Time |
{{{subsession_location}}} | Subsession room |
{{{subsession_speakers}}} | Subsession speakers |
{{{parent_session_title}}}, {{{parent_session_id}}} | Title and ID of the session the subsessions belong to |
{{{parent_session_starts_at}}}, {{{parent_session_ends_at}}}, {{{parent_session_location}}} | Its start, end and room |
{{{my_subsessions_summary}}} | A table of the same subsessions: ID, title, start, end and room |
Which subsession they show depends on what the email is about:
- An email about a subsession shows that subsession. This is the case for Subsessions only or Selected sessions and their subsessions in Sessions to include, and for a send from one subsession. Each subsession gets its own email, so one abstract can be told about its decision without writing to the others. The exception is Select Individual Contacts with Selected sessions and their subsessions: a person on both a selected session and one of its subsessions gets one email, the selected session’s, so the tags show their subsessions as described next. Use Subsessions only when every abstract needs its own email. The parent tags show the session it belongs to.
- A campaign that targets subsession participants sends one email per person per parent session, as before. The tags show the subsession that qualified the person, the same one the Subsession tags use: the first by order when several did. To write about each abstract separately, send from Sessions with Subsessions only.
- An email about a top-level session shows the recipient’s own subsessions under it: every subsession they are a participant on, in any role, or submitted. Drafts are left out.
- With one subsession, the tags show its values.
- With several, they list each one, by start time with unscheduled ones last, separated by semicolons.
{{{my_subsessions_summary}}}puts them in a table, one row each, which reads better. - A recipient on none of the subsessions sees nothing for these tags.
- The parent tags show the session itself.
Add-to-calendar templates don’t offer these tags, because a calendar entry has no recipient.
Upcoming sends
Section titled “Upcoming sends”Upcoming sends lists every email the event will send on its own, so you can check who gets a reminder before it goes out. Open it from the Upcoming sends button at the top of Email Campaigns, or search for “Upcoming sends”.

Choose the next 7, 14, or 30 days. The list covers scheduled and recurring campaigns, upload slot reminders, participant acceptance reminders, call for papers deadline reminders, awards deadline and reviewer reminders, the speaker feedback release, and date-based automations. Each row shows when it sends in the event timezone, the kind of email, and how many people get it. A send that is paused or switched off says Off — will not send.
Click a send to see the recipient list, with the session or submission that put each person on it, and the email as the first recipient will see it.
- A banner and a badge on the row warn you when a send reaches people on pending, decline-queue, or declined sessions.
- Automations that send when something happens, such as when a submission comes in, are listed separately, with a link to each automation.
- If one kind of email cannot be checked, the page says so instead of showing fewer sends.
Upcoming sends needs the same permission as the rest of Email Campaigns.
Analytics & History
Section titled “Analytics & History”Analytics
Section titled “Analytics”Settings → Analytics shows campaign performance across your event.
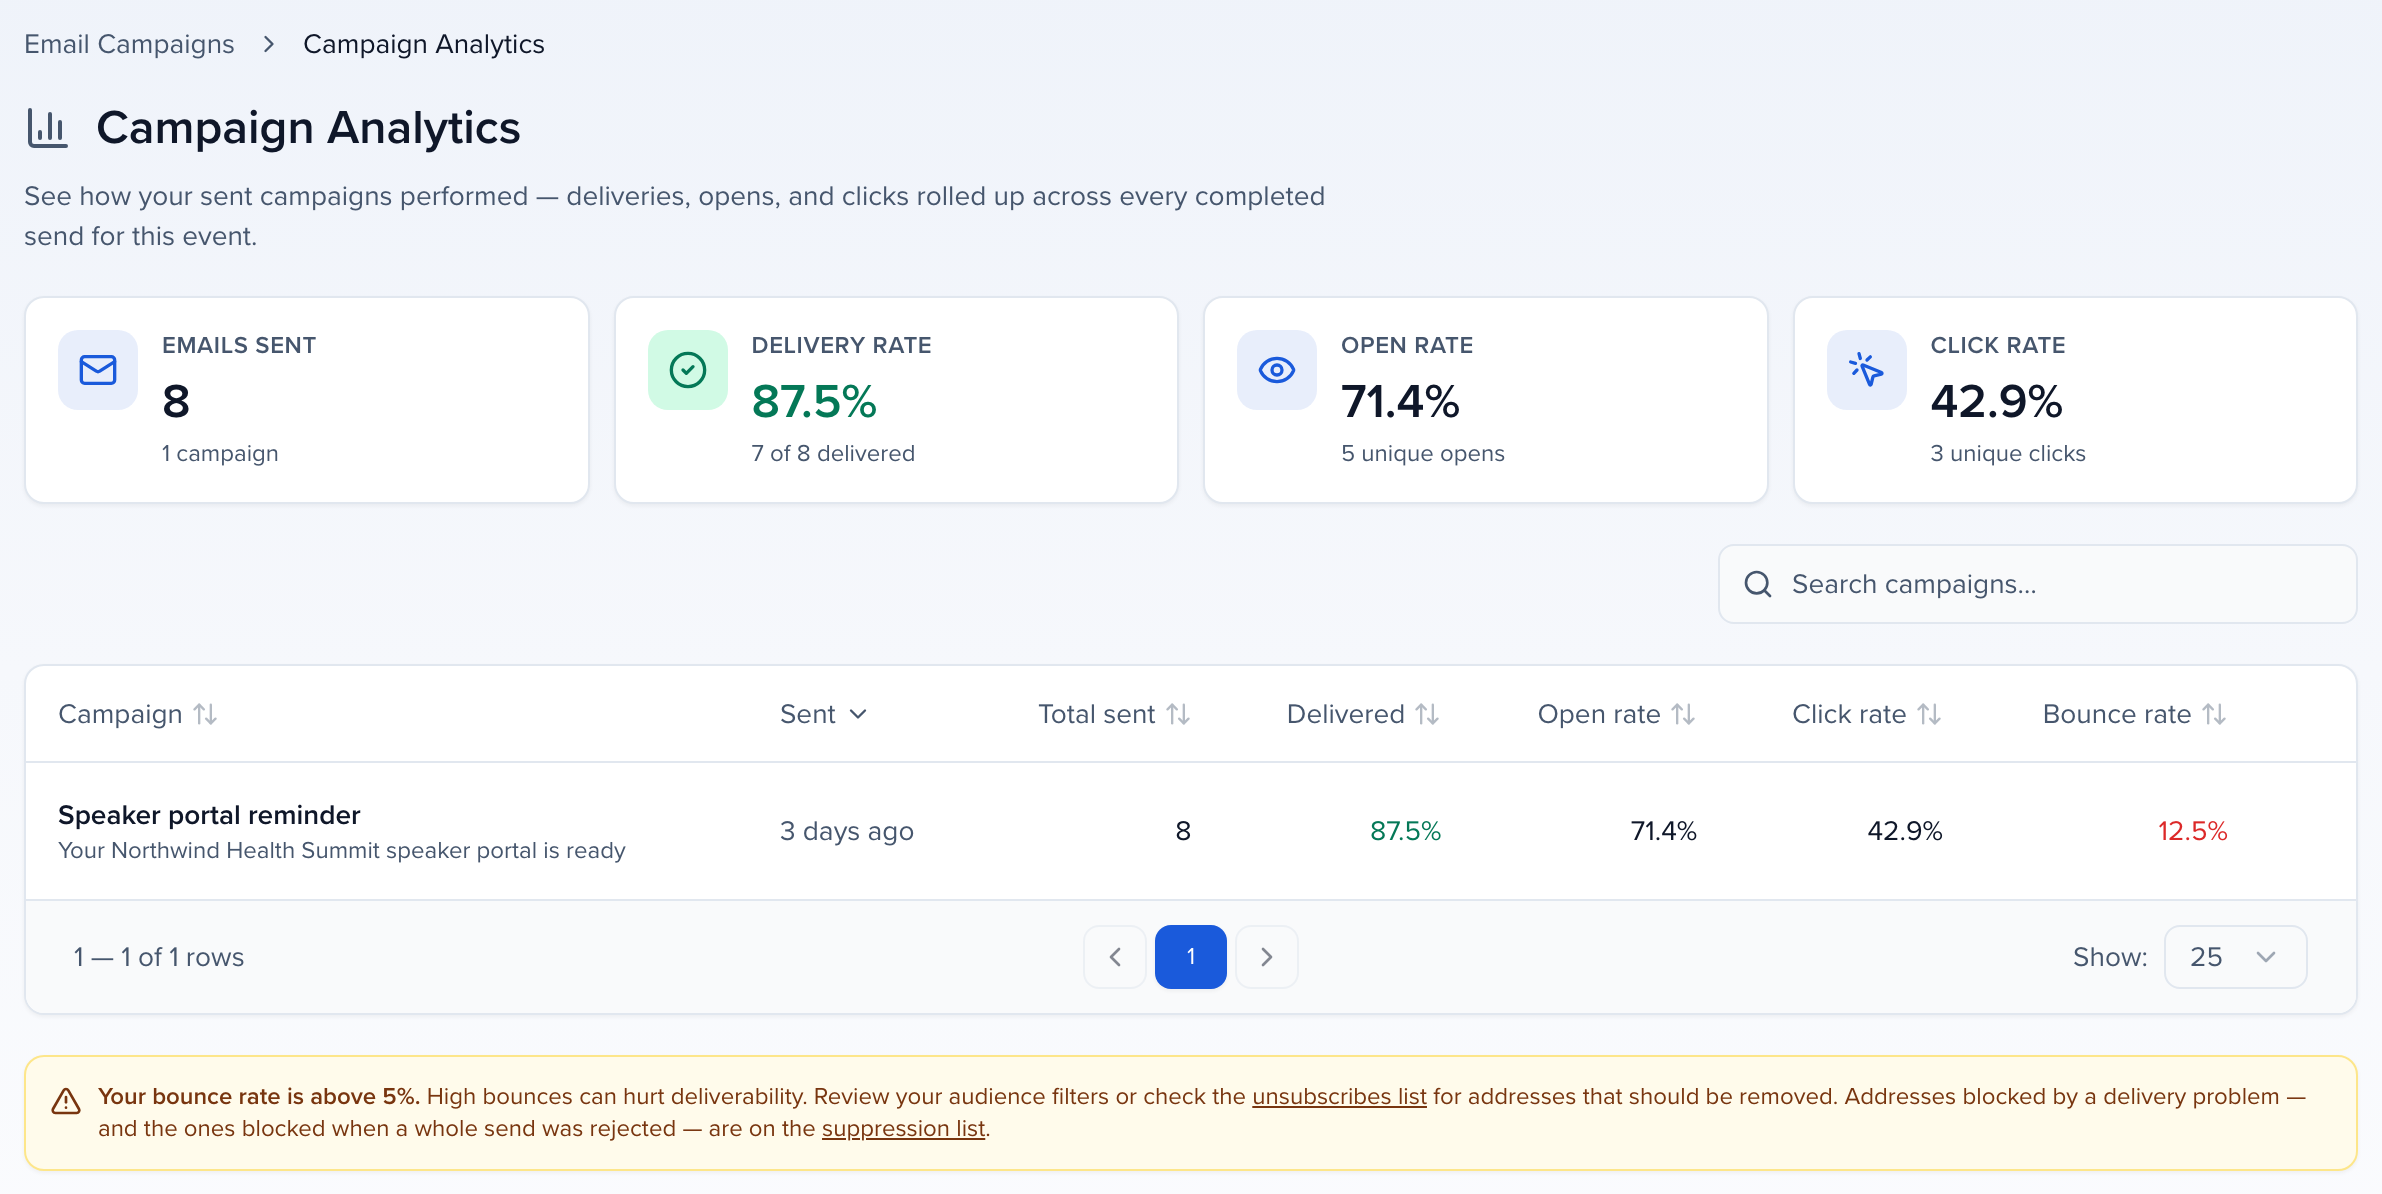
Key metrics include:
- Open Rate: Percentage of recipients who opened the email
- Click Rate: Percentage who clicked at least one link
- Bounce Rate: Emails that could not be delivered
- Unsubscribe Rate: Recipients who opted out
- Total Sent: Number of emails delivered
For deeper analysis, build a custom email report in custom reports.
History
Section titled “History”Every campaign run is logged under History → Emails: one row per campaign in Email Campaigns, and one row per recipient with a delivery status in Sent Emails.
Unsubscribes
Section titled “Unsubscribes”Settings → Unsubscribes lists contacts who opted out through the unsubscribe link. They will not receive future campaigns from this event even when they match the recipient filters. This is a separate list from the suppression list, which holds addresses that bounced or failed.
Permissions & access
Section titled “Permissions & access”Email Campaigns access is controlled at the event level. Go to Event Team → Permissions, select a role, and configure under Emails:
- Can view email campaigns
- Can create email campaigns
- Can send email campaigns
- Can manage email templates
- Can manage email themes
FAQ & troubleshooting
Section titled “FAQ & troubleshooting”My merge tags are showing as placeholder text instead of real data, what happened?
Section titled “My merge tags are showing as placeholder text instead of real data, what happened?”This usually means the audience was changed after the message was composed. Go back to Step 2, remove the broken merge tags, and reinsert them using the merge tag selector for your current audience type.
Why do I see fewer recipients than expected in Step 3?
Section titled “Why do I see fewer recipients than expected in Step 3?”The recipient count only includes contacts matching your active filters who have a valid email address. Check that filters aren’t too restrictive and that profiles include an email. Unsubscribed contacts are excluded automatically.
Can a campaign go only to people who have not finished a task or uploaded a file?
Section titled “Can a campaign go only to people who have not finished a task or uploaded a file?”Yes. On the Recipients step, open Portal assignment, pick the Task or Form, and set status to Incomplete. The live count is people who have that item and have not finished it. A Recurring campaign re-runs the filter each send, so people drop off once they complete it.
You can still start from the table instead: in CRM → All Contacts, add the task as a column, filter it to Incomplete, select the rows and click Send. That path is in track task completion.
Can I edit a campaign after I have created it?
Section titled “Can I edit a campaign after I have created it?”That depends on its status. Draft, Scheduled and Paused campaigns are editable — open the campaign from the dashboard, click Edit, make your changes and re-save. Once a send has started, the subject, message, attachments and recipients are locked permanently.
| Status | Subject, message, attachments and recipients |
|---|---|
| Draft | Editable. |
| Scheduled | Editable — but your changes go out to recipients instead of the version you previewed. Cancel the schedule first if you need time to review, then re-schedule. |
| Paused | Editable. Changes take effect the next time you resume the campaign. |
| Sending, Sent, Partially sent, Failed, Cancelled | Locked. |
A locked campaign still opens, because the wizard is also how you read back what was sent, and its internal title can still be changed. To make a real change, duplicate the campaign from the campaign list and edit the copy. The wizard says so in a banner at the top, so you find out before typing the changes rather than after.

What’s the difference between Recurring and Schedule for later?
Section titled “What’s the difference between Recurring and Schedule for later?”Schedule for later sends the campaign once at a specific time. Recurring sends on a repeating schedule — daily, weekly or monthly — and re-runs its recipient filters each time, so it reaches whoever matches on that day.
Can I pause or cancel a campaign that’s already scheduled?
Section titled “Can I pause or cancel a campaign that’s already scheduled?”Yes. In the campaign list, open the ⋯ menu on the campaign and choose Cancel schedule (a one-time send) or Cancel series (a recurring one). A campaign that is mid-send offers Cancel send.
What happens if a recipient is on the unsubscribe list?
Section titled “What happens if a recipient is on the unsubscribe list?”Unsubscribed contacts are automatically excluded from all campaigns, regardless of the filters applied in Step 3.
One contact stopped receiving campaigns while everyone else got them
Section titled “One contact stopped receiving campaigns while everyone else got them”They are probably on the suppression list, which blocks an address after mail to it fails. Open Settings → Suppression List from the campaigns page to see whether the address is there and whether it bounced or was caught by a failed send, then clear the block once the cause is fixed. See Suppression list.
A sent campaign says delivery analytics will appear once activity is reported
Section titled “A sent campaign says delivery analytics will appear once activity is reported”Nothing is wrong with the send. Delivery, open and click figures come from your email provider, which reports them back over the following minutes rather than at the moment of sending, so a campaign you just sent has no figures yet. The card tells you how many recipients it went to and waits for the rest.
Sessionboard deliberately shows that message instead of zeros, because “0 delivered” and “no report has arrived” are very different things and a row of zeros reads like a failed campaign. Refresh after a few minutes. Very old campaigns can keep showing it permanently — providers only retain activity for about a month, so once that window passes the figures are genuinely gone rather than zero.
To send a campaign’s content when a session or person field changes — to that record only — use Automations.