

Build a course in the course builder
The course builder is where a course’s lessons and quizzes are written. Every change saves to a private draft as you type; learners see nothing until you publish.
Open a course
Section titled “Open a course”Go to Courses, select a course and select Edit course. The outline of the course is on the left and the lesson you’re editing is on the right. A new course opens with a starter outline (two modules, two lessons and a quiz) that you can rename or replace.
Above the lesson:
- Edit, Preview and Phone switch between writing and seeing the lesson as a learner on a computer or a phone.
- Question bank opens your organization’s reusable questions. See Reuse questions with the question bank.
- History lists every published version.
- Publish makes your draft what learners see.
Arrange the outline
Section titled “Arrange the outline”The outline groups lessons and quizzes into modules.
- Add with Lesson, Quiz or Module under the outline.
- Drag a lesson or a module by its handle to move it. From the keyboard, focus the handle, press Space or Enter, move with the arrow keys and press Space or Enter again.
- Each row’s menu has Rename, Move up, Move down and Remove…. Removing a module keeps its lessons.
Write a lesson
Section titled “Write a lesson”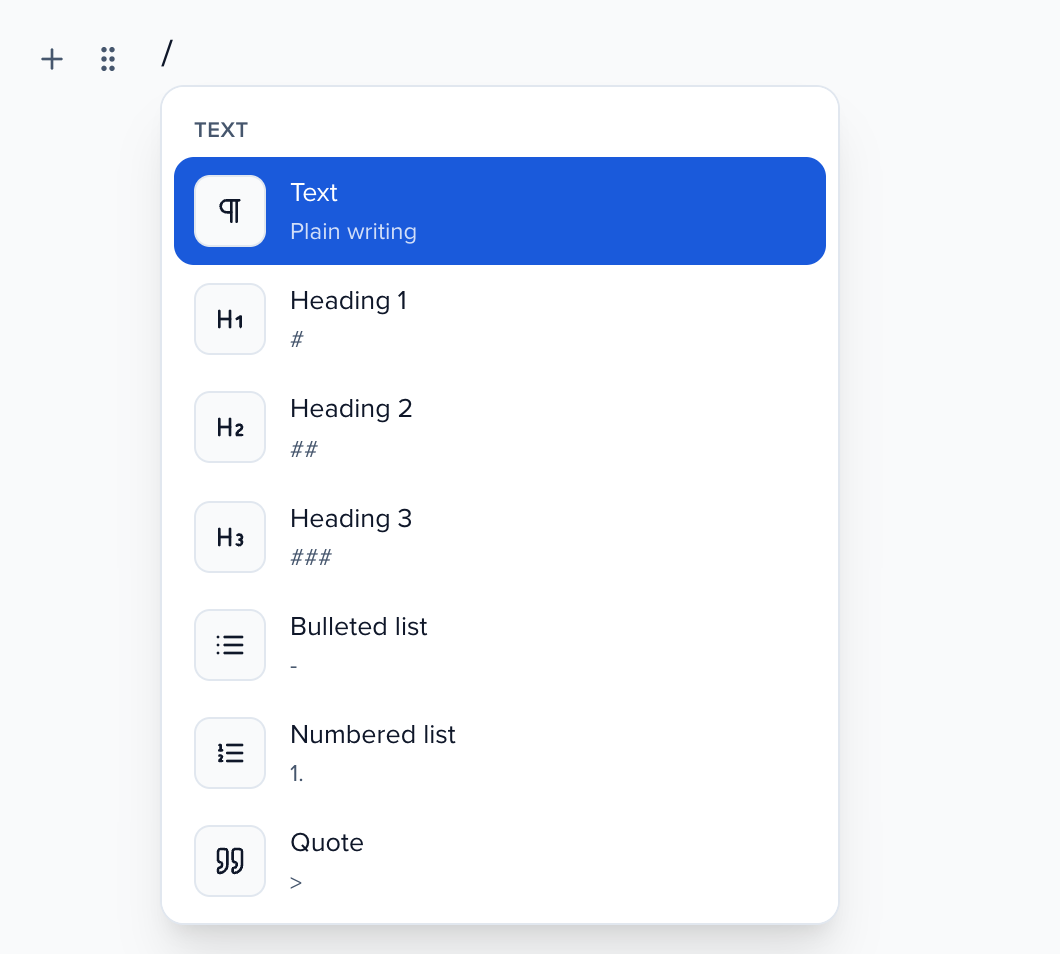
Type on the page as you would in a document. To add anything else, type / at the start of a line and pick from the menu, or keep typing to filter it. The menu has:
| Group | Blocks |
|---|---|
| Text | Text, headings, bulleted and numbered lists, quote, callout, divider, code |
| Media | Image, video, audio, file or PDF, embed, Course package (SCORM, xAPI or cmi5: see Play SCORM, xAPI and cmi5 courses) |
| Layout | Accordion, tabs |
| Interactive | Flashcards, Continue button, labeled graphic, process, timeline, sorting activity (see Interactive blocks) and Scenario (see Build a branching scenario) |
| Questions | Every question type, and Questions from the bank on a quiz |
Select text to bold it, italicize it, add a link, or turn its block into a heading or quote. Markdown shortcuts work too: # for a heading, - for a list, 1. for a numbered list, > for a quote and three backticks for code. Paste from Google Docs or Word and the headings, lists, bold and links come with it.
Each block has a handle on its left. Drag it to move the block, or open its menu to duplicate, move, turn into another kind of block or delete it. The keyboard icon above the lesson lists the shortcuts.
Images, files and embeds
Section titled “Images, files and embeds”Drop or paste an image straight onto the page (JPG, PNG, WebP or GIF, up to 15 MB). Fill in its Description for screen readers: publishing asks for one, because learners who can’t see the image hear it instead.
File or PDF lets learners open or download a document. Embed shows a page from Google Docs, Slides and Forms, Figma, Miro, Canva, Loom, YouTube, Vimeo, H5P, Typeform and other supported tools.
A video comes from your library (Choose from your library) or a YouTube, Vimeo or Loom link. Tick Learners must watch this to finish the lesson to make watching count: the player measures it, and it counts toward credit. One video per lesson can be required. Under a required video, the editor shows the course’s Minimum watched before they can continue (Off unless you set it); select it to change it, as described below.
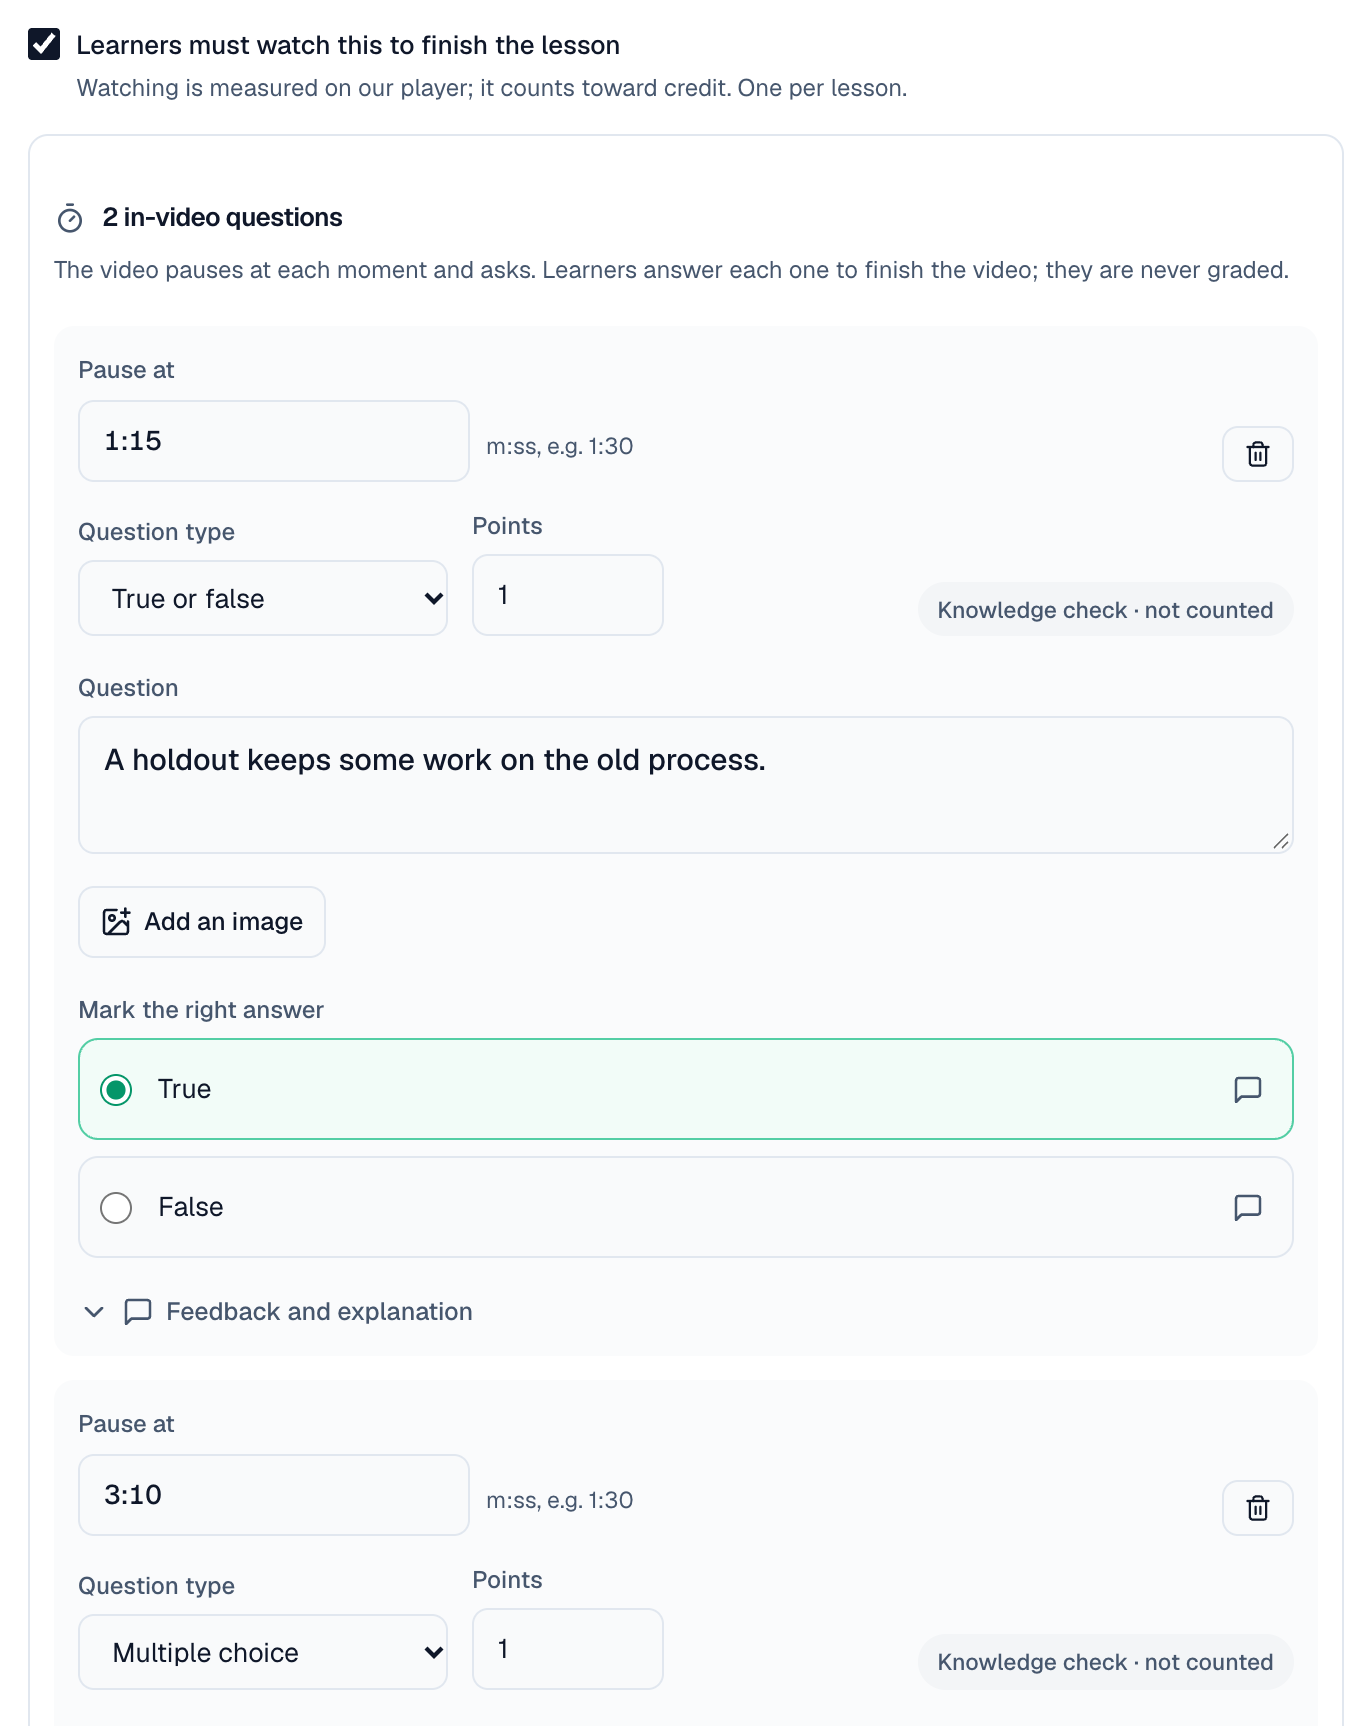
On a video learners must watch, Add an in-video question adds a question the video pauses on. Set Pause at in minutes and seconds (1:30) and write the question as you would anywhere else. Learners answer each one to finish the video; in-video questions are never graded.
Require watching before completion
Section titled “Require watching before completion”By default, learners can mark a video done with I watched this whenever they choose. To make them actually watch it first, open the course from Courses and select Off next to Watch to finish. Tick Require watching before completion, set Minimum watched (80% unless you change it, anything from 10 to 100) and select Save.
From then on a learner can finish a video only after playing at least that much of it. Sessionboard counts the seconds they actually played: skipping ahead doesn’t count, and watching the same minute twice counts once. Until they reach it, the page shows Watch at least 80% of this video to finish it with how far they are.
The setting covers every video in the course, except a step marked attestation-only (I watched this alone finishes it) and an embedded video or a link that Sessionboard can’t follow. It is separate from the share learners must watch to claim credit: see Credits and certificates.
Continue buttons
Section titled “Continue buttons”A Continue button hides everything below it until the learner presses it. Choose Only after they answer the questions above to make them try the knowledge checks first.
Preview as a learner
Section titled “Preview as a learner”Select Preview or Phone. The lesson looks the way learners will see it, and you can answer its knowledge checks to see the feedback they get. Your answers are not saved.
Working with others
Section titled “Working with others”Teammates and Ask can edit the same course while you have it open. Their changes appear in your outline within a few seconds, and a lesson someone else changed reloads on its own when you have nothing unsaved. If you were both typing in the same lesson, you see Load their version and Keep mine.
The course’s page
Section titled “The course’s page”Every course gets a page on your Learning Site that visitors see before they enrol: a cover, a description, What you’ll learn, the outline, the length, the price and the credit. Open the course from Courses to set it up under Course page.
- Cover: a frame from the course’s first video, or your Brand Kit image if the course has no video.
- Description: until you write one, the box holds a draft taken from your first page. Visitors don’t see the draft until you select Use this description or save your own.
- What you’ll learn: your page titles, quizzes left out. Rename a page to change it.
Publish
Section titled “Publish”Select Publish. If something would stop learners from finishing (a question with no right answer, an image with no description, a required video with nothing to play), the dialog lists each one with the lesson it’s on. Fix them and publish again.
Publishing keeps learners’ progress: anyone who already finished the course stays finished. A course that is still a draft keeps your changes until you publish the course from Courses.