
This guide only applies to organizations with Speaker CRM enabled.
Have questions or want to receive pricing for the Speaker CRM? Contact support@sessionboard.com.
In this article:
- What is the Pipeline?
- How the Pipeline relates to Interest Forms
- Accessing the Pipeline
- Default stages and behavior types
- Enrolling prospects (automatic and manual)
- Working a card: stage moves, history, activity, reports
- Managing pipeline stages
- Views and tabs
- Assigning a prospect to an event
What is the Pipeline?
The Pipeline is a capability within Speaker CRM that lets you track and move prospective speakers through your sourcing workflow, from the moment they're identified to the point they're confirmed for an event (or set aside for future programming).
It's a kanban-style board where each column is a stage in your workflow, and each card is a prospect. Cards can come in automatically from Interest Form submissions or be added manually by your team.
Key benefits
- Centralized sourcing: All prospects across all sources live in one workflow
- Stage-based progression: Move prospects through clear, defined steps
- Drag-and-drop: Advance or move prospects between stages with a simple gesture
- Per-card context: Every prospect carries their source, stage history, activity log, and team notes
- Customizable stages: Rename system stages or add your own to match how your team actually works
How the Pipeline relates to Interest Forms
The Pipeline and Interest Forms work together as the entry and management surfaces of Speaker CRM:
- Interest Forms: How prospects come into the CRM. Every submission to a published Interest Form is automatically created as a card in the Pipeline.
- Pipeline: Where your team works with prospects. Once a card exists in the Pipeline, you can advance it through stages, capture research, leave notes, and ultimately assign it to an event.
You don't need an Interest Form to use the Pipeline; you can manually enroll any speaker contact at any time using the Enroll button
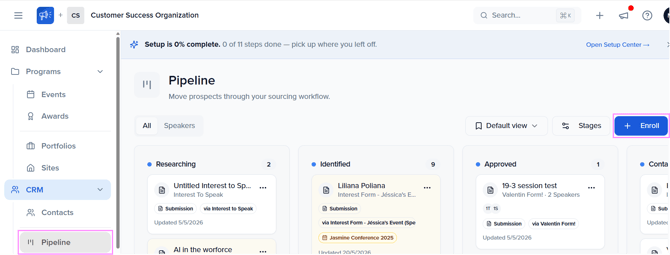
Accessing the Pipeline
Navigate to your Organization Dashboard > CRM > Pipeline in the left sidebar.
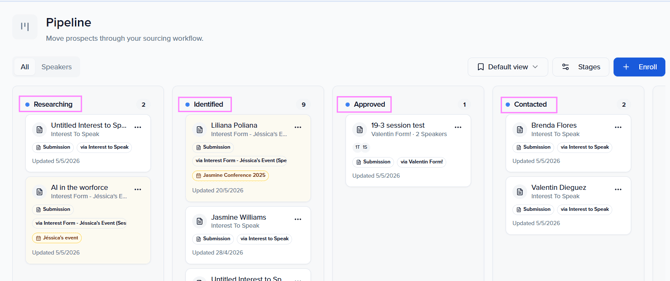
You'll see a kanban board with all your stages displayed as columns and prospect cards arranged within each stage.
The header includes:
- Tabs — All / Speakers
- Saved views — Switch between, create, or manage filtered views (default starts on "Default view")
- Stages — Open the Manage pipeline stages modal
- + Enroll — Add a new prospect manually
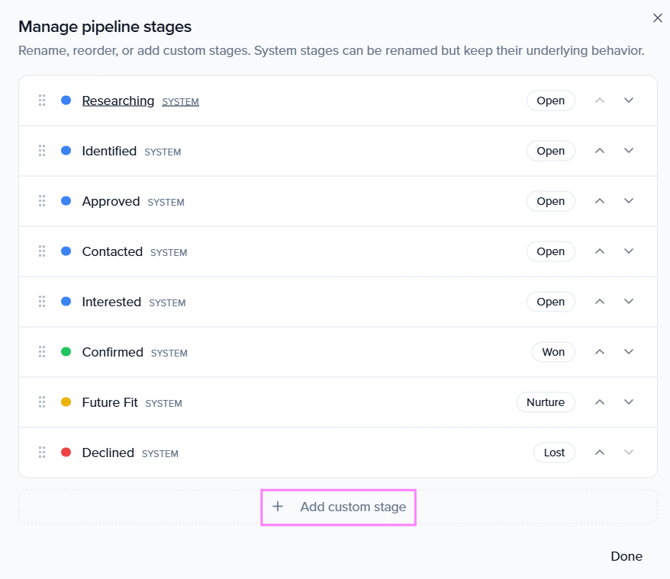
Default stages and behavior types
The Pipeline ships with 8 system stages, each with an underlying behavior type. The behavior type controls how the stage is treated for reporting and progression. You can rename a system stage, but its underlying behavior stays the same.
- Open — Prospect is actively being worked through the sourcing process
- Won — Prospect has been confirmed (typically the final positive outcome)
- Nurture — Prospect is a fit for the future, parked for later consideration
- Lost — Prospect declined or is otherwise not moving forward
| Stage | Behavior type |
|---|---|
| Researching | Open |
| Identified | Open |
| Approved | Open |
| Contacted | Open |
| Interested | Open |
| Confirmed | Won |
| Future Fit | Nurture |
| Declined | Lost |
Enrolling prospects
There are two ways for a prospect to land in the Pipeline.
Automatic enrollment via Interest Forms
When a speaker submits an Interest Form, an entry is automatically created in the Pipeline (Identified stage by default), tagged with the form they came through (e.g., Submission · via Session Submission Form). For more on Interest Forms, see Speaker CRM: Interest Forms.
Manual enrollment
Click + Enroll in the top right corner of the Pipeline page. This opens the Enroll in pipeline modal:
- Speaker: Select the type of prospect (Speaker is the default).
- Search speakers:Type a name or email to find an existing contact in your Speaker CRM.
- Starting stage: Choose which stage the prospect lands in. Defaults to Researching.
- Fit & rationale: Optional, but useful later:
- Score (0–100) — How strong a fit this prospect is (0 = weak, 100 = perfect).
- Rationale — A short note (1–3 sentences, markdown OK) teammates can read when triaging the prospect.
Click Enroll to add the prospect to the Pipeline.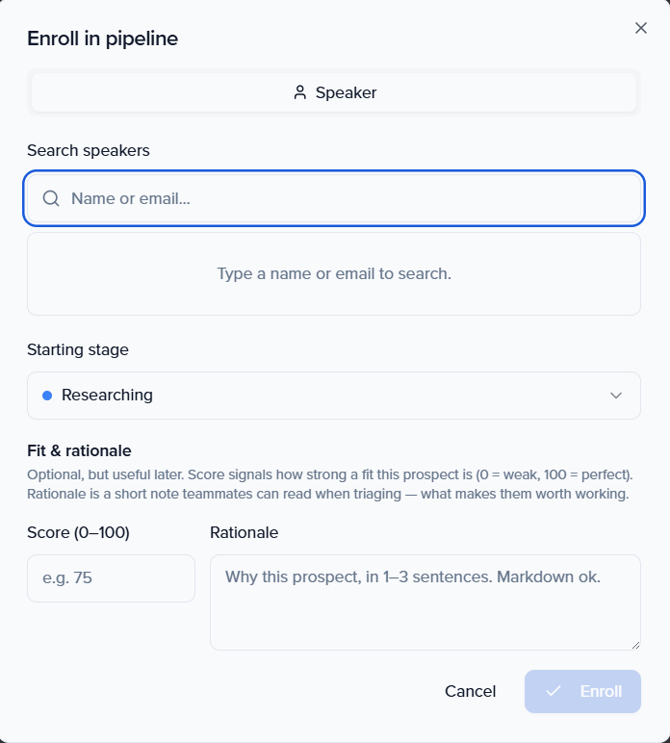
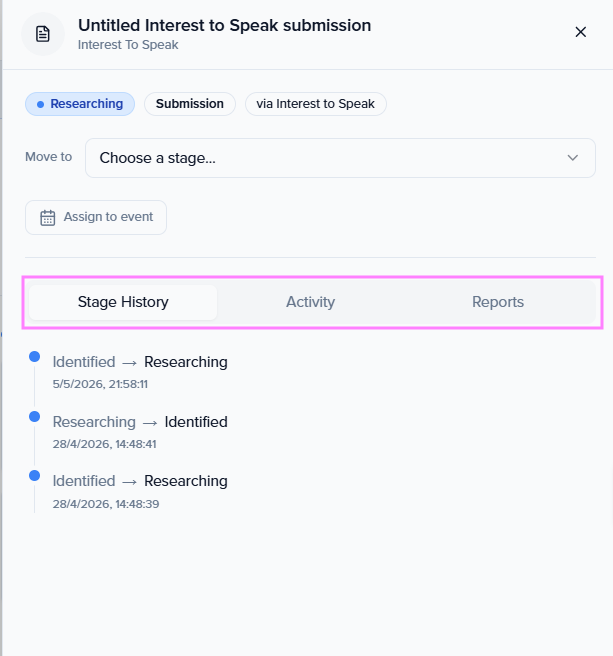
Working a card
Click any card to open its detail panel. The panel includes:
Header
- Name and source of the prospect (e.g., the Interest Form they submitted from)
- Status pills: Current stage, prospect type (e.g., Submission), and the form they came in from
Quick actions
- Move to: Dropdown to advance the prospect to any other stage
- Assign to event: Connect this prospect to a specific event in your organization
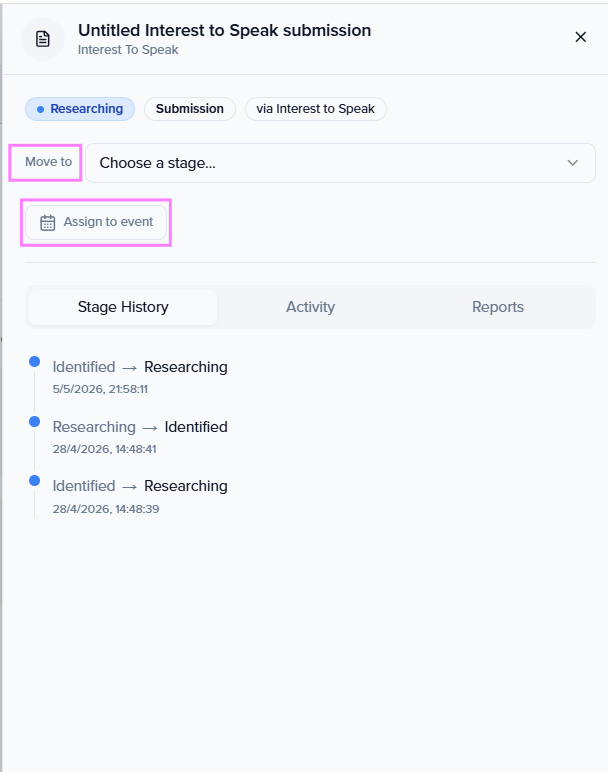
Tabs
- Stage History: Chronological log of every stage transition this prospect has gone through, with timestamps
- Activity: Full activity feed for this card with filters:
- User: Actions taken by your team
- Agent: Actions taken by automated agents
- System: Automated system-level events
- Rule: Events triggered by configured rules
- Notes: Inside the Activity tab, you can add internal notes to capture context for teammates without affecting the prospect's status
- Reports: Scouting Reports authored for this prospect (manually via + New, or in the future automatically via Scout)
Managing pipeline stages
Click Stages in the top right of the Pipeline page to open the Manage pipeline stages modal.

From here you can:
- Rename a system stage: System stages can be renamed but keep their underlying behavior type (Open / Won / Nurture / Lost).
- Reorder stages: Drag the handle on the left of each stage to change its position in the workflow.
- Add a custom stage: Click + Add custom stage at the bottom to insert a new stage that's unique to your workflow.
- Click Done when finished: changes apply to the Pipeline immediately.
Views and tabs
Tabs
- All: Every prospect in the Pipeline, regardless of type
- Speakers: Only prospects of type Speaker
Saved views
Use the Saved views dropdown to switch between, create, and manage filtered views of the Pipeline. The default view loads automatically when you open the page; you can create new views to slice the Pipeline by stage, form source, score, event interest, or any combination that fits your team's workflow.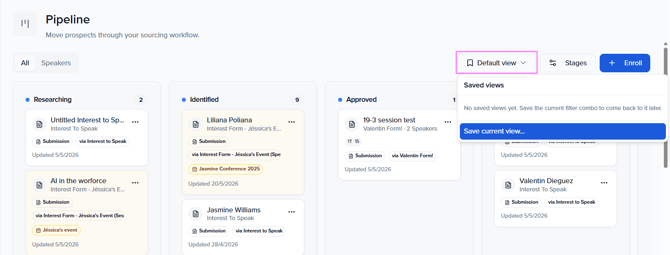
Assigning a prospect to an event
When a prospect is ready to be programmed for a specific event:
- Open the prospect's card by clicking it in the Pipeline.
- Click Assign to event.
- Select the target event.
- The prospect is linked to that event, where you can continue your normal speaker workflow (sessions, agreements, portal access, etc.).
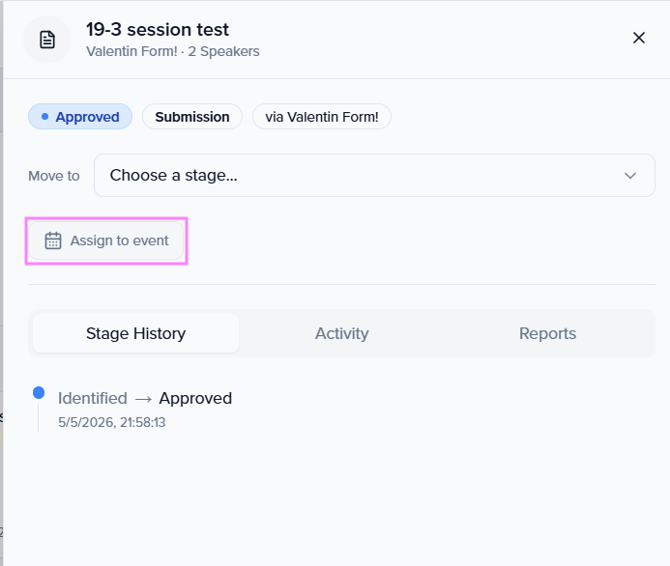
Note: This is how prospects exit the Pipeline and become part of an event's working set.
Key Things to Know
-
- Auto-enrolled submissions: Every new submission to an Interest Form creates a card in the Pipeline (Identified stage by default).
- Manual enrollment: Use the Enroll button to add prospects who didn't come through a form.
- System vs. custom stages: System stages can be renamed but their underlying behavior type (Open / Won / Nurture / Lost) cannot be changed. Custom stages give you full flexibility for team-specific workflow needs.
- Drag-and-drop: Cards can be moved between stages by dragging, or via the Move to dropdown inside the card detail panel.
- Activity log: Every action on a card — by users, agents, the system, or rules — is logged in the Activity tab.
- Notes: Internal notes can be added inside a card's Activity tab for team coordination without affecting the prospect's status.
- Exit through events: A prospect remains "in the pipeline" until they are assigned to an event (Assign to event) or moved into Confirmed, Future Fit, or Declined.