
- How evaluations work in Sessions 2.0
- The evaluation plan wizard
- Step 1: Overview
- Step 2: Rounds
- → Configuring scorecards
- → Reviewer View Configuration
- Step 3: Evaluators
- Step 4: Assignments
- Managing your evaluation plans
- Best practices
- Next steps
How evaluations work in Sessions 2.0
Round-based evaluations replace the single-stage evaluation model from the previous version. Instead of one review pass, you can build a multi-stage process that mirrors how peer review actually works, for example: Initial Screen → Peer Review → Committee Decision.
Each round has its own timeline, scorecard, anonymization settings, and evaluator pool. This means your triage committee can use a simple pass/fail scorecard in Round 1, while your expert reviewers use a detailed rubric with multiple criteria in Round 2.
Key changes from the previous evaluation model:
- Multiple rounds per plan: Chain as many review stages as your program requires.
- Scorecards replace rigid rubrics: Each round has its own scorecard with flexible question types (ratings, text, dropdowns, file uploads).
- Reviewer View Configuration: Control which submission fields evaluators can see, filter by, and view on submission cards.
- Flexible assignment logic: Choose from four distribution modes: All to All, Per Submission, Per Reviewer, or Individual Reviewer.
- Real-time admin visibility: See all evaluators' progress across all rounds from a single dashboard. The Summary page shows Started / In progress / Complete metrics for Assignments and Evaluators.
- Funnel vs. Parallel rounds: Choose whether submissions must be promoted between rounds (Funnel) or reviewed across rounds simultaneously (Parallel).
- Points vs. Percentage scoring: Plans can be measured by total accumulated points or by percentage out of 100%.
The evaluation plan wizard
When you create or edit an evaluation plan, Sessionboard opens a 4-step wizard with a sidebar navigation:
- Overview, Name and basics (plan name, instructions, review period, and global toggles).
- Rounds, Review rounds (configure round names, types, voting, and scorecards).
- Evaluators, Select users who can evaluate (choose from existing event users).
- Assignments, Who evaluates what (filter sessions and set assignment logic).
You can navigate between steps using the sidebar or the Continue → and ← Back buttons at the bottom. Your progress is saved automatically as you work.
To create a new plan, navigate to Program → Evaluations in the left-hand sidebar and click Evaluation Plans → + Add Plan. The wizard opens to the Overview step.

Step 1: Overview
The Overview step (labeled "Name and basics" in the sidebar) is where you configure the plan's core settings.
Name and Instructions
- Name: Give the plan a descriptive name (e.g., "My Evaluation Plan").
- Set Plan as Open: Toggle this on to open the evaluation plan and begin letting your evaluators review submissions. Leave it off while you are still configuring.
- Instructions: A rich-text editor for guidance that applies to your default round (Round 1). Use formatting, links, and lists to clearly describe the evaluation criteria and expectations.

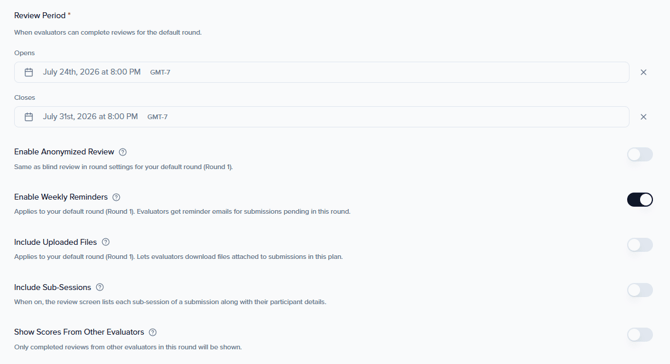
Review Period
Set the window during which evaluators can complete reviews for the default round:
- Opens: The date evaluators can begin submitting reviews.
- Closes: The deadline after which evaluators can no longer submit or modify their reviews.
Additional settings
- Enable Anonymized Review: Hides submitter and participant identity from evaluators (applies to Round 1).
- Enable Weekly Reminders: Evaluators get reminder emails for sessions pending in this round (applies to Round 1).
- Include Uploaded Files: Lets evaluators download files attached to sessions in this plan (applies to Round 1).
- Include Sub-Sessions: When enabled, sub-sessions are included in the evaluation scope alongside their parent sessions.
- Show Scores From Other Evaluators: When enabled, evaluators can see other reviewers' scores for a submission while completing their own review.
Scoring Method
Configure how the plan measures overall evaluator scores. This is set in the Overview step under Scoring method:
- Percentage-based: Normalizes scores to a percentage out of 100%, regardless of the number of scorecard questions or their individual point values.
- Points-based: Displays scores as total accumulated points across all scorecard questions.
💡 Tip: Percentage mode makes it easier to compare submissions across rounds that use different scorecards with different total possible points.
💡 Tip: Keep Set Plan as Open toggled off until you have finished configuring all four steps. Once you open the plan, evaluators with assignments can begin reviewing immediately.
Step 2: Rounds
The Rounds step (labeled "Review rounds" in the sidebar) is where you configure review rounds (similar to award program rounds). A default Round 1 is created automatically. Click + Add round to add additional stages.
Basic Information
- Round Name: A descriptive label (e.g., "Round 1," "Peer Review," "Final Selection").
- Round Type: Select the round type (e.g., "Review Only"). This setting cannot be changed after creation.
Voting
- Reviewer Type: Define who can vote in this round (e.g., "Reviewers," where only selected evaluators can vote).
- Voting Type: Choose the voting method (e.g., "Score Voting").

Round Mode: Funnel vs. Parallel
When configuring your evaluation plan, you can now choose how submissions move between rounds:
- Funnel (default): Submissions must be explicitly promoted from one round to the next. Only promoted submissions appear in subsequent rounds. This is the traditional peer-review model where you triage first and advance only qualifying submissions.
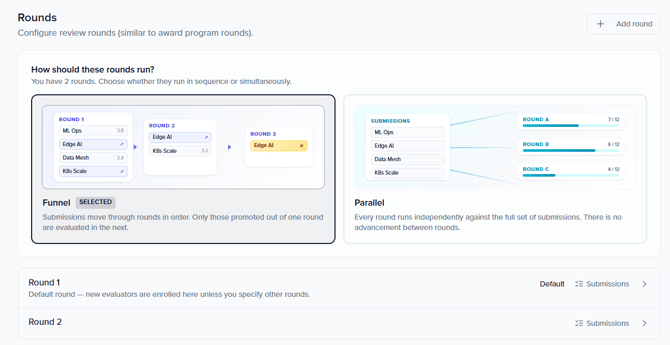
⚠️ Note: Choose your round mode before creating rounds. Confirm with the product team whether this setting can be changed after plan creation.
⚠️ Note: Round Type cannot be changed once the round is created. Make sure you select the correct type before proceeding.
💡 Tip: You can add as many rounds as you need. A typical 3-stage process might look like:
-
Round 1: Triage (quick pass/fail by committee chairs)
-
Round 2: Peer Review (detailed scoring by subject-matter experts)
-
Round 3: Final Selection (committee vote on top-scored submissions)
Configuring scorecards
Each round has its own Scorecard, the set of questions your evaluators answer when reviewing a submission. The scorecard is configured within the round settings.
Click + Add Question to choose from:
Scoring Questions
- 1-3 Scale: Rate on a 1 to 3 scale.
- 1-5 Scale: Rate on a 1 to 5 scale.
- 1-10 Scale: Rate on a 1 to 10 scale.
- Numeric Score: Custom min/max input for non-standard scoring ranges.
- Custom Dropdown: Custom options with point values (e.g., "Accept = 3, Revise = 2, Reject = 1").
Input Fields
- Free Text: Open comments and written feedback.
- File Upload: Document upload (e.g., marked-up manuscripts or review forms).
Layout
- Separator: Section divider to organize longer scorecards visually.

Note: Each round can have a completely different scorecard. Your triage round might use a single 1-3 rating question, while your full peer review round might include three rating scales, a free-text justification field, and a recommendation dropdown.
Reviewer View Configuration
The Reviewer View Configuration section controls what evaluators see when reviewing submissions. It has three sub-sections:
Visible Fields to Reviewers
Choose which submission fields evaluators can see during their review. All fields are visible by default. Uncheck any field to hide it from reviewers.
Each field shows its type (e.g., Text, Wysiwyg, Dropdown). Common fields include ID, Type, Title, Description, Format, and Tags.

Filterable Fields for Reviewers
Choose which fields reviewers can filter submissions by. Only checkbox, dropdown (single or multi-select), and multi-select fields are eligible.
The category is always included and cannot be removed. You can optionally enable filtering by Format, Tags, Level, Language, Status, Submitter, Track, Location, and other dropdown-type fields.

Submission Card Fields
Customize what information appears on the submission card in the evaluator's dashboard. Title is always the card heading and cannot be removed. You can add up to 3 optional fields below the title, displayed in the order you set.
See Add a field to choose from available fields like ID, Type, Description, Format, Tags, Level, Language, Status, and Submitter.

Tip: Use Submission Card Fields to help evaluators quickly identify submissions without opening each one. Adding Format and Track to the card lets reviewers see at a glance what type of session they are about to evaluate.
Visible Participant Fields to Reviewers
A fourth sub-section — Visible Participant Fields to Reviewers — lets you choose which participant/speaker fields are visible to evaluators when reviewing a submission. Use this to control how much biographical or identifying information reviewers see about the people associated with each session.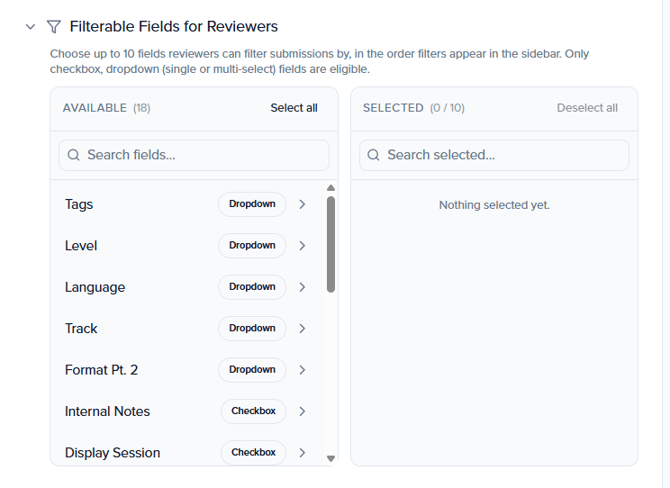
Step 3: Evaluators
The Evaluators step (labeled "Select users who can evaluate" in the sidebar) is where you choose who will review submissions for this plan.
Evaluators must already be users on this event. To add an evaluator:
- Use the Search by name or email... bar to find the user.
- Click on their name to select them.
At the top of the page, the Rounds section shows which rounds new evaluators are enrolled in. New evaluators are enrolled in the rounds you select here. Check or uncheck rounds to control which review stages each evaluator participates in.

Invite email toggle: A toggle labeled "Send invite email to new evaluators" controls whether evaluators added from this point on receive an invitation email. Note that existing evaluators are never re-emailed through this toggle.
Resending invites to existing evaluators: To resend an invite to an evaluator who has already been added, go to the plan's deep-dive view → Evaluators tab, click the ⋯ menu next to the evaluator's name, and select Resend invite email.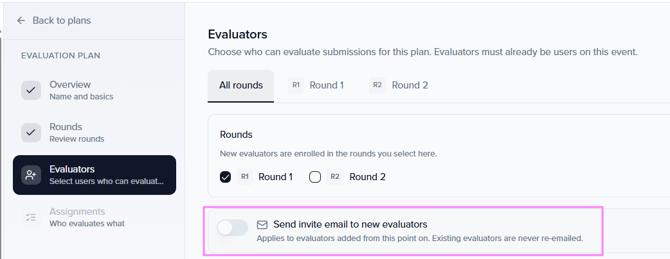
Note: Evaluators must already exist as users on this event. If you need to add someone who is not yet a user, add them to the event first, then return to this step to select them as an evaluator.
Step 4: Assignments
The Assignments step has been redesigned with a simplified Assignment Wizard UI. The flow is the same — define a rule, filter sessions, choose logic, preview, confirm — but the interface is more streamlined and easier to navigate.
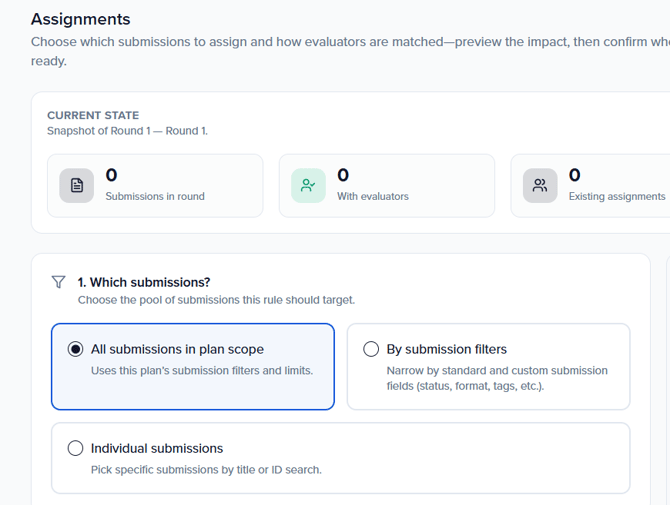
The Assignments step (labeled "Who evaluates what" in the sidebar) is where you define which submissions each evaluator reviews. The wizard is configured per round — a round selector at the top right (e.g., "Round 1") shows which round you are configuring. The left panel shows a snapshot of the current state; the right panel shows a live Impact Preview as you make selections.
The Assignments step has been redesigned with a simplified, three-stage wizard UI. The flow replaces the previous multi-step preview flow and is more streamlined.
Stage 1: Which submissions?
Choose the pool of submissions this rule should target:
- All submissions in plan scope: Uses this plan's submission filters and limits.
- By submission filters: Narrow by standard and custom submission fields (status, format, tags, etc.). Use this to route specific types of submissions to the most relevant evaluators.
- Individual submissions: Pick specific submissions by title or ID search.
Stage 2: How should they be distributed?
Choose the distribution strategy — this controls how submissions map to evaluators:
- All to All: Every reviewer receives all filtered submissions.
- Individual Reviewer: Assign to one or more specific reviewers you select.
Optionally, set Workload constraints to cap how work is spread:
- Reviewers per submission: Maximum number of reviewers assigned to each submission.
- Max submissions per evaluator: Maximum number of submissions assigned to each evaluator.
When both workload constraints are off, each evaluator is assigned to every submission in scope.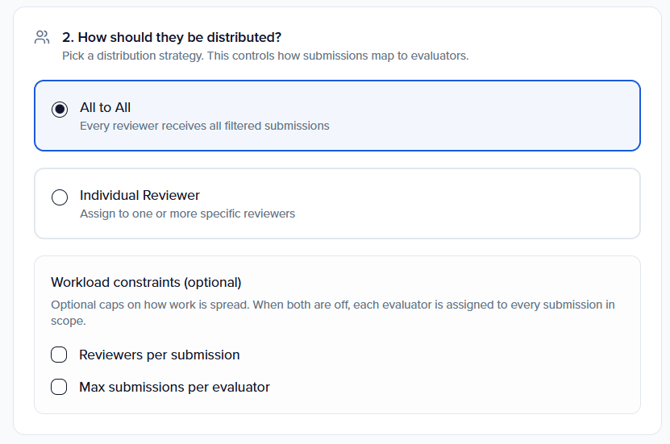
Stage 3: Review and apply
The Impact Preview panel on the right updates in real time and shows:
- Filtered submissions
- Evaluators in this round
- New Assignments
Before applying, choose how this rule interacts with existing assignments (When applying):
- Add to existing: Adds new pairs only; never removes anything.
- Replace not-yet-reviewed: Removes in-scope assignments that don't match this rule and have no review activity yet.
- Replace all (including reviewed): Removes all non-matching in-scope assignments, even if a reviewer has already started.
Click the Assign [X] submissions to [Y] evaluators button to apply. When finished, click Done to exit the wizard.
⚠️ Important: Assignments save immediately when you click the Assign button. The Replace all (including reviewed) option will remove assignments even if evaluators have already started reviewing — use with caution.
Managing your evaluation plans
From the Evaluation Plans list, you can perform the following actions on any plan:
- Review: If you're an admin & a reviewer, you'll be able to review.
- Edit: Re-open the plan wizard to modify settings, rounds, evaluators, and assignments.
- Open / Close: Control whether evaluators can currently access and submit reviews.
- Export Results: Download evaluation data in two formats: Individual Grades Report (every evaluator's responses per submission) or Cumulative Grades Report (aggregated scores per submission).
- Duplicate: Create a copy of the plan with the same configuration, useful for running similar evaluations across multiple tracks or events.
- Notify: Notify evaluators.
- Delete: Permanently remove the plan and all associated data.
Deep-Dive View
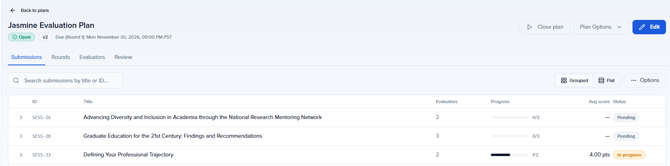
Clicking on an evaluation plan now opens a dedicated deep-dive view with four tabs:
- Submissions: See all submissions in the plan with their evaluation status (ID, Title, Evaluators, Progress, Avg score, Status). Supports Grouped and Flat views.
- Rounds: View submissions grouped by round. Select submissions and use the Bulk action dropdown to Promote to next round or Demote to previous round.
- Evaluators: Monitor individual evaluator progress across all rounds. Use the ⋯ menu next to each evaluator to resend the invite email, Edit assignments, or Remove from plan.
- Review: Access the review interface directly from the plan management view (available when you are also an evaluator on the plan).
Summary Page Metrics
The evaluation summary page (Program → Evaluations → Summary tab) now shows enhanced metrics. Metrics are shown separately for Assignments and Evaluators:
- Started: Assignments/evaluators that have begun but not completed all reviews.
- In progress: Assignments/evaluators actively in the middle of a review.
- Complete: Finished evaluations.
Additional metrics on the Summary page include: Total Evaluations, Evaluated Submissions, number of Evaluation Plans, and number of Evaluators. Average Submission Score By Plan and Top 10 Submissions are also available.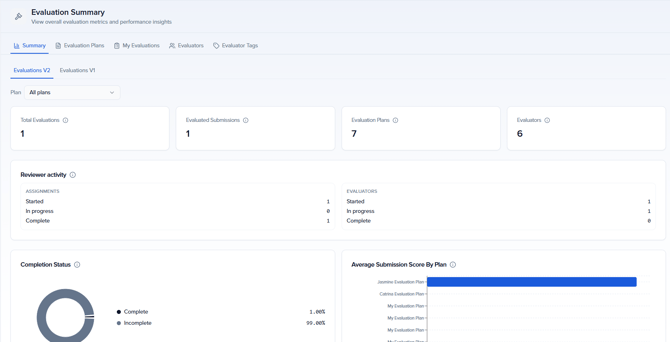
Best practices
- Start simple, add complexity: If this is your first round-based evaluation, start with a single round. You can always add more rounds in future programs.
- Choose your round mode intentionally: Use Funnel when you want to triage submissions before advancing them. Use Parallel when all submissions should be reviewed at every stage simultaneously.
- Use anonymization strategically: Enable anonymized review for peer evaluation rounds to reduce bias, but consider disabling it for committee decision rounds where context matters.
- Set clear instructions: Use the rich-text Instructions field on the Overview step to clearly describe evaluation criteria, scoring guidelines, and expectations.
- Customize the reviewer view: Hide irrelevant submission fields and configure card fields so evaluators can quickly scan and prioritize their assigned sessions.
- Enable weekly reminders: Turn on weekly reminder emails to keep evaluators on track without manual follow-up.
- Use field filtering for targeted assignments: Take advantage of the new field filtering in the Assignment Wizard to route specific types of submissions (by language, format, level, etc.) to the most relevant evaluators.
- Preview assignments before saving: Use the Impact Preview panel to verify session counts and evaluator workload before anything goes live.
- Monitor progress via the Summary page: Use the Started / In progress / Complete metrics to spot evaluators who are behind, and follow up before your close date.
- Export early and often: Download interim reports to track trends, even before all evaluations are complete.
Next steps
With your evaluation plan configured, continue setting up your review process:
- How To Evaluate Sessions (Sessions 2.0): Share this guide with your evaluators. It walks them through accessing their assignments, reviewing submissions, and completing scorecards.
- Building Your Submission Form (Sessions 2.0): Review how submissions are collected and what fields evaluators will see during their review.
- Program Site (Sessions 2.0): Publish your forms and evaluations to a branded portal so evaluators and submitters have a single access point.