
In this article:
- Accessing Email Campaigns
- Managing Email Templates
- Managing Email Themes
- Creating a Campaign
- Merge Tags Reference
- Analytics & History
- Unsubscribe Management
- Permissions & Access
- FAQ & Troubleshooting
Accessing Email Campaigns
Email Campaigns is available at the event level. To access it, open your event, then navigate to Collect & Preview > Send from the left-hand menu.

The dashboard organizes campaigns by status:
- All: every campaign regardless of status
- Draft: campaigns in progress, not yet sent or scheduled
- Scheduled: campaigns queued for a future send
- Sending: campaigns currently in delivery
- Sent: completed campaigns
- Paused: campaigns that have been temporarily stopped
- Cancelled: campaigns that have been cancelled
Filter by Campaign name, Status, Type, Send date, or Creator.
From the Settings menu you can also reach:
- Email Templates: reusable email layouts
- Themes: visual branding for your emails
- History: a log of all email activity
- Analytics: performance metrics across campaigns
- Unsubscribe: contacts who have opted out

Managing Email Templates
Templates define the content and structure of your campaigns. Navigate to Settings → Email Templates to manage them.

Creating a Template
Click Add Template and configure:
- Template Name: internal reference name
- Sender Name & Email: the "From" display name and address
- Reply-To Address: where replies will be directed
- CC Recipients: additional recipients to copy
- Subject Line: the email subject
- Email Body: the message content (supports rich text and merge tags)
Reusing Templates Across Events
Use Copy From to import a template from another event in your organization — handy for recurring events.
Managing Email Themes
Themes control the visual styling of your campaigns. Navigate to Themes from the Email Campaigns menu.

Create, duplicate, or reuse themes across events. Customize:
- Text styling (font, size, color)
- Button appearance
- Dividers and spacing
- Social sharing buttons
- Header and footer layout
- Brand colors and logo
💡 Tip: Configure your Brand Kit in Event Settings before creating themes, your organization's logo, colors, and typography will be applied automatically.
Creating a Campaign
To create a new campaign, click Create Campaign from the Email Campaigns dashboard.

Sessionboard guides you through a five-step workflow.
Step 1: Select Your Audience Type
Select the audience type:

Individuals
Send personalized emails to individual participants: Speakers, Moderators, Authors, Attendees, or any contact type.
Companies
Send to Sponsors and Exhibitors, uniformly or customized per company.
Sessions
Target sessions and reach Speakers, Chairs, and Moderators assigned to them.
📌 Note: The available merge tags change depending on the audience type you select. If you switch audience types after composing your message, you will need to reapply your merge tags.
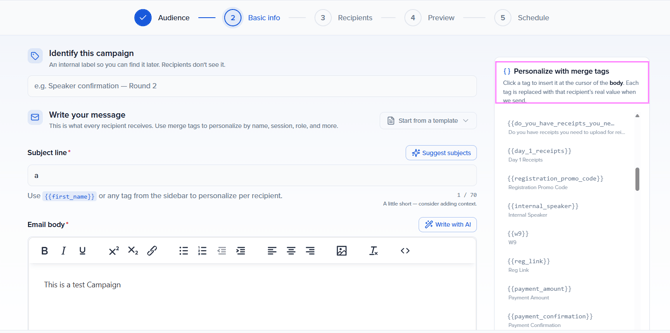
Step 2: Compose Your Message
Write your email content, including:
- Subject Line
- Email Body
- Sender Name & Address
- Reply-To Settings

Use merge tags to personalize content. See the Merge Tags Reference section below for the full list.
⚠️ Important: If you change the template module after you've started writing the message body, the current merge tags will no longer be valid. Reapply your merge tags after switching modules, available tags differ per audience type.
Step 3: Select Recipients
Define who receives the campaign. Sessionboard shows the eligible recipient count with advanced filter options.

Filter recipients by:
- Participant Role — Author, Speaker, Moderator, Panelist, etc.
- Submission Status — target based on submission progress
- Acceptance Status — filter by participation confirmation
- Session Information — target participants by session assignment
- Custom Fields — use any additional contact data for precise targeting
You can also add recipients from outside the event database when needed.
Step 4: Preview & Test
Review the campaign exactly as recipients will see it before sending.

From the preview screen you can:
- Verify layout, content, and branding
- Check merge tag rendering
- Send a test email to any address to validate the final result
Step 5: Send or Schedule
Choose your delivery method:

- Send Now: delivers the campaign immediately
- Schedule for Later: set a specific future date and time for delivery
- Recurring Campaign: set up an automated schedule that sends regularly without manual intervention (e.g. weekly reminders, follow-up sequences)
💡 Tip: Use Recurring Campaigns for ongoing touchpoints like weekly speaker reminders or regular sponsor updates.
Merge Tags Reference
Merge tags insert personalized data into your emails. Available tags vary by audience type (set in Step 1).
Individuals
- First Name
- Last Name
- Full Name
- Email Address
- Job Title
- Company Name
- Portal Link
- Custom contact fields
Companies
- Company Name
- Point of Contact Name
- Point of Contact Email
- Portal Link
Sessions
- Session Title
- Session Date & Time
- Session Room / Location
- Session Track
- Speaker Name(s)
- Portal Link
📌 Note: Changing the audience type after composing your message invalidates existing merge tags. Select your audience type before writing the body.
Analytics & History
Analytics
Analytics show campaign performance across your event.

Key metrics include:
- Open Rate: Percentage of recipients who opened the email
- Click Rate: Percentage who clicked at least one link
- Bounce Rate: Emails that could not be delivered
- Unsubscribe Rate: Recipients who opted out
- Total Sent: Number of emails delivered
For deeper analysis, use Sessionboard's Insights: AI Reports & Custom Dashboards to build custom email reports.

History
History logs all sent campaigns and email activity for your event. Review past sends, delivery details, and earlier communications.
Unsubscribe Management
The Unsubscribe section shows contacts who opted out of email communications for your event. Monitor this to maintain healthy communication and evaluate campaign relevance.
Unsubscribed contacts will not receive future campaigns from this event, even if they match the recipient filters.
Permissions & Access
Email Campaigns access is controlled at the event level.
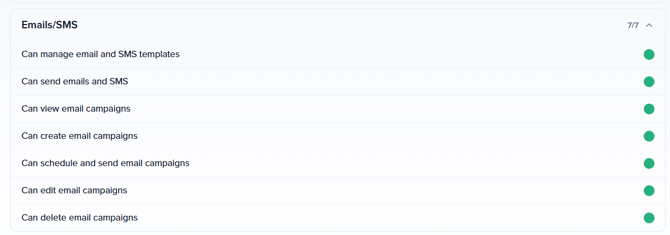
Go to Event Team → Permissions, select a role, and configure under Emails:
- Can view email campaigns
- Can create email campaigns
- Can send email campaigns
- Can manage email templates
- Can manage email themes
📌 Note: Email Campaigns is an Early Access feature. Contact support@sessionboard.com to enable it for your account.
FAQ & Troubleshooting
My merge tags are showing as placeholder text instead of real data, what happened?
This usually means the audience type was changed after the message was composed. Go back to Step 2, remove the broken merge tags, and reinsert them using the merge tag selector for your current audience type.
Why do I see fewer recipients than expected in Step 3?
The recipient count only includes contacts matching your active filters who have a valid email address. Check that filters aren't too restrictive and that profiles include an email. Unsubscribed contacts are excluded automatically.
Can I edit a scheduled campaign?
Yes. Open the campaign from the dashboard and click Edit. Make your changes and re-save. Note that if the campaign is actively sending, editing is not available until delivery is complete.
What's the difference between a Recurring Campaign and scheduling for later?
Scheduling for later sends the campaign once at a specific time. A Recurring Campaign sends automatically on a repeating schedule (daily, weekly, etc.) without manual intervention — useful for ongoing communication sequences.
Can I pause or cancel a campaign that's already scheduled?
Yes. From the campaign dashboard, click the ... menu on the campaign card and select Pause or Cancel.
What happens if a recipient is on the unsubscribe list?
Unsubscribed contacts are automatically excluded from all campaigns, regardless of the filters applied in Step 3.