Speaker CRM: Set-Up & Best Practices
This guide applies only to organizations that have the Speaker CRM enabled.
Have questions or want to receive pricing for the Speaker CRM? Contact support@sessionboard.com.
What is a CRM?
A CRM (Customer Relationship Management) system is a specialized tool designed to help event professionals manage relationships with their speakers, exhibitors, sponsors, and other stakeholders.
Benefits of a CRM
- Streamlined Communication: Keep all interactions with speakers, sponsors, and exhibitors in one place.
- Enhanced Attendee Experience: Personalize outreach and ensure event contacts receive relevant updates and recommendations.
- Data-Driven Decisions: Use insights from past events to optimize future strategies and outcomes.
- Speaker Database: View all of your event contacts in one central database. Keep track of which events they’ve participated in and add them to new events.
How to set up a CRM system
Before you can leverage your CRM within Sessionboard, we recommend completing the below four steps:
Invite team members
A CRM isn’t just a tool for one department—it’s a central hub for your entire team to collaborate, stay informed, and work more efficiently. Inviting your internal team to the CRM ensures everyone has access to the same information and can contribute to your organization’s success.Think of the different teams that should have access to the CRM:
-
- Executive Leadership Team: Monitor business performance through high-level dashboards and reports + use insights to make strategic decisions
- Marketing Team: Segment audiences for personalized campaigns
- Content Team: Track communication with speakers, sponsors, and exhibitors + Ensure historical data is up-to-date
- IT/Technical Team: Manage integrations with other tools

-
- Within your CRM, select Settings > Organization Team
- Select the orange 'Add User' button on the right side of your screen
- Provide the following details for the team member you wish to invite to your event:
- First Name
- Last Name
- Active User: Deactivated users can not access the organization level, as well as any events within the organization.
- Organization Access: When enabled, the user can access the organization level (i.e. CRM).
- Selected Events: Select the events this user should have access to (NOTE: Giving a user Organization Access does not grant them access to all events).
Create custom contact fields
Custom fields in a CRM allow you to tailor the system to meet your organization's specific needs. They enable you to capture, organize, and analyze information beyond the standard fields provided by Sessionboard.
Any details you collect about a contact can be stored within a custom or standard contact field. You’ll have access to this information within each event the contact is associated with.
Sessionboard Standard Fields
Standard fields provided by Sessionboard will have one of the following category types:
- Profile
- Communication
- Attribute
- System
Those fields with a Custom category are fields created by your team.

How to create a custom contact field
-
- Navigate to the Content > Fields module and select the orange +Add Field button
- Fill out all required fields:
- Field Name: Field names can not exceed 255 characters
- Field Type
- Field Description: Provide a description for your field so that other internal team members know how to best use the field.
- Field Level: Fields created within your CRM are created as Global Fields. A global field is a standardized field that applies across all events within the platform. These fields are created to ensure uniformity and consistency for data collection, reporting, and integrations across multiple events. Common data points like 'First Name', 'Last Name', and 'Email Address' are common global fields.
Pro Tip: When creating fields, use dropdowns instead of open text fields when applicable (Past events, for example) to help ensure the same terminology is used across all contacts.
-
- Previous Event
- Speaker Type (CME vs Non-CME)
- Internal or External speaker
Import existing data
Importing data into your new CRM enables your team to hit the ground running with a complete consolidated view of your pre-existing speakers, sponsors, and exhibitors.
It is important to create your custom fields before you import your information into your new CRM so that you have fields to map your data to.
How to Import: 
NOTE: Before generating an import template or importing data into your CRM, ensure to add any custom contact fields created to your module view.


Importing Best Practices
- Data Cleaning and Preparation:
- Identify and remove duplicates: Eliminate duplicate contacts within your data set (NOTE: each contact must have a unique email address).
- Standardize formatting: Ensure consistent data formatting (e.g., dates, addresses, phone numbers) across your data.
- Fill in missing data: Review and fill in any missing or incomplete fields where possible.
- Review field requirements and limitations: Ensure all required fields have data (i.e. First Name, Last Name, Email).
- Data Mapping:
- Field mapping: Create custom fields as needed to map each field from your old system to the corresponding field in Sessionboard.
- Post-Import Validation:
- Data quality checks: After importing, perform data quality checks to ensure all data is accurate and properly mapped in Sessionboard.
File Requirements & Technical Limitations
-
Only CSV, XLSX, and XLS files are accepted.
-
The limit of records that can imported per file is 1000.
-
Phone numbers (i.e. Mobile Phone & Hom Phone fields) must be in the following format: +1 (123)456-7891
-
Numbers must include the country code as well as the area code.
-
-
URL links (i.e. website, LinkedIn URL) should be provided in the following format: https://sample-website.com.
-
Files (i.e. contact headshots) can not be imported at this time.
-
Currency field types can not be imported at this time.
Create segments
A Segment is a subset of your overall contact database, grouped based on specific criteria or characteristics. The criteria can range from demographic information to session/abstract details, allowing you to tailor your communications to specific groups of contacts. Segmentation helps you send more relevant, targeted messages to the right people at the right time. Segments can be dynamic (updated automatically based on your criteria) or curated (only the contacts you select).
How to create a segment
Before a segment can be created, you need to determine what types of contacts to group into a segment. This can be achieved through Advanced Search.
Advanced Search
Cast a wide net or drill down to find relevant contacts.
Using the search bar, team members can conduct a simple search for contacts and/or speakers using key terms that relate to a field (i.e. Contact Name, Company Name, or Job Title).

Advanced Search allows users to use a combination of attributes and fields (i.e. facets) that narrow down the contact search. Ultimately, this can be utilized to create segments.

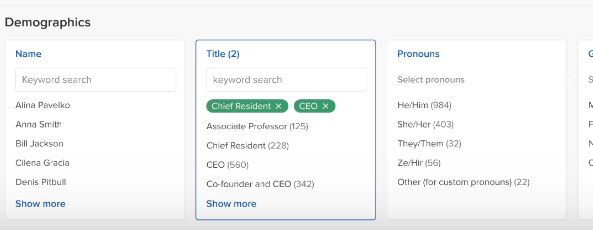
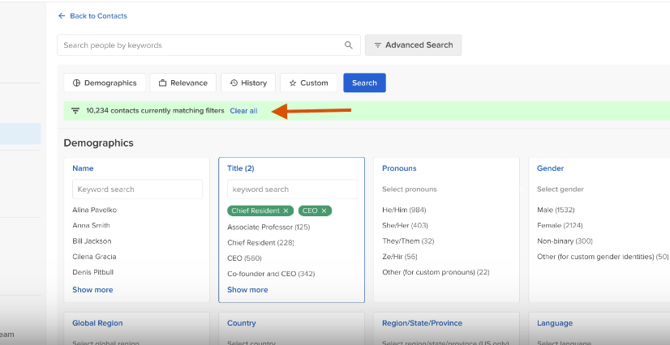
By selecting 'Advanced Search' to the right of the search bar within 'Contacts', the user will be shown a list of fields and attributes grouped into categories for ease of navigation. These categories include Demographics, Relevance, Company, History & Connections, Sessions, and Custom.
NOTE: To exit Advanced Search, select the 'X' icon to the right of your view.

Within each filter (white box), users can select fields and attributes by typing a keyword to search by or selecting a field/attribute from the curated shortlist provided. Next to each field/attribute, users will be able to identify the number of contacts that are associated with them (i.e. CEO (560) > this indicates that there are a total of 560 contacts that have the title of CEO). Each filter acts as an 'AND' (i.e. Title = CEO AND Pronouns = She/Her) and each attribute/field within a filter acts as an 'OR' (i.e. Tile = CEO OR Chief Resident)

As fields and attributes are selected, users will be able to see the total number of contacts that match the search thus far at the top of the page within the green banner.

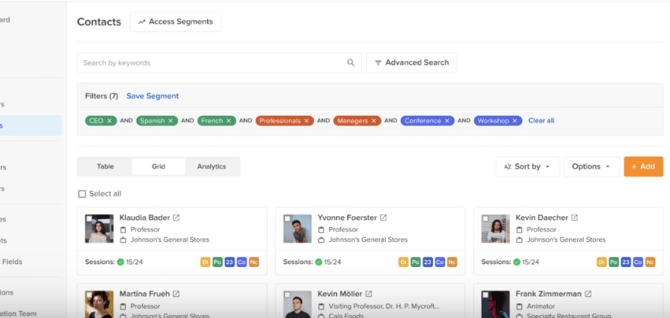
Once attributes and fields have been selected, click the blue 'Search' button at the top of the page to lock in the filters and view the list of contacts that match the advanced search.

- Once you have filtered down your list of contacts that you would like to add to a list, select 'Save Segment' at the top of the page.

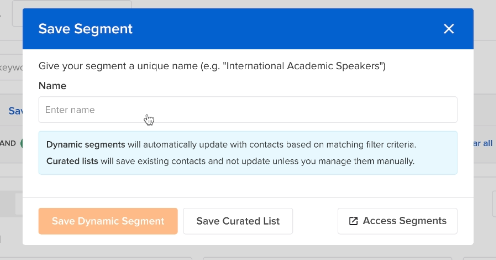
- A pop-up window will appear asking you to name the segment as well as identify if this segment is dynamic or a curated list.

- Dynamic Segment: A list that will automatically update with contacts based on the matching filter criteria.
- Curated List: A list that will save existing contacts and not update unless you manage them manually.
Key steps for effective contact segmentation:
- Gather relevant data: Collect as much customer information as possible (i.e. demographics) to identify patterns and create meaningful segments.
- Define segmentation criteria: Choose relevant factors to segment your contacts (i.e. Demographics: Age, gender, location).
- Create distinct segments: Avoid overly broad categories, and aim for well-defined segments with clear characteristics to deliver more personalized communications.
Contact Segment Examples
- 2024 Keynote Speakers (Curated List)
- Sessionboard Speakers (Dynamic List)
- Members + Speakers (Dynamic List)
