
- Before you start
- Submission Setup
- Welcome Screen
- Session Information
- Participant Information & custom roles
- Payments & Fees
- Form Settings
- Notifications
- Conditional logic (question rules)
- Previewing & publishing your form
- Best practices
- Next steps
Before you start
Submission forms are how you collect abstracts and session proposals from your community. In Sessions 2.0, forms have been redesigned around three key changes:
- Abstract vs. Session: When creating a form, you now choose what you are collecting. Abstracts and sessions are treated as distinct submission types throughout the platform.
- Custom participant roles: "Speaker Information" has been renamed to Participant Information. You can define custom roles like Author, Co-author, or Panelist instead of being limited to "Speaker."
- Integrated payments: Submission fees, promo codes, and VAT rules can be configured directly on the form. No external tools needed.
Submission Setup
Submission Setup is the first step of the form builder, it is where you define what you are collecting and who is involved.
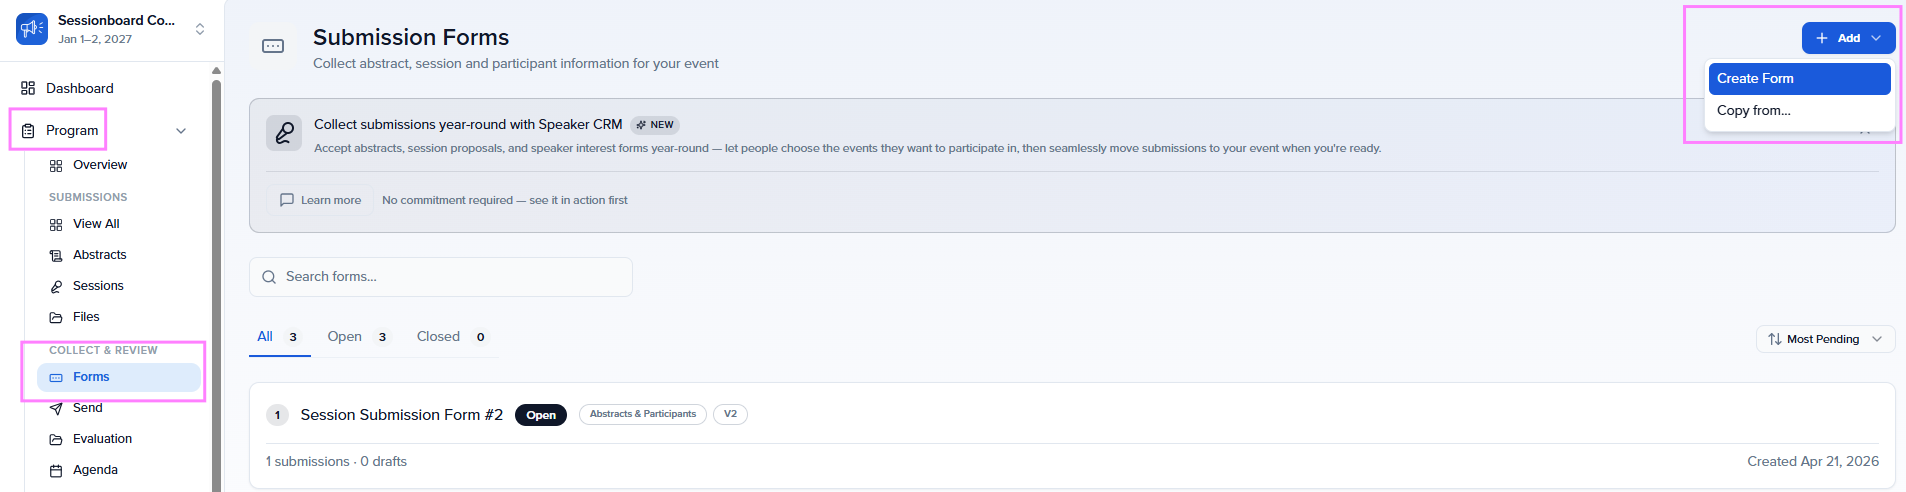
To create a new submission form:
- Navigate to Program → Forms in the left-hand sidebar.
- Click Add and select Create Form.
- The form builder opens to the Submission Setup step.
Submission type
Choose the submission type: Abstract or Session. This choice determines how submissions are labeled and organized throughout the platform. Abstract submissions appear under the Abstracts tab in Program, and session submissions appear under Sessions. You can always view everything together in the All Submissions tab.
Tip: Choose Abstract if you are running a call for papers, poster submissions, or any content that goes through a review process before being accepted as a finalized session. Choose Session if you are collecting proposals that will become sessions directly.
Participant roles
Still within Submission Setup, you configure the participant roles for this form. Choose which of the three core role types to enable: Speaker, Chairperson, and Moderator, and set minimum and maximum counts for each. See Participant Information & custom roles for full details.

After completing Submission Setup, the left sidebar shows the remaining form builder steps: Welcome Screen, Session Information, Participant Information, Payments & Fees, Form Settings, and Notifications.
Welcome Screen
The Welcome Screen is the first thing submitters see when they open your form. Use it to introduce your program and set expectations.
You can configure:
- Title: The name of your call for submissions (e.g., "2026 Annual Conference — Call for Abstracts").
- Description: A rich-text area for instructions, eligibility criteria, deadlines, or any context submitters need before they begin. Supports formatting, links, and lists.

Session Information
The Session Information step is where you configure the fields that collect information about the submission itself, titles, descriptions, topics, file uploads, and any other data you need.
At the top of this step, you can set:
- Section Title: An internal label for this step.
- Page Heading: The heading submitters see at the top of this page (e.g., "Tell us about your submission").
- Description & Instructions: A rich-text area for guidance or context shown to submitters before the form questions.

The Title field
In Sessions 2.0, Title is the only required field on every submission form and is marked as Locked, it cannot be removed. The Description field is no longer mandatory, giving you full control over your form structure. Each field displays its type and constraints underneath the label (e.g., "Text · Max 10 chars" or "Wysiwyg · Max 5,000 chars").
Adding fields
Click + Add Field to open the field menu. You have three options:
- Add Section Element: Insert a layout element: Section Header, Rich Text, or Divider (see Layout tools).
- Create Field: Create a brand-new field for this form.
- Search existing fields: Use the search bar to find and add fields that already exist at the event level (e.g., "Client Session ID," "Custom Track"). This avoids recreating fields that are already defined.

Each field can be marked as Required (toggle on the field row) and further customized using the ⋯ menu, which offers:
- Customize question: Change the label, add placeholder text, add help text, and set the field as required.
- Edit field: Modify the underlying field definition (name, type, options).
- Use question rules: Add conditional logic to show or hide this field based on other answers (see Conditional logic).

Customizing a field
When you click Customize question, a dialog opens where you can set:
- Custom Label: Override the default field name shown to submitters.
- Placeholder: Hint text that appears inside the field before the user types.
- Help Text: Additional instructions or examples displayed below the field.
- Required Field: Toggle to make this field mandatory.

Layout tools
In addition to data fields, you can add layout elements to organize your form visually. Click + Add Field → Add Section Element and choose from:
- Section Header: Break your form into logical groups (e.g., "Nomination Details").
- Rich Text: Add formatted instructions or context between fields.
- Divider: Visual separator between form sections.

Sub-session Submissions
At the bottom of the Session Information step, you can enable sub-session support:
- Allow submitters to select a parent session: When enabled, submitters can link their submission to an existing parent session (e.g., submit a talk within a pre-defined symposium or workshop)
- Allow submitters to submit sub-sessions: When enabled, submitters can include sub-sessions (e.g., sub-topics or breakout talks) along with the parent session they are submitting

Participant Information & custom roles
The Participant Information section, previously called "Speaker Information"; collects details about the people associated with each submission. In Sessions 2.0, this section supports fully custom participant roles.
At the top of this step, you can set:
- Section Title: An internal label for this step.
- Page Heading: The heading submitters see (e.g., "Participant Information").
- Check participant limit: Enable this checkbox to enforce the min/max participant limits you configure for each role.

Default fields
Below the page heading, the Form Questions area shows the fields collected for each participant. These are split into two groups:
- Required Fields: First Name, Last Name, and Email are always required and cannot be removed.
- Additional Fields: Optional fields like Mobile Phone, Biography, and any custom fields you add. Each has a Required toggle and a ⋯ menu for customization.
Click + Add Field to add more participant fields as needed.

Participant roles
Instead of the generic "Speaker" label, you can define roles that match your program's terminology. For example:
- Author (mapped to Speaker): Min: 1, Max: 1
- Co-author (mapped to Chairperson): Min: 0, Max: 3
- Panelist, Discussant, Presenter: any label that fits your community.
The Participant roles section shows the three core role types: Speaker, Chairperson, and Moderator. Check the checkbox next to each role you want to enable for this form. For each enabled role, set:
- Min: The minimum number of participants required for that role per submission.
- Max: The maximum number of participants allowed for that role per submission.
- Total across all roles: At the bottom of the panel, set an overall Total min and Total max to cap the combined participant count across all roles.

Conditional participant limits
If different session types require different participant limits, use conditional rules to override the defaults. For example, a "Workshop" might allow more presenters than a "Poster."
Click + Add rule to create a rule. Each rule has:
- WHEN ALL MATCH: Define one or more conditions using a session field, operator, and value (e.g., "Format is Workshop").
- THEN APPLY PER ROLE: Set custom Min/Max overrides for each role when the condition is met.
- OPTIONAL: Total Participants Override: Override the total min/max for submissions matching this rule.
The first matching rule wins, if a submission matches multiple rules, only the first one applies. The overrides are merged onto your default limits.

Tip: If you have no conditional rules, all submissions use the default min/max limits from the roles panel. You can always add rules later as your program requirements evolve.
Unique Contact Settings
Below the conditional limits, the Unique Contact Settings section controls how the platform handles participants who already exist as contacts in your system:
- Allow users to submit new information for existing contacts: When enabled, submitters can update details for participants who are already known contacts. When disabled, existing contacts must log in to the portal to update their own information.
- Notify existing contacts that they have been added to a submission: When enabled, existing contacts receive an email notification to log in to the portal and review/update their information. When disabled, they receive no notification.

Payments & Fees
The Payments & Fees step (labeled "Fees, gateway, and promo codes" in the sidebar) lets you collect submission fees directly on the form, no external payment tools or reconciliation required.
When to Collect Payment
Choose when payment is required from submitters:
- Do Not Collect Payment: Payment collection is disabled for this form.
- Upon Submission: Payment is collected when the submission is completed and submitted.

Select Payment Gateway
Select a payment gateway that has been set up within your organization. If no gateway is configured, the dropdown shows "None." Click the Manage Payment Settings link below the dropdown to go to your organization's payment configuration.
Base Fee
Set the default session submission fee (e.g., $50 USD). This is the base amount charged to every submitter before any pricing rules, promo codes, or VAT adjustments are applied.

Tip: Payment gateways are configured at the organization level in your organization settings. Sessionboard supports 100+ gateways and charges zero platform transaction fees, all revenue goes directly to your organization.
Pricing Rules
Use pricing rules to adjust fees based on form field values or user attributes. For example, charge a different fee depending on the session format or submission track.
Click + Add Rule to create a pricing rule. Each rule has:
- Field: The form field to evaluate (e.g., a session type dropdown).
- Operator: The comparison (e.g., "is," "is not," "contains").
- Value: The value to match.
- Action: What to do when the rule matches: Add or adjust the fee by a specific amount.
- Amount: The dollar amount to add or subtract.

VAT Rules
Add VAT rules that apply tax to the overall total in a submitter's checkout. Click + Add VAT Rule to configure each rule with a Type (percentage or fixed), Amount, and Label (the text shown to the submitter at checkout).
Promo Codes
Add discount codes that applicants can enter at checkout. Click + Add Promo Code and enter a Code (e.g., "SAVE10"), Type (percentage or fixed), and Amount.

Form Settings
The Form Settings step (labeled "Deadlines, limits, and success page" in the sidebar) controls submission deadlines, limits, and post-submission behavior. This step has two tabs: General and Membership & Access.
General
- Close Date: Set a date and time (with timezone) after which the form will automatically stop accepting new submissions.
- Set Submission Limit: Toggle on to limit the number of sessions one user can submit to this event. This limit must be within the event-level limit if one is set.
- Automatically redirect to the user's portal after 10 seconds: When enabled, submitters are automatically redirected from the confirmation page to their portal. When disabled, they see a "Continue to portal" button instead.
- Customize the success page message: A rich-text editor where you customize the confirmation page content submitters see after completing their submission (e.g., "Thank you for submitting to present at our event!").

Membership & Access
The Membership & Access tab controls who is allowed to submit and validates participant data.
Submitter Requirements: Restrict who can submit based on user attributes configured in your Organization Settings → Membership. When enabled, only users matching the specified membership criteria can access the form.
Participant Validation: Validate participant data against an external system using an HTTP lookup. When enabled, you configure:
- Validation URL: The endpoint to call for validation.
- Request/response format: JSON configuration for how participant data is sent and how responses are interpreted.

Note: Participant Validation is an advanced feature typically used by organizations that need to verify participants against an external database or membership system before accepting the submission.
Notifications
The Notifications step lets you configure who gets notified and what emails are sent when submissions come in.
This step has three sections:
Admin alert recipients
Two dropdown selectors let you choose which admins receive alerts:
- What admins should be notified when a new session is submitted?
- What admins should be notified when an existing session is updated?
Submitter notifications
One email template is available for submitters:
- Submission Confirmation: Sent to the submitter when their submission is successfully received. Toggle it on or off, and click Customize to edit the email content.
Admin notifications
Two email templates are available for admins:
- New Submission Alert: Notifies selected admins when a new submission is received. Toggle on/off and click Customize to edit.
- Submission Revision Alert: Notifies selected admins when an existing submission is updated. Toggle on/off and click Customize to edit.

Tip: Review your notification templates before opening the form for submissions. The submission confirmation email is the first communication your submitters receive — make sure it includes clear next steps and sets the right expectations.
Conditional logic (question rules)
Conditional logic lets you create dynamic forms that show or hide fields based on a submitter's answers. This keeps your form concise; submitters only see the questions relevant to them.
To add a rule:
- Click the ⋯ menu on the field you want to conditionally show.
- Select Use question rules.
- Set the condition: choose the trigger field, the operator, and the value that activates this rule.
Question rules can be applied to fields of type: Checkbox, Dropdown, and Number. When the condition is met, the target field becomes visible to the submitter.

Tip: Use conditional logic to ask follow-up questions only when relevant. For example, if a submitter selects "Workshop" as the format, you might conditionally show a field asking for the required number of breakout rooms.
Previewing & publishing your form
Before sharing your form with submitters, use the Preview button to see exactly what the submission experience looks like from the submitter's perspective. This lets you verify field order, conditional logic, payment steps, and the overall flow.
Once your form is ready:
- Share via direct link: Every form has a unique URL you can share directly with submitters.
- Publish on your Program Site: Add the form to your event's Program Site so submitters can find it alongside other open forms. See Program Site for details.

Best practices
- Keep forms focused: Only ask for what you need at the submission stage. You can always collect additional information later through portal tasks or follow-up forms.
- Use help text generously: Submitters benefit from clear instructions, examples, and character limit guidance on every field. A few seconds of clarity saves hours of back-and-forth.
- Preview before publishing: Always preview your form to check field order, conditional logic, and the payment flow. Submit a test entry yourself if possible.
- Set realistic deadlines: Build in a buffer for your submission deadline. You can always extend it, but closing early can frustrate last-minute submitters.
Next steps
With your submission form built, continue setting up your program:
- Setting Up Round-Based Evaluations (Sessions 2.0): Create evaluation plans to review and score submissions, assign evaluators, and manage the review lifecycle.
- Program & Session Settings (Sessions 2.0): Configure tracks, categories, rooms, and other session taxonomy settings for your program.
- Program Site (Sessions 2.0): Publish your form to a branded portal where submitters can access all open forms and track their submissions.
Tip: You can create up to 20 submission forms per event. Use this to run multiple calls in parallel, for example, one form for abstract submissions and another for invited session proposals.