Collect Documents/File Requests
A file request is a specific type of task that requires the contact/group to upload a document, image, or other file type.
📁 File Request Examples:
-
Upload Signed Speaker Agreement
-
Upload Sponsor/Exhibitor Ad
-
Upload Commercial Video
❗️Need to collect Headshots? We recommend using the field Headshot within a Portal Form to request headshots.
❗️Need to collect presentations & handouts? For session assets, we recommend utilizing Files so that you can download all presentations as one zip file.
- Create a File Request
- Assign a File Request to a Portal
- View File Request Completion Status Per Contact/Group
- View & Approve File Request Results
- Export Submitted Files
- File Request Messages
Create a File Request
IMPORTANT NOTE❗️: File requests support only one file submission per request. Contacts/groups can upload file versions if they need to provide an updated file. If you are requesting contacts/groups to submit more than one file, we recommend using a form.
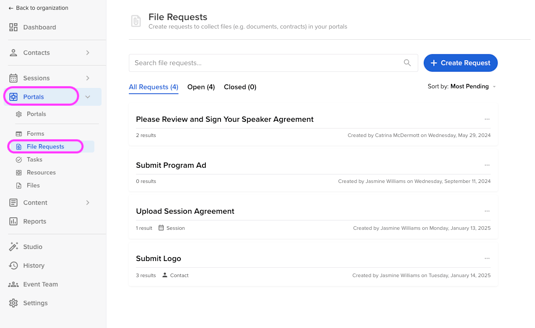
Navigate to Portals on the navigation panel and select "File Requests" at the top of the page.

Select the blue "Create Request" button and complete the following fields:
-
File Request Title: This is the name that the task will be listed as within the portal
- Type:
-
People = Speakers or Contacts
-
Groups = Sponsors or Exhibitors
- Sessions = Sessions
-
-
Criteria/Instructions: Provide additional helpful instructions on what is needed to submit the requested file.
-
Include sample file(s) with this request: By providing a sample file, the portal user may download it to understand what is needed of them.
Once complete, click the orange "Save File Request" button at the bottom of the pop-up module.
📣 File Requests can only accept one file and may not exceed 1.95 GB when uploaded by the portal user.
Assign A File Request
Now that you have added your file request, it is time to assign it to the respective portal.
Note: File requests can be assigned to more than one portal.
-
Within the Portals module, select the ellipses to the right of the portal you would like to assign the file request task to and select Edit Tasks.

-
Within the Collect Files widget, select the button Assign file requests to open a pop-up module. This will show any file requests you have created to select and assign to your portal.

-
Once the tasks have been assigned, you can edit additional settings by selecting the pencil under "Actions".

-
Alias: Adjust the name of what the task will be listed as in the portal
-
Required: Tasks can be marked as required by toggling ON this button. This action can also be done from the portal's main menu.
-
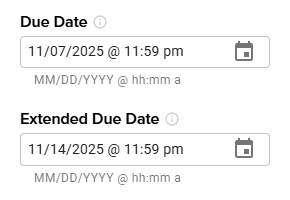
Due Date: Assign a due date to each task that the portal user can track.
- Extended Due Date: Allow task completion beyond the regular due date.

-
-
-
Make Completed Tasks View-Only: Tasks will be set as closed after they are completed. This will not allow contacts/groups to change their task to "Incomplete" after it is completed.
- Assign By Filter (Session Tasks Only): Apply a filter to a session task so that that task is only visible for sessions that match the filter(s) applied.
Note: A maximum of three (3) filters can be applied to a session task.
- EXAMPLE: Tags is CPOI Credit Eligible > contacts/groups who are associated with a session and the session tag is CPOI Credit Eligible will see this task.
.gif?width=670&height=377&name=Get%20started%20in%20Canva%20(5).gif)
- EXAMPLE: Tags is CPOI Credit Eligible > contacts/groups who are associated with a session and the session tag is CPOI Credit Eligible will see this task.
-
-
Once complete, ensure to click the blue Update button in the bottom right-hand corner.
View who has completed the task(s)
Within your module (speaker, session sponsor, or exhibitor), edit your dashboard view by adding the file request reporting field(s). This will inform you of who has completed the task and who hasn't. Don't forget to save the view when you are done😊
| Task Icons | |
| Green Check Mark
|
Task is complete |
|
Yellow Folder
|
File Request pending approval (new submissions AND declined submissions) |
|
Orange Checklist
|
Task assigned (not completed) |
|
Grey Plus Sign
|
Task not assigned |
Reviewing & Approving Files
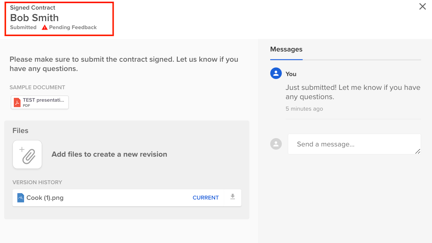
When a portal user submits a file, it will be noted as "Pending Feedback" within their portal with an orange circle next to the task name. This allows for an event admin to review the file that was submitted before it is approved, allowing the portal user to resubmit if needed.


Below are the steps an admin will need to take to review the document that was submitted.
-
Navigate to the Portal module and select the tab "File Requests".
-
Next, select the ellipses to the right of the file request and select View Results.

-
Select the pencil icon to the left of the contact you want to review a file for.

Within the pop-up module that appears, you can review the file by clicking on the file name to open it in a new window or download the file by clicking the download icon to the right of the file name.
To approve or deny the file, you can use the green and red icons below the file. You can also click the three vertical dots to the right of the download icon to approve or deny as well.

- Green check mark = Approved

- Red "x" = Denied
- NOTE: When a file request submission is denied, a notification is not sent to the contact/group. As a result, we recommend sending a message so that the contact/group is notified (via email) that there are changes that need to be made. When a file request submission is denied, the contact/group is given the ability to submit a new file as a new version.

- Revert to Pending: If you have made a mistake and need to revert the file to its pending status, you can do so by clicking the three vertical dots next to the file download icon and clicking "Revert to pending".

Export Files
Files can be exported in one of two ways:
| Individually: Download each file individually to view and share with your team. |
Select 'Option' with the Actions column to open and download your file.
Alternatively, select the download icon within the file request pop-up model.
|
| Bulk: Download the most recent file versions in bulk | 
TIP: Increase your pagination to show up to 100 records to export up to 100 files at once.
|
File Request Messages
Admin users can send a message to the contact/group using the messaging function to the right of the individual file request pop-up model.
 When an admin user sends a message, the contact/group receives the following email:
|
Subject Line: <Admin Name> sent a message about "<Task Name>" in <Event Name>
|
When a contact/group sends a message, all event admins receive the following email:
IMPORTANT NOTE❗️: Admin users are not able to disable notifications at the time. Backend users who have access to Portals Tasks (see image below) will receive these emails.

|
Subject Line: <Contact Name> sent a message about "<Task Name>" in <Event Name>
|


