Create a session submission form
The Session Submission Form is the first interaction a submitter or speaker has with Sessionboard. It captures information about the session and speaker(s), and once submitted, creates records accessible to admins.
Teams can create up to 20 submission forms.
- How to Build a Submission Form
- Creating, Editing, & Managing Fields (Help Text, Field Label, Edit Fields & Question Rules/Conditional Logic)
- Additional Layout Tools (Section Headers, Rich Text Box, & Form Divider)
- Additional Form Actions (View Result, Duplicate Forms & Delete Forms)
How to Build a Submission Form
From your Dashboard module, select the blue Manage Forms" button within the Session Submission Form widget.

By default, Sessionboard creates an initial submission form that you can customize. Click the ellipsis (⋯) to see additional actions, then select Edit to start configuring your form.

Edit the four sections of the submission form: Welcome Screen, Session Information, Speaker Information, and Form Settings.
-
Welcome Screen - Introduction to the event. This is the first screen a user will see when they access your submission form. Event admins can create a custom welcome message with basic text box functionality.

-
Session Information - Collect information about the submitted session by adding a page title, page description/instructions, as well as questions to collect data.
Title & Description are two fields that are required and can not be deleted from the form.-1.png?width=670&height=314&name=Submission+Form+(1)-1.png)
-
Speaker Information - Collect information for the session's speaker(s) by adding a page title, page description/instructions, as well as questions to collect data.
First Name, Last Name, and Email are required fields that can not be deleted from the form.-1.png?width=670&height=314&name=Submission+Form+(2)-1.png)
- Form Settings - The following settings can be applied to your form:
-
Close Date: The date and time that new submissions are no longer accepted, as well as the date and time that edits can be made to existing submissions.
- Send Reminder Email (only visible when a close date is set):
Enable reminder emails to be sent to session submitters with draft submissions—five days and one day before the form closes.
Edit reminder emails within the Email Templates page of the Settings module. -
Admins who should be notified when new submissions are received.
-
Admins who should be notified when edits have been made to existing submissions.

-
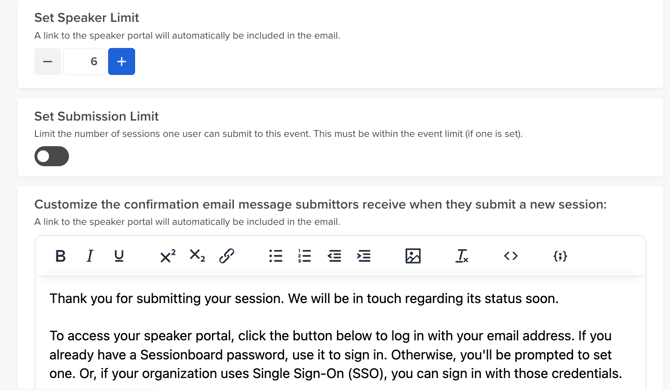
Set speaker limit for the number of speakers who can be added to a session (max limit: 15)
-
Set a submission limit for the number of times a submitter can complete a new submission.
-
Confirmation Message: Customize the message that appears in the confirmation email to session submitters.
-
Automatically redirect to the user's portal after 10 seconds: If enabled, we will automatically redirect the user from the confirmation page to the user's portal after 10 seconds. If disabled, they will need to click the "Continue to portal" button.

- Customize the success page message: Customize the messaging that appears on the screen once a form has been submitted. By default, this message includes a link for submitters to submit another form.
-
-
Note: This messaging will appear for ~10 seconds before the submitter is directed to the portal home page if the automatic redirect is turned on.
-

-
Creating, Editing, & Managing Fields
Creating Fields
Note: If your event will use Evaluation Plans, any field names you create will be visible to Evaluators when they review the submitted sessions.
On the Session Information and Speaker Information pages, event organizers can add system fields or create custom fields to display on the form.
Click the Add Question button at the bottom of the pop-up modal to view all the fields you can add.

The Select Fields page displays all standard and previously created custom fields. Use the checkbox to the left of a field name to add it to your form.

To add a new field, click the Create New Field button and follow the prompts to configure it.

🤔Things to Keep in Mind...
|

|
Editing, & Managing Fields
Once fields have been added to your form, select the ellipses within the Actions column to customize questions, use question rules (i.e., conditional logic), edit a field, or remove a field from your form.

Customize Question
| Use a field label to customize how the field name appears to submitters, or add help text to provide extra guidance as they complete the field. |  |
Use question rules
Use question rules (conditional logic) to create customizable forms that adjust based on the answers that your users provide to various questions. This allows you to use one form to intake multiple different types of sessions.
Question rules can only be used on the following field types:
-
Checkbox
-
Dropdown
-
Number
When using question rules, keep in mind the following:
-
Create and add all fields to your form, then save it before applying question rules. Applying question rules before saving will result in the following error message:

-
Question rules should be applied to the question that is conditional.
A conditional question is a question that only appears based on the answer to a previous question. For example:
-
Q1: "Are you a member?"
-
Q2 (conditional): “Provide your Member ID” → This only appears if the answer to Q1 is “Yes.”
-

Additional Layout Tools
Hover between fields and click the blue + icon to insert a section header, add a divider line, or insert a rich text box.

Section Header
Add a header between your fields to divide them based on similarity (Character Limit: 255)

Form Divider
Insert a line/break into your form to divide your fields

Rich Text Box
Add rich text to include images, hyperlinks, and additional text

From the ellipsis menu (⋯) next to a submission form, event organizers can access additional actions:
|
|

